Introduction
The KBBYT UAngel Angel30 is a 3-inch FPV freestyle drone frame kit designed for enthusiasts and pilots seeking a compact yet robust platform for agile flight performance. With a 149mm wheelbase, this frame provides an optimal balance between maneuverability and stability, making it suitable for both park flying and technical freestyle aerobatics.
Constructed from durable carbon fiber, the Angel30 frame is engineered to withstand aggressive flying styles and frequent impacts. Its thoughtful design supports standard component integration, ensuring compatibility with common 3-inch drone parts such as flight controllers, electronic speed controllers (ESCs), motors, and cameras. This manual provides comprehensive instructions for assembling, operating, maintaining, and troubleshooting your Angel30 frame kit.
Package Contents
Before beginning assembly, please verify that all components listed below are present in your package. Refer to the image below for a visual representation of the included parts.
- Carbon Fiber Top Plate
- Carbon Fiber Bottom Plate
- Carbon Fiber Arms (4x)
- TPU Camera Mount
- TPU Antenna Mount
- TPU Arm Protectors/Motor Mounts (4x)
- Standoffs and Screws Kit

This image displays all the individual parts included in the Angel30 frame kit, such as carbon fiber plates, arms, standoffs, and hardware, ready for assembly.
Assembly Instructions
Follow these steps carefully to assemble your UAngel Angel30 frame kit. Ensure all screws are tightened securely but do not overtighten to avoid damaging the carbon fiber.
- Prepare Components: Lay out all carbon fiber plates, arms, TPU parts, and hardware. Identify the bottom plate, top plate, and four individual arms.
- Attach Arms to Bottom Plate: Secure each of the four carbon fiber arms to the main bottom plate using the provided screws. Ensure the arms are oriented correctly, typically forming an 'X' or 'H' configuration depending on the design.
- Install Standoffs: Mount the metal or plastic standoffs onto the bottom plate. These will create space for your flight controller stack and support the top plate.
- Mount TPU Arm Protectors: Slide the TPU arm protectors onto the ends of the carbon fiber arms. These often double as motor mounts and provide impact absorption.
- Install Camera Mount: Attach the TPU camera mount to the front of the frame, typically secured by screws to the top plate or standoffs.
- Secure Top Plate: Place the top carbon fiber plate onto the standoffs and secure it with the remaining screws. Ensure all components are aligned before fully tightening.
- Final Checks: Double-check all screws for tightness. Ensure there is no wobble or loose parts.

A top-down view of the fully assembled Angel30 frame kit, showcasing the main carbon fiber plate, arms, and green TPU parts.
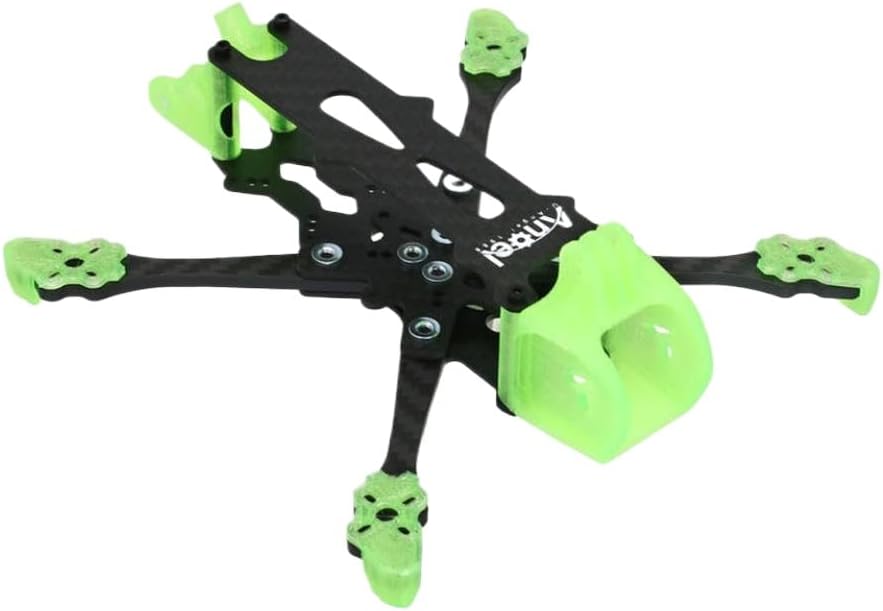
An angled view of the assembled Angel30 frame, highlighting the front camera mount area and the overall compact design.

A side profile of the assembled Angel30 frame, showing the stack height and the robust carbon fiber construction.

The bottom view of the assembled Angel30 frame, illustrating the motor mounting points on the arms and the screw placements.
Operating Guidelines
As the Angel30 is a frame kit, its operation depends on the electronic components you choose to install. The following guidelines pertain to the general setup and considerations for an FPV freestyle drone built on this frame:
- Component Installation: Carefully install your flight controller, ESCs, motors, FPV camera, video transmitter (VTX), and receiver (RX) within the frame. Ensure proper insulation and secure mounting to prevent short circuits or dislodgement during flight.
- Wiring: Follow the wiring diagrams provided with your electronic components. Pay close attention to power and signal connections. Use appropriate wire lengths and secure them to prevent interference with propellers or moving parts.
- Flight Controller Setup: Configure your flight controller firmware (e.g., Betaflight, Emuflight) according to the manufacturer's instructions. Perform motor direction checks, accelerometer calibration, and radio setup.
- Propeller Installation: Install 3-inch propellers, ensuring correct rotation direction for each motor. Incorrect propeller direction will prevent the drone from flying correctly.
- Battery Selection: Use a compatible LiPo battery (typically 3S-4S for 3-inch drones) that fits securely within the designated battery strap area. Ensure the battery's C-rating is sufficient for your motors.
- Pre-Flight Checks: Before each flight, inspect the frame for any damage, loose screws, or frayed wires. Verify propeller tightness and battery connection.
Maintenance
Regular maintenance is crucial for the longevity and safe operation of your FPV drone. Perform these checks periodically:
- Screw Tightness: Regularly check all screws on the frame, especially after crashes or hard landings. Carbon fiber can compress slightly, leading to loosened screws over time.
- Carbon Fiber Inspection: Examine the carbon fiber plates and arms for cracks, delamination, or stress marks. Replace any damaged parts immediately.
- TPU Parts: Inspect TPU camera mounts, antenna mounts, and arm protectors for tears or deformation. These parts are designed to absorb impact but can wear out.
- Wiring and Connections: Check all internal wiring for signs of wear, cuts, or loose connections. Ensure solder joints are solid.
- Cleaning: Keep the frame clean from dirt, dust, and debris, especially around motor mounts and electronic components. Use a soft brush or compressed air.
Troubleshooting
If you encounter issues with your drone build, consider the following troubleshooting steps related to the frame:
- Excessive Vibrations:
- Check for loose screws on the frame, arms, or motor mounts.
- Inspect arms for cracks or damage that could cause flex.
- Ensure motors are securely mounted and not vibrating independently.
- Unstable Flight:
- Verify that the flight controller is rigidly mounted to the frame and not experiencing excessive soft mounting or movement.
- Ensure no wires are pinching or interfering with the flight controller's gyroscopes.
- Damaged Components:
- If a crash occurs, thoroughly inspect all carbon fiber and TPU parts for damage. Replace broken arms or plates to maintain structural integrity.
- Difficulty Fitting Components:
- Refer to the frame's design specifications for recommended component sizes. Ensure you are using compatible parts.
- Double-check assembly steps to ensure no parts are installed incorrectly, obstructing component placement.
Specifications
| Feature | Detail |
|---|---|
| Brand | KBBYT |
| Model Name | Angel30 (KBBYT479) |
| Wheelbase | 149mm |
| Propeller Compatibility | 3 Inch |
| Frame Type | FPV Freestyle Drone Frame Kit |
| Material | Carbon Fiber, TPU |
| Item Model Number | KBBYT126 |
| ASIN | B0GH77LF4M |
| Item Weight | 0.071 ounces (approx. 2 grams) |
| Product Dimensions | 0.39"L x 0.39"W x 0.39"H (referring to packaging/component size, not assembled frame) |
Note: Some specifications like 'Connectivity Technology', 'Battery Capacity', and 'Battery Cell Composition' are not directly applicable to the frame kit itself but may refer to a complete drone system or packaging details.
Warranty and Support
This product is a frame kit, and specific warranty details may vary. Please refer to the seller or retailer from whom you purchased this product for information regarding their return policy or any applicable warranty.
For technical support or inquiries regarding the KBBYT UAngel Angel30 frame kit, please contact the seller directly through your purchase platform. They can provide assistance with assembly questions or component compatibility.