1. Introduction
This manual provides detailed instructions for the GiGimundo LK10 DisplayLink Docking Station and the accompanying 512GB External USB-C SSD Flash Drive. Please read this manual thoroughly before using the product to ensure proper operation and to maximize its capabilities. This device is designed to expand connectivity for your laptop or computer and provide high-speed external storage.
2. Product Overview
The GiGimundo LK10 combines a versatile DisplayLink docking station with a high-capacity, high-speed external SSD. The docking station offers extensive port expansion, including dual 4K@60Hz display outputs, multiple USB 3.2 Gen2 ports, Gigabit Ethernet, and power delivery. The SSD provides fast and portable storage with both USB-A and USB-C connectivity.

Image 2.1: Overview of the GiGimundo LK10 Docking Station with its various ports labeled, including USB-A 3.2 Gen2 10Gbps, DP v1.4 4K@60Hz, HDMI v2.0 4K@60Hz, R45 1000Mbps Ethernet, USB-C PD100W Input, and 3.5mm Audio Jack with Mic.
2.1 Docking Station Features:
- Dual 4K@60Hz Display Output: Supports two external monitors via HDMI 2.0 and DisplayPort 1.4, both capable of 4K resolution at 60Hz.
- High-Speed Data Transfer: Equipped with USB-A 3.2 Gen2 ports offering up to 10Gbps data transfer speeds.
- Gigabit Ethernet: RJ45 port for stable and fast wired network connection (10/100/1000Mbps).
- Power Delivery: USB-C PD100W input for charging your host laptop while using the docking station.
- Audio Connectivity: 3.5mm audio jack with microphone support.
2.2 External SSD Features:
- 512GB Storage Capacity: Ample space for documents, media, and applications.
- USB 3.2 Gen2 Speed: Offers read speeds up to 1073MB/s and write speeds up to 953MB/s.
- Dual-Port Design: Features both USB-A and USB-C connectors for broad compatibility without adapters.
- ProRes Recording: Supports direct 4K 60fps ProRes recording from compatible devices.
- Durable Construction: Aerospace-grade aluminum alloy for enhanced durability.
3. Setup Instructions
3.1 DisplayLink Driver Installation
Before using the docking station's display outputs, the DisplayLink driver must be installed on your host computer. This is crucial for proper functionality of the external monitors.
- Visit the official DisplayLink website or the GiGimundo support page for the LK10 model.
- Download the latest DisplayLink driver compatible with your operating system (Windows, macOS).
- Follow the on-screen instructions to complete the driver installation. A system restart may be required.

Image 3.1: A laptop connected to the docking station, illustrating the need for DisplayLink driver installation before use, especially for network and display functions.
3.2 Connecting the Docking Station
- Connect the integrated USB-C cable from the docking station to a compatible USB-C port on your laptop or computer.
- For power delivery to your laptop, connect your laptop's original power adapter or a compatible USB-C PD charger (up to 100W) to the USB-C PD input port on the docking station.
3.3 Connecting External Monitors
The docking station supports up to two external 4K@60Hz monitors.
- Connect your first monitor using an HDMI cable to the HDMI 2.0 port on the docking station.
- Connect your second monitor using a DisplayPort cable to the DP 1.4 port on the docking station.
- Ensure your monitors are powered on and set to the correct input source.
3.4 Connecting Peripherals
- USB Devices: Connect USB keyboards, mice, external hard drives, or other USB peripherals to the available USB-A 3.2 Gen2 ports.
- Ethernet: For a wired network connection, connect an Ethernet cable from your router/modem to the RJ45 Gigabit Ethernet port.
- Audio: Connect headphones or speakers to the 3.5mm audio jack.
3.5 Connecting the External SSD
The 512GB external SSD can be connected directly to your computer or via the docking station.
- USB-C Connection: Plug the SSD's USB-C connector directly into a USB-C port on your computer or the docking station.
- USB-A Connection: Slide the switch on the SSD to reveal the USB-A connector, then plug it into a USB-A port on your computer or the docking station.

Image 3.2: The GiGimundo external SSD demonstrating its dual-port design with both USB-A and USB-C connectors, allowing connection to various devices without an adapter.
4. Operating Instructions
4.1 Using Dual Monitors
After installing the DisplayLink driver and connecting your monitors, you can configure your display settings.
- Extend Mode: Allows you to spread your desktop across multiple screens, providing more workspace.

Image 4.1: Illustration of two external monitors connected to the docking station operating in Extend Mode, displaying different content at 3840*2160@60Hz resolution.
- Mirror Mode: Duplicates your primary display onto the external monitors, useful for presentations.
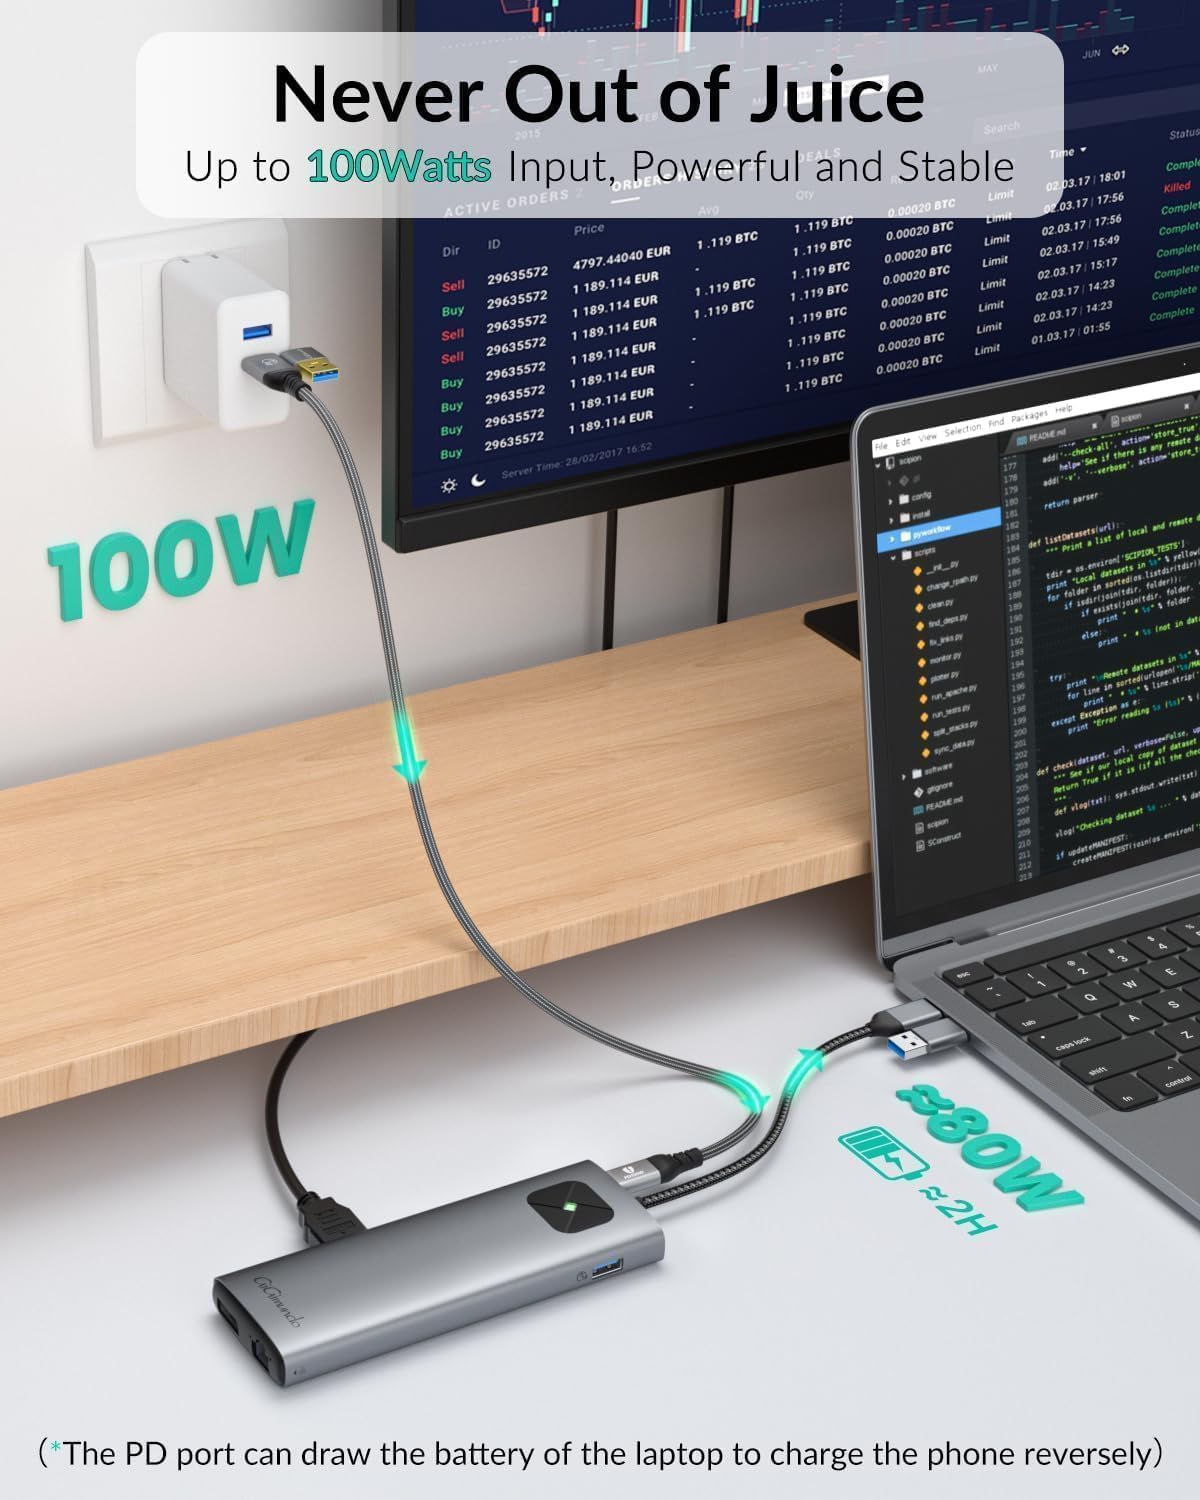
Image 4.2: Illustration of two external monitors connected to the docking station operating in Mirror Mode, displaying identical content at 3840*2160@60Hz resolution.
To configure display settings, right-click on your desktop (Windows) or go to System Preferences > Displays (macOS).
4.2 Power Delivery Functionality
The docking station supports up to 100W Power Delivery (PD) through its USB-C input port. This allows you to charge your host laptop while simultaneously using the docking station's other features.

Image 4.3: A laptop connected to the docking station, which is receiving 100W power input from a wall adapter, demonstrating the power delivery capability to the laptop.
4.3 Using the External SSD
The 512GB external SSD is plug-and-play. Once connected, it will appear as an external drive on your computer.
- Data Transfer: Drag and drop files to and from the SSD. Its USB 3.2 Gen2 interface ensures rapid data transfer.
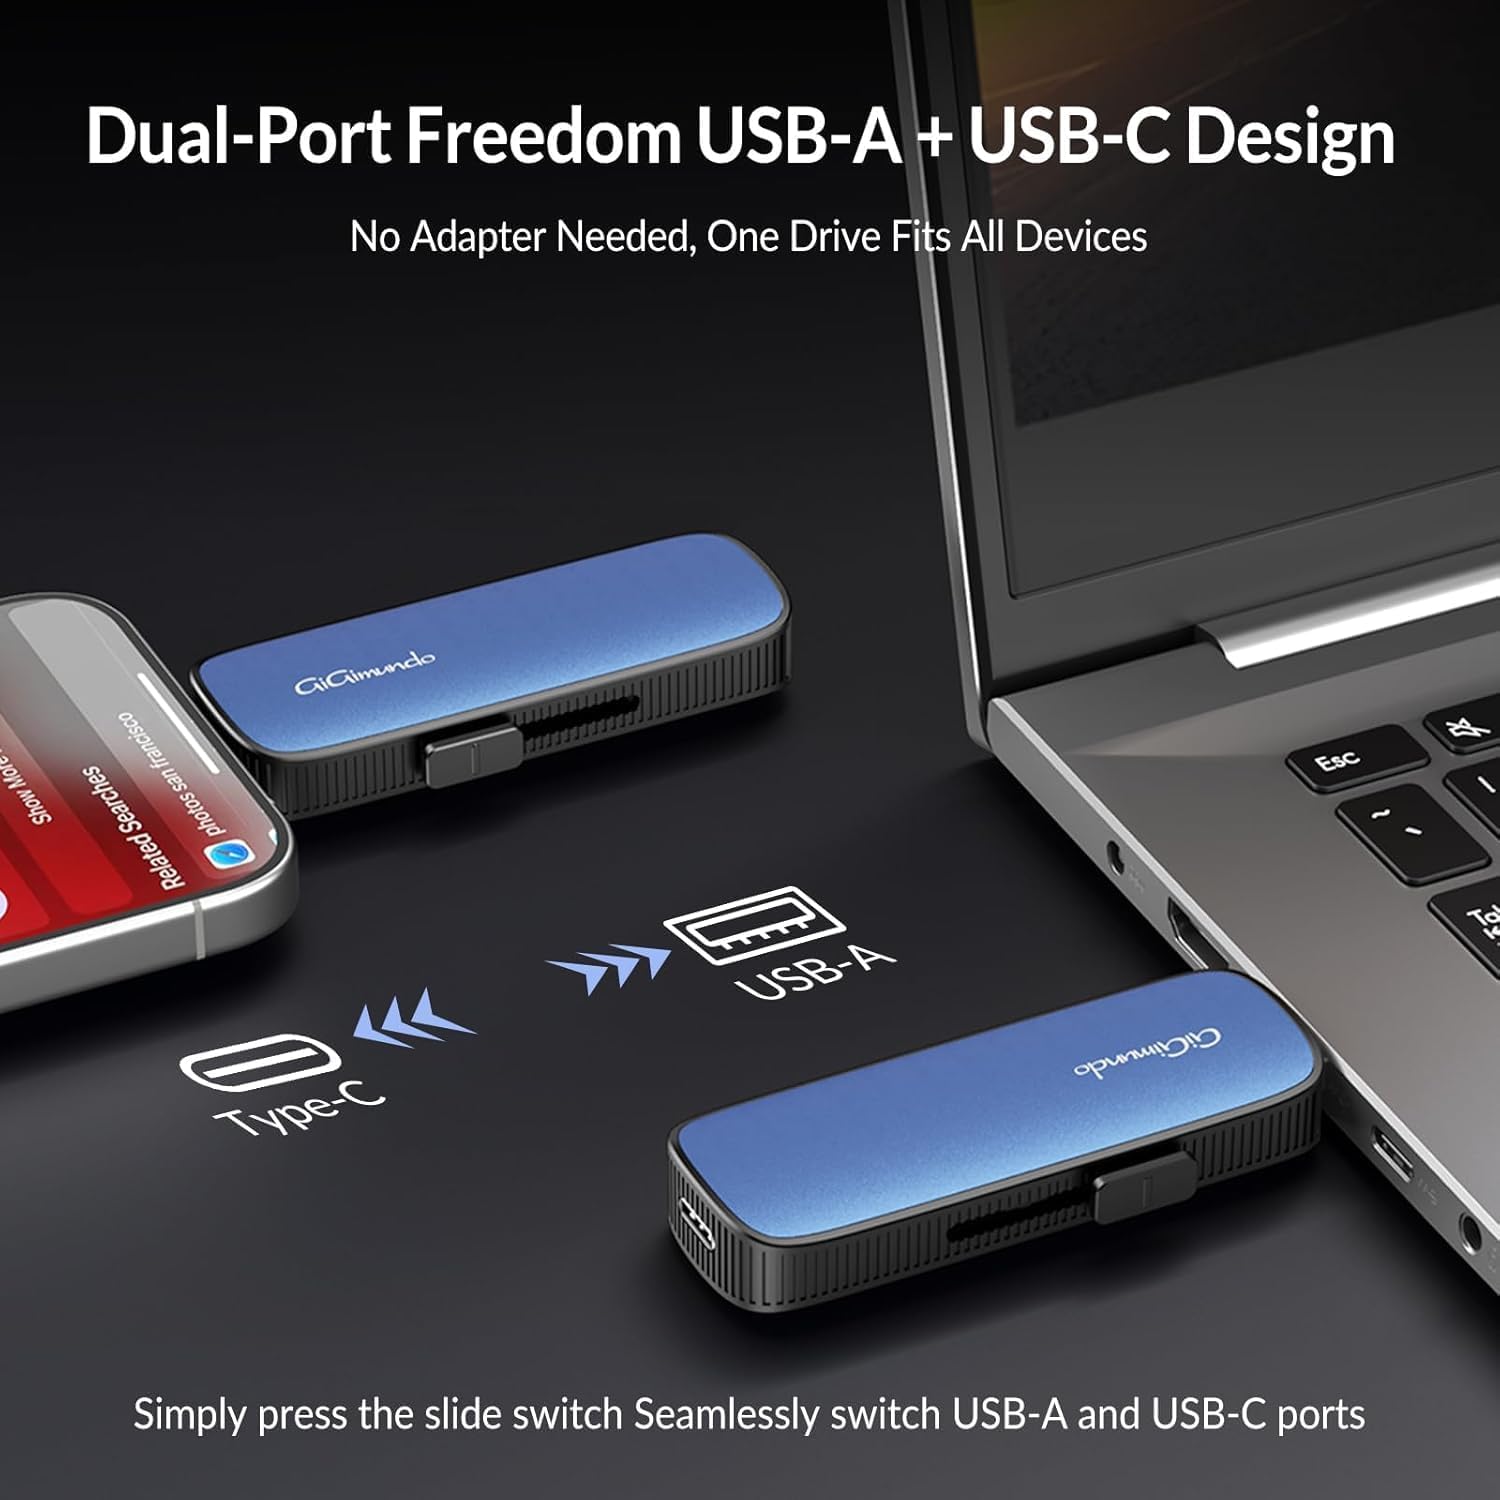
Image 4.4: The GiGimundo external SSD demonstrating its high-speed performance, capable of transferring a 20GB 4K movie in 21 seconds, with read speeds up to 1073MB/s and write speeds up to 953MB/s.
- Dual-Port Switching: To switch between USB-A and USB-C connectivity, simply press the slide switch on the SSD to extend the desired connector.

Image 4.5: The GiGimundo external SSD showcasing its dual-port design, allowing users to seamlessly switch between USB-A and USB-C connectors by pressing a slide switch.
- ProRes Recording: For compatible devices (e.g., certain smartphones), the SSD can be used for direct 4K 60fps ProRes video recording in real-time.
Image 4.6: A smartphone connected to the GiGimundo SSD, demonstrating its capability for direct 4K 60fps ProRes recording in real-time, highlighting 10Gbps speed, TLC NAND, and Plug & Play functionality.
5. Maintenance
- Cleaning: Use a soft, dry cloth to clean the surfaces of the docking station and SSD. Avoid liquid cleaners or abrasive materials.
- Storage: Store the devices in a cool, dry place away from direct sunlight and extreme temperatures.
- Handling: Avoid dropping or subjecting the devices to strong impacts. The aluminum alloy casing provides durability, but excessive force can cause damage.
- Firmware Updates: Periodically check the GiGimundo website for any available firmware updates for the docking station or SSD to ensure optimal performance and compatibility.
6. Troubleshooting
- No Display Output:
- Ensure the DisplayLink driver is correctly installed and updated.
- Check all cable connections (USB-C to host, HDMI/DP to monitors).
- Verify that monitors are powered on and set to the correct input source.
- Try restarting your computer.
- No Power Delivery to Laptop:
- Ensure your laptop's power adapter or a compatible USB-C PD charger is connected to the docking station's USB-C PD input.
- Verify the power adapter is functioning correctly.
- USB Devices Not Recognized:
- Try connecting the USB device to a different port on the docking station or directly to your computer.
- Ensure the docking station is properly connected to your host computer.
- Slow SSD Transfer Speeds:
- Ensure the SSD is connected to a USB 3.2 Gen2 (10Gbps) compatible port on your computer or docking station.
- Check the cable used for connection; ensure it supports USB 3.2 Gen2 speeds.
- Performance can vary based on the host system, file types, and other active processes.
- Ethernet Connection Issues:
- Check the Ethernet cable connection to both the docking station and your router/modem.
- Verify network settings on your computer.
7. Specifications
| Product Name | GiGimundo LK10 DisplayLink Docking Station & External SSD |
| Model | LK10 |
| Docking Station Host Connection | USB-C |
| Video Output | 1x HDMI 2.0 (4K@60Hz), 1x DisplayPort 1.4 (4K@60Hz) |
| USB Data Ports | Multiple USB-A 3.2 Gen2 (10Gbps) |
| Ethernet | RJ45 Gigabit Ethernet (10/100/1000Mbps) |
| Power Delivery Input | USB-C PD100W |
| Audio | 3.5mm Audio Jack with Mic |
| SSD Capacity | 512GB |
| SSD Interface | USB 3.2 Gen2 (USB-A & USB-C dual-port) |
| SSD Read Speed | Up to 1073MB/s |
| SSD Write Speed | Up to 953MB/s |
| Material | Aerospace-Grade Aluminum Alloy |
| Compatibility | Windows, macOS, mainstream laptops/consoles |
8. Warranty and Support
The GiGimundo LK10 DisplayLink Docking Station and External SSD come with a 3-year coverage. For technical support, warranty claims, or further assistance, please contact GiGimundo customer service through their official website or the retailer where the product was purchased.
For more information, visit the GiGimundo Official Store.