1. Safety Information
This Neoteck Clamp Meter is designed and manufactured to meet CAT III 600V safety standards, providing superior defense against high-voltage transients. Always adhere to the following safety precautions to prevent electric shock or personal injury.
- Do not apply more than the rated voltage, as marked on the meter, between terminals or between any terminal and earth ground.
- Exercise extreme caution when working with voltages above 30V AC RMS, 42V peak, or 60V DC. These voltages pose a shock hazard.
- Always use the meter with the correct function and range selected.
- Inspect test leads for damaged insulation or exposed metal before use. Replace if damaged.
- Ensure the battery cover is securely closed before operating the meter.
- Do not operate the meter if it appears damaged or is not functioning properly.
- Overload Protection: The meter features intelligent anti-burnout and overload protection across all ranges.

Image: Internal view of the Neoteck Clamp Meter, highlighting double safety protection and overload protection features. The device complies with CAT III 600V security level standards.
2. Product Overview
The Neoteck Clamp Meter MY2610D is a versatile digital multimeter designed for comprehensive electrical troubleshooting in home, automotive, industrial, and HVAC applications. It offers True RMS measurements for accurate readings on non-sinusoidal waveforms.
Key Features:
- 800A AC/DC Current: Measures high current with a 26mm high-capacity jaw.
- True RMS: Provides accurate measurements for AC/DC voltage, resistance, capacitance, frequency, and duty cycle.
- NCV Detection: Non-Contact Voltage detection for live wire checking.
- Diode and Continuity Test: Essential for circuit diagnostics.
- Temperature Measurement: Includes a K-type thermocouple.
- User-Friendly Features: Data hold, bright backlight, flashlight, and 15-minute auto power-off.
Package Contents:
- 1 x Neoteck Clamp Meter MY2610D
- 1 x Pair of Test Leads
- 1 x K-type Thermocouple
- 1 x Pair of Alligator Clips
- 1 x Screwdriver
- 3 x AAA Batteries
- 1 x Storage Pouch
- 1 x User Manual (this document)

Image: Labeled diagram of the Neoteck Clamp Meter, showing its various components and controls.

Image: The complete professional kit for the Neoteck Clamp Meter, ready for immediate use.
3. Setup
3.1 Battery Installation
- Locate the battery compartment on the rear of the meter.
- Use the provided screwdriver to open the battery cover.
- Insert the 3 AAA batteries, observing correct polarity.
- Securely close the battery cover.
3.2 Connecting Test Leads
For voltage, resistance, capacitance, diode, and continuity measurements, insert the test leads into the appropriate input terminals:
- Insert the black test lead into the COM (common) terminal.
- Insert the red test lead into the INPUT terminal.
4. Operating Instructions
Turn the rotary range selector to the desired measurement function. Use the 'SEL' button to switch between sub-functions (e.g., AC/DC voltage, resistance/continuity/diode).
4.1 AC/DC Current Measurement (Clamp)
Use the clamp jaw for non-contact current measurement.
- Turn the rotary selector to the 800A AC/DC or 60A AC/DC position.
- Press the jaw trigger to open the clamp.
- Enclose only one conductor within the clamp jaw. Measuring multiple wires will distort results.
- Read the current value on the LCD display.

Image: The clamp meter in use, measuring current on a single electrical wire. The 26mm jaw allows for direct cable measurement without cutting.
4.2 AC/DC Voltage Measurement
Connect test leads as described in Section 3.2.
- Turn the rotary selector to the V~ (AC Voltage) or V- (DC Voltage) position.
- Touch the test probes to the circuit points where voltage is to be measured.
- Read the voltage value on the LCD display.
Video: Demonstration of the Neoteck Clamp Meter measuring alternating current (AC) and direct current (DC) voltage, as well as using the NCV function. The video shows the meter's LCD backlight in action and how to measure current on a single wire.
4.3 Resistance, Capacitance, Diode, and Continuity
Connect test leads as described in Section 3.2.
- Turn the rotary selector to the Ω/Cap/Diode/Continuity position.
- Press the 'SEL' button to cycle through Resistance (Ω), Capacitance (Cap), Diode, and Continuity functions.
- For Resistance: Connect probes across the component.
- For Capacitance: Connect probes across the capacitor.
- For Diode: Connect probes across the diode.
- For Continuity: Connect probes across the circuit. An audible beep indicates continuity.

Image: The clamp meter performing various measurements including resistance, diode test, capacitance, and continuity on a test circuit board.
4.4 NCV (Non-Contact Voltage) Function
This function detects AC voltage without physical contact.
- Turn the rotary selector to the NCV position.
- Move the NCV sensor probe near the conductor or outlet.
- An audible and visual alarm will indicate the presence of AC voltage (90V to 1000V).
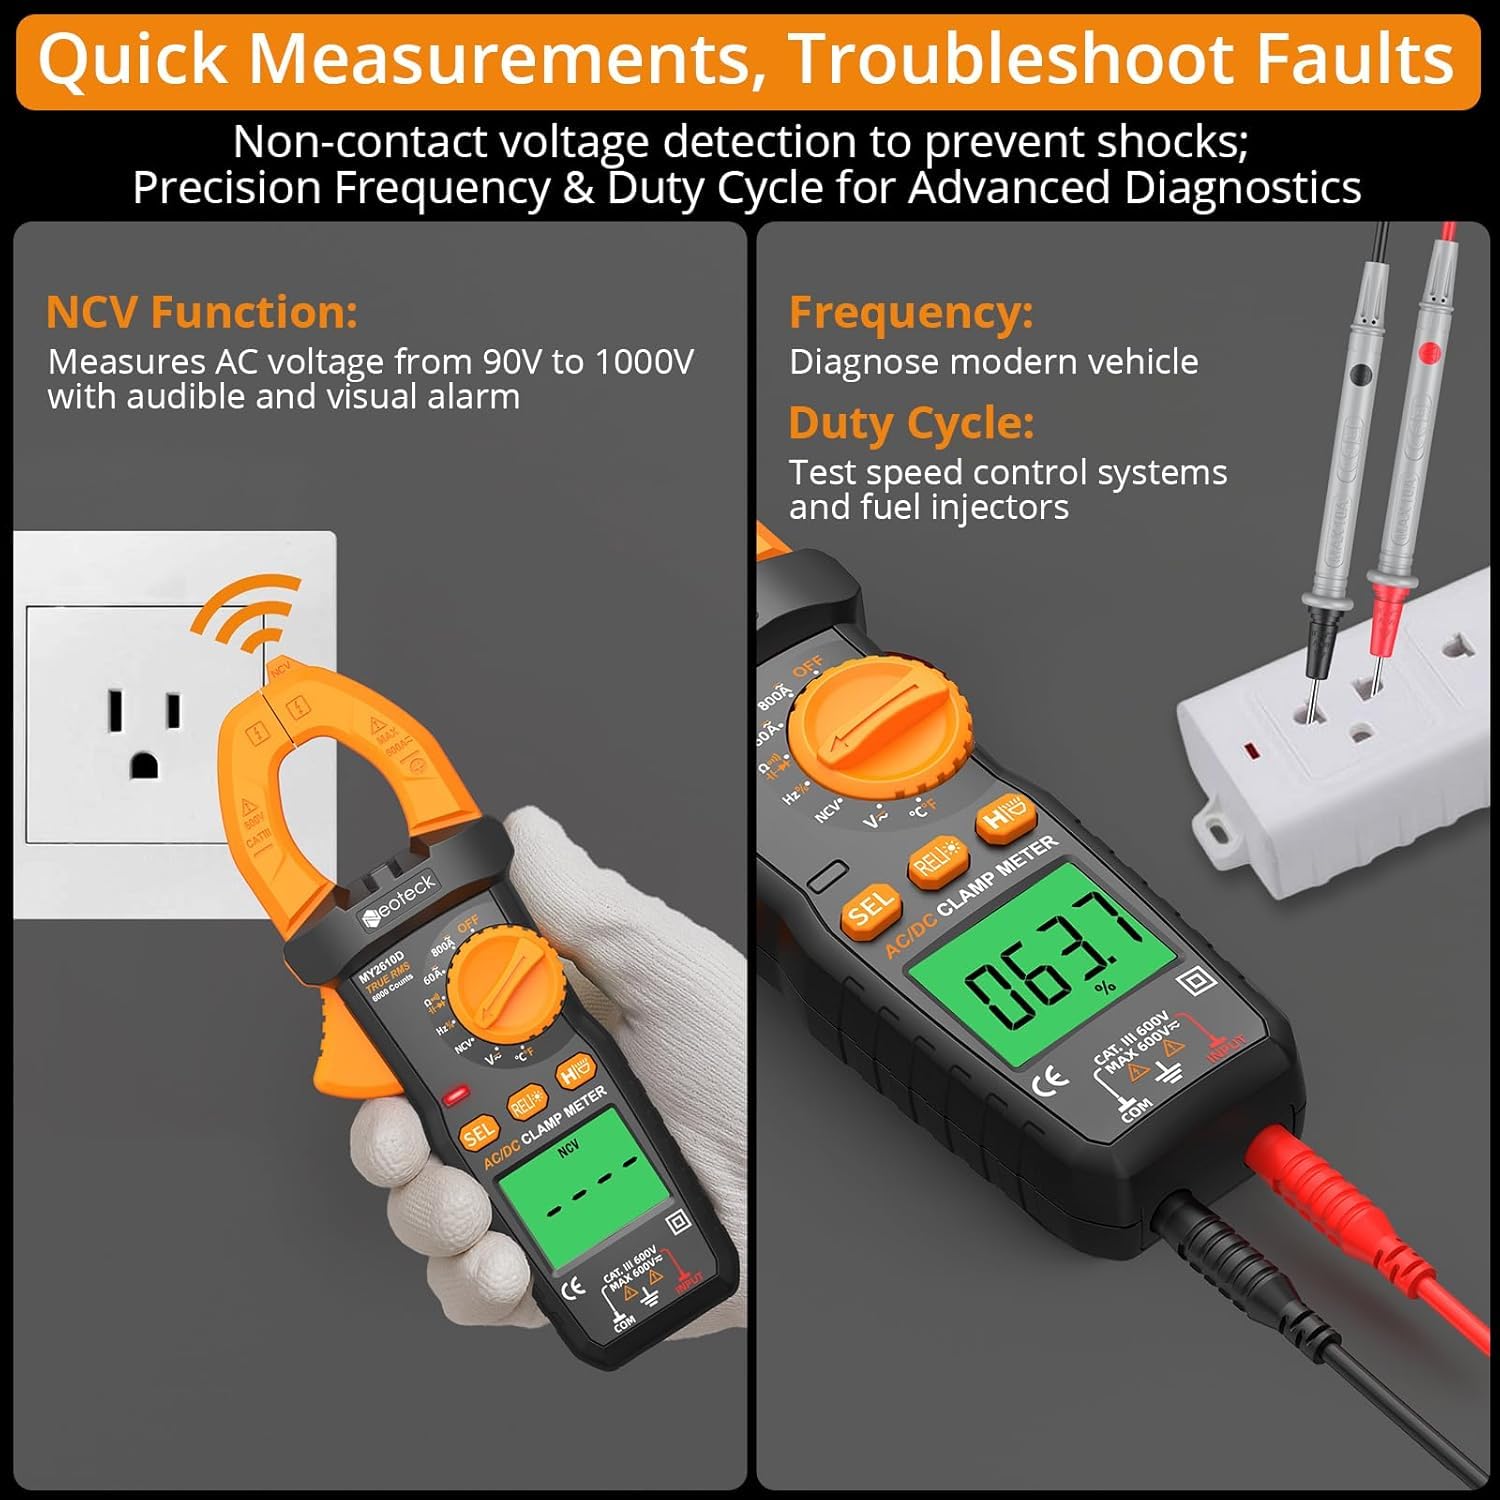
Image: The NCV function in use, detecting AC voltage near an electrical outlet. Also shown is the meter measuring frequency and duty cycle.
4.5 Additional Functions
- Data Hold (HOLD button): Freezes the current reading on the display. Press again to release.
- Backlight (Backlight button): Illuminates the LCD display for use in dim lighting. Automatically turns off after 30 seconds.
- Flashlight (Flashlight button): Provides illumination for the work area.
- Auto Power-Off: The meter automatically powers off after 15 minutes of inactivity to conserve battery life.

Image: Visual representation of the meter's thoughtful designs, including overload protection, auto-off feature, data hold, and integrated flashlight with LCD backlight.
5. Maintenance
5.1 Cleaning
Wipe the meter with a dry, soft cloth. Do not use abrasives or solvents.
5.2 Battery Replacement
When the battery indicator appears on the display, replace the batteries as described in Section 3.1.
5.3 Storage
If the meter is not used for an extended period, remove the batteries to prevent leakage. Store the meter in its protective pouch in a cool, dry place.
6. Troubleshooting
- No display or faint display: Check battery installation and replace batteries if necessary.
- Incorrect readings: Ensure test leads are properly connected and the correct function/range is selected. Verify ambient temperature is within 0-40°C for accurate current readings.
- Continuity function delay: Some delay may occur. Ensure a solid connection for consistent beeping.
- NCV not detecting: Ensure the NCV sensor is close to the live conductor and within the specified voltage range (90V-1000V AC).
If issues persist, contact customer support.
7. Specifications
| Specification | Value |
|---|---|
| Brand | Neoteck |
| Model | MY2610D |
| Power Source | Battery Powered (3x AAA) |
| Style | Orange, 800A AC/DC Current |
| Color | Orange |
| Item Weight | 191 Grams |
| Minimum Operating Voltage | 0.6 Volts (DC) |
| Upper Temperature Rating | 1000 Degrees Celsius (for K-type thermocouple) |
| Measurement Type | Multimeter |
| Item Dimensions | 7.28 x 2.76 x 1.38 inches |
| Safety Specification Met | CAT III 600V |
| Jaw Opening | 26mm |
| Display Counts | 6000 Counts |
8. Warranty & Support
The Neoteck Clamp Meter MY2610D comes with an 18-month warranty from the date of purchase. This warranty covers manufacturing defects and malfunctions under normal use.
For technical support, warranty claims, or any questions regarding the product, please contact Neoteck customer service through the retailer where the product was purchased or visit the official Neoteck website for contact information.
Please retain your proof of purchase for warranty service.