
1. Introduction
This manual provides detailed instructions for the installation, operation, and maintenance of your AZUIQiMeng Android 14 Car Stereo. This head unit is specifically designed for 1999-2005 Toyota Vitz XP10, Yaris, Platz, and Echo models, offering enhanced performance with an 8-CORE CPU, 2GB RAM, and 32GB ROM. It features a 9-inch 1280x720 QLED display, wireless CarPlay, Android Auto, GPS navigation, Bluetooth, and a built-in cooling fan for optimal performance.
2. What's in the Box (Accessories)
Before beginning installation, verify that all components are present in the package:
- Android 14 Car Stereo Head Unit (9-inch Touch Screen)
- Wiring Harness
- Rear Camera
- Mounting Frame
- GPS Antenna
- USB Cables (x2)
- External Microphone
- RCA Cables (for subwoofer, video output, etc.)
- Radio Antenna
- Installation Tools
- Protocol Box (if required for your vehicle)
- Tempered Glass Screen Protector

Figure 2.1: Back of the host device and included accessories. This image illustrates the various connection ports on the rear of the head unit and the types of cables and components supplied in the package, such as RCA cables, GPS antenna, and USB cables.
3. Setup and Installation
3.1 Pre-Installation Check
Before installation, confirm your vehicle's compatibility. This unit is designed for 1999-2005 Toyota Vitz XP10, Yaris, Platz, and Echo. If your car is equipped with an OEM amplifier or a factory camera, a specific wiring harness may be required. Contact technical support if you have these components to ensure you receive the correct harness.

Figure 3.1: Visual comparison of the dashboard before and after installation. This demonstrates the integrated appearance of the new 9-inch head unit within the vehicle's interior.
3.2 Wiring Connections
Refer to the wiring diagram provided in the package and Figure 2.1 for detailed connection instructions. Ensure all cables are securely connected to their corresponding ports. Key connections include:
- Power Harness: Connect to the vehicle's power, ground, and accessory wires.
- GPS Antenna: Connect the GPS antenna to the dedicated port on the back of the unit and position it in a location with a clear view of the sky for optimal signal reception.
- USB Cables: Connect the provided USB cables for external device connectivity.
- Radio Antenna: Connect the vehicle's radio antenna.
- Rear Camera: Connect the AHD rearview camera to the designated input for parking assistance.
- External Microphone: Plug in the external microphone for improved call quality.
- RCA Cables: Connect for subwoofer output, additional video inputs/outputs as needed.
3.3 Mounting the Head Unit
Install the head unit into the dashboard using the provided mounting frame and screws. Ensure it is securely fastened and does not obstruct any vehicle controls.
4. Operating Instructions
4.1 Wireless CarPlay and Wired Android Auto
The head unit supports both Wireless CarPlay (for iOS devices) and Wired Android Auto (for Android devices).

Figure 4.1: Wireless CarPlay and Wired Android Auto connection steps. This image illustrates the user interface and instructions for connecting both iOS and Android smartphones to the head unit for integrated functionality.
Wireless CarPlay (iOS System):
- Connect your iPhone to the head unit via Bluetooth.
- On the head unit, select the 'Car Link' application.
- Wait for the connection to establish. CarPlay can also be connected via a USB cable.
Wired Android Auto (Android System):
- Connect your Android phone to the head unit using a USB cable.
- On the head unit, select the 'Car Link' application.
- Wait for the connection to establish.
4.2 Steering Wheel Control
The unit supports original steering wheel control buttons, allowing you to manage audio and calls without taking your hands off the wheel. To configure:
- Navigate to 'Settings' on the head unit.
- Select 'Steering Learn' or 'Steering Wheel Control'.
- Follow the on-screen prompts to assign functions to each button.

Figure 4.2: Steering wheel control setup interface. This image displays the menu for configuring steering wheel buttons, alongside examples of the radio and Bluetooth call screens.
4.3 Radio and Bluetooth
Radio (FM/AM/RDS):
Access the 'Radio' application to tune into FM or AM stations. The RDS (Radio Data System) feature displays station information where available. Use the on-screen controls or configured steering wheel buttons to change stations and adjust volume.
Bluetooth:
The built-in Bluetooth module enables hands-free calling and wireless music streaming. Pair your smartphone via Bluetooth settings. The external microphone ensures clear conversations.
4.4 GPS Navigation and WiFi
The unit includes a GPS module with an external antenna for accurate navigation. It supports various navigation apps and offline maps. Dual-band 5G/2.4G WiFi provides fast and stable internet access for online navigation, app downloads, and real-time updates.
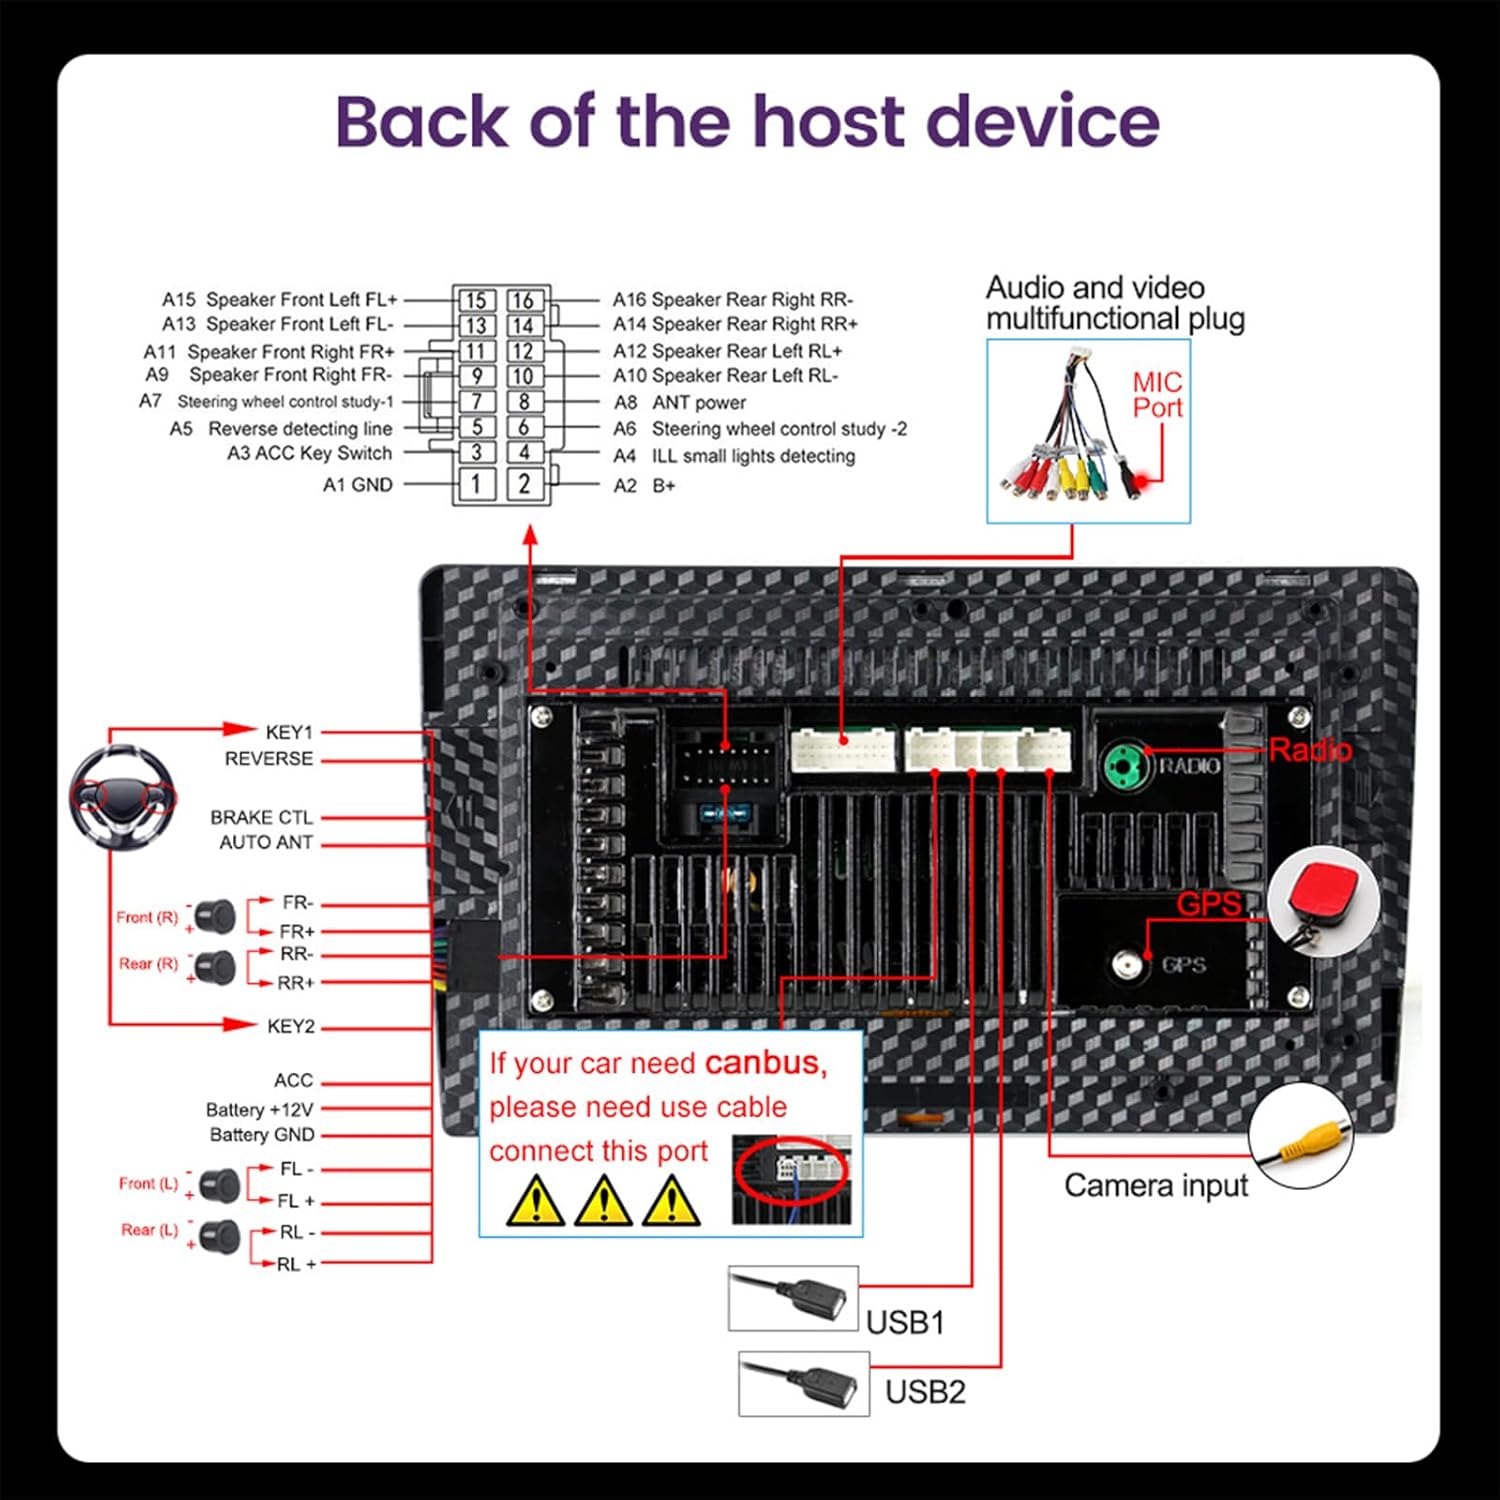
Figure 4.3: WiFi, GPS Navigation, Split Screen, and UI Themes. This image demonstrates the unit's capabilities for internet connectivity, turn-by-turn navigation, multitasking with two applications simultaneously, and personalizing the user interface.
4.5 Split Screen Mode and UI Themes
Utilize the split-screen feature to run two applications simultaneously, such as navigation and music playback. The system also offers 5 stylish UI themes and 7 customizable button ambient lighting colors to personalize your driving experience.
4.6 AHD Reversing Camera
The included AHD rearview camera provides a clear, high-definition image when reversing, enhancing parking safety and visibility. The display automatically switches to the camera feed when the vehicle is in reverse gear.
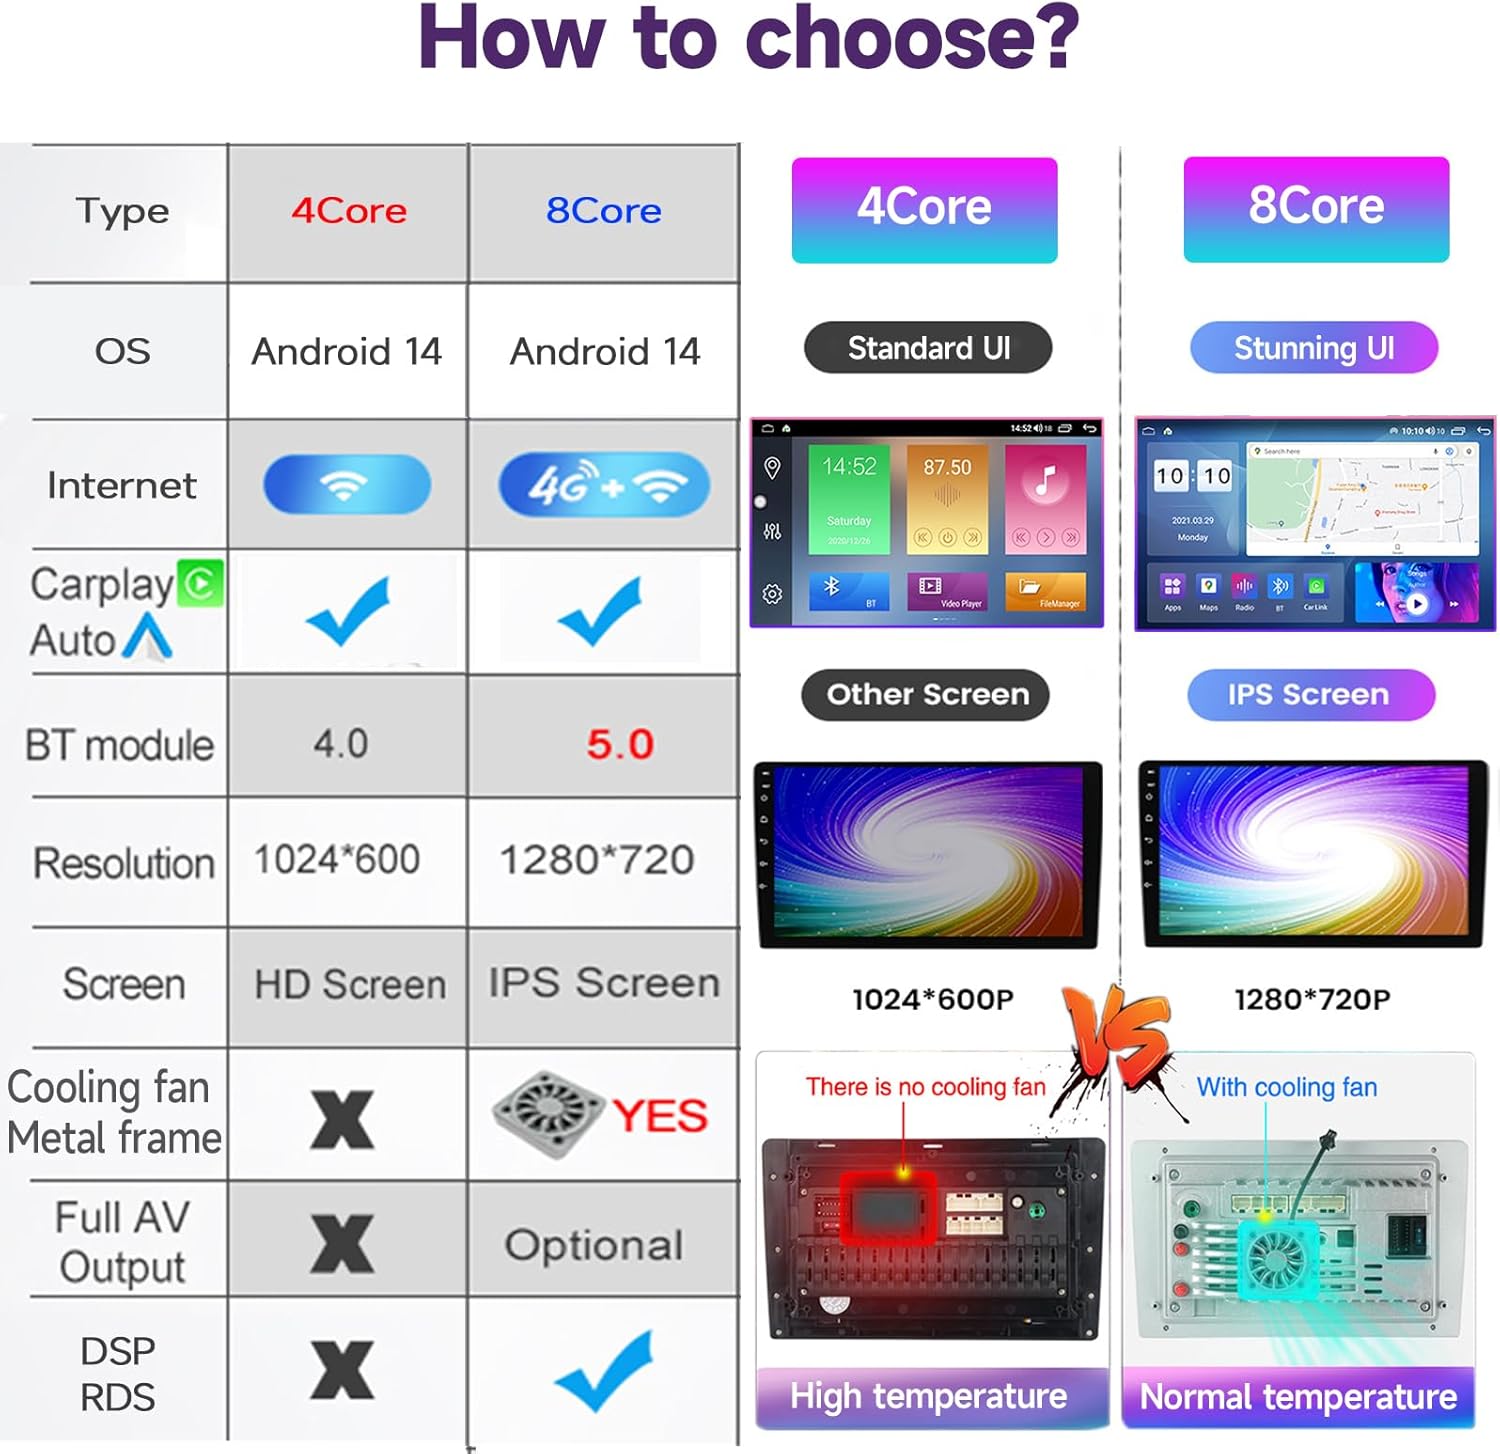
Figure 4.4: AHD HD reversing camera functionality. This image visually explains how the high-definition rear camera provides a clear view and parking assistance on the head unit screen.
5. Maintenance
- Screen Cleaning: Use a soft, lint-free cloth to clean the touch screen. Avoid abrasive cleaners or solvents.
- Software Updates: Periodically check for system software updates to ensure optimal performance and access to new features. Updates can typically be performed via WiFi.
- Heat Management: The unit features a built-in cooling fan and metal frame for heat dissipation. Ensure proper ventilation around the unit.
6. Troubleshooting
If you encounter issues, refer to the following common problems and solutions:
| Problem | Possible Cause / Solution |
|---|---|
| Unit does not power on | Check power connections (ACC, B+, GND). Ensure fuses are intact. |
| No sound output | Verify speaker connections. Check volume settings. Ensure correct audio source is selected. If your car has an OEM amp, confirm correct wiring harness. |
| GPS signal is weak or inaccurate | Ensure GPS antenna is properly connected and placed in a location with a clear view of the sky. Update GPS maps if necessary. |
| Bluetooth connection issues | Ensure Bluetooth is enabled on both the head unit and your phone. Delete previous pairings and re-pair. Restart both devices. |
| CarPlay/Android Auto not connecting | For Wireless CarPlay, ensure Bluetooth is connected. For Wired Android Auto, try a different USB cable. Ensure the 'Car Link' app is selected. |
| Touch screen unresponsive | Restart the unit. Ensure the screen is clean and free of debris. |
If the problem persists after attempting these solutions, please contact technical support.
7. Specifications
The following table outlines the key specifications for the AZUIQiMeng Android 14 Car Stereo (8-CORE 2+32GB model):
| Feature | Specification |
|---|---|
| Operating System | Android 14.0 |
| CPU | 8-CORE |
| RAM | 2GB |
| ROM (Internal Storage) | 32GB |
| Screen Size | 9 Inches |
| Display Type | QLED MIPI High-definition Quantum Touch Screen |
| Resolution | 1280x720 |
| Connectivity | Wireless CarPlay, Wired Android Auto, Bluetooth 5.0, 5G/2.4G WiFi, USB |
| Navigation | Built-in GPS module with external antenna, supports worldwide maps |
| Radio | FM/AM/RDS |
| Special Features | Built-in Cooling Fan, Metal Frame, 2.5D Hard Glass, DSP Sound, Split Screen, Steering Wheel Control, AHD Rearview Camera Support |
| Product Dimensions | 5.9"L x 13.77"W x 16.92"H |

Figure 7.1: Feature comparison between 4-Core and 8-Core models. This table emphasizes the enhanced specifications of the 8-Core version, including its QLED display, higher resolution, and integrated cooling system.
8. Warranty and Support
Your AZUIQiMeng car stereo comes with technical support. If you encounter any installation or usage issues, please contact the seller directly. They are available to assist you promptly with any questions or concerns regarding your product.