1. Introduction
The Generic NV8000 is a professional head-mounted full-color infrared night vision device designed for enhanced observation in various outdoor environments, including low-light and complete darkness. This device offers both full-color and infrared modes, providing clear and detailed visuals. Its head-mounted design allows for hands-free operation, making it suitable for activities such as hunting, wildlife observation, security, and exploration.
Key features include a 3D display, 7x optical magnification, 8x digital zoom, 3-megapixel photo capture, 1080p HD video recording, and a 1.4-inch TFT internal screen with adjustable brightness. The integrated 850nm infrared illuminator enables observation up to 250-300 meters in total darkness. The device is equipped with dual eyepieces featuring independent diopter adjustment and is powered by a built-in 3000mAh rechargeable lithium battery. With an IP54 waterproof and dustproof rating, the NV8000 is built for durability in challenging weather conditions.
2. Package Contents
Please check the package carefully to ensure all items are present:
- NV8000 Night Vision Binoculars
- Adjustable Headband
- Hard Carrying Case
- 32GB TF Card
- Type-C Data Cable
- User Manual
- Cleaning Cloth

Image 2.1: Contents of the NV8000 package, including the device, headband, case, and accessories.
3. Device Overview and Controls
Familiarize yourself with the device's components and control buttons:
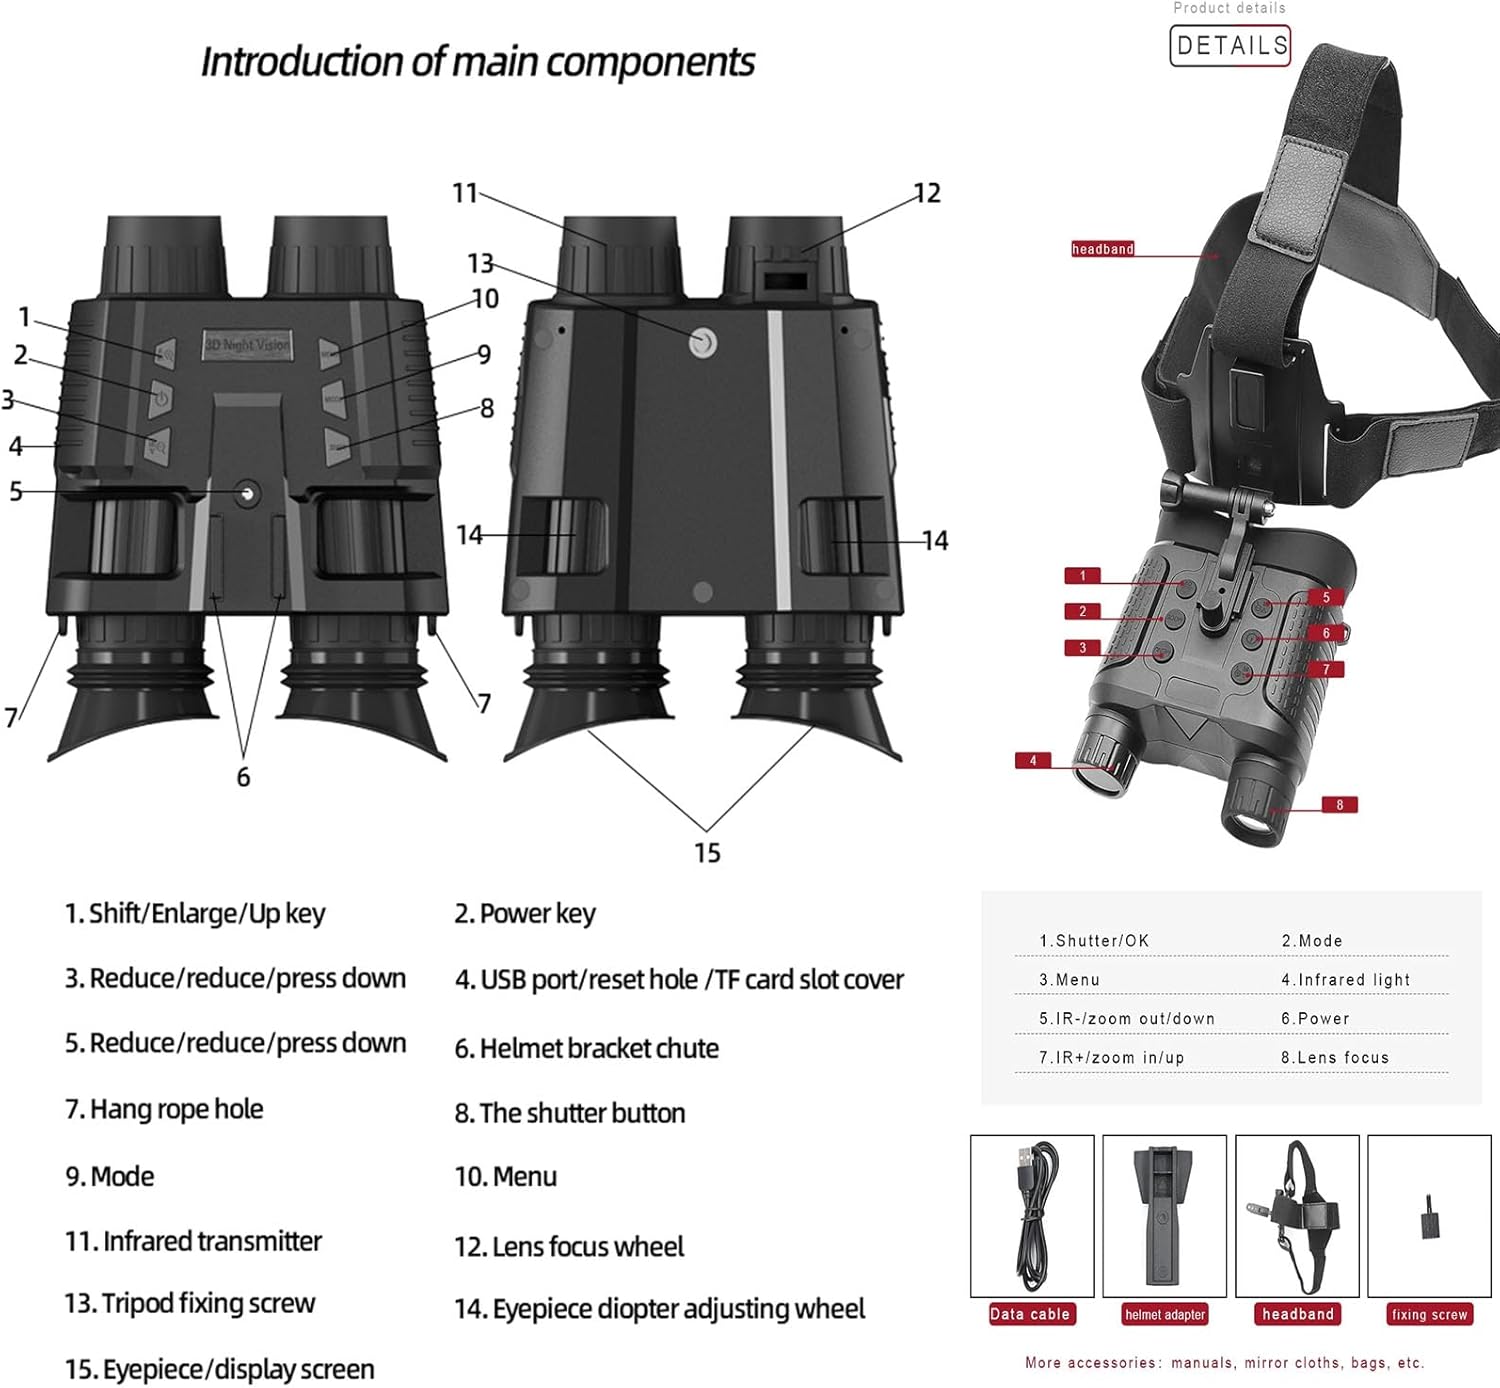
Image 3.1: Diagram illustrating the main components and control buttons of the NV8000 device.
- Shift/Enlarge/Up key: Used for navigation and zooming in.
- Power key: Turns the device on or off.
- Reduce/reduce/press down: Used for navigation and zooming out.
- USB port/reset hole/TF card slot cover: Access point for charging, data transfer, and memory card.
- Reduce/reduce/press down: Another navigation key.
- Helmet bracket chute: For attaching the device to a helmet mount.
- Hang rope hole: Attachment point for a neck strap.
- The shutter button: Captures photos or starts/stops video recording.
- Mode: Switches between photo, video, and playback modes.
- Menu: Accesses the device settings menu.
- Infrared transmitter: Emits infrared light for night vision.
- Lens focus wheel: Adjusts the focus of the objective lens.
- Tripod fixing screw: For mounting the device on a tripod.
- Eyepiece diopter adjusting wheel: Adjusts the focus for individual eyesight.
- Eyepiece/display screen: Where you view the image.
4. Setup
4.1 Charging the Device
The NV8000 features a built-in 3000mAh rechargeable lithium battery. Before initial use, fully charge the device.
- Connect the provided Type-C data cable to the USB port (4) on the device.
- Connect the other end of the cable to a standard USB charger (DC 5V/2A recommended) or a power bank.
- The charging indicator will show the charging status. Ensure the device is fully charged before prolonged use.
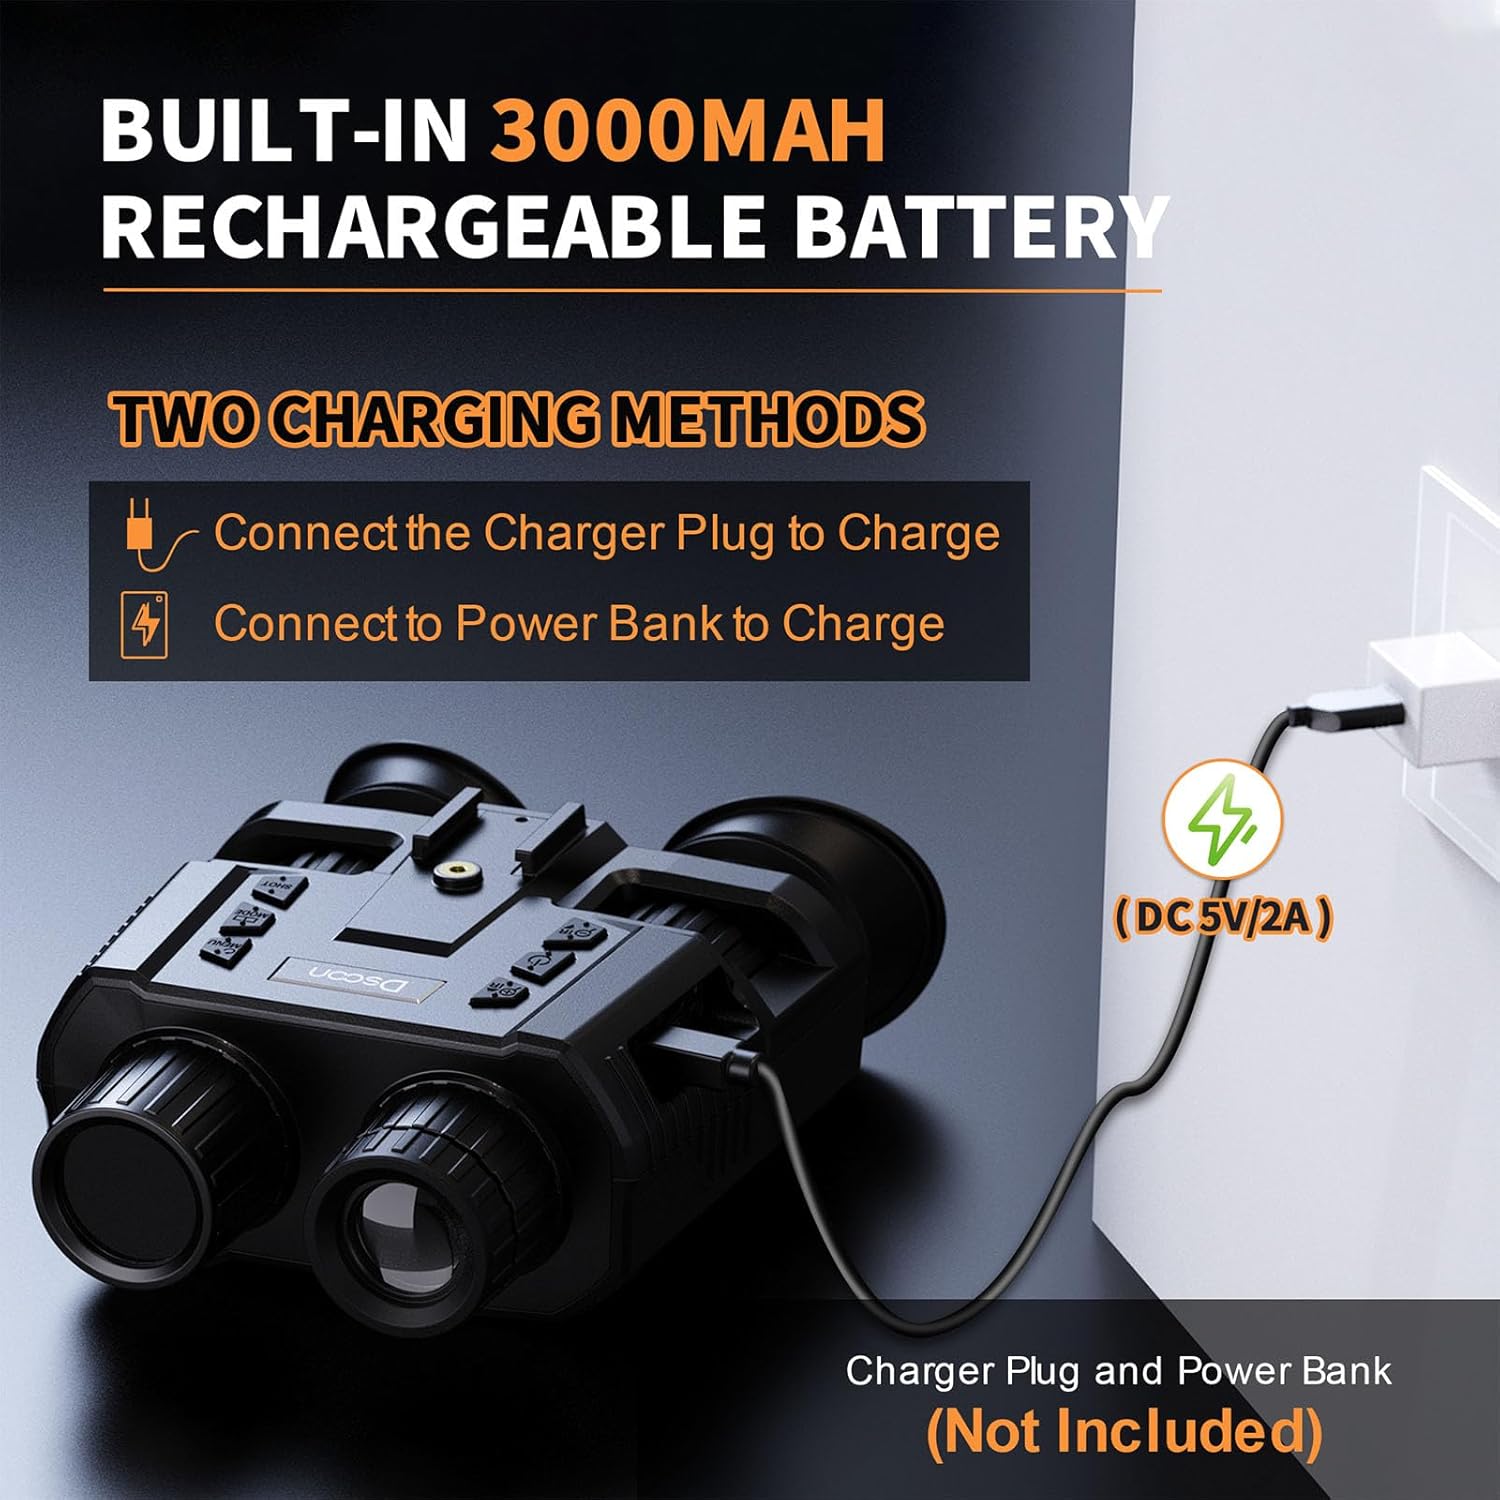
Image 4.1: The NV8000 can be charged using a charger plug or a power bank via the Type-C USB port.
4.2 Inserting the TF Card
The device supports a TF (microSD) card for storing photos and videos. A 32GB TF card is included.
- Locate the TF card slot cover (4) on the device.
- Gently open the cover.
- Insert the TF card into the slot with the gold contacts facing down until it clicks into place.
- Close the cover securely to protect the port from dust and moisture.
4.3 Attaching the Headband
For hands-free operation, attach the adjustable headband to the device.
- Align the helmet bracket chute (6) on the device with the corresponding mount on the headband.
- Slide the device onto the mount until it locks securely.
- Adjust the straps of the headband to ensure a comfortable and stable fit on your head.

Image 4.2: The NV8000 device mounted on a headband for hands-free operation, demonstrating its use in a dark environment with infrared illumination.
4.4 Diopter Adjustment
The NV8000 features independent diopter adjustment for each eyepiece to accommodate individual eyesight (myopia refraction adjustment range +/-3, hyperopia 300° adjustment compensation).
- While looking through the eyepieces (15), rotate the eyepiece diopter adjusting wheels (14) until the image appears clear and sharp for each eye.
- This adjustment ensures optimal viewing clarity without the need for additional corrective eyewear.
5. Operating Instructions
5.1 Power On/Off
- To power on, press and hold the Power key (2) until the screen illuminates.
- To power off, press and hold the Power key (2) again until the screen turns off.
5.2 Adjusting Focus and Zoom
- Optical Focus: Rotate the Lens focus wheel (12) to bring distant or close objects into sharp focus.
- Digital Zoom: Use the Shift/Enlarge/Up key (1) to zoom in and the Reduce/press down key (3 or 5) to zoom out. The device offers up to 8x digital zoom.

Image 5.1: The NV8000 features 7x optical magnification and 8x digital zoom for detailed observation.
5.3 Day and Night Use
The NV8000 supports both daytime full-color viewing and nighttime infrared viewing.
- Daytime: The device operates in full-color mode, providing clear images in ambient light.
- Nighttime: In low light or complete darkness, activate the infrared illuminator.

Image 5.2: Comparison of daytime full-color viewing and nighttime infrared viewing with the NV8000.
5.4 Infrared (IR) Illumination
To enhance visibility in dark conditions, activate the infrared illuminator.
- Press the Infrared light button (not explicitly numbered but typically near the IR transmitter) to cycle through 7 levels of IR brightness.
- Adjust the IR level based on the ambient darkness and desired observation range.
5.5 Changing Color Modes
The device offers multiple color effects for different viewing preferences and environments.
- Access the menu (10) and navigate to the color mode settings.
- Select from options such as Color, Black and White, Green, or Negative to achieve the best viewing effect for your specific conditions.

Image 5.3: The NV8000 offers various color modes including Color, Black and White, Green, and Negative for adaptable viewing.
5.6 Photo and Video Recording
- Press the Mode button (9) to switch between Photo mode and Video mode.
- In Photo mode, press the Shutter button (8) to capture a still image.
- In Video mode, press the Shutter button (8) once to start recording and again to stop recording.
- Recorded files are saved to the inserted TF card.
5.7 Playback
- Press the Mode button (9) to enter Playback mode.
- Use the navigation keys (1, 3, 5) to browse through your recorded photos and videos.
- Press the OK button (often integrated with Shutter or a central button) to view a selected file.
5.8 Menu Settings
Press the Menu button (10) to access various settings, including:
- Image Resolution (36MP, 12MP, etc.)
- Video Resolution (4K, FHD, HD)
- Screen Brightness (7 levels)
- Auto Power Off (Off, 1 min, 3 min, 5 min, 10 min)
- Date and Time
- Language
- Format TF Card
6. Maintenance
- Cleaning: Use the provided cleaning cloth to gently wipe the lenses and display screen. Do not use abrasive materials or harsh chemicals.
- Storage: When not in use, store the device in its hard carrying case in a cool, dry place, away from direct sunlight and extreme temperatures.
- Battery Care: To prolong battery life, avoid fully discharging the battery frequently. Recharge the device regularly, even if not in use for extended periods.
- Water Resistance: The NV8000 has an IP54 rating, meaning it is protected against dust ingress and splashing water from any direction. Avoid submerging the device in water.
7. Troubleshooting
- Device does not power on: Ensure the battery is charged. Connect the device to a charger and try again.
- Image is blurry: Adjust the lens focus wheel (12) and the eyepiece diopter adjusting wheels (14) for clarity. Ensure lenses are clean.
- No image in dark conditions: Activate the infrared illuminator and adjust its brightness level.
- TF card error: Ensure the TF card is inserted correctly. Try formatting the TF card through the device's menu (this will erase all data). If the issue persists, try a different TF card.
- Device unresponsive: Use a small pin to press the reset hole (part of 4) to restart the device.
8. Specifications
| Feature | Specification |
|---|---|
| Image Resolution | 36MP, 12MP, 8MP, 5MP, 3MP, 2MP, 1MP |
| Video Resolution | 4K, FHD (1080p), HD |
| Sensor | 1.3MP Star Sensor |
| Display | 1.4-inch 390*390 TFT Internal Screen |
| Eyepiece Diopter Adjustment | ±3° (Myopia), 300° (Hyperopia) |
| Infrared LED | 3W, 850nm, 7 levels brightness |
| Lens Aperture | F1.4 Large Aperture |
| Focal Length | 25mm |
| Field of View | 10 Degrees |
| Auto Power Off | Off/1 Min/3 Mins/5 Mins/10 Mins |
| Observation Distance (All Black) | 200-250 Meters |
| Magnification | 7x Optical, 8x Digital Zoom |
| Power Supply | 3.7V, 3000mAh Lithium Battery |
| USB Interface | Type-C |
| Dimensions | 152mm x 122mm x 55mm (5.98"L x 4.8"W x 2.17"H) |
| Weight | 440g |
| Material | ABS material |
| IP Rating | IP54 |
9. Warranty and Support
9.1 Warranty Information
Please refer to the warranty card included in your package for specific warranty terms and conditions. Typically, products are covered against manufacturing defects for a limited period from the date of purchase. Keep your proof of purchase for warranty claims.
9.2 Customer Support
For technical assistance, troubleshooting, or warranty inquiries, please contact the retailer or manufacturer's customer support. Refer to the contact information provided on the product packaging or the official website of the Generic brand.