1. Introduction
Thank you for purchasing the Generic Soft Serve Ice Cream Machine Model ZB-BQL28. This manual provides essential information for the safe and efficient operation, maintenance, and troubleshooting of your new ice cream machine. Please read this manual thoroughly before initial use and retain it for future reference.
This commercial countertop machine is designed for single-flavor soft serve ice cream production, suitable for both home and light commercial use. It features a 450W motor, stainless steel construction, and an auto-clean function for convenience.
2. Important Safety Instructions
To reduce the risk of fire, electric shock, or injury, always follow these basic safety precautions:
- Read all instructions before operating the appliance.
- Do not immerse the appliance, cord, or plug in water or other liquids.
- Close supervision is necessary when any appliance is used by or near children.
- Unplug from outlet when not in use, before putting on or taking off parts, and before cleaning.
- Avoid contact with moving parts.
- Do not operate any appliance with a damaged cord or plug, or after the appliance malfunctions or has been damaged in any manner. Contact customer support for examination, repair, or adjustment.
- The use of attachments not recommended or sold by the manufacturer may cause fire, electric shock, or injury.
- Do not use outdoors.
- Do not let cord hang over edge of table or counter, or touch hot surfaces.
- Do not place on or near a hot gas or electric burner, or in a heated oven.
- Always attach plug to appliance first, then plug cord into the wall outlet. To disconnect, turn any control to "off", then remove plug from wall outlet.
- Do not use appliance for other than intended use.
- Ensure the machine is placed on a stable, level surface with adequate ventilation.
- Only use the specified voltage (110V) for this appliance.
3. Product Overview
The Generic Soft Serve Ice Cream Machine is designed for efficient and consistent production of soft serve desserts. Key components and features are highlighted below.
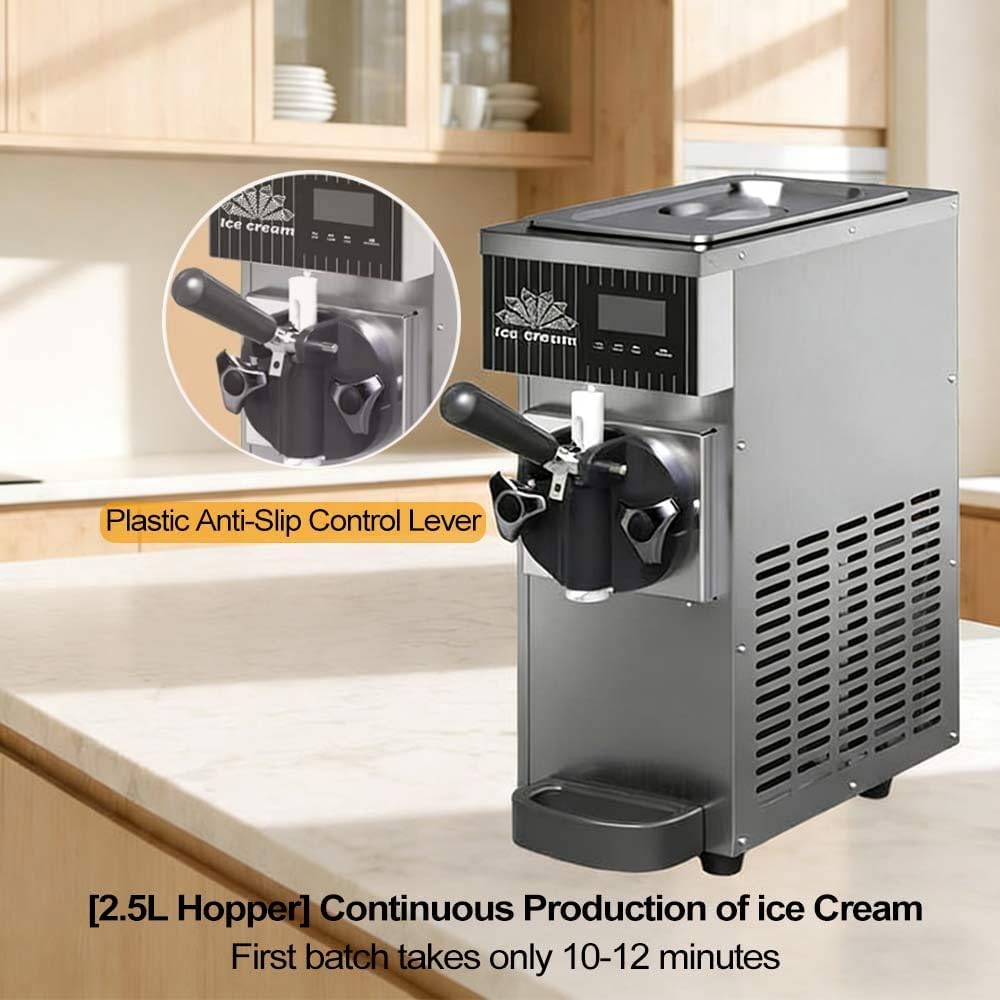
Figure 3.1: Front view of the ice cream machine, showing the plastic anti-slip control lever and the 2.5L hopper for continuous ice cream production. The first batch typically takes 10-12 minutes.

Figure 3.2: Internal components and construction details. This image illustrates the Digital Microcomputer Control Panel, High-quality pure copper motor, All-stainless steel body, and a Renowned Compressor, ensuring durability and performance.

Figure 3.3: Close-up of the LED screen and its functions. The panel offers intuitive controls for One-Touch Freeze, One-Touch Freshness, One-Touch Cleaning, and Continuous rapid production.

Figure 3.4: View of the food-grade large capacity 304 stainless steel storage tank, designed for hygiene and durability.
4. Specifications
| Feature | Detail |
|---|---|
| Model Number | ZB-BQL28 |
| Rated Power | 450W |
| Voltage | 110V |
| Material | Stainless Steel |
| Cylinder Capacity | 4.7L (for this specific model) |
| Hopper Capacity | 2.5L |
| Freezer Capacity | 1L |
| Yield | 4-5L/h (80-100 servings of 80g per hour) |
| Refrigerant | R290 |
| Display | LED Panel |
| Dimensions (approx.) | 20cm (W) x 50cm (D) x 59cm (H) |
| Net Weight | 21kg |
| Operating Temperature Range | 5°C to 32°C (41°F to 89.6°F) |

Figure 4.1: Approximate dimensions of the ice cream machine (20cm W x 50cm D x 59cm H) and visual representation of available color variants.
5. Setup and First Use
5.1 Unpacking
- Carefully remove the machine from its packaging.
- Inspect the machine for any signs of damage during transit. If damaged, contact your supplier immediately.
- Remove all packing materials, including any protective films or tapes.
5.2 Placement
- Place the machine on a stable, level, and dry surface capable of supporting its weight.
- Ensure there is adequate ventilation around the machine, especially at the rear and sides, to allow for proper heat dissipation. Maintain at least 15 cm (6 inches) of clearance from walls or other appliances.
- Avoid placing the machine near heat sources or in direct sunlight.
5.3 Initial Cleaning
Before first use, it is crucial to clean all parts that will come into contact with food.
- Ensure the machine is unplugged from the power outlet.
- Disassemble the dispensing head and any removable parts (e.g., drip tray, hopper lid).
- Wash all removable parts with warm, soapy water. Rinse thoroughly and dry completely.
- Wipe down the interior of the hopper and the exterior of the machine with a damp cloth.
- Reassemble all parts once dry.
5.4 Power Connection
- Connect the power cord to a grounded 110V electrical outlet.
- Ensure the electrical circuit can handle the machine's 450W power requirement.
6. Operating Instructions
6.1 Preparing the Mix
- Prepare your soft serve ice cream mix according to its specific instructions. Ensure the mix is properly chilled before adding it to the machine.
- Pour the prepared mix into the 2.5L hopper. Do not overfill.
6.2 Making Ice Cream
- Turn on the machine using the main power switch.
- On the LED control panel, press the "Freeze" or "Start" button (refer to Figure 3.3 for button identification). The machine will begin the freezing process.
- The first batch typically takes about 10-12 minutes to reach the desired consistency. Subsequent batches may be ready in 2-3 minutes due to the rapid freezing capabilities.
- Monitor the display for hardness settings. You can adjust the hardness using the control panel if available.
- Once the ice cream reaches the desired consistency, it is ready to dispense.
6.3 Dispensing Ice Cream
- Place a cone or bowl under the dispensing nozzle.
- Pull the plastic anti-slip control lever down to dispense the soft serve ice cream.
- Push the lever back up to stop dispensing.
6.4 Continuous Operation
The machine is designed for continuous operation. As ice cream is dispensed, new mix can be added to the hopper to maintain production. The rapid freezing ensures minimal downtime between servings.
7. Maintenance and Cleaning
7.1 Daily Cleaning (Auto-Clean Function)
The machine features an automatic cleaning program for daily maintenance:
- Ensure the hopper is empty of ice cream mix.
- Pour warm water (approximately 2-3 liters) into the hopper.
- Press the "Clean" button on the LED control panel (refer to Figure 3.3). The machine will agitate the water to clean the internal components.
- Allow the cleaning cycle to run for a few minutes.
- Dispense the cleaning water through the nozzle into a bucket.
- Repeat with fresh water if necessary until the water runs clear.
- Turn off and unplug the machine.
7.2 Deep Cleaning (Weekly/Bi-Weekly)
For thorough sanitation, a deep clean is recommended regularly:
- Perform the daily auto-clean cycle first.
- Unplug the machine.
- Disassemble all removable parts: dispensing lever, dispensing head, mixing shaft, seals, and hopper lid.
- Wash all disassembled parts thoroughly with warm, soapy water and a brush. Pay close attention to crevices and seals.
- Rinse all parts completely with clean water to remove any soap residue.
- Sanitize the parts using a food-grade sanitizer solution according to the sanitizer's instructions.
- Allow all parts to air dry completely before reassembly.
- Wipe down the exterior of the machine with a damp cloth.
- Reassemble the machine, ensuring all seals and parts are correctly seated to prevent leaks.
7.3 Drip Tray Cleaning
- The detachable drip tray should be emptied and cleaned regularly to prevent spills and maintain hygiene.
8. Troubleshooting
Before contacting customer support, please refer to the following troubleshooting guide for common issues:
| Problem | Possible Cause | Solution |
|---|---|---|
| Machine does not turn on |
|
|
| Ice cream is too soft or watery |
|
|
| Ice cream is too hard |
|
|
| Machine is leaking |
|
|
| Unusual noise during operation |
|
|
9. Customer Support
If you encounter any issues not covered in this manual or require further assistance, please contact our customer support team. Provide your model number (ZB-BQL28) and a detailed description of the problem.
Contact information for support is typically provided at the point of purchase or on the product packaging. Please refer to those resources for the most up-to-date contact details.
The product description mentions: "If you have any questions about the product, please feel to write to us. We will respond within 24 hours and provide a solution. We wish you a happy shopping experience."


