1. Important Safety Instructions
Please read all instructions carefully before using the UPRUBE YD-F99N Vacuum Sealer. Retain this manual for future reference.
- Do not operate the appliance with a damaged cord or plug.
- Keep the appliance away from water or other liquids. Do not immerse the unit.
- This appliance is not intended for use by persons with reduced physical, sensory, or mental capabilities, or lack of experience and knowledge, unless they have been given supervision or instruction concerning use of the appliance by a person responsible for their safety.
- Children should be supervised to ensure they do not play with the appliance.
- Use only UPRUBE approved vacuum sealer bags and accessories.
- Unplug from outlet when not in use and before cleaning.
- Do not use outdoors.
2. Product Overview
The UPRUBE YD-F99N Vacuum Sealer is designed to preserve food freshness up to 8 times longer than traditional methods. It features a 9-in-1 smart system, a powerful 95kPa suction, and a convenient easy-tear cutter.
Key Features:
- 95kPa Pro Suction: Powerful vacuum for optimal air removal.
- Easy Tear Cutter: Built-in blade for effortless bag opening.
- 9-in-1 Smart Modes: Includes Dry, Moist, Damp, Gentle, Normal, Vacuum, Pulse, Seal, and High-Temp functions.
- 135W Motor: Ensures fast sealing with 12L/min airflow.
- 11" Wide Seal Bar: Accommodates various bag sizes.
- Intelligent Display: Monitors sealing progress and cooling.
- Built-in Cutter & Storage: For custom bag sizes and convenient roll storage.
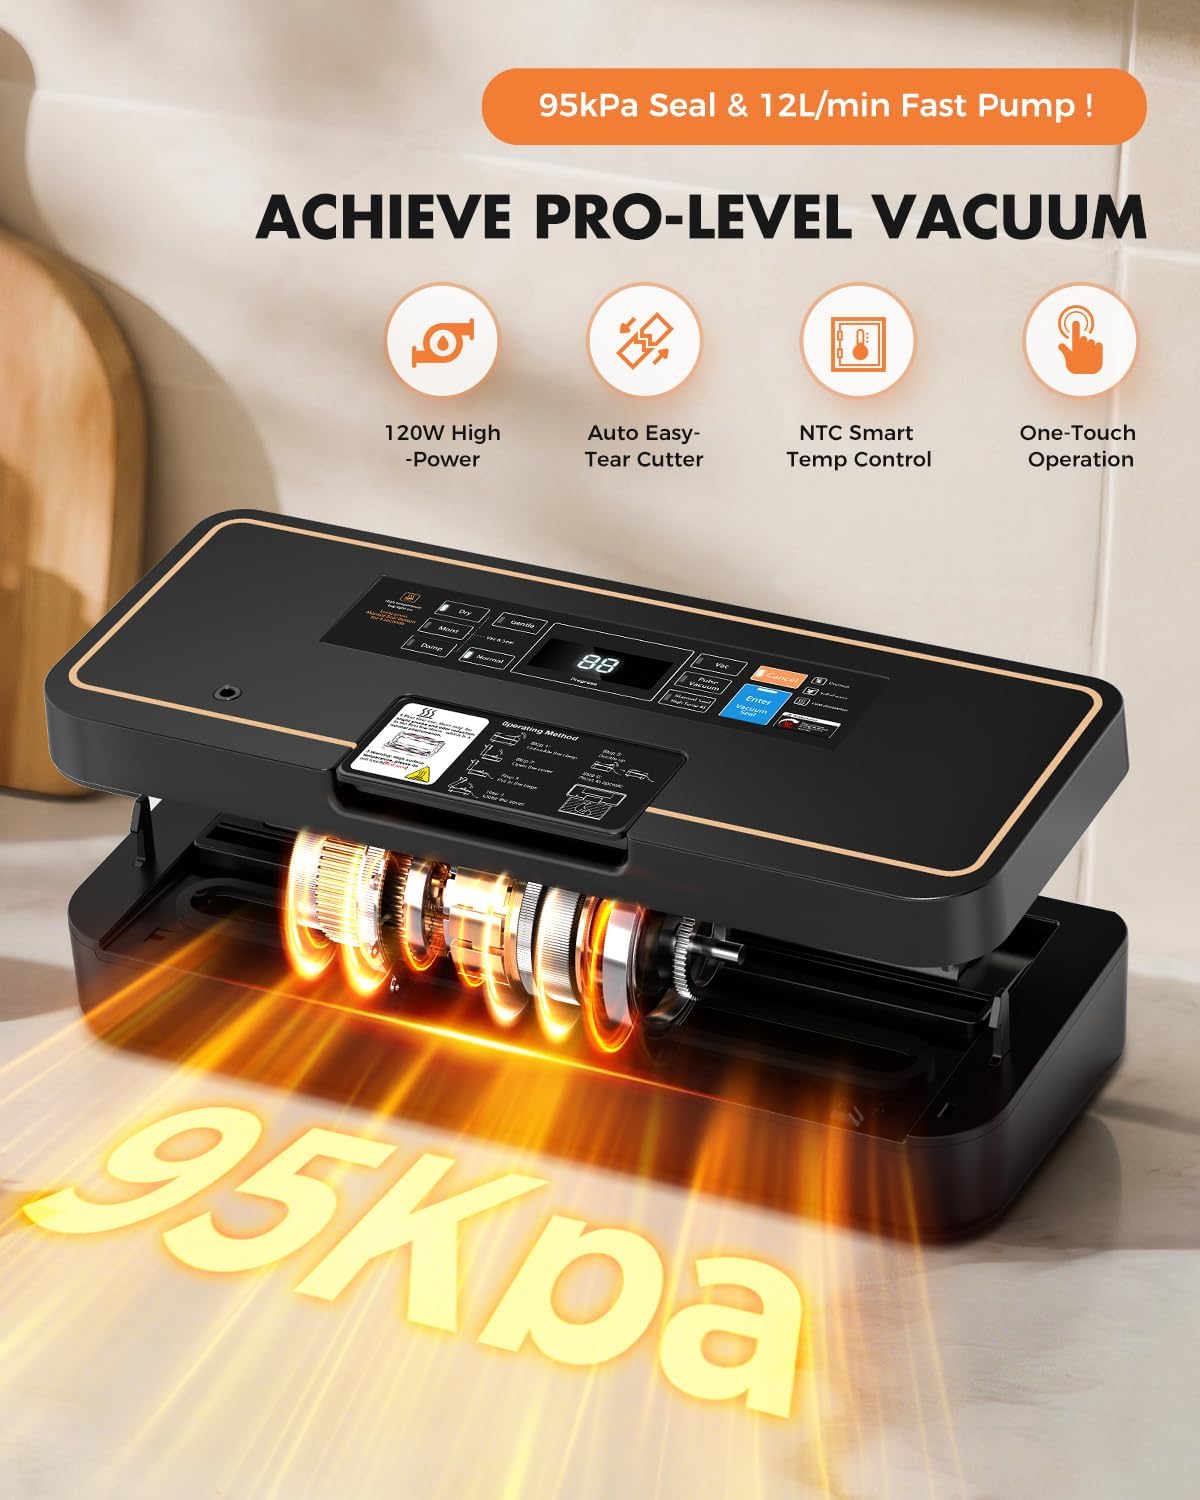
Figure 2.1: UPRUBE YD-F99N Vacuum Sealer highlighting 95kPa seal and 12L/min fast pump capabilities.

Figure 2.2: The control panel displaying the 5 operating modes: Dry, Moist, Damp, Seal, and Pulse, along with other functions.
3. Setup
3.1 Unpacking and Initial Inspection
- Carefully remove the vacuum sealer and all accessories from the packaging.
- Inspect the unit for any signs of damage. Do not use if damaged.
- Wipe the exterior of the unit with a damp cloth. Ensure the sealing strip and vacuum chamber are clean and dry.
3.2 Installing the Bag Roll (Optional)
The unit includes a built-in storage compartment for a vacuum bag roll and an integrated cutter.
- Open the lid of the vacuum sealer.
- Place the vacuum bag roll into the internal storage slot.
- Pull out the desired length of bag material and position it under the cutter.
- Slide the cutter across to create a custom-sized bag.

Figure 3.1: Overview of the vacuum sealer's built-in bag storage, cutter, and 11-inch sealing strip.

Figure 3.2: Step-by-step guide for cutting and sealing custom bag sizes using the integrated cutter.
4. Operating Instructions
4.1 Basic Vacuum Sealing (Dry Foods)
- Place the food inside a vacuum sealer bag, ensuring at least 3 inches of space between the food and the open end of the bag.
- Open the lid of the vacuum sealer.
- Position the open end of the bag flat into the vacuum chamber, ensuring it is within the sealing strip area. Align the bag edge with the positioning slot.
- Close the lid and press down firmly on both sides until it clicks securely into place.
- Select the 'Dry' mode on the control panel.
- Press 'Enter Vacuum Seal' to begin the vacuuming and sealing process. The intelligent display will show progress.
- Once the process is complete and the light turns off, open the lid and remove the sealed bag.

Figure 4.1: Step-by-step instructions for vacuum sealing dry foods.
4.2 Sealing Moist or Damp Foods
- Prepare the food in a vacuum sealer bag as described for dry foods.
- Place the open end of the bag into the vacuum chamber.
- Close the lid and fasten the buckle.
- Select 'Moist' or 'Damp' mode on the control panel, depending on the moisture content.
- Press 'Enter Vacuum Seal' to begin. The machine will adjust suction and sealing time for moist conditions.
- Once complete, remove the sealed bag.

Figure 4.2: Step-by-step instructions for vacuum sealing moist or damp foods.
4.3 Using the Pulse Vacuum Function (for delicate items)
The Pulse Vacuum function allows for manual control over the vacuum process, ideal for delicate foods like chips or pastries that could be crushed by full vacuum.
- Prepare the food in a vacuum sealer bag and place the open end in the vacuum chamber.
- Close the lid and fasten the buckle.
- Press and hold the 'Pulse Vacuum' button. The machine will vacuum as long as the button is held.
- Release the button when the desired air removal is achieved.
- Immediately press the 'Seal' button to seal the bag.
4.4 External Vacuum Function (for containers/jars)
Use the included accessory hose to vacuum seal compatible containers or jars.
- Connect one end of the accessory hose to the external vacuum port on the sealer.
- Connect the other end of the hose to the port on your vacuum-sealable container or jar.
- Ensure the container lid is properly secured.
- Press 'Vac' for continuous suction or 'Pulse Vacuum' for controlled vacuum.
- Release the button when the desired vacuum level is reached.

Figure 4.3: Instructions for using the external vacuum function with jars or containers.
4.5 Using the Easy Tear Cutter
The built-in easy tear cutter creates a pre-cut notch on your sealed bags for convenient, tool-free opening.
- After sealing, ensure the bag is properly sealed.
- Align the sealed edge of the bag with the positioning tab near the cutter.
- The built-in blade will automatically create a tear line.
- Simply pinch and tear along this line to open the bag.

Figure 4.4: Detail of the auto easy-tear cutter innovation, showing how it creates a notch for manual opening.
4.6 High-Temp Mode
For thicker vacuum bags, activate the High-Temp Mode by holding the 'Manual Seal' button for 4 seconds. This provides a stronger, longer heat seal.
5. Maintenance
5.1 Cleaning
- Always unplug the appliance before cleaning.
- Wipe the exterior with a damp cloth and mild soap. Do not use abrasive cleaners.
- Clean the vacuum chamber and sealing strip regularly to prevent food residue buildup.
- If liquids are accidentally drawn into the drip tray, remove and clean it thoroughly.
- Ensure all parts are completely dry before storing or next use.
5.2 Storage
Store the vacuum sealer in a cool, dry place. For optimal gasket longevity, it is recommended to store the unit with the lid unlatched to prevent compression of the sealing gaskets.

Figure 5.1: The compact design of the UPRUBE Vacuum Sealer allows for easy storage in kitchen drawers or shelves.
6. Troubleshooting
| Problem | Possible Cause | Solution |
|---|---|---|
| Machine does not turn on. | No power supply. | Check if the power cord is securely plugged into an outlet. |
| Vacuum pump runs but does not seal. | Bag not properly placed; sealing strip/gasket dirty or damaged. | Ensure bag opening is flat and within the vacuum chamber. Clean or replace sealing strip/gasket. |
| Bag does not vacuum completely. | Air leakage; bag too full; moist food. | Check for wrinkles in the bag. Ensure enough space from food to seal. Use 'Moist' or 'Damp' mode for wet items. |
| Bag melts during sealing. | Sealing time too long; incorrect bag type. | Ensure you are using appropriate vacuum sealer bags. If using High-Temp mode, ensure it's necessary for bag thickness. |
| External vacuum not working. | Hose not properly connected; container not sealed. | Ensure hose is firmly connected to both the sealer and the container. Check container lid for proper seal. |
7. Specifications
- Brand: UPRUBE
- Model Number: YD-F99N
- Material: Acrylonitrile Butadiene Styrene (ABS)
- Color: Light Black
- Product Dimensions: 15.2"L x 6.1"W x 3.5"H
- Item Weight: 4.18 pounds
- Power Source: AC
- Operation Mode: Automatic
- Wattage: 135 watts
- Voltage: 120 Volts
- Manufacturer: QUANZHOU YIDA HOME APPLIANCE INDUSTRY CO.,LTD
8. Product Video
Video 8.1: An official product video demonstrating the features and operation of the UPRUBE Vacuum Sealer, including its 99% air removal, auto-cut blade, and multi-container adapter.
9. Warranty and Support
For warranty information or technical support, please refer to the contact details provided with your purchase or visit the official UPRUBE website. Keep your purchase receipt as proof of purchase for warranty claims.