1. Introduction
Thank you for purchasing the GarveeHome 63'' Mid Century Modern TV Stand. This manual provides detailed instructions for assembly, operation, and maintenance to ensure safe and proper use of your new entertainment center. Please read all instructions carefully before beginning assembly and retain this manual for future reference.
Safety Warnings
- Do not overload the stand beyond its weight capacity. The stand is designed to support a weight of up to 150 lbs.
- Be cautious when handling the glass shelves to prevent breakage.
- Ensure all screws and fasteners are securely tightened during assembly to prevent instability.
- Keep small parts away from children during assembly to avoid choking hazards.
2. Package Contents
Before assembly, verify that all components are present and undamaged. If any parts are missing or damaged, please contact customer support.
| Component | Quantity |
|---|---|
| Top Panel | 1 |
| Bottom Panel | 1 |
| Side Panels | 2 |
| Middle Divider Panels | 2 |
| Back Panel | 1 |
| Wooden Legs | 4 |
| Central Support Leg | 1 |
| Cabinet Doors | 2 |
| Glass Shelf | 1 |
| LED Light Strip with Remote | 1 |
| Power Outlet Unit (2 USB, 2 Standard) | 1 |
| Hardware Pack (screws, hinges, shelf pins, etc.) | 1 |
3. Assembly Instructions
Follow these step-by-step instructions for assembling your TV stand. All parts are labeled for easy identification.
Assembly Video Guide
Official GarveeHome assembly video for the TV stand. This video provides a visual guide for each step of the assembly process, from unboxing to final setup.
Step-by-Step Guide
- Unpack and Identify Parts: Carefully unbox all components. Lay out all wooden panels, hardware, and accessories. Refer to the included instruction booklet to identify each part, which should be labeled.
- Assemble the Base Panels: Take the bottom panel (often labeled '1' or '2' in diagrams) and screw in the necessary bolts as indicated in the manual. Ensure screws are inserted into the correct holes.
- Attach Legs to the Base: Assemble the four wooden legs and the central metal support leg. Securely screw these legs onto the bottom panel. This forms the foundational structure of the TV stand.
- Install Side and Middle Divider Panels: Flip the assembled base over. Insert the side panels and middle divider panels into their designated slots on the bottom panel. Secure them by screwing in the appropriate fasteners.
- Insert Back Panel: Slide the back panel into the grooves of the side and middle divider panels. Ensure it fits snugly.
- Attach Top Panel: Place the top panel onto the assembled structure, aligning it with the side and divider panels. Tighten all screws to secure the top panel firmly in place.
- Install Cabinet Doors: Attach the hinges to the cabinet doors. Then, align the hinges with the pre-drilled holes on the side panels and screw the doors onto the TV stand.
- Prepare and Insert Glass Shelf: Before inserting the glass shelf, attach the LED light strip to its underside or edge as per the LED light instructions. Insert the rubber-protected support studs into the desired height holes within the central compartment. Carefully place the glass shelf onto these support studs.
- Install Power Outlet Unit: Place the power outlet unit into the designated cutout on the top surface of the TV stand. Secure it by screwing it into place.
- Secure Back Panel with Support Studs: Screw in the small support studs onto the corners of the back panel to ensure it remains sturdy and in place.
- Cover Screw Holes: Use the provided stickers to cover any visible screw holes for a clean finish.
Visual Aids for Assembly

Image showing the overall dimensions of the TV stand and its compatibility with various TV sizes up to 75 inches.
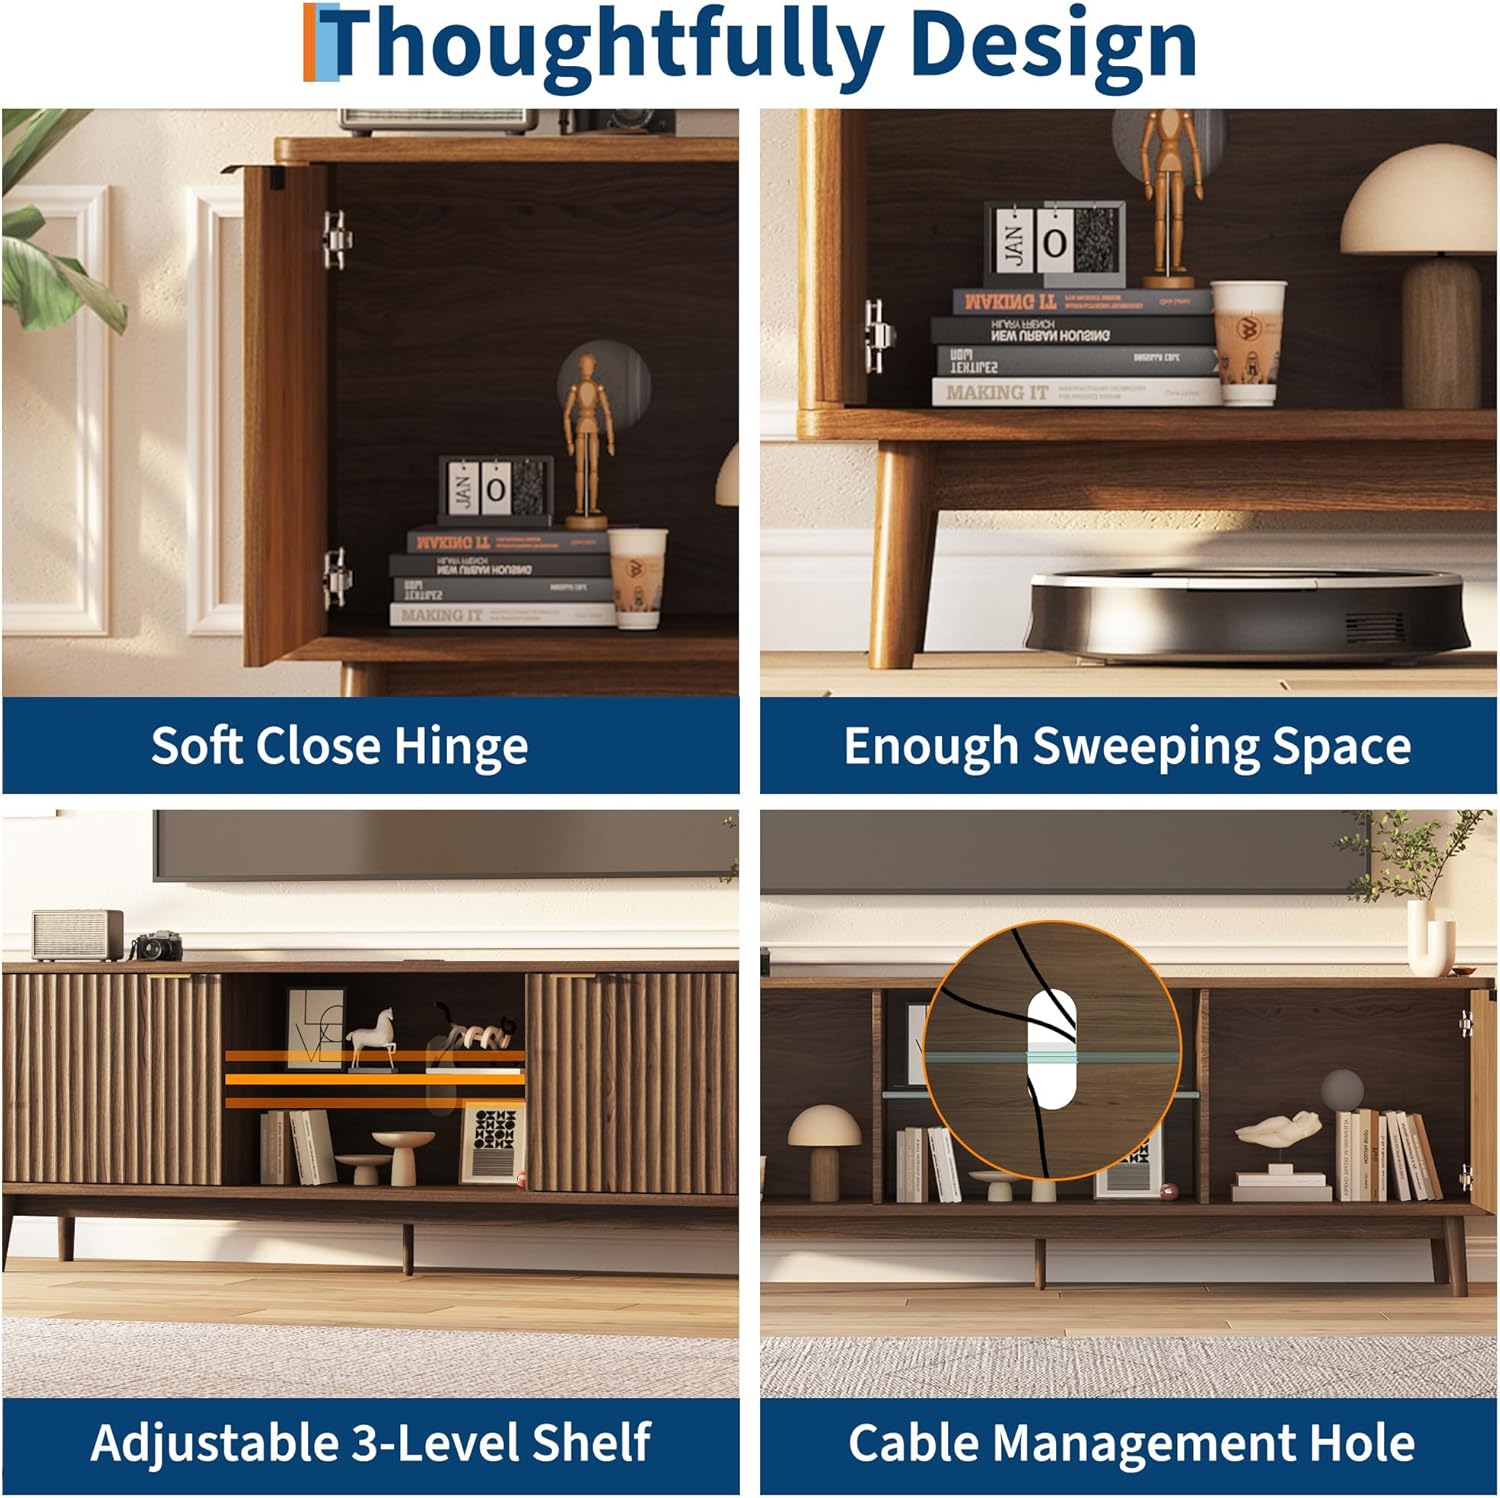
Detailed view of thoughtful design elements including soft-close hinges, ample sweeping space underneath, the adjustable 3-level glass shelf, and a convenient cable management hole.

Image illustrating the integrated power outlet featuring two USB ports and two standard power sockets for convenient device charging and connectivity.

Overview highlighting the 150 lbs weight capacity, spacious storage compartments, tempered glass shelf, and sturdy solid wood feet.
4. Operating Instructions
LED Lighting System
The TV stand features a built-in LED light strip with 7 color options to enhance your living space ambiance. Use the provided RF wireless remote control to operate the lights.
- Power On/Off: Press the red power button on the remote.
- Color Selection: Use the 'COLOR' buttons or the colored buttons directly to choose from 7 different light colors.
- Brightness Adjustment: Use the 'BRIGHT +' and 'BRIGHT -' buttons to increase or decrease the light intensity.
- Mode Selection: Cycle through various lighting modes (e.g., flash, strobe, fade, smooth) using the 'MODE' button.
- Speed Adjustment: Adjust the speed of dynamic lighting modes using the 'SPEED +' and 'SPEED -' buttons.

Image showing the TV stand's LED lighting system in action, with the remote control for color and mode adjustments.
Integrated Power Outlet
The TV stand includes a convenient power outlet unit on its top surface, providing easy access to power for your electronic devices.
- USB Ports: Two USB ports are available for charging smartphones, tablets, and other USB-powered devices.
- Standard Power Sockets: Two standard AC power sockets allow you to connect your TV, stereo system, game consoles, or other electronic appliances.
- Cable Management: Utilize the cable management holes at the back of the stand to organize and route power cords and other cables, keeping your setup tidy.
5. Maintenance
To maintain the appearance and longevity of your GarveeHome TV stand, follow these simple care instructions:
- Cleaning: Wipe surfaces with a soft, damp cloth. Avoid using harsh chemicals, abrasive cleaners, or polishes that may damage the wood finish.
- Spills: Immediately wipe up any spills to prevent staining or water damage.
- Dusting: Regularly dust with a dry, soft cloth.
- Glass Shelf Care: Clean the glass shelf with a glass cleaner and a soft cloth.
- Inspection: Periodically check all screws and fasteners to ensure they remain tight. Re-tighten if necessary.
6. Troubleshooting
This section addresses common issues you might encounter with your TV stand.
- Stand feels wobbly: Ensure all assembly screws are fully tightened. Check that the floor is level; adjust the feet if necessary.
- Cabinet doors do not close smoothly: Check the hinge alignment. Adjust the screws on the hinges to fine-tune the door position.
- LED lights not working: Verify that the LED strip is properly connected to its power source and that the remote control has working batteries. Ensure the power outlet is receiving power.
- Power outlets not functioning: Check if the main power cord for the outlet unit is securely plugged into a wall socket. Test the wall socket with another device to ensure it is working.
If you encounter an issue not listed here or require further assistance, please contact GarveeHome customer support.
7. Specifications
| Feature | Detail |
|---|---|
| Overall Dimensions | 62.99 x 15.75 x 22.05 inches (63''W x 16''D x 22''H) |
| Color | Walnut (Wave Doors-walnut) |
| Material Type | Wood |
| Style | Mid-Century |
| Item Weight | 74.52 Pounds |
| Assembly Required | Yes |
| TV Size Compatibility | Up to 75 inches (e.g., 32/42/55/60/65/75 inches) |
| Storage | 2 large storage cabinets, 1 adjustable 3-level glass shelf |
| Power Outlets | 2 USB ports, 2 standard power sockets |
| Lighting | LED light strip with 7 colors |
| Cable Management | 3 cable management holes |
8. Warranty and Support
Specific warranty information for this product may vary. Please refer to the documentation included with your purchase or visit the official GarveeHome store for details.
For customer support, missing parts, or assembly assistance, please visit the GarveeHome Store on Amazon.
