1. Introduction
Thank you for choosing the Devoko 3x3m LED Garden Gazebo. This manual provides essential information for the safe assembly, operation, and maintenance of your new gazebo. Please read all instructions carefully before beginning assembly and retain this manual for future reference.
This gazebo is designed to provide a comfortable and shaded outdoor space, featuring a robust metal frame, a waterproof canopy, and integrated LED lighting for evening use.
2. Safety Information
WARNING: Failure to follow these safety instructions may result in serious injury or property damage.
- Always assemble the gazebo with at least two adults. Some components are heavy and require careful handling.
- Ensure all screws and fasteners are securely tightened before and after assembly. Regularly check for loose connections.
- Do not use the gazebo in extreme weather conditions such as strong winds, heavy rain, or snow. Disassemble or secure the canopy during such conditions to prevent damage.
- Keep children and pets away from the assembly area to prevent accidents.
- Exercise caution when handling electrical components for the LED lights. Ensure the solar panel and USB charging port are dry before connecting or charging.
- Do not hang heavy objects from the gazebo frame.
- Position the gazebo on a level surface to ensure stability. Use ground stakes or weights for additional security, especially in windy conditions.
3. Package Contents
Before beginning assembly, verify that all parts listed below are present and undamaged. If any parts are missing or damaged, please contact customer support.

Figure 3.1: All components included in the package.
The package includes various metal frame pieces, connectors, screws, the main canopy, a smaller top canopy, LED light globes, a solar panel, a remote control, and assembly tools. Refer to the detailed parts list in your physical manual for specific quantities and identifiers.
4. Assembly Instructions
Follow these steps carefully for proper assembly. It is recommended to have at least two people for this process.
Video 4.1: Step-by-step assembly guide for the Devoko Garden Gazebo.
Step-by-Step Guide:
- Assemble the Base Frame: Connect the horizontal base bars to the vertical corner posts using the provided screws and washers. Ensure all connections are firm.
- Attach Upper Frame Sections: Secure the decorative upper frame sections to the top of the vertical posts. These sections often feature ornamental designs.
- Install Roof Support Beams: Connect the main roof support beams to the upper frame, forming the primary structure for the canopy.
- Secure Central Roof Connector: Attach the central roof connector piece, which will support the smaller top canopy and the solar panel.
- Place Main Canopy: Carefully drape the large main canopy over the assembled roof frame. Ensure it is centered and all corners are aligned.
- Install Small Top Canopy: Place the smaller top canopy over the central roof connector. This provides additional ventilation and weather protection.
- Attach Curtains: Hang the removable curtains from the designated rails on the gazebo frame. Secure them as desired.
- Install LED Lights and Solar Panel: Attach the LED light globes to the designated points on the frame. Mount the solar panel on the top of the gazebo, ensuring it receives maximum sunlight. Connect all wiring according to the diagram in your physical manual.
- Final Securing: Use the provided ground stakes or other anchoring methods to secure the gazebo to the ground, especially if placing it on grass or soft soil. For hard surfaces, consider using sandbags or weights.
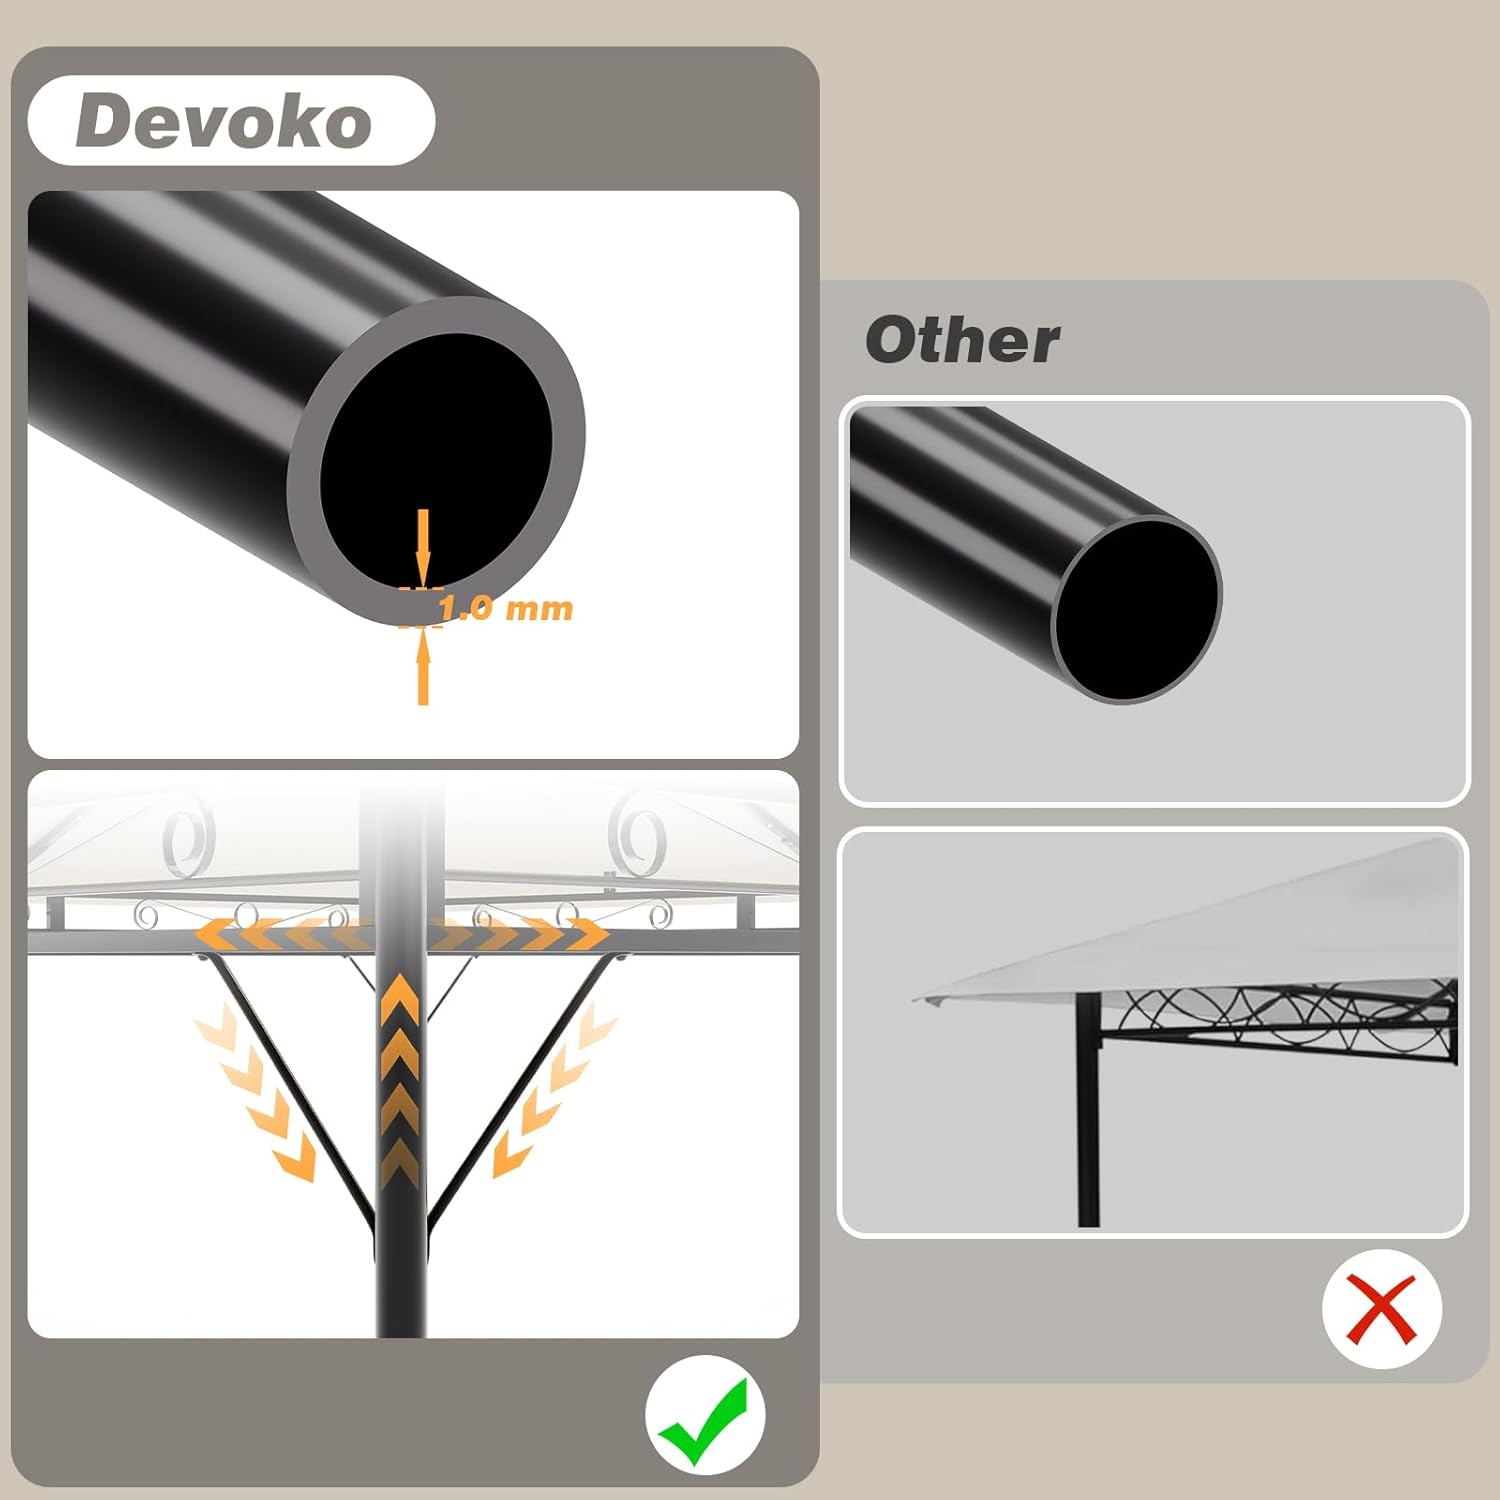
Figure 4.2: Detail of the robust metal frame construction.

Figure 4.3: Assembled gazebo with double roof and LED lights.
5. Operating Instructions (LED Lights)
Your Devoko Gazebo is equipped with integrated LED lighting for enhanced ambiance.
Powering the LED Lights:
- Solar Charging: The gazebo features a solar panel on the roof. Ensure the solar panel is exposed to direct sunlight for optimal charging. Charging time is typically 6-9 hours under strong light, providing approximately 4 hours of use.
- USB Charging: For faster or alternative charging, the LED system can also be charged via USB. Connect a USB cable to the designated port. Charging time is 5-7 hours. A green light indicates full charge. Do not operate or charge below -15°C.

Figure 5.1: Solar and USB charging details for LED lights.
Using the Remote Control:
The included remote control allows you to manage the LED lights:
- On/Off: Use the dedicated buttons to turn the lights on or off.
- Brightness Adjustment: Select from five levels of brightness to suit your preference.
- Timer Function: Set the lights to automatically turn off after 30 or 60 minutes. The system also features an automatic four-hour runtime.

Figure 5.2: Gazebo with LED lights in use at night.
6. Maintenance
Regular maintenance will extend the life and appearance of your gazebo.
- Canopy Cleaning: Clean the canopy fabric with mild soap and water. Do not use harsh chemicals or abrasive cleaners, as this may damage the UV coating. Allow the canopy to dry completely before folding or storing.
- Frame Cleaning: Wipe the metal frame with a damp cloth to remove dirt and debris. The galvanized alloy frame is designed to be rust-resistant, but regular cleaning helps maintain its condition.
- Fastener Check: Periodically inspect all screws and connections to ensure they remain tight. Re-tighten if necessary.
- Winter Storage: During winter months or prolonged periods of non-use, it is recommended to disassemble the canopy and store it in a dry, protected area to prevent damage from snow, ice, or extreme cold.
- Curtain Care: The removable curtains can be cleaned according to their fabric care instructions, typically gentle washing.
7. Troubleshooting
Here are some common issues and their solutions:
- Lights Not Working:
- Check if the solar panel is clean and receiving direct sunlight.
- Ensure the battery is charged (try USB charging if solar is insufficient).
- Verify all electrical connections are secure.
- Check the remote control battery.
- Gazebo Instability:
- Ensure the gazebo is on a level surface.
- Verify all frame connections are securely tightened.
- Use ground stakes or additional weights to anchor the gazebo.
- Water Accumulation on Canopy:
- Ensure the canopy is stretched taut and properly secured to allow water runoff.
- The double-roof design aids in drainage, but heavy rainfall may still cause some pooling if not properly tensioned.
If you encounter issues not covered here, please contact Devoko customer support for assistance.
8. Specifications
| Brand | Devoko |
| Model Number | 3*3m |
| Product Dimensions (L x W x H) | 3L x 3l x 2.85H meters |
| Material (Frame) | Aluminum |
| Material (Canopy) | Polyester with UV50+ coating |
| Water Resistance Level | Waterproof |
| UV Protection | UV50+ |
| Color | Beige |
| Shape | Rectangular (Square base) |
| Assembly Required | Yes |
| Occupancy | 6-8 people |
9. Warranty and Support
For warranty information and customer support, please refer to the documentation included with your purchase or visit the official Devoko website. If you have any questions regarding assembly, operation, or maintenance, do not hesitate to contact our support team.
Contact information can typically be found on the product packaging or the brand's official online store page.