Introduction
Thank you for choosing the VAXMAY 2 Gallon Battery Powered Electric Garden Sprayer. This manual provides essential information for the safe and effective use, maintenance, and troubleshooting of your new sprayer. Please read it thoroughly before operation and retain it for future reference.
Safety Information
WARNING: Always wear appropriate personal protective equipment (PPE) such as gloves and eye protection when operating the sprayer, especially when handling chemicals.
- Do not spray flammable liquids.
- Keep out of reach of children and pets.
- Ensure the sprayer is turned off and disconnected from power before cleaning or maintenance.
- Do not immerse the handle or battery compartment in water.
- Use only the recommended 5V/1A USB charger for charging.
- Avoid spraying towards electrical outlets or equipment.
Package Contents
Verify that all items are present in your package:
- 2 Gallon Electric Sprayer Tank
- Rechargeable Handle with Integrated Wand
- 4 Mist Nozzles (F-Type Dual, Cone, Fan, 6-Hole Pattern)
- Shoulder Strap
- USB Type-C Charging Cable (charger not included)
- Measuring Cup
- User Manual
Setup
- Charge the Battery:
Connect the USB Type-C charging cable to the handle and a compatible 5V/1A USB power adapter (not included). The battery indicator lights on the handle will show charging status. A full charge provides up to 3 hours of continuous operation.

Image: The sprayer handle with its integrated battery indicator, showing the power level. This indicator helps monitor remaining battery life.
- Assemble the Sprayer:
Follow these steps for assembly:

Image: A step-by-step diagram illustrating the assembly process of the electric sprayer, from attaching the nozzle to connecting the hosepipe and waterpipe.
- Install the desired nozzle onto the wand and tighten it securely.
- Install the extension rod into the handle, twisting to secure.
- Unscrew the nut from the handle's hose connection.
- Thread the nut through the hosepipe.
- Insert the hosepipe into the tail end of the handle, then tighten the nut to seal the hosepipe.
- Insert the waterpipe into the spout of the tank and tighten the nut.
- Fill the Tank:
Unscrew the cap(s) of the tank. The sprayer features dual wide-mouth openings for easy filling and mixing. Use the transparent tank scale to monitor liquid levels. Ensure the sealing ring is properly seated to prevent leaks.
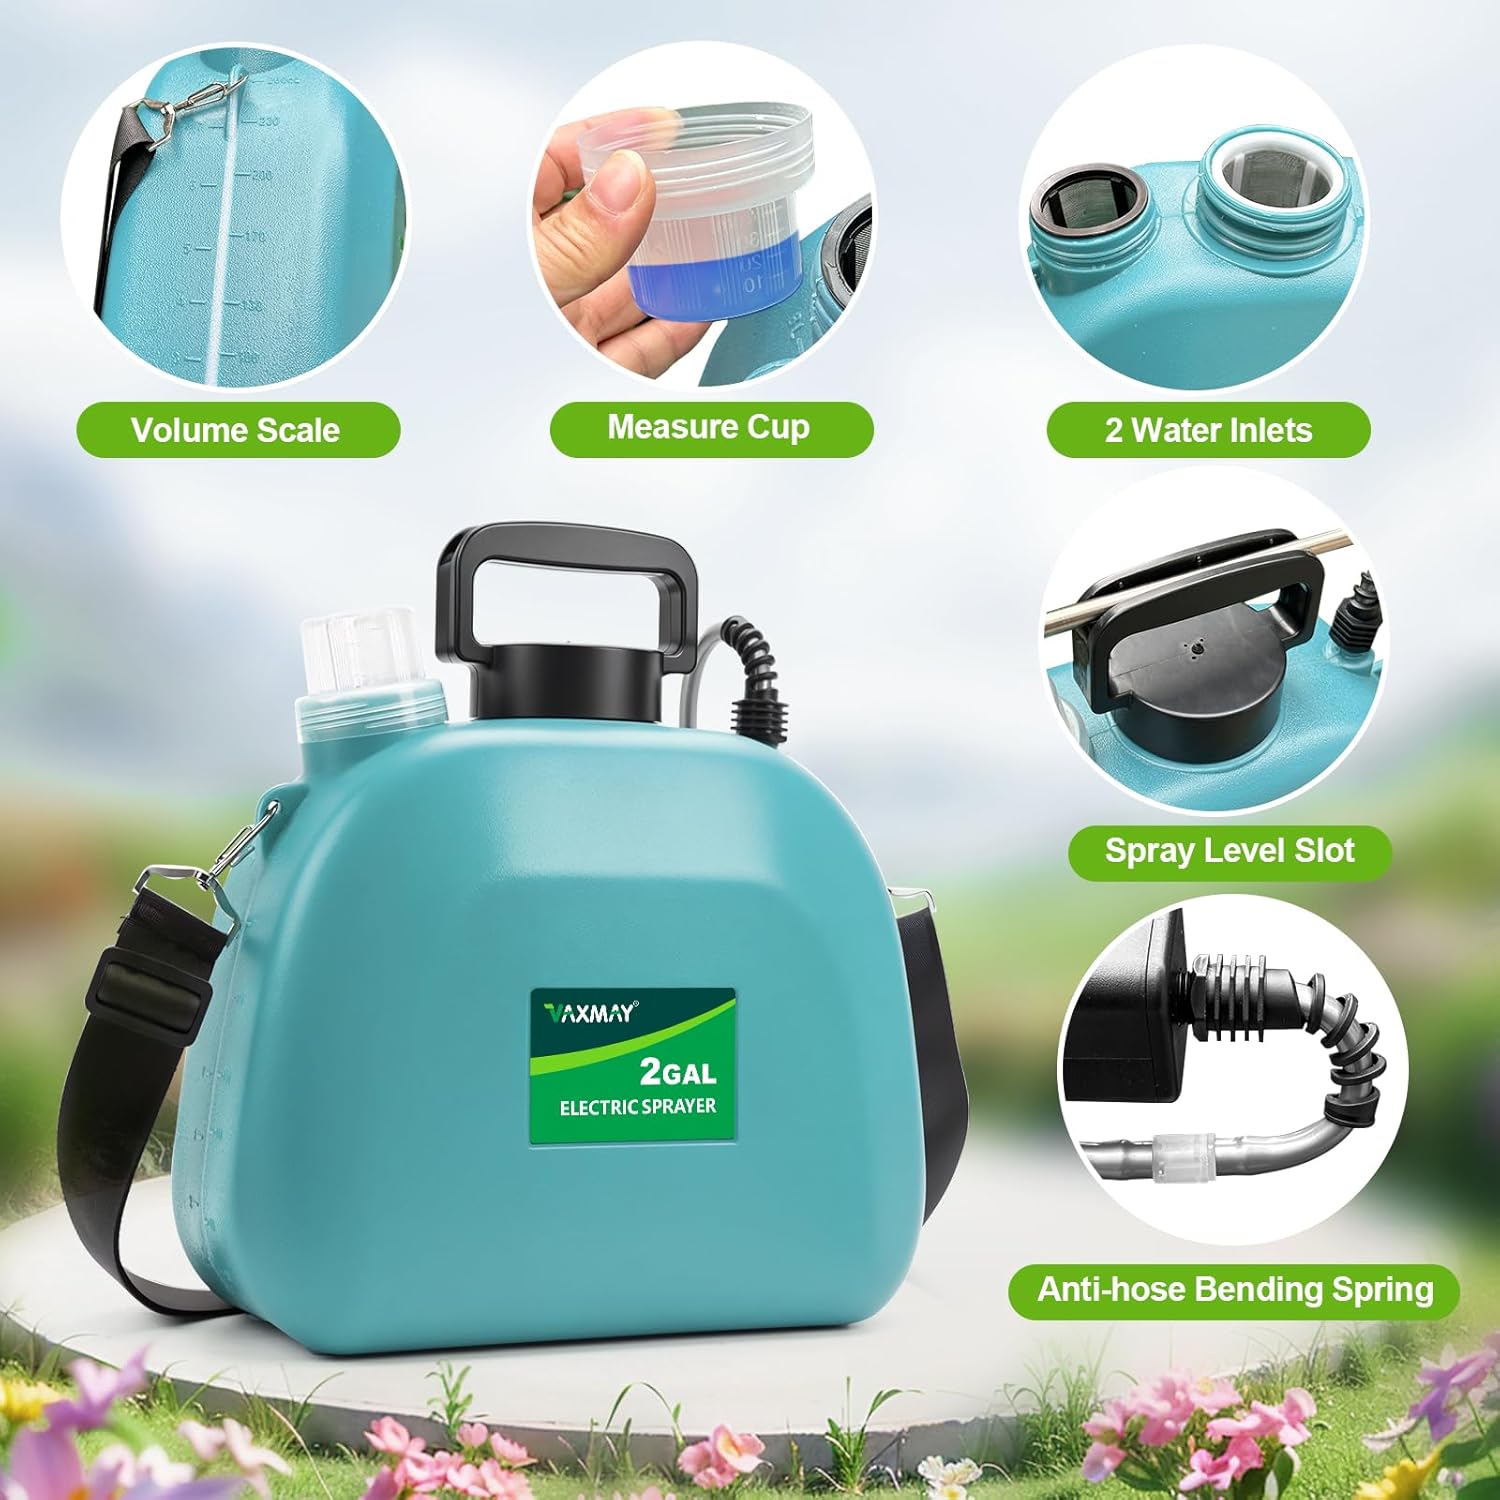
Image: A detailed view of the sprayer's tank, highlighting the volume scale, a measuring cup for precise mixing, and two water inlets for convenient filling.
- Attach Shoulder Strap:
Attach the shoulder strap to the designated hooks on the tank for comfortable carrying during use.
Operating Instructions
- Power On/Off:
Press the 'On' button on the handle to start the sprayer. Press the 'Off' button to stop. The sprayer is designed for one-button operation.
- Adjust Spray Speed/Force:
The handle features 3 adjustable spray forces. Press the 'Speed' button to cycle through soft, medium, and strong spraying modes. The battery indicator lights will briefly show the selected speed before reverting to battery level display.

Image: A visual comparison of the three adjustable spray forces: soft, medium, and strong, demonstrating the versatility of the sprayer for different tasks.
- Select Nozzle Type:
Choose from the 4 included mist nozzles based on your application needs:
- F-Type Dual Nozzle: Ideal for fast watering of lawns and large areas.
- Cone Nozzle: Suitable for shrubs, hedges, and flowerbeds.
- Fan Nozzle: Best for gentle spraying of flowers and young plants.
- 6-Hole Pattern Nozzle: For targeted watering of plants and vegetables.

Image: A display of the four distinct mist nozzles and their corresponding spray patterns, illustrating their suitability for various gardening tasks.
- Use the Retractable Wand:
The telescopic wand extends from 8.66 inches to 23.6 inches (or up to 31.1 inches with full extension) to reach high or distant areas without bending or straining.

Image: A person demonstrating the use of the sprayer with its telescopic wand extended, reaching to spray a tall bush, highlighting its utility for hard-to-reach places.
- General Spraying:
Direct the nozzle towards the target area and press the 'On' button. Move the wand steadily to ensure even coverage. The sprayer is suitable for watering plants, applying fertilizers, herbicides, and for general cleaning tasks.

Image: A collage of four images showcasing the wide applications of the sprayer, including fertilizing plants, general watering, applying weed killer, and disinfection.
Maintenance
- Cleaning the Sprayer:
After each use, especially when using chemicals, rinse the tank thoroughly with clean water. Operate the sprayer with clean water for a few minutes to flush out the hose and nozzle. This prevents clogging and extends the life of the sprayer.
- Storage:
Store the sprayer in a cool, dry place, away from direct sunlight and freezing temperatures. Ensure the tank is empty and clean before storage. Fully charge the battery before long-term storage to maintain battery health.
- Filter Head:
The sprayer includes a filter head to prevent clogging. Periodically inspect and clean the filter to ensure optimal performance.
Troubleshooting
| Problem | Possible Cause | Solution |
|---|---|---|
| Sprayer does not turn on. | Battery is low or depleted. | Charge the battery fully. |
| No spray or weak spray. | Nozzle is clogged. | Clean the nozzle. |
| Filter head is clogged. | Clean the filter head. | |
| Tank is empty. | Refill the tank. | |
| Liquid leaks from connections. | Connections are loose or sealing ring is misplaced. | Tighten all connections and ensure sealing rings are correctly seated. |
Specifications
- Brand: VAXMAY
- Model Name: 2026-8L
- Power Source: Battery Powered
- Battery: 7.4V, 4000mAh rechargeable battery
- Continuous Operation: Up to 3 hours
- Tank Capacity: 2 Gallon (8 Liters)
- Material: HDPE & ABS (Acrylonitrile Butadiene Styrene)
- Product Dimensions: 7"W x 11"H
- Wand Length: Retractable, extends from 8.66" to 23.6" (up to 31.1" with full extension)
- Nozzles: 4 interchangeable mist nozzles
- Charging: USB Type-C (5V/1A recommended charger)
Warranty and Support
This VAXMAY product is backed by a 1-year warranty from the date of purchase. For any questions, concerns, or technical support, please contact VAXMAY customer service. Our professional 24/7 service team is committed to providing assistance.
Product Video
Watch this official product video for a visual guide on the VAXMAY Electric Sprayer's features and operation:
Video: An official product video from VAXMAY demonstrating the features, assembly, and various uses of the 2 Gallon Battery Powered Electric Garden Sprayer.