1. Introduction
This manual provides essential information for the proper use, maintenance, and care of your GREEN DEVIL Matrix Aero Type 2 Hard Hat. Please read these instructions carefully before using the product to ensure maximum safety and performance. This hard hat is designed to offer advanced head protection in various demanding work environments.
Important Safety Information
- Always inspect the hard hat for damage before each use. Do not use if damaged.
- Ensure the hard hat fits securely and comfortably on your head.
- This hard hat is designed to protect against impacts to the top, front, sides, and back of the head.
- Do not modify the hard hat in any way, as this may compromise its protective capabilities.
- Clean the hard hat regularly according to the maintenance instructions.
2. Product Features and Components
The GREEN DEVIL Matrix Aero Type 2 Hard Hat is engineered with several features to provide superior protection and comfort.
ANSI Z89.1 Certified Type 2 Class C
This hard hat meets ANSI Z89.1 Type 2 Class C standards, providing protection against top, front, side, and rear impacts. It is also rated for Low Temperature (LT) and High Temperature (HT) environments, and meets CE EN 397:2012+A1:2012 standards.

Image: Overview of the GREEN DEVIL Matrix Aero Type 2 Hard Hat highlighting key features such as reflective decals, ABS shell, ventilation, and accessory slots.
Comprehensive Impact Protection
Constructed from premium ABS material with a thickened EPS shock-absorbing liner, the hard hat delivers robust protection against impacts and penetration from all angles.

Image: Close-up view of the EPS foam liner, illustrating its role in absorbing impact forces.
Ergonomic Comfort System
Features an upgraded 6-point suspension system, adjustable ratchet headband (52-63cm head circumference), and soft, breathable chin strap for all-day comfort.
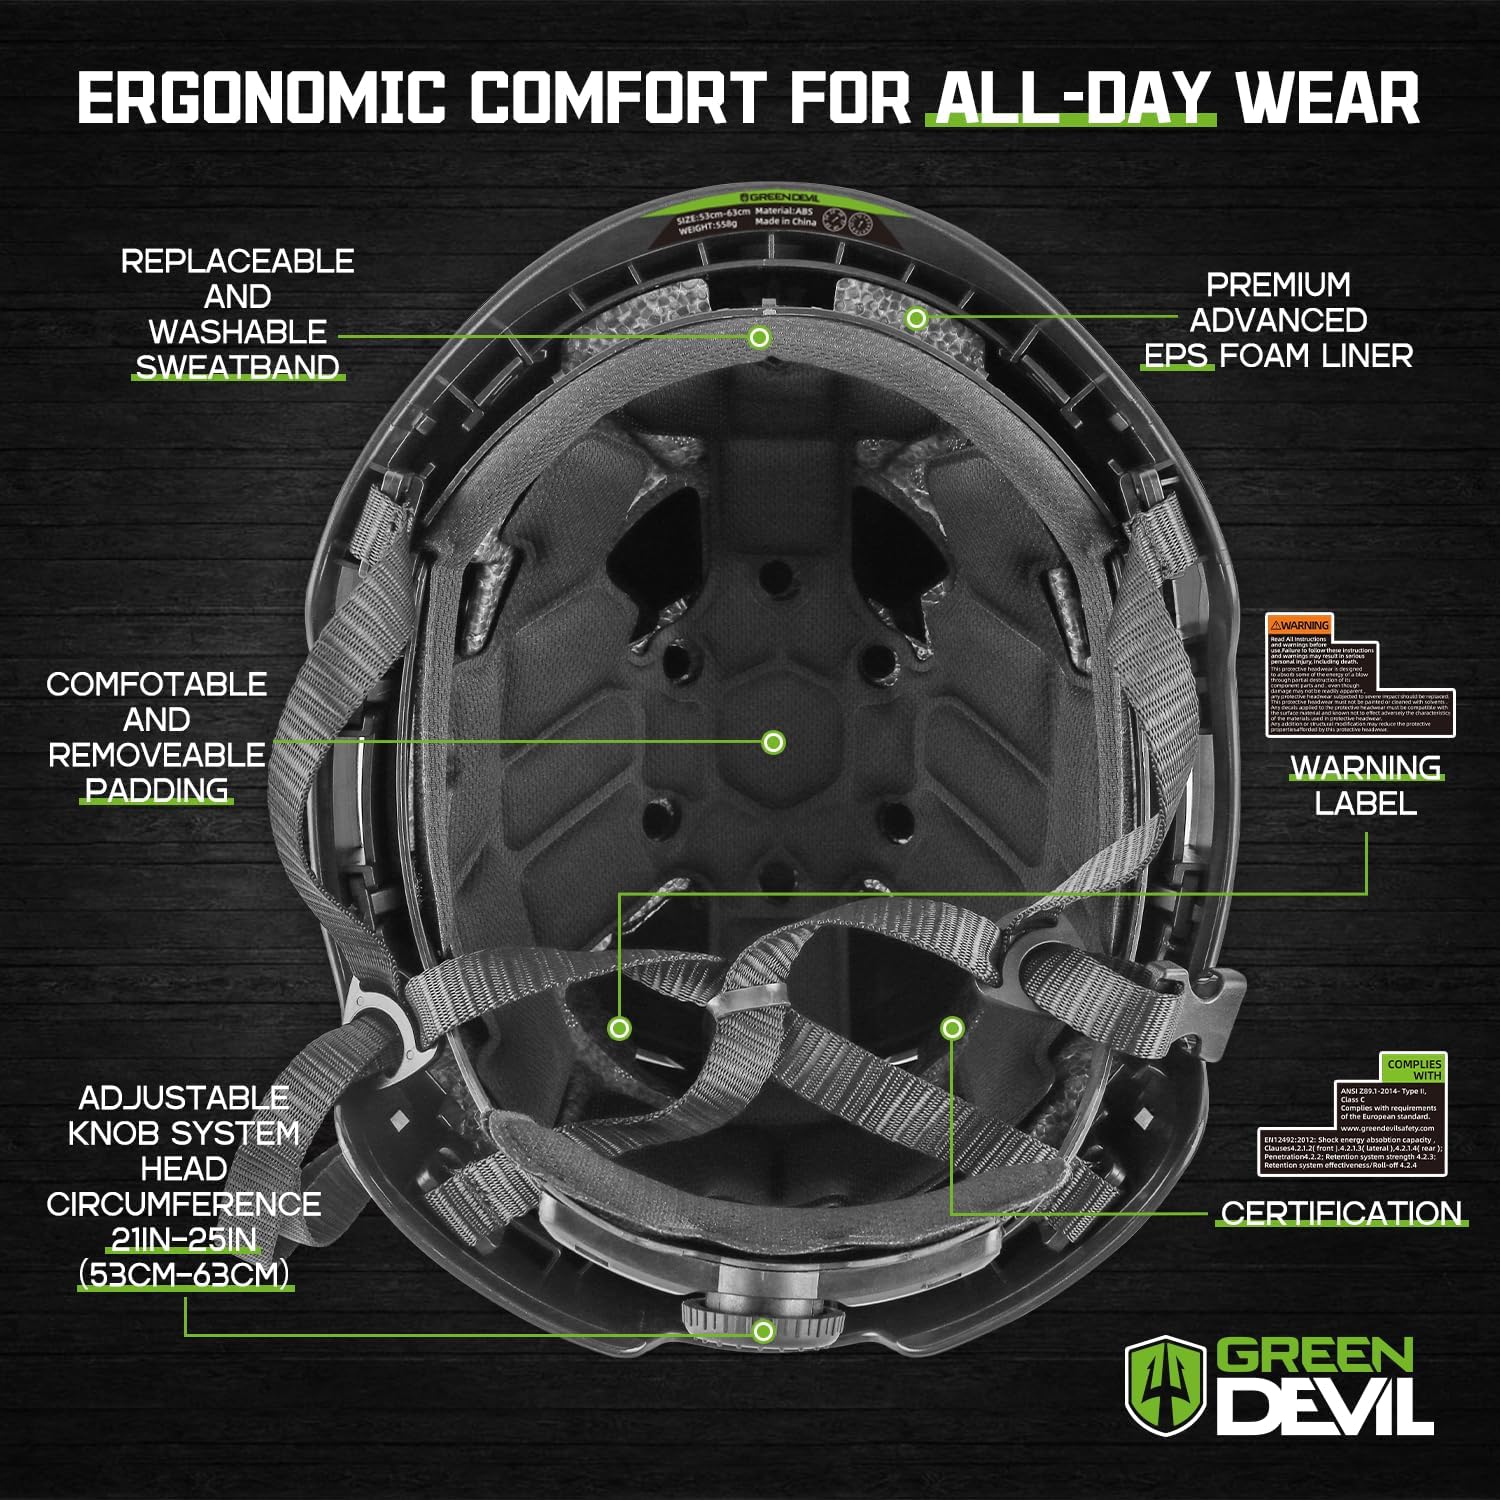
Image: Interior view of the hard hat, detailing the comfort features like the adjustable headband and padding.
Ventilation and Visibility
Strategically placed ventilation slots enhance air circulation, while integrated reflective strips improve visibility in low-light conditions.

Image: Side profile of the hard hat, illustrating the ventilation system and reflective elements.
3. Setup and Adjustment
Proper setup ensures optimal protection and comfort.
3.1 Adjusting the Ratchet Suspension
- Place the hard hat on your head.
- Locate the ratchet knob at the back of the suspension system.
- Turn the knob clockwise to tighten the fit, or counter-clockwise to loosen it, until the hard hat feels snug but comfortable.

Image: Detail of the ratchet suspension for head size adjustment (53-63cm).
3.2 Adjusting the Chin Strap
- Fasten the quick-release buckle of the 4-point chin strap.
- Adjust the straps on both sides to ensure a secure fit under your chin, preventing the hard hat from shifting during movement.

Image: The 4-point chin strap system with adjustable buckles for secure helmet placement.
3.3 Applying Custom Decals
The hard hat includes two sheets of custom crystal decals for personalization. Follow these steps for application:
- Carefully cut out the desired stickers using scissors.
- Press the surface of the chosen sticker back and forth to ensure it adheres well to its backing.
- Gently peel off the sticker from its backing.
- Position the sticker on the hard hat in the desired location.
- Repeatedly press the surface and edges of the sticker to ensure firm adhesion and remove any air bubbles.
- Once applied, peel off the transparent surface protective film. The sticker is waterproof and easy to clean.
Video: Instructions on how to apply the included crystal decals to personalize your hard hat.
4. Operation and Use
Ensure the hard hat is worn correctly for maximum protection.
- Always wear the hard hat with the brim facing forward unless specific job requirements dictate otherwise.
- Confirm the chin strap is securely fastened and adjusted to prevent the hard hat from shifting during movement.
- The hard hat features strong lamp carrying clips compatible with all elastic-band headlamps.
- Slotted adapters are provided for use with various face shield adapters and ear muffs. Ensure any attached accessories are compatible and securely fitted.
Video: Overview of the GREEN DEVIL Matrix Aero Type 2 Class C Safety Helmet, demonstrating its features and use.
5. Maintenance and Care
Proper maintenance extends the life of your hard hat and ensures continued protection.
- Cleaning: Clean the hard hat shell with mild soap and water. Avoid abrasive cleaners or solvents that could damage the material. Rinse thoroughly and air dry.
- Sweatband and Padding: The premium replaceable and washable sweatband and padding can be removed for cleaning. Hand wash with mild soap and water, then air dry completely before reattaching.
- Inspection: Regularly inspect the hard hat for cracks, dents, discoloration, or any signs of wear or damage to the shell, suspension, or chin strap. Replace the hard hat immediately if any damage is found.
- Storage: Store the hard hat in a cool, dry place away from direct sunlight, extreme temperatures, and chemicals.
6. Troubleshooting
If you encounter any issues with your hard hat, refer to the following common solutions:
| Problem | Possible Cause | Solution |
|---|---|---|
| Hard hat feels loose or unstable. | Improper suspension adjustment or chin strap not secured. | Adjust the ratchet suspension knob and ensure the chin strap is fastened and tightened correctly. |
| Discomfort during prolonged wear. | Incorrect fit or dirty/worn padding. | Re-adjust the suspension for a comfortable fit. Clean or replace the sweatband and padding if necessary. |
| Accessories (e.g., headlamp) do not fit. | Incompatible accessory or incorrect attachment. | Ensure accessories are compatible with the hard hat's clips and slotted adapters. Refer to accessory instructions for proper attachment. |
If problems persist or you have concerns about the hard hat's integrity, discontinue use and contact customer support.
7. Specifications
| Feature | Detail |
|---|---|
| Brand | GREEN DEVIL |
| Model Name | Matrix Aero |
| Type | Type 2 Hard Hat |
| Certification | ANSI Z89.1 Type 2 Class C, CE EN 397:2012+A1:2012 |
| Material | Acrylonitrile Butadiene Styrene (ABS) shell, EPS foam liner |
| Head Circumference | 52-63 cm (20.87-24.80 inches) |
| Suspension System | 6-point ratchet adjustable |
| Chin Strap | 4-point, soft, breathable, quick-release buckle |
| Included Components | 1*helmet, 1*helmet liner, 1*drawstring backpack, 2*customized helmet decals |
8. Warranty and Support
GREEN DEVIL is committed to providing high-quality products. While specific warranty details are not provided in the product description, the manufacturer states:
"If you have any problems about our Matrix Aero Type 2 safety helmet hard hat, reach out to us and we will make things right, FAST!"
For any product issues, questions, or support needs, please contact GREEN DEVIL customer service through the retailer where the product was purchased or refer to the contact information provided with your product packaging.