1. Introduction
This manual provides detailed instructions for the installation, operation, and maintenance of your SAMA V52 ATX Mid Tower PC Case. Please read this manual thoroughly before beginning assembly to ensure proper setup and safe usage. The SAMA V52 features a dual-chamber panoramic tempered glass design, supporting high-end gaming hardware and advanced cooling solutions.

Image 1.1: Overview of the SAMA V52 ATX Mid Tower PC Case, highlighting its clear view and airflow design.

Image 1.2: Diagram showing the dual-chamber structure, separating the PSU and cables from the main components for improved airflow and cable management.
2. Safety Information
Always follow basic safety precautions when assembling or maintaining your PC. Failure to do so may result in personal injury or damage to your equipment.
- Disconnect the power supply from the wall outlet before performing any installation or maintenance.
- Wear an anti-static wrist strap to prevent electrostatic discharge (ESD) damage to components.
- Handle tempered glass panels with care. They are fragile and can break if dropped or subjected to impact.
- Keep small parts and screws away from children.
- Ensure proper ventilation around the PC case to prevent overheating.
3. Package Contents
Verify that all components are present before beginning assembly:
- SAMA V52 ATX Mid Tower PC Case
- 7 x Pre-installed PWM ARGB Fans (1 rear, 3 bottom reverse, 3 side reverse)
- ARGB Hub for fan control
- Accessory Box (screws, standoffs, cable ties, user manual)
4. Specifications
The following table details the key specifications of the SAMA V52 PC Case:

Image 4.1: Visual representation of the SAMA V52 specifications, including dimensions and hardware support.
| Feature | Specification |
|---|---|
| Model Name | V52 |
| Case Type | ATX Mid Tower |
| Dimensions (D x W x H) | 443mm x 277mm x 435mm (16"D x 10"W x 17"H) |
| Motherboard Compatibility | ATX, Micro ATX, Mini ITX, Back-connect ATX/M-ATX |
| GPU Length Support | Up to 420mm |
| CPU Cooler Height Support | Up to 158mm |
| PSU Length Support | Up to 260mm |
| Radiator Support | Top: 360mm/280mm/240mm/140mm/120mm Bottom: 360mm/280mm/240mm/140mm/120mm Side: 360mm/240mm/120mm |
| Fan Support | Rear: 1x 120mm Top: 3x 120mm / 2x 140mm Bottom: 3x 120mm / 2x 140mm Side: 3x 120mm Total: Up to 10x 120mm fans or 4x 140mm fans |
| Pre-installed Fans | 7 x PWM ARGB Fans (1 rear, 3 bottom reverse, 3 side reverse) |
| Drive Bays | 2 x 3.5" HDD, 3 x 2.5" SSD |
| Front I/O Ports | 1 x USB 3.2 Gen2 Type-C, 2 x USB 3.0, HD Audio, Power, LED Control |
| Material | Tempered Glass, Steel |
| Special Features | Dual-Chamber Design, Panoramic Tempered Glass, Back-Connect ATX Support, Dust Filters, LED Control Button, RGB Lighting |
5. Setup and Installation
Follow these steps to assemble your PC components within the SAMA V52 case.
Video 5.1: An overview of the SAMA V52 ATX Mid Tower PC Case, demonstrating its features and compatibility.
5.1. Accessing the Interior
The SAMA V52 features toolless access to its interior. Gently pull the tempered glass side panels to detach them from the chassis. The top and front panels can also be removed for easier access during installation.
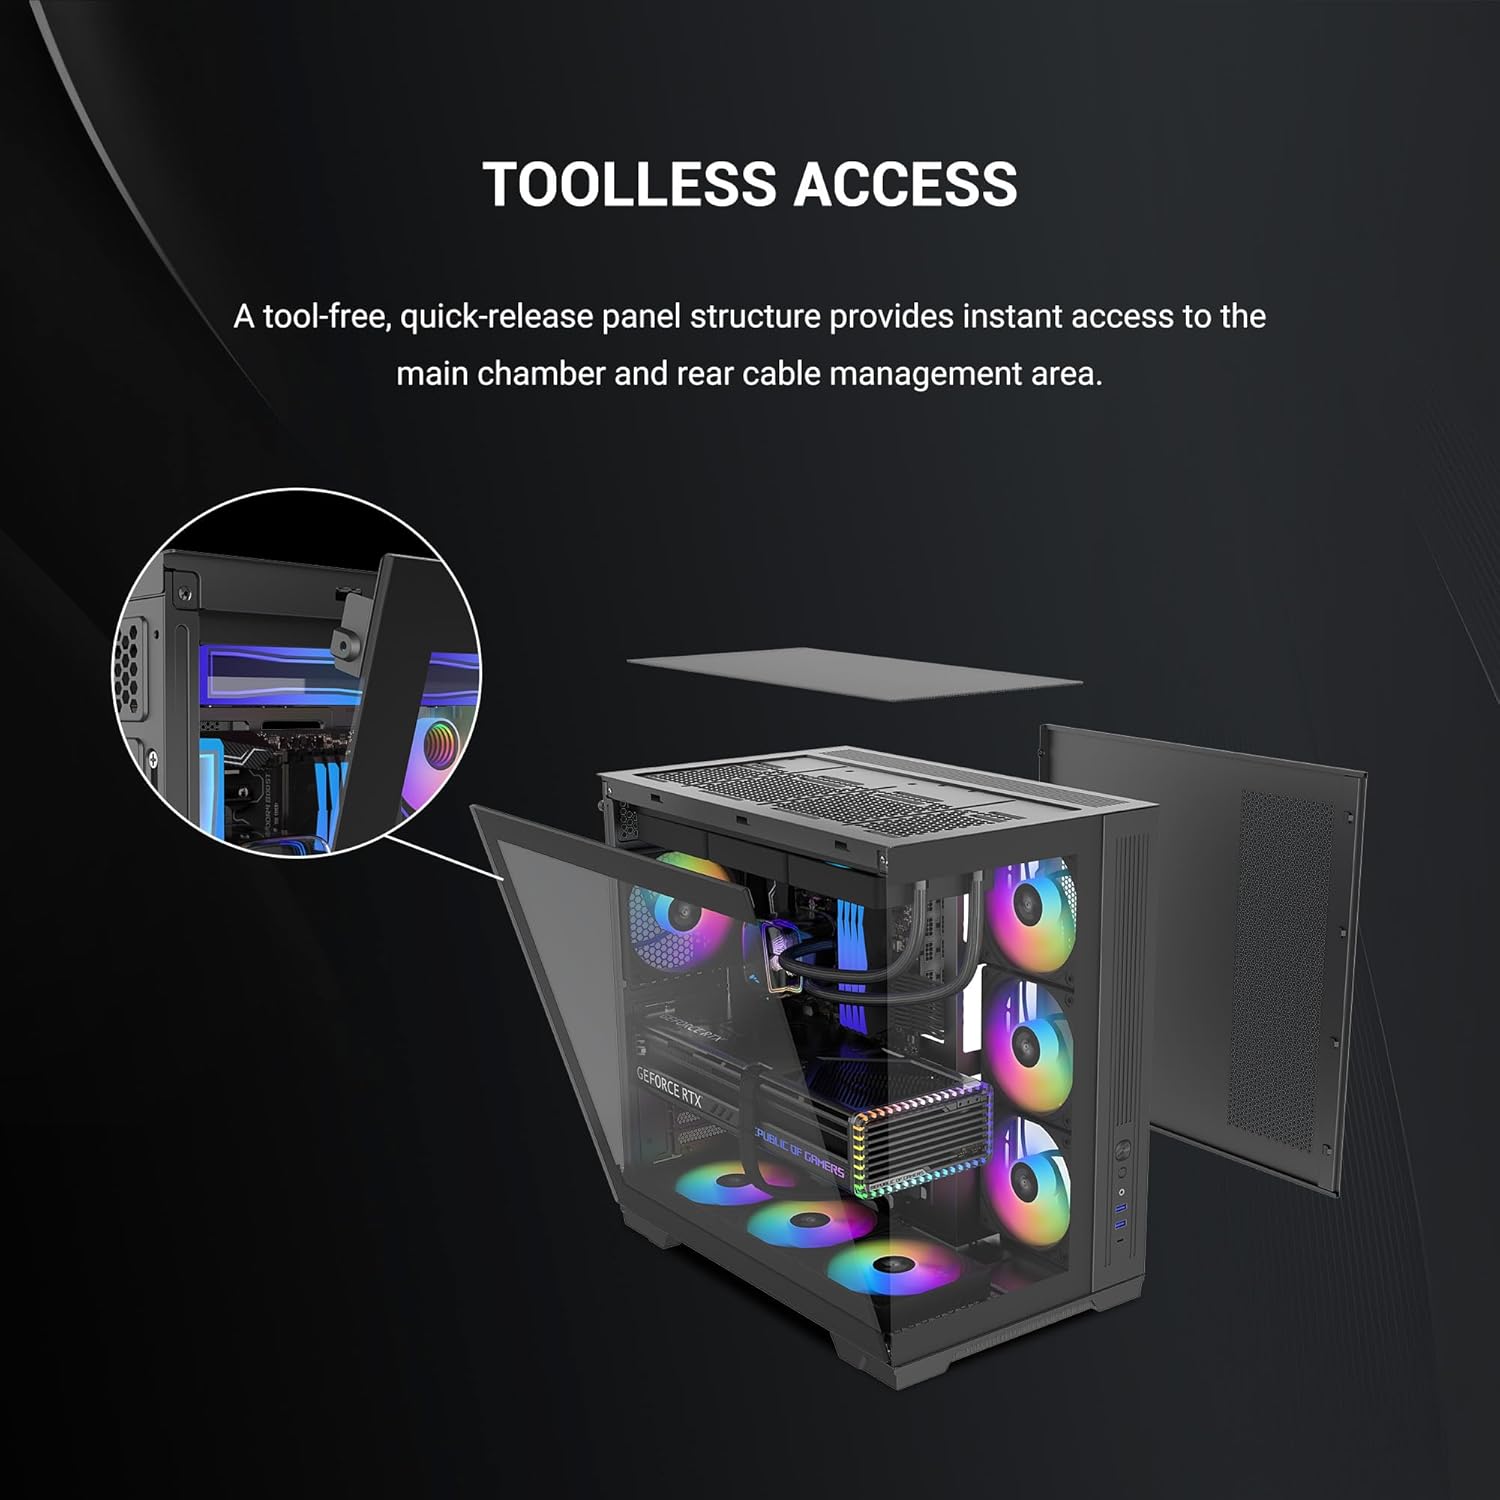
Image 5.1.1: Illustration of the toolless quick-release panel structure, providing instant access to the main chamber and rear cable management area.
5.2. Motherboard Installation
The SAMA V52 supports ATX, Micro ATX, Mini ITX, and back-connect ATX/M-ATX motherboards. Install the necessary standoffs for your motherboard size, then carefully place the motherboard and secure it with screws.

Image 5.2.1: Visual guide for motherboard compatibility, indicating placement for ITX, M-ATX, and ATX motherboards.
5.3. Storage Drive Installation
The case provides dedicated brackets for storage. It supports up to 2 x 3.5" HDDs or 3 x 2.5" SSDs. Locate the drive brackets in the rear chamber, secure your drives, and then re-attach the brackets.

Image 5.3.1: Illustration of the dedicated drive bracket in the rear chamber, supporting up to 2 HDDs or 3 SSDs.
5.4. GPU Installation
The SAMA V52 supports graphics cards up to 420mm in length. It also features rotatable PCIe slots for vertical GPU mounting (riser cable sold separately). Remove the necessary PCIe slot covers, insert your GPU, and secure it with screws.

Image 5.4.1: Visual guide demonstrating the ample clearance for GPUs up to 420mm in length.

Image 5.4.2: Illustration of the rotatable 7 PCIe slots, allowing for vertical GPU installation.
5.5. PSU Installation
The power supply unit (PSU) is installed in the dedicated rear chamber. The case supports ATX power supplies up to 260mm. Slide the PSU into its bay and secure it with screws from the rear of the case.

Image 5.5.1: Visual guide for PSU compatibility, indicating support for power supplies up to 260mm.

Image 5.5.2: Illustration of the dedicated mesh zone on the right-side panel for PSU air intake, enhancing cooling performance.
5.6. Fan and Radiator Installation
The SAMA V52 comes with 7 pre-installed PWM ARGB fans. Additional fans and radiators can be installed as per the specifications. Ensure correct airflow direction for optimal cooling.
- Pre-installed Fans: 1x 120mm rear, 3x 120mm bottom (reverse), 3x 120mm side (reverse).
- Radiator Support: Up to 360mm on top, bottom, and side.

Image 5.6.1: Diagram illustrating the configuration of the 7 pre-installed ARGB PWM fans, including their positions (rear, bottom, side).
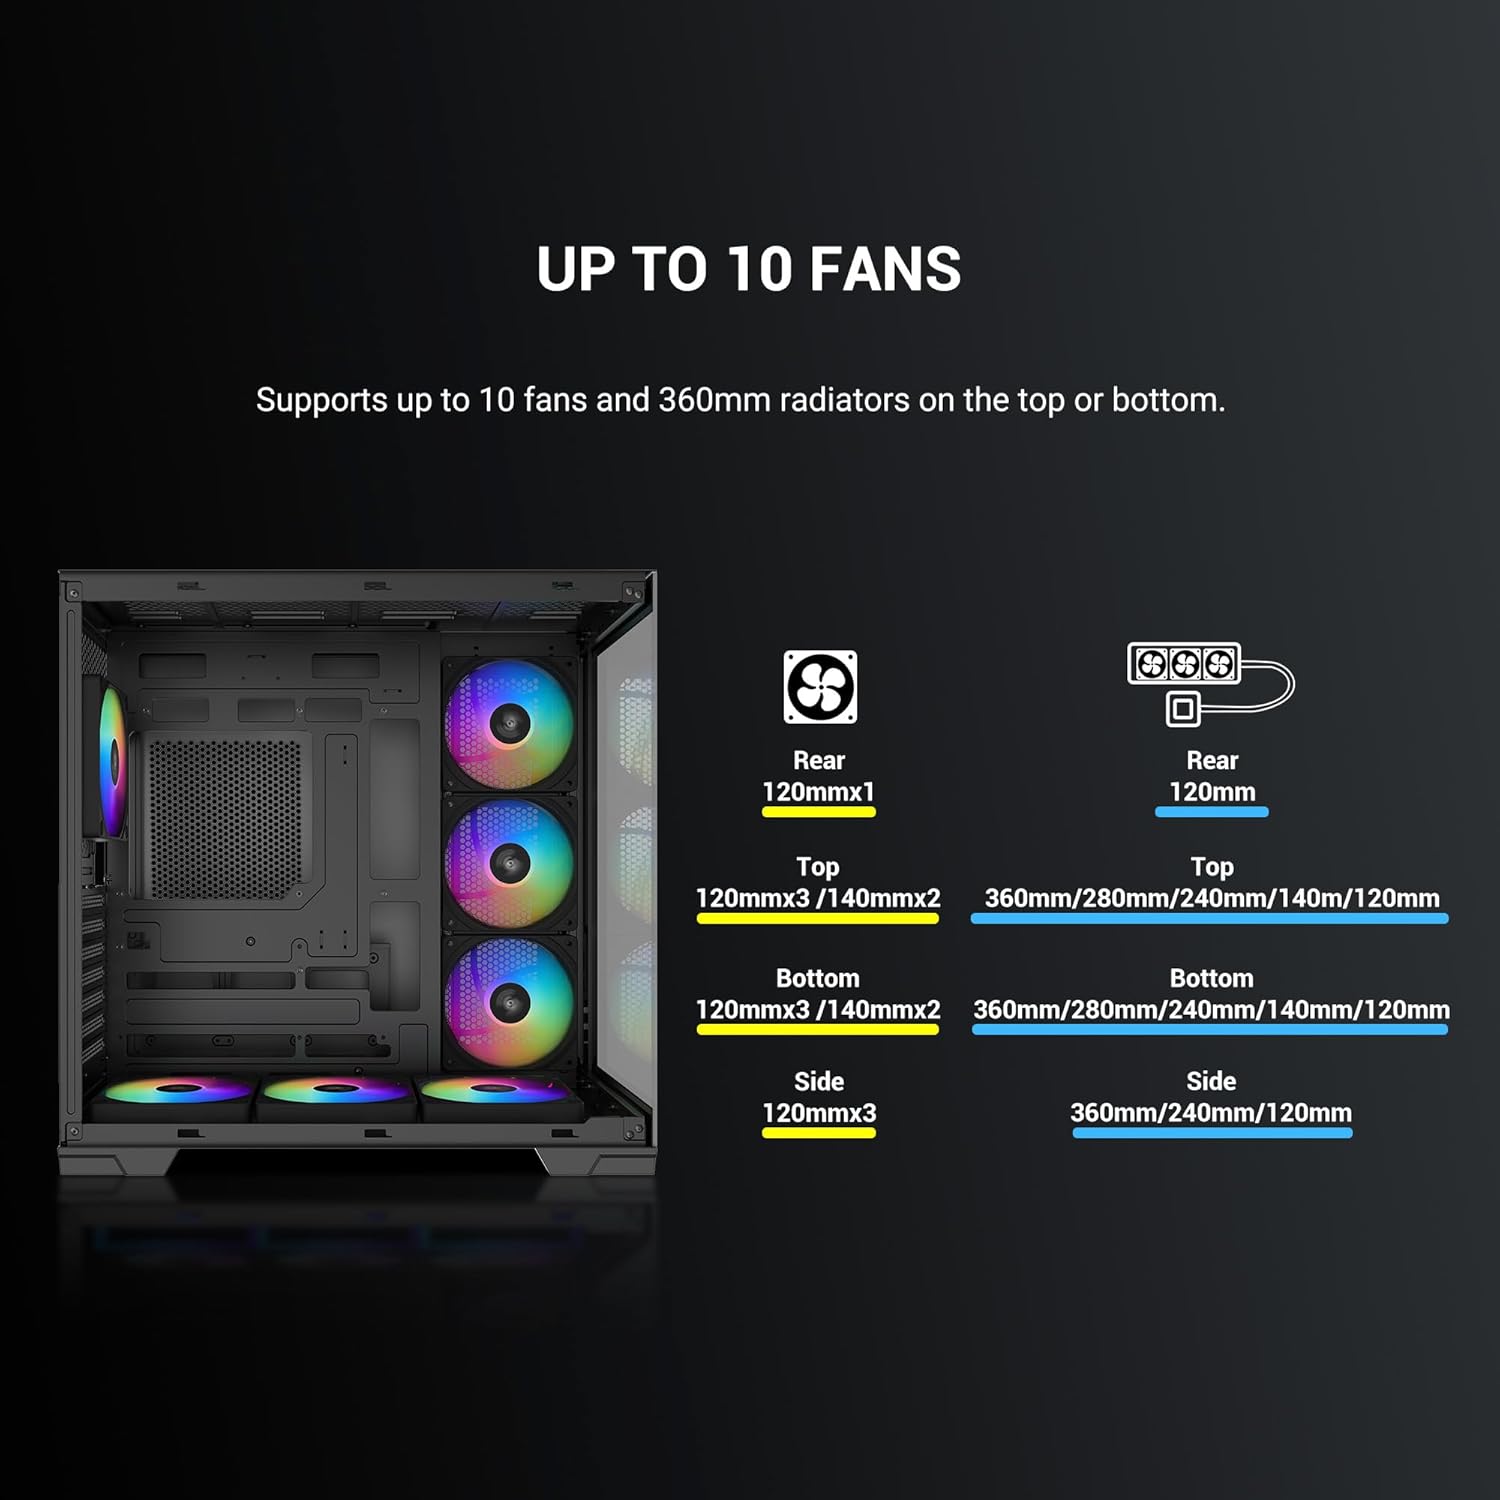
Image 5.6.2: Visual guide detailing the extensive fan and radiator support, allowing for up to 10 fans and 360mm radiators on multiple sides.
5.7. CPU Cooler Installation
The case supports CPU air coolers up to 158mm in height. For liquid cooling, it supports AIO coolers up to 360mm.

Image 5.7.1: Illustration of the 158mm clearance for CPU air coolers, accommodating most dual-tower air coolers.
5.8. Cable Management
The dual-chamber design and 90mm wide second chamber provide ample space for cable routing. Utilize the multiple tie points and included Velcro straps to organize cables for a clean build and improved airflow.

Image 5.8.1: Visual representation of the cable management area, highlighting multiple tie points and clear cable routes within the 90mm wide second chamber.
5.9. Front I/O Connections
Connect the front I/O cables from the case to the corresponding headers on your motherboard. The front panel includes:
- 1 x USB 3.2 Gen2 Type-C Port
- 2 x USB 3.0 Ports
- HD Audio (Headphone/Microphone)
- Power Button
- LED Control Button

Image 5.9.1: Detailed view of the front I/O panel, indicating the Power, LED, HD Audio, USB 3.0, and Type-C USB 3.2 Gen2 ports.
6. Operating
6.1. Power On
After all components are securely installed and cables connected, close the side panels. Connect your PC to a power source and press the power button on the front I/O panel to turn on your system.
6.2. ARGB Lighting Control
The pre-installed ARGB fans are connected to an ARGB hub. You can control the lighting effects in two ways:
- Case LED Button: Press the LED control button on the front I/O panel to cycle through various pre-set lighting modes.
- Motherboard Sync: If your motherboard supports ARGB synchronization (e.g., ASUS Aura Sync, MSI Mystic Light Sync, ASRock Polychrome Sync), connect the ARGB hub to the motherboard's 3-pin 5V ARGB header. You can then control the lighting via your motherboard's software.

Image 6.2.1: Illustration of ARGB lighting control options, including motherboard synchronization with popular software.
7. Maintenance
7.1. Cleaning Dust Filters
The SAMA V52 is equipped with magnetic dust filters on the top and bottom panels. Regularly clean these filters to maintain optimal airflow and prevent dust buildup inside the case.
- Gently remove the magnetic dust filters.
- Clean them with a soft brush or rinse with water. Ensure they are completely dry before reattaching.

Image 7.1.1: Illustration of the top and bottom magnetic dust filters, designed for easy maintenance.
7.2. Cleaning Tempered Glass Panels
Use a microfiber cloth and a non-abrasive glass cleaner to clean the tempered glass panels. Avoid harsh chemicals or abrasive materials that could scratch the glass.
8. Troubleshooting
If you encounter issues during or after assembly, consider the following common troubleshooting steps:
- No Power: Ensure all power cables (24-pin ATX, 8-pin CPU, PCIe power, SATA power) are securely connected. Check the power switch on the PSU and the wall outlet.
- No Display: Verify that the GPU is correctly seated in the PCIe slot and that the display cable is connected to the GPU (not the motherboard, unless using integrated graphics).
- Fans Not Spinning/No RGB: Check fan power connections to the motherboard or ARGB hub. Ensure the ARGB hub is powered and connected to the motherboard's ARGB header if using software control.
- Overheating: Confirm all fans are spinning in the correct direction for optimal airflow. Ensure CPU cooler and GPU fans are functioning. Clean dust filters.
- Loose Connections: Re-seat all components (RAM, GPU, storage drives) and re-check all cable connections.
9. Warranty and Support
SAMA products are designed for quality and reliability. For warranty information, technical support, or to report any issues, please refer to the official SAMA website or contact their customer service. Keep your proof of purchase for warranty claims.
Official SAMA Website: SAMA Official Store


