1. Product Overview
The Masoll XM-3 RV Tire Pressure Monitoring System is designed for RV applications, providing real-time tire pressure and temperature data. This system includes a color LCD display and external sensors, suitable for RV trailers or campers with tire pressures up to 87 PSI and a maximum length of 120 feet. It features auto-calibration and multiple alarm functions to enhance driving safety.
Key Features:
- RV-Specific Design: Flexible sensor options (2/4/6/8) to match the number of tires requiring monitoring.
- Color LCD Display: Bright and clear readings with 4-level brightness adjustment for visibility in various lighting conditions.
- Auto-Calibration: Sensors are pre-paired at the factory. Current tire pressure is configured as the reference upon installation.
- High-Powered Signal Booster: Enhances sensor signal for transmission distances up to 120 feet, covering various RV trailer setups. The booster is IP69 waterproof and dustproof with built-in high voltage protection.
- Multiple Alarms: Includes alerts for high/low tire pressure, high temperature, fast leakage, sensor loss, and low sensor battery.
2. Package Contents
The package includes the Masoll XM-3 Tire Pressure Monitor only. Sensors and other accessories are typically sold separately or as part of a complete system kit.
3. Installation Guide
Follow these steps to install your Masoll XM-3 Tire Pressure Monitoring System:
- Power On Monitor: Turn on the monitor first to ensure it is ready to receive sensor data.
- Install Anti-Theft Nut: Screw the anti-theft nut onto the tire valve stem.
- Install Sensor: Screw the corresponding sensor onto the valve stem, ensuring it is tightened securely.
- Secure Anti-Theft Nut: Tighten the anti-theft nut counter-clockwise against the sensor using the provided wrench to prevent unauthorized removal.
- Mount Monitor: Attach the monitor to a suitable location in your vehicle using the adjustable magnetic bracket. Ensure it is within clear view and does not obstruct your driving.
Upon successful installation, the monitor will display real-time tire pressure and temperature readings. The system will provide instant flashing alarms for any abnormal situations detected.
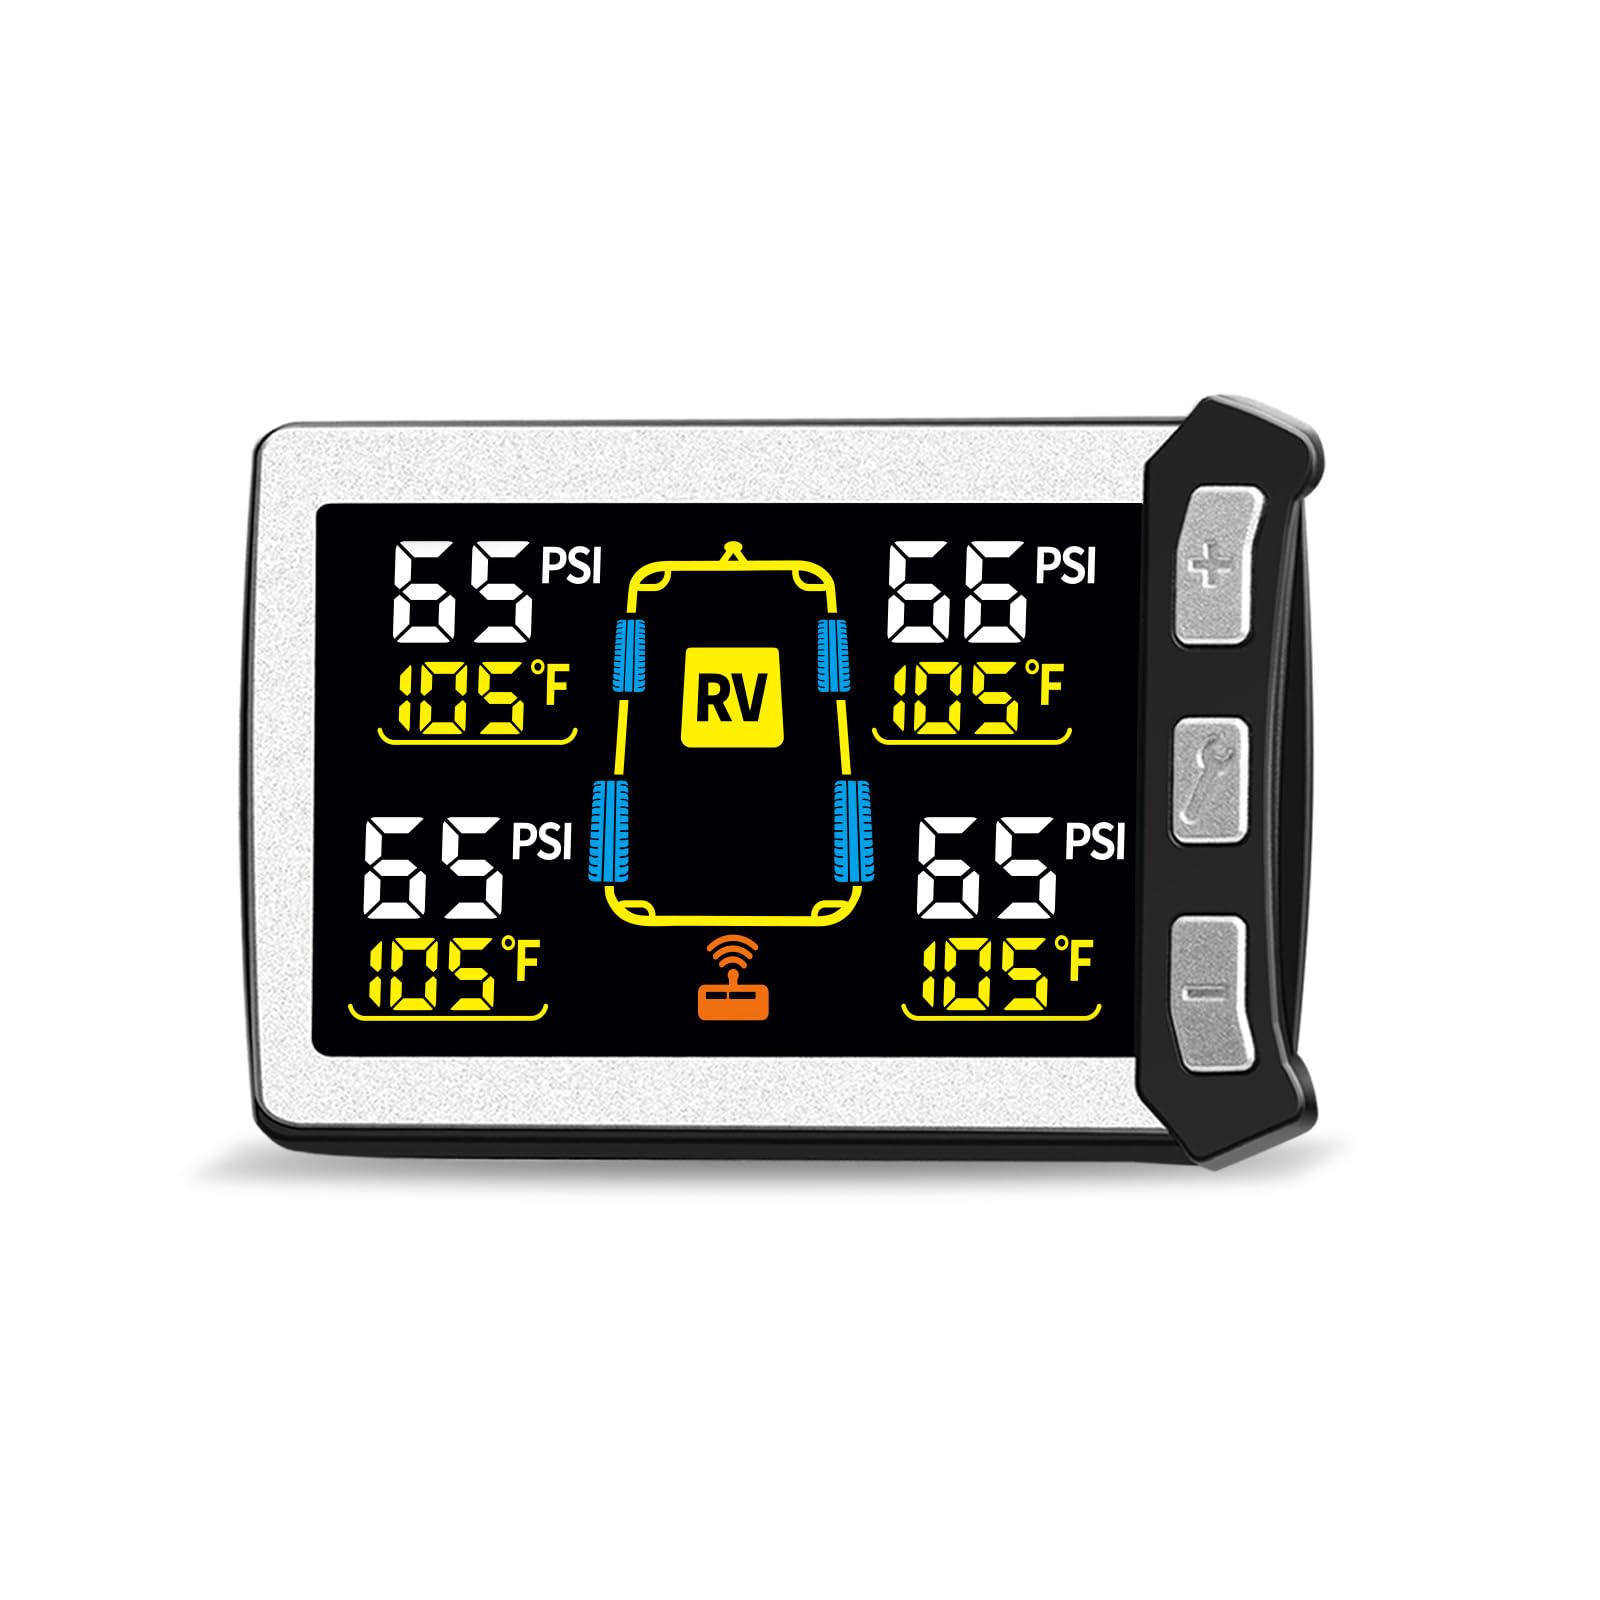
Image: The Masoll XM-3 monitor displaying tire pressure and temperature for a vehicle and trailer setup.
Video: This video demonstrates the installation steps for the B-Qtech RV Tire Pressure Monitoring System, which shares similar installation procedures with the Masoll XM-3. It shows how to install sensors, anti-theft nuts, and mount the monitor.
4. Operating Instructions
The Masoll XM-3 monitor allows for customization of display units and alarm thresholds.
4.1 Displaying Tire Data:
- Switching between Pressure and Temperature: Short press the '▲' (Up) button to switch between displaying tire pressure and tire temperature.
- Switching between 4-wheel and 8-wheel mode: Long press the power button to switch between 4-wheel and 8-wheel display modes, depending on your vehicle/trailer configuration.
4.2 Tire Pressure Unit Setting:
- Long press the '▼' (Down) button and select "01" to enter the pressure unit setting mode.
- Short press the power button to toggle between BAR and PSI. The selected unit will flash.
- Short press the power button again to save the selection.
- Long press the power button to return to the main display.
4.3 Temperature Unit Setting:
- Long press the '▼' (Down) button and select "02" to enter the temperature unit setting mode.
- Short press the '▲' (Up) or '▼' (Down) button to toggle between ℃ (Celsius) and ℉ (Fahrenheit). The selected unit will flash.
- Short press the power button to save the selection.
- Long press the power button to return to the main display.
4.4 Low Tire Pressure Alarm Setting:
This setting applies to the 4-wheel mode.
- Long press the '▼' (Down) button and select "03" to enter the low pressure alarm setting mode.
- Short press the '▲' (Up) or '▼' (Down) button to adjust the desired low pressure alarm value.
- Short press the power button to save the setting.
- Long press the power button to return to the main display.
For 8-wheel mode, long press the '▼' (Down) button and select "04" to adjust the low pressure alarm value for the trailer tires, following the same adjustment and saving steps.
4.5 High Tire Pressure Alarm Setting:
This setting applies to the 4-wheel mode.
- Long press the '▼' (Down) button and select "07" to enter the high pressure alarm setting mode.
- Short press the '▲' (Up) or '▼' (Down) button to adjust the desired high pressure alarm value.
- Short press the power button to save the setting.
- Long press the power button to return to the main display.
For 8-wheel mode, long press the '▼' (Down) button and select "08" to adjust the high pressure alarm value for the trailer tires, following the same adjustment and saving steps.
5. Maintenance
- Cleaning: Wipe the monitor and sensors with a soft, dry cloth. Avoid using abrasive cleaners or solvents.
- Battery Check: Monitor the battery indicator on the display. Replace sensor batteries as needed to ensure continuous operation.
- Sensor Inspection: Periodically check sensors for damage or loose connections. Ensure anti-theft nuts are securely tightened.
- Booster Placement: Ensure the signal booster is mounted in a location that provides optimal signal transmission and is protected from extreme weather conditions.
6. Troubleshooting
- No Signal/Missing Readings: Ensure sensors are correctly installed and tightened. Check if the signal booster is powered on and functioning. Verify the monitor is within range of the sensors.
- Inaccurate Readings: Confirm that the sensors are installed on the correct tire positions. Ensure tires are inflated to the recommended pressure before initial setup for accurate auto-calibration.
- Monitor Not Powering On: Check the power connection to the monitor. Ensure the vehicle's power outlet is functional.
- Persistent Alarms: Investigate the cause of the alarm (e.g., low pressure, high temperature). If the issue persists after addressing the cause, contact customer support.
7. Specifications
| Feature | Specification |
|---|---|
| Model Number | XM-3 |
| Package Dimensions | 6.5 x 5 x 2.7 inches |
| Item Weight | 8.5 ounces |
| Brand | Masoll |
| Material | Glass, Plastic |
| Manufacturer | nLONG |
| Thread Type | 1/4" Npt |
| First Available Date | January 5, 2026 |
8. Warranty and Support
For warranty information, technical support, or any inquiries regarding your Masoll XM-3 Tire Pressure Monitor, please refer to the official Masoll website or contact their customer service directly. You can also visit the Masoll Store on Amazon for additional resources and contact details.