1. Product Overview
The YWBL-WH Electric Rechargeable Cordless Screwdriver is a versatile tool designed for various fastening tasks. It features dual operation modes (electric and manual), adjustable torsion settings, and integrated LED illumination for enhanced visibility. This manual provides essential information for safe and effective use of your screwdriver.

Image 1.1: The YWBL-WH Electric Rechargeable Cordless Screwdriver, showcasing its ergonomic design and integrated bit holder.
2. Package Contents
Verify that all items listed below are included in your package. If any items are missing or damaged, please contact customer support.
- 1 x Electric Screwdriver
- 12 x Screwdriver Bits
- 1 x Extension Adapter
- 1 x USB Cable (Type-C)
- 1 x Instruction Manual

Image 2.1: The electric screwdriver shown with its included bits and an extension adapter, alongside various screws.
3. Safety Information
Please read and understand all safety warnings and instructions before using this product. Failure to follow the warnings and instructions may result in electric shock, fire, and/or serious injury.
- Keep work area clean and well lit. Cluttered or dark areas invite accidents.
- Do not operate power tools in explosive atmospheres, such as in the presence of flammable liquids, gases, or dust. Power tools create sparks which may ignite the dust or fumes.
- Keep children and bystanders away while operating a power tool. Distractions can cause you to lose control.
- Avoid accidental starting. Ensure the switch is in the off-position before connecting to battery pack, picking up or carrying the tool.
- Use personal protective equipment. Always wear eye protection. Protective equipment such as dust mask, non-skid safety shoes, hard hat, or hearing protection used for appropriate conditions will reduce personal injuries.
- Do not overreach. Keep proper footing and balance at all times. This enables better control of the power tool in unexpected situations.
- Dress properly. Do not wear loose clothing or jewelry. Keep your hair and clothing away from moving parts. Loose clothes, jewelry or long hair can be caught in moving parts.
- Disconnect the battery pack from the power tool before making any adjustments, changing accessories, or storing power tools.
- Store idle power tools out of the reach of children and do not allow persons unfamiliar with the power tool or these instructions to operate the power tool.
- Maintain power tools and accessories. Check for misalignment or binding of moving parts, breakage of parts and any other condition that may affect the power tool’s operation. If damaged, have the power tool repaired before use.
- Use the power tool, accessories and tool bits etc. in accordance with these instructions, taking into account the working conditions and the work to be performed. Use of the power tool for operations different from those intended could result in a hazardous situation.
4. Setup
4.1. Charging the Battery
The screwdriver is powered by a built-in 1600mAh rechargeable lithium battery. Before first use, or when the battery is low, charge the device using the provided USB Type-C cable.
- Locate the Type-C charging port on the screwdriver.
- Connect the USB Type-C cable to the screwdriver's charging port.
- Connect the other end of the USB cable to a compatible USB power source (e.g., wall adapter, computer USB port).
- The charging indicator light will illuminate during charging and turn off or change color when fully charged (refer to the product diagram for indicator location).
4.2. Installing Screwdriver Bits
To install or change screwdriver bits, follow these steps:
- Ensure the screwdriver is powered off.
- Insert the desired screwdriver bit into the magnetic bit holder at the front of the tool. The bit will snap into place.
- If using a short bit, first install the extension adapter into the bit holder, then insert the short bit into the extension adapter.
- To remove a bit, simply pull it straight out from the bit holder.

Image 4.1: A close-up view demonstrating the insertion of a screwdriver bit into the tool's magnetic bit holder.
5. Operating Instructions
5.1. Power On/Off and LED Light Control
The screwdriver features a power button that also controls the integrated LED lights.
- To Power On/Activate Light: Long press the power button (marked with a power symbol) to turn on the device and activate the top LED light, which illuminates the work area.
- To Adjust Torsion Gear: While the device is on, short press the power button to cycle through the three available torsion settings (2Nm, 2.5Nm, 3.5Nm).
- To Turn Off Light: After the top LED light is on, press the power button lightly to turn it off.
- Bottom LED Flashlight: The bottom LED can be used as a separate flashlight for general illumination. Refer to the product diagram for its activation method (usually a separate short press or specific button combination).
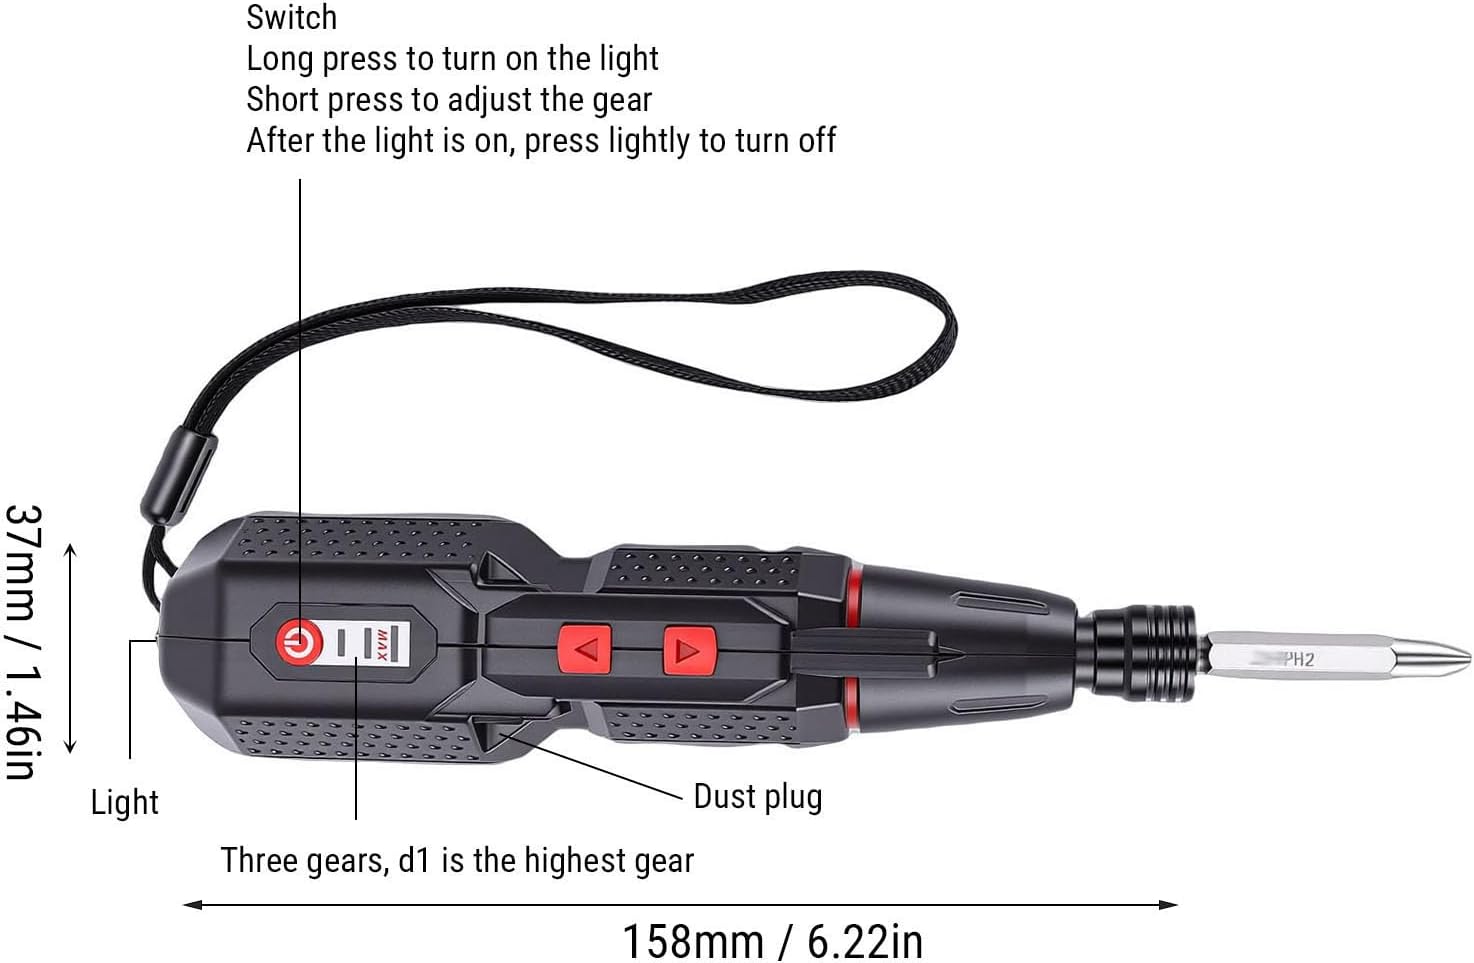
Image 5.1: A detailed diagram illustrating the screwdriver's components, including the power switch, LED light, dust plug, and torsion gear indicator, along with dimensions.
5.2. Adjusting Torsion Settings
The screwdriver offers three electric torsion settings to prevent over-tightening or damage to delicate materials.
- 2Nm: Suitable for light tasks and delicate materials.
- 2.5Nm: General purpose setting for most common applications.
- 3.5Nm: For tasks requiring higher torque, such as driving longer screws into harder materials.
To adjust the torsion, short press the power button while the screwdriver is active. The device will cycle through the settings, indicated by a visual cue or a change in motor resistance.
5.3. Dual Mode Operation (Electric and Manual)
This screwdriver provides flexibility with both electric and manual modes.
- Electric Mode: Delivers a powerful 280rpm speed for quick and effortless screw tightening or loosening. Activate by pressing the forward or reverse buttons.
- Manual Mode: Provides precise control with up to 10Nm of torque. This mode is ideal for tasks requiring fine adjustments or when the electric motor is not needed. Simply use the screwdriver manually without engaging the electric motor.
5.4. Direction Control
Use the directional buttons to select between tightening (forward) and loosening (reverse) screws.
- Identify the forward (usually '▲') and reverse (usually '▼') buttons on the screwdriver body.
- Press the appropriate button to engage the electric motor in the desired direction.
- Release the button to stop the motor.

Image 5.2: Top view of the screwdriver, highlighting the forward and reverse directional control buttons.
6. Maintenance
Proper maintenance ensures the longevity and optimal performance of your YWBL-WH Electric Screwdriver.
- Cleaning: Regularly wipe the tool with a soft, dry cloth to remove dust and debris. Do not use harsh chemicals or abrasive cleaners.
- Storage: Store the screwdriver in a dry, cool place, away from direct sunlight and moisture. Keep it out of reach of children.
- Battery Care: To prolong battery life, avoid fully discharging the battery frequently. Charge the battery when the power is low, and if storing for extended periods, charge it to approximately 50% every few months.
- Bit Maintenance: Keep screwdriver bits clean and free of rust. Replace worn or damaged bits to ensure effective fastening.
7. Troubleshooting
If you encounter issues with your screwdriver, refer to the following common problems and solutions:
| Problem | Possible Cause | Solution |
|---|---|---|
| Screwdriver does not turn on. | Battery is discharged. | Charge the battery using the provided USB Type-C cable. |
| Motor runs but screw does not turn. | Bit is not properly seated or is worn. | Ensure the bit is fully inserted. Replace the bit if it is stripped or worn. |
| Screws are stripped or damaged. | Incorrect torsion setting or excessive force. | Select a lower torsion setting. Use manual mode for delicate tasks. Ensure the correct bit size is used. |
| LED light does not work. | Battery is low or light function is not activated. | Charge the battery. Long press the power button to activate the top LED. Check manual for bottom LED activation. |
| Screwdriver stops unexpectedly. | Battery is depleted or tool is overheated. | Recharge the battery. Allow the tool to cool down if it feels hot. |
If the problem persists after attempting these solutions, please contact customer support.
8. Specifications
| Feature | Specification |
|---|---|
| Model Name | YWBL-WHzkt1du53lc |
| Battery Type | 1 x 1600mAh Rechargeable Li Battery (Built-in) |
| Charging Port | USB Type-C |
| Electric Torsion Settings | 3 Gears (2Nm, 2.5Nm, 3.5Nm) |
| Manual Torque | Up to 10Nm |
| Electric Speed | 280rpm |
| Illumination | Dual LED Lights (Top for work area, Bottom for flashlight) |
| Material | ABS, Alloy Steel |
| Dimensions (Approx.) | 158mm (Length) x 37mm (Width) / 6.22in x 1.46in |
9. Warranty Information
This product is covered by a standard manufacturer's warranty. Please refer to the warranty card included in your original packaging or contact the retailer for specific warranty terms and conditions. Keep your purchase receipt as proof of purchase for any warranty claims.
10. Customer Support
For technical assistance, troubleshooting beyond this manual, or warranty inquiries, please contact YWBL-WH customer support through the retailer's platform or the official brand website. Please have your product model number (YWBL-WHzkt1du53lc) and purchase details ready when contacting support.