1. Introduction
Thank you for choosing the AECOJOY 40"x80" Manual Retractable Awning. This awning is designed to provide sun shade and light rain protection for your door entrance, patio, backyard, porch, or deck. This manual provides essential information for the safe and efficient installation, operation, and maintenance of your awning. Please read it thoroughly before assembly and retain it for future reference.

Image 1.1: The AECOJOY 40"x80" Manual Retractable Awning in a dark grey color, installed above a doorway on a brick building, providing shade.
2. Safety Information
To ensure safe operation and prevent damage, observe the following safety guidelines:
- Always retract the awning during heavy storms, high winds, or heavy snowfall. While the fabric is splashproof, extreme weather conditions can cause damage to the awning structure.
- Do not stand or place heavy objects under the extended awning. The awning is designed for shade and light rain protection, not to support weight.
- Ensure all mounting hardware is securely fastened to a stable structure before use.
- Keep children and pets away from the awning during operation to prevent entanglement or injury.
- Regularly inspect the awning for any signs of wear, damage, or loose components. Address any issues promptly.
3. Package Contents
Verify that all components are present before beginning assembly. Refer to the packaging for a complete list of parts. Key components include:
- Awning Fabric Assembly
- Support Arms
- Wall Brackets
- Manual Adjusting Chain
- Mounting Hardware (screws, anchors, etc.)
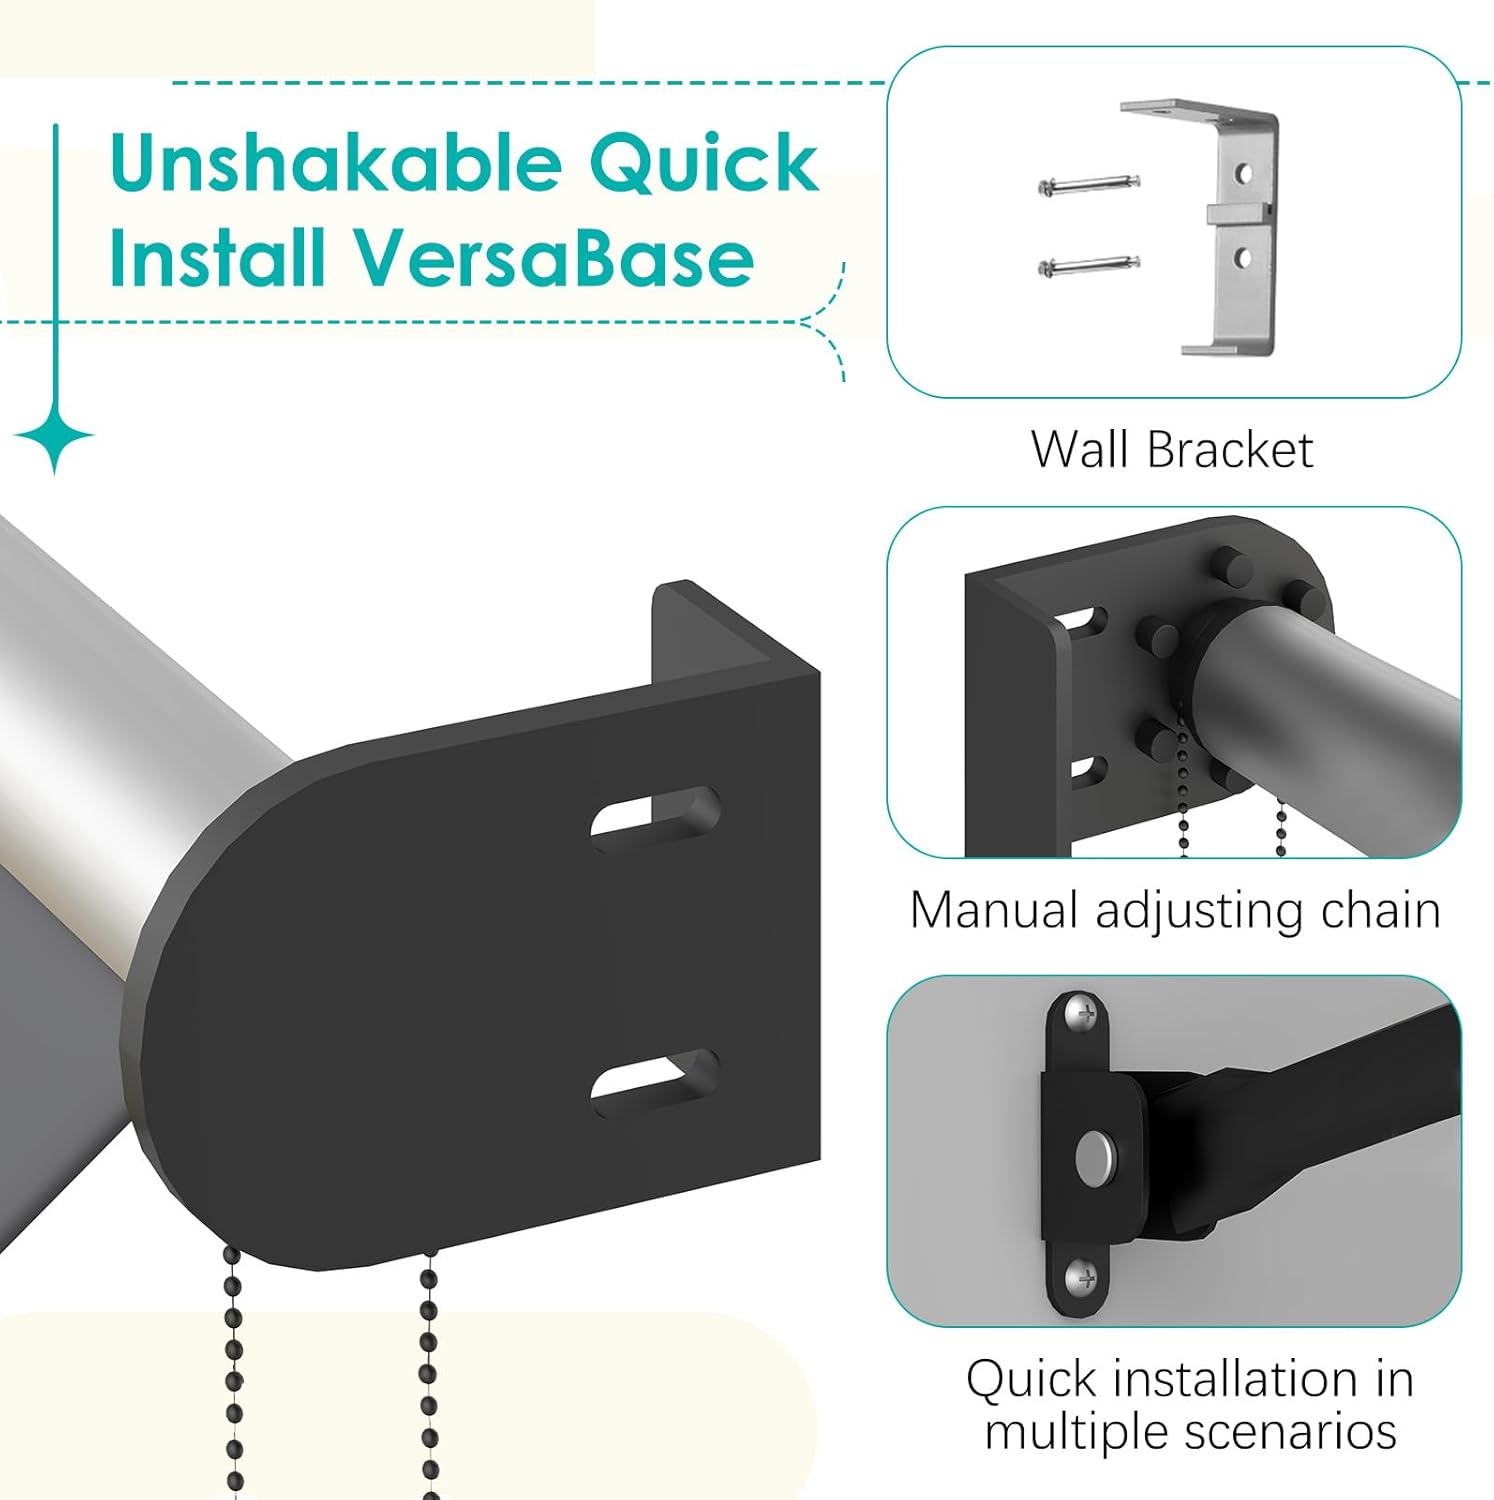
Image 3.1: Detailed view of the wall bracket, manual adjusting chain, and the quick installation mechanism, which are key components for mounting and operating the awning.
4. Setup and Installation
The AECOJOY Retractable Awning requires assembly and secure mounting. Professional installation is recommended for optimal safety and performance. Ensure you have the necessary tools (e.g., drill, level, measuring tape, wrench) before starting.
- Choose Location: Select a suitable mounting surface (e.g., sturdy wall above a window or door) that can support the awning's weight and withstand operational forces.
- Measure and Mark: Carefully measure and mark the positions for the wall brackets. Ensure the brackets are level and spaced correctly according to the awning's dimensions. A sufficient installation distance of at least 47 inches from any obstructions is recommended.
- Install Wall Brackets: Drill pilot holes and securely attach the wall brackets using the provided mounting hardware. Ensure they are firmly anchored to the structure.
- Mount Awning Assembly: Carefully lift and attach the awning fabric assembly to the installed wall brackets. Secure it in place according to the specific instructions provided with your hardware.
- Attach Support Arms: Connect the support arms to the awning and the lower mounting points on the wall.
- Install Manual Adjusting Chain: Attach the manual adjusting chain mechanism, ensuring it operates smoothly.

Image 4.1: An illustration detailing the installation steps, focusing on how the awning's main roller tube connects to the wall brackets.
5. Operating Instructions
Your AECOJOY awning operates manually, allowing for flexible shade control.
- Extending the Awning: Gently pull the manual adjusting chain downwards to extend the awning fabric. Continue pulling until the desired projection is achieved.
- Retracting the Awning: Gently pull the manual adjusting chain upwards to retract the awning fabric. Ensure the fabric rolls up evenly.
- Angle Adjustment: The awning features multi-angle adjustment, allowing you to set the pitch between 0 and 35 degrees to optimize shade coverage throughout the day. Adjust the support arms as needed to achieve the desired angle.

Image 5.1: The awning's multi-angle adjustment feature, demonstrating how the pitch can be set between 0 and 35 degrees using the manual chain for free control of the fabric area.
6. Maintenance
Proper maintenance will extend the lifespan and appearance of your awning.
- Cleaning the Fabric: The awning is made from 180g polyester fabric with waterproof and color-locking properties, making it easy to clean. Use a mild soap solution and a soft brush or cloth to clean the fabric. Rinse thoroughly with clean water and allow it to air dry completely before retracting. Do not use harsh chemicals or abrasive cleaners.
- Weather Protection: Always retract the awning during heavy storms, high winds, or heavy snowfall to prevent damage. While the fabric is splashproof, it is not designed for prolonged exposure to severe weather.
- Hardware Inspection: Periodically check all bolts, screws, and connections to ensure they are tight and secure. Lubricate moving parts if necessary.
- Storage: If storing the awning for an extended period, ensure it is clean and dry before retracting fully.

Image 6.1: A close-up of the awning's fabric, demonstrating its waterproof properties with water beading on the surface. The fabric also features UPF50+ sunblock weave for UV protection.
7. Troubleshooting
If you encounter issues with your awning, consider the following:
- Awning not extending/retracting smoothly: Check the manual adjusting chain for any obstructions or tangles. Ensure all moving parts are clean and free of debris.
- Awning sagging: Verify that the support arms are correctly adjusted and locked into place. Ensure the mounting brackets are securely fastened.
- Fabric unevenly rolled: Gently guide the fabric while retracting to ensure it rolls evenly onto the roller tube.
- Water pooling on fabric: Adjust the awning's pitch to a steeper angle (up to 35 degrees) to allow for better water runoff.
If problems persist, contact customer support for assistance.
8. Specifications
| Brand | AECOJOY |
| Model Number | 16032 |
| Size | 40"x80" (Width x Projection) |
| Color | Dark Grey |
| Material | Polyester (180g/㎡ fabric) |
| Product Dimensions (D x W x H) | 80"D x 40"W x 70"H |
| Operation Mode | Manual |
| Required Assembly | Yes |

Image 8.1: A detailed diagram illustrating the dimensions of the awning, including width, projection, and height.
9. Warranty and Support
For warranty information or technical support, please refer to the warranty card included with your product or contact AECOJOY customer service directly. Keep your purchase receipt as proof of purchase.