1. Introduction
Thank you for choosing the DATOUBOSS 48V 6000W Pure Sine Wave Hybrid Solar Inverter. This manual provides essential information for the safe and efficient installation, operation, and maintenance of your inverter. Please read this manual thoroughly before installation and keep it for future reference. This inverter is designed for off-grid solar systems, reliably converting 48V DC to 230V/50Hz pure sine wave AC, suitable for sensitive electronic equipment.
2. Safety Instructions
Please observe the following safety precautions during installation, operation, and maintenance of the inverter:
- Qualified Personnel: Installation and maintenance should only be performed by qualified personnel.
- Disconnect Power: Always disconnect all power sources (PV array, battery, utility grid) before performing any wiring or maintenance.
- Proper Grounding: Ensure the inverter is properly grounded to prevent electric shock.
- Ventilation: Install the inverter in a well-ventilated area to prevent overheating.
- Environmental Conditions: Avoid exposure to rain, snow, or excessive dust. The inverter features integrated lightning and water protection, but proper installation environment is crucial.
- Battery Safety: Work with batteries carefully. Wear eye protection and remove jewelry. Do not short-circuit battery terminals.
- No Disassembly: Do not attempt to disassemble or repair the inverter yourself. Refer to qualified service personnel.
The inverter includes a comprehensive safety system with protection against overload, overvoltage, short circuit, and overheating. It also supports Battery Management System (BMS) to prevent overcharge and deep discharge, extending battery life.
3. Product Overview
3.1 Key Features
- Pure Sine Wave Output: Provides stable, grid-quality AC power for sensitive electronics.
- Integrated MPPT Charge Controller: 120A MPPT controller for efficient solar charging.
- High PV Input Capability: Supports PV arrays up to 8000W with a maximum open circuit voltage of 500V DC.
- Flexible Operation: Can operate with or without batteries.
- Comprehensive Protection: Built-in surge, lightning, and waterproofing protection.
- LCD Display: Clear display for real-time system status, voltage, power, and battery information.
- Wide Compatibility: Compatible with 48V lead-acid (sealed, AGM, Gel, flooded) and lithium batteries.
- Versatile Modes: Multiple selectable charging and output priority modes.
3.2 Inverter Components and Interfaces

Figure 1: Front view of the DATOUBOSS Hybrid Solar Inverter highlighting key technical parameters.
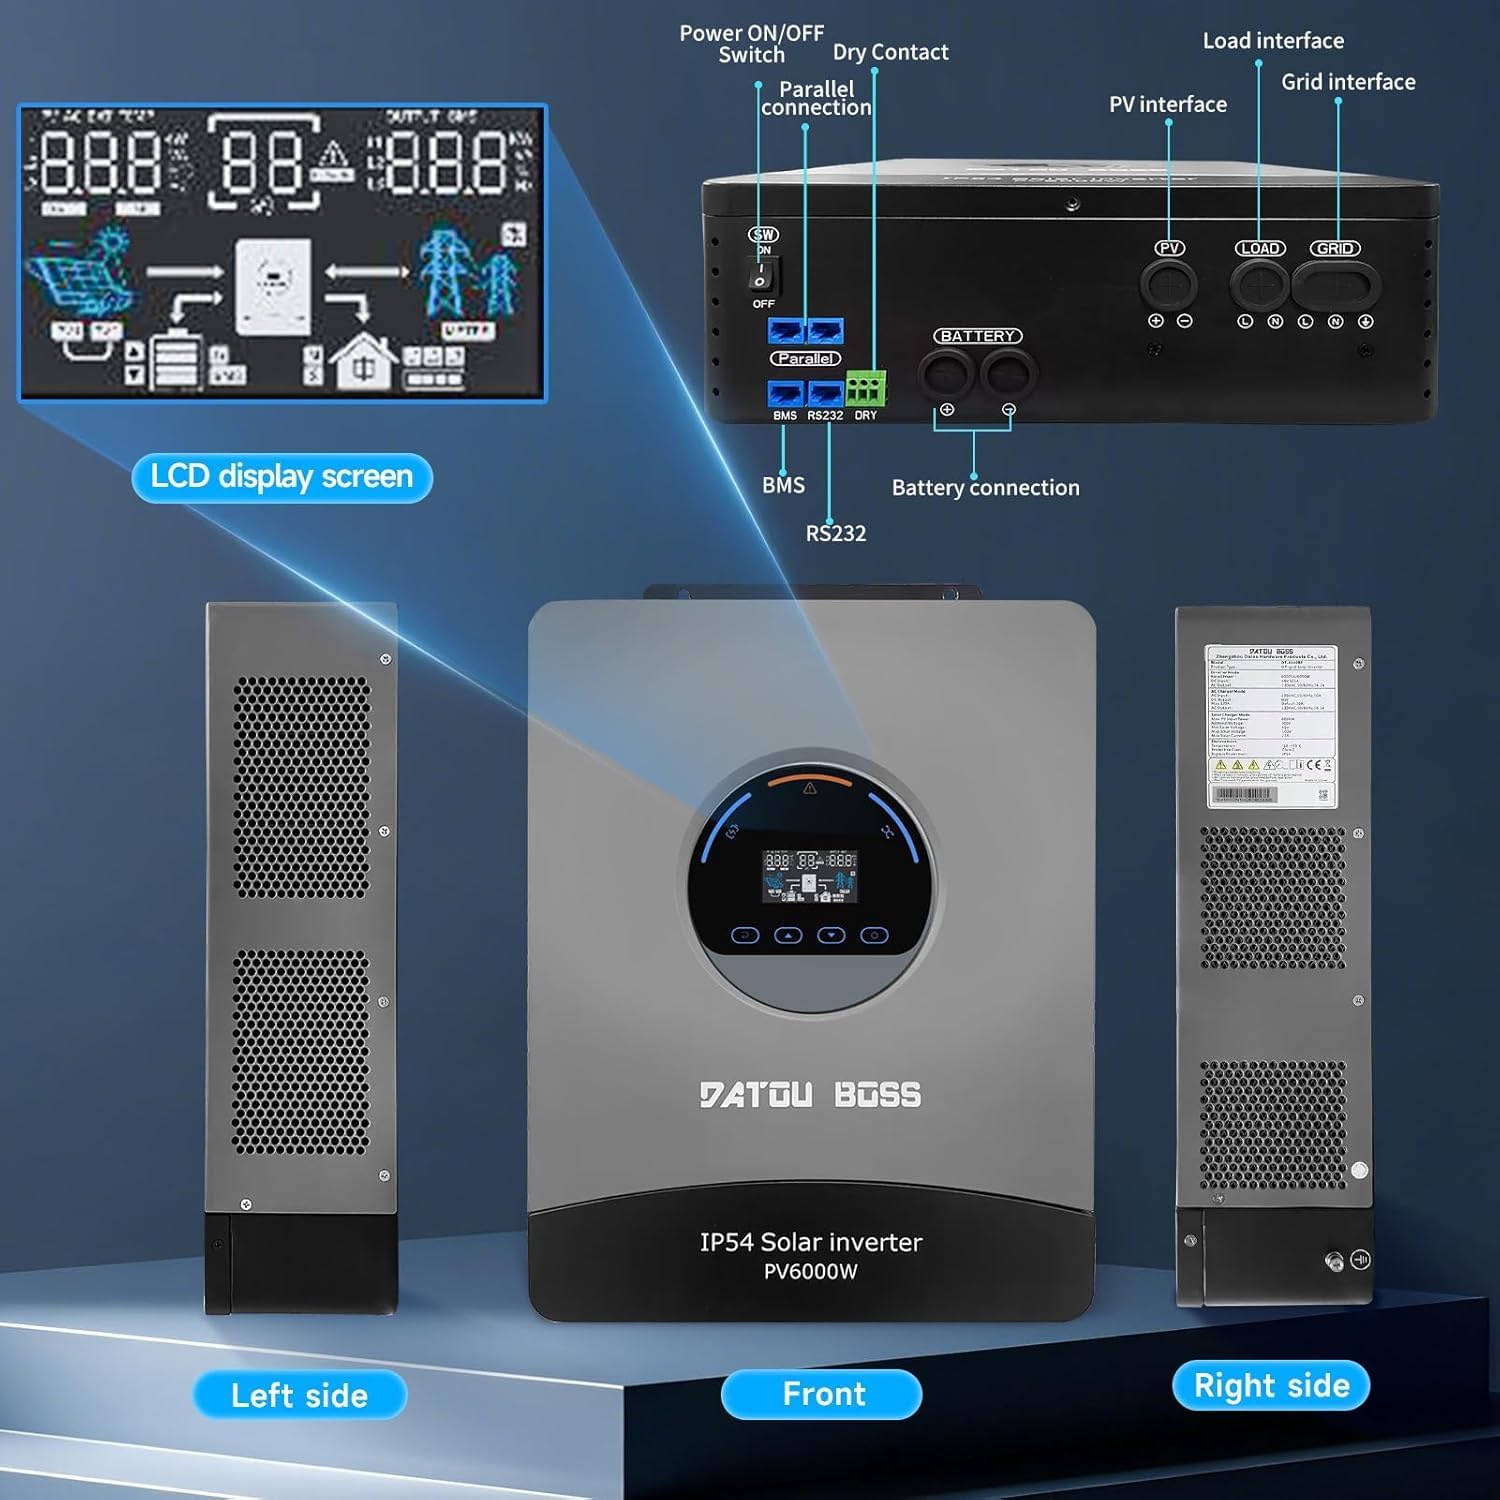
Figure 2: Overview of the inverter's physical layout, including the LCD display, power switch, parallel connection ports, dry contact, PV interface, load interface, grid interface, BMS, RS232, and battery connection terminals.
4. Installation and Setup
4.1 What's in the Box
Upon unpacking, ensure all items are present and undamaged:
- 1 x DATOUBOSS 48V 6000W Hybrid Solar Inverter
- User Manual (this document)
- Mounting accessories (if applicable)
4.2 Mounting the Inverter
- Choose a suitable mounting location that is dry, well-ventilated, and protected from direct sunlight and moisture.
- Ensure sufficient clearance around the inverter for proper airflow and heat dissipation.
- Mount the inverter vertically on a sturdy surface using appropriate fasteners.
4.3 Connection Guidelines
Follow these steps for connecting the inverter. Refer to Figure 2 for port locations.
- Battery Connection: Connect the 48V battery bank to the battery terminals. Ensure correct polarity (+ to + and - to -).
- PV Array Connection: Connect the solar panel array to the PV input terminals. Observe maximum voltage and current ratings.
- AC Input (Grid) Connection: Connect the utility grid power to the AC input terminals.
- AC Output (Load) Connection: Connect your AC loads (appliances) to the AC output terminals.
- Grounding: Connect the inverter's grounding terminal to a reliable earth ground.
- Communication Ports: Connect BMS, RS232, or parallel communication cables if applicable for your system configuration.
Battery-Free Operation: This inverter supports operation without a battery. In grid-tied or PV-only modes, loads can be powered directly from the grid or solar panels, offering flexible installation options.
5. Operating Instructions
5.1 LCD Display
The inverter features a clear LCD screen that provides real-time information about the system's operation. You can monitor:
- Input and output voltage
- Power consumption
- Battery status (voltage, charge level)
- System operational status
- Error codes for quick troubleshooting
5.2 Operating Modes
The inverter offers versatile charging and output priority modes to suit different energy management needs:
Charging Modes (Selectable)
- Solar Priority: Solar power is prioritized for charging the battery.
- Utility Priority: Utility grid power is prioritized for charging the battery.
- Solar and Utility Hybrid: Utilizes both solar and utility power for charging.
- Solar Only: Only solar power is used for charging.
Output Modes (Adjustable)
- PV Priority: Solar power is prioritized to supply loads.
- Grid Priority: Utility grid power is prioritized to supply loads.
- Inverter Priority: Inverter (battery/PV) power is prioritized to supply loads, switching to grid only when necessary.
6. Maintenance
Regular maintenance ensures the longevity and optimal performance of your inverter:
- Cleanliness: Keep the inverter clean and free from dust and debris. Use a dry cloth for cleaning.
- Ventilation: Ensure ventilation openings are not blocked.
- Connection Checks: Periodically check all electrical connections for tightness and signs of corrosion.
- Cable Integrity: Inspect cables for any damage or wear.
- Environmental Check: Ensure the installation environment remains within specified temperature and humidity ranges.
7. Troubleshooting
The LCD display will show error codes to assist in diagnosing issues. Refer to the table below for common problems and their solutions. For persistent issues or error codes not listed, please contact customer support.
| Problem | Possible Cause | Solution |
|---|---|---|
| Inverter not turning on | No battery power, PV input too low, or AC input missing. | Check battery connections and charge level. Verify PV array output. Ensure AC input is present. |
| No AC output | Overload, short circuit, or inverter fault. | Reduce load. Check for short circuits in wiring. Restart inverter. |
| Battery not charging | PV input issue, charger fault, or battery connection problem. | Check PV array connections and output. Verify charging mode settings. Inspect battery cables. |
| Overheating warning | Blocked ventilation or excessive ambient temperature. | Ensure clear airflow around the inverter. Relocate to a cooler environment if necessary. |
8. Technical Specifications
The following table details the technical parameters of the DATOUBOSS 48V 6000W Hybrid Solar Inverter:

Figure 3: Detailed technical parameters for the DATOUBOSS Hybrid Solar Inverter.
| Parameter | Value |
|---|---|
| Model | DT-4860BF-A-EU |
| Rated Power | 6000W |
| DC Input Voltage | 48V |
| AC Output Voltage | 230V AC |
| AC Output Frequency | 50 Hz |
| Waveform | Pure Sine Wave |
| Max. PV Input Power | 8000W |
| Max. PV Open Circuit Voltage | 500V DC |
| Rated PV Input Current | 27A |
| MPPT Charge Controller Current | 120A |
| Ingress Protection | IP54 |
| Operating Temperature | -10°C to 55°C |
| Compatible Battery Types | 48V Lead-acid (sealed, AGM, Gel, flooded), Lithium |
| UPC | 740684063723 |
9. Warranty and Support
DATOUBOSS is committed to providing high-quality products and customer satisfaction.
- Warranty: This product comes with a 24-month warranty from the date of purchase.
- Returns: We offer a 30-day unconditional return guarantee.
- Customer Support: For any questions, technical assistance, or warranty claims, please contact our 7x24 customer support.

Figure 4: DATOUBOSS customer service and warranty information.