
1. Introduction
Thank you for choosing the HEI LIANG Smart Door Handle MS205-A1. This electronic door lock offers advanced security and convenience with its 5-in-1 access methods: biometric fingerprint, anti-peep keypad, IC cards, smartphone app, and traditional mechanical keys. Designed for front doors, this handle is reversible for both left and right-handed door configurations and features an auto-lock function for enhanced security. This manual provides essential information for installation, operation, maintenance, and troubleshooting to ensure optimal performance and safety.
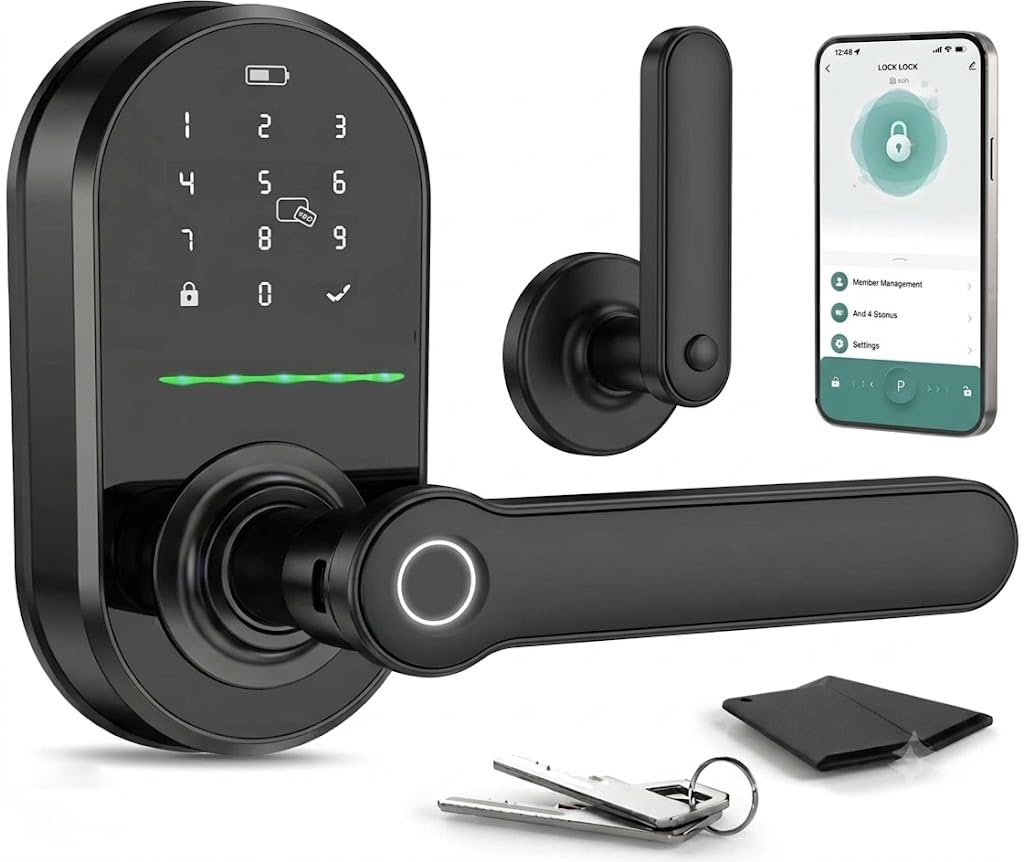
Image 1.1: Overview of the HEI LIANG Smart Door Handle MS205-A1 with its various components and app interface.
2. Safety Information
- Read all instructions carefully before installation and use.
- Do not attempt to disassemble or repair the lock yourself. Contact customer support for assistance.
- Use only 4 AAA alkaline batteries. Do not mix old and new batteries or different types of batteries.
- Keep mechanical keys in a safe, accessible location outside the property in case of emergency or battery depletion.
- Avoid exposing the lock to direct sunlight, rain, or extreme temperatures.
- Ensure the door frame is structurally sound and properly aligned before installation.
3. Package Contents
Verify that all components are present in the package:
- Front Handle Assembly (with keypad and fingerprint sensor)
- Rear Handle Assembly (with battery compartment)
- Latch Bolt
- Strike Plate
- Mounting Screws and Hardware
- Mechanical Keys (2)
- IC Cards (2)
- Installation Template
- User Manual
4. Setup and Installation
Before beginning installation, ensure your door meets the following specifications: door thickness between 1-3/8" to 2-1/8" (35mm-55mm) and an adjustable latch of 2-3/8" or 2-3/4" (60mm or 70mm).
4.1 Installation Steps
- Prepare the Door: Use the provided template to mark and drill holes if necessary. Ensure the existing holes are compatible.
- Install the Latch Bolt: Insert the latch bolt into the door edge. Adjust its length if needed.
- Install the Front Handle: Route the cable from the front handle through the door and secure the front handle assembly.
- Install the Rear Handle: Connect the cable from the front handle to the rear handle. Secure the rear handle assembly to the door using the provided screws.
- Insert Batteries: Open the battery cover on the rear handle and insert 4 new AAA alkaline batteries.
- Test Operation: Test the lock with a mechanical key and ensure the handle operates smoothly.
4.2 Door Handing Adjustment
The HEI LIANG Smart Door Handle is reversible. If the handle direction is incorrect after installation, refer to the detailed instructions in the installation video or the included paper manual for adjustment.
4.3 App Pairing (Optional)
Download the designated smartphone app (refer to the manual for app name). Follow the in-app instructions to pair your smart door handle. This typically involves creating an account, adding a new device, and following on-screen prompts to connect via Bluetooth. For remote features, a G2 Gateway (sold separately) is required.
Video 4.1: Detailed installation guide for the HEI LIANG Smart Door Handle. This video demonstrates the step-by-step process of mounting the lock onto a door.
5. Operating Instructions
The HEI LIANG Smart Door Handle offers multiple ways to access your home.

Image 5.1: Visual representation of the 5-in-1 access methods available with the smart door handle.
5.1 Biometric Fingerprint Access
- Registering Fingerprints: Follow the instructions in the smartphone app or the lock's programming mode to register your fingerprints. You can typically register multiple fingerprints.
- Unlocking: Place your registered finger firmly on the fingerprint sensor located on the handle. The lock will unlock if the fingerprint is recognized.

Image 5.2: Demonstrates the use of the biometric fingerprint sensor for unlocking.
Video 5.1: Short demonstration of the smart door handle's biometric fingerprint functionality.
5.2 Keypad Keyless Entry
- Setting Passcodes: Use the app or the lock's programming mode to set and manage user passcodes.
- Unlocking: Enter your valid passcode on the keypad, then press the '#' key (or equivalent confirmation key).
- Anti-Peep Function: To prevent others from guessing your code, you can enter random digits before or after your actual passcode. For example, if your code is 123456, you can enter 987+123456+321.
5.3 IC Card Access
- Registering IC Cards: Follow the app or lock's programming instructions to register the included IC cards.
- Unlocking: Present a registered IC card to the card reader area on the lock. The lock will unlock upon successful recognition.
5.4 Smartphone App Control
- Unlocking: Open the paired app on your smartphone and follow the prompts to unlock the door.
- Guest Access: Create temporary or scheduled access codes for visitors or couriers through the app.
- Entry Logs: View a history of lock and unlock events via the app.
- Remote Control: Requires a G2 Gateway (sold separately) for remote unlocking and management when you are away from home.
5.5 Mechanical Key Access
- Emergency Use: In case of battery failure or electronic malfunction, use the provided mechanical keys to unlock the door manually.
5.6 Auto-Lock Function
- The lock is equipped with an auto-lock feature that automatically locks the door after a set period (configurable via the app). This ensures your door is always secured.

Image 5.3: Illustration of the auto-lock feature, providing convenience and security.
6. Maintenance
6.1 Battery Replacement
- The lock is powered by 4 AAA batteries (not included).
- When batteries are low, the lock will provide a low-battery alert via the app and/or an indicator on the lock itself.
- To replace, remove the rear handle cover, replace all 4 AAA batteries, and reattach the cover.
6.2 Emergency Power
- If the batteries completely drain, you can temporarily power the lock using a power bank connected to the Type-C emergency backup power interface located on the bottom of the front handle.
Video 6.1: Demonstration of how to unlock the door handle using a power bank when the internal batteries are low or depleted.
6.3 Cleaning
- Wipe the lock surface with a soft, dry cloth.
- Do not use abrasive cleaners, solvents, or chemical sprays, as these can damage the finish and electronic components.
7. Troubleshooting
| Problem | Possible Cause | Solution |
|---|---|---|
| Lock does not respond. | Dead batteries. | Replace batteries or use emergency Type-C power. |
| Fingerprint not recognized. | Finger is wet, dirty, or not placed correctly; unregistered fingerprint. | Ensure finger is clean and dry, place firmly on sensor. Re-register fingerprint if needed. Try another registered finger. |
| Keypad not responding. | Incorrect code; keypad malfunction. | Verify passcode. Try using mechanical key or app. Check battery level. |
| Auto-lock not working. | Feature disabled or incorrect settings. | Check auto-lock settings in the smartphone app. |
| App connection issues. | Bluetooth off; lock out of range; app error. | Ensure Bluetooth is on and you are within range. Restart app and/or phone. Re-pair the lock if necessary. |
8. Specifications
| Feature | Detail |
|---|---|
| Model Number | MS205-A1 |
| Brand | HEI LIANG |
| Access Methods | Fingerprint, Keypad, IC Card, App, Mechanical Key |
| Material | Aluminum, Zinc Alloy |
| Color | Deep Black |
| Dimensions (L x W x H) | 8.26 x 8.15 x 3.54 inches (21 x 20.7 x 9 cm) |
| Item Weight | 2.5 pounds (1.13 kg) |
| Power Supply | 4 x AAA Alkaline Batteries (not included) |
| Standby Time | 10-12 months |
| Emergency Power | Type-C USB Interface |
| Door Thickness Compatibility | 1-3/8" to 2-1/8" (35mm-55mm) |
| Adjustable Latch | 2-3/8" or 2-3/4" (60mm or 70mm) |
| Special Features | Auto-Lock, Reversible Handle, Low-Battery Alerts |
9. Warranty and Support
9.1 Warranty Information
For detailed warranty information regarding your HEI LIANG Smart Door Handle MS205-A1, please refer to the product packaging or visit the official HEI LIANG website. Warranty terms and conditions may vary.
9.2 Customer Support
If you encounter any issues, have questions about installation, operation, or require technical assistance, please contact HEI LIANG customer service. Contact details can typically be found on the product packaging, the official HEI LIANG website, or through your purchase platform.