1. Introduction and Overview
The SPORTNOW Seated Arm and Leg Pedal Exerciser (Model A90-396V00WT) is designed to provide a low-impact workout for both upper and lower body. It is suitable for rehabilitation, improving circulation, and maintaining fitness, particularly for seniors. This manual provides essential information for safe and effective use.

Figure 1: User operating the SPORTNOW pedal exerciser.
2. Safety Information
Please read all instructions carefully before using the exerciser. Keep this manual for future reference.
- Consult a physician before starting any exercise program, especially if you have pre-existing medical conditions.
- Ensure the exerciser is placed on a stable, flat surface.
- Keep children and pets away from the equipment during use.
- Check all parts for wear or damage before each use. Do not use if any part is damaged.
- Do not stand on the exerciser. It is designed for seated use only.
- Wear appropriate footwear to ensure a secure grip on the pedals.
- Adjust resistance gradually to avoid strain.

Figure 2: Secure pedal straps and non-slip feet for enhanced safety.
3. Package Contents
Verify that all components are present before assembly. If any parts are missing or damaged, contact customer service.
- Main Frame Assembly
- Pedals with Straps (2)
- Handlebar Assembly
- LCD Display Unit
- Adjustment Knobs/Pins
- Tools for Assembly (if required)
- Instruction Manual
4. Assembly Instructions
Follow these steps to assemble your pedal exerciser. It is recommended to have a clear, flat workspace.
- Unpack all components and lay them out.
- Attach the pedals to the main frame, ensuring they are securely tightened. Note that some pedals may be marked 'L' for left and 'R' for right.
- Insert the handlebar assembly into the main frame's vertical post. Secure it using the provided adjustment knob/pin.
- Mount the LCD display unit onto the designated slot on the handlebar or main frame, connecting any necessary cables.
- Ensure all connections are tight and the unit is stable before use.
5. Setup and Adjustments
Proper setup ensures comfort and effectiveness during your workout.
5.1. Adjusting Height
The exerciser's height can be adjusted from 86 cm to 91 cm to suit your preference and the height of your chair or sofa.
- Loosen the height adjustment knob/pin on the vertical post.
- Raise or lower the handlebar to the desired height.
- Securely tighten the adjustment knob/pin to lock the height in place.

Figure 3: Adjusting the exerciser's height for optimal comfort.
5.2. Adjusting Resistance
The progressive resistance control allows you to vary the intensity of your workout.
- Locate the resistance knob, typically found near the pedals or handlebars.
- Turn the knob clockwise to increase resistance for a more challenging workout.
- Turn the knob counter-clockwise to decrease resistance for lighter exercise.
- Start with low resistance and gradually increase as your strength improves.
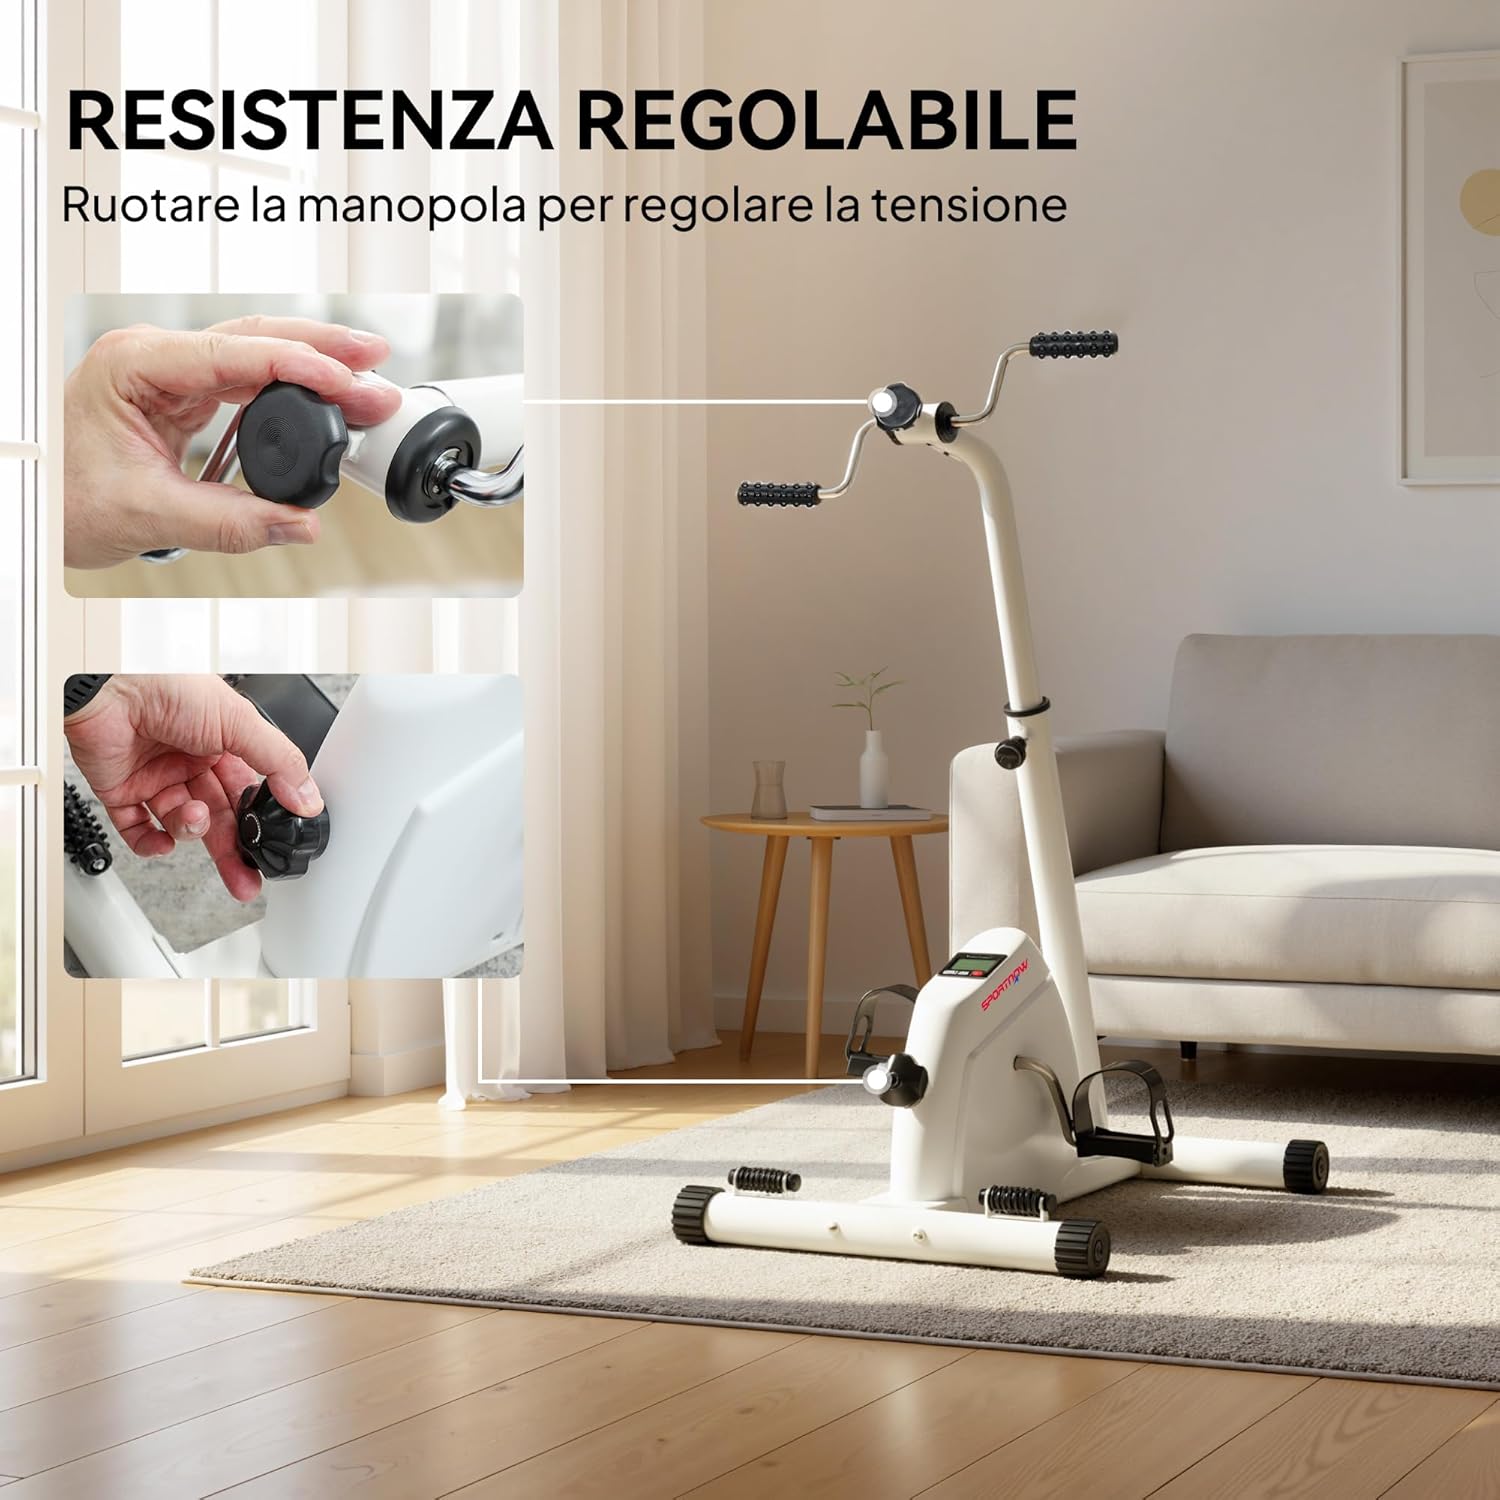
Figure 4: Resistance adjustment knobs for customized workout intensity.
6. Operating Instructions
This section details how to use your SPORTNOW pedal exerciser for effective arm and leg workouts.
6.1. Using the LCD Display
The integrated LCD display helps you track your progress and stay motivated.
- The display automatically turns on when you start pedaling.
- Press the button to cycle through different metrics: Time, Distance, Count (revolutions), and Calories burned.
- To reset the values, press and hold the button for a few seconds.
- The display is powered by 1 AAA battery (not included). Replace when the display becomes dim.

Figure 5: LCD display showing workout metrics.
6.2. Arm Exercise
To exercise your arms, place the exerciser on a stable surface in front of you, such as a table. Grip the handlebars and rotate them in a circular motion.
- Ensure the exerciser is stable and does not move during use.
- Adjust the height of the handlebars to a comfortable position.
- Begin rotating the handlebars slowly, gradually increasing speed and resistance as desired.
6.3. Leg Exercise
For leg exercise, place the exerciser on the floor in front of your chair or sofa. Place your feet into the pedal straps.
- Sit comfortably with your back supported.
- Adjust the pedal straps to secure your feet.
- Begin pedaling in a smooth, controlled motion.
- Adjust resistance as needed.
6.4. Dual Massage Feature
The exerciser features integrated massaging particles on both the handlebars and pedals.
- These particles provide a gentle massage during your workout, which can help stimulate circulation.
- For foot massage, simply place your bare feet on the massaging pedals and gently move them back and forth.
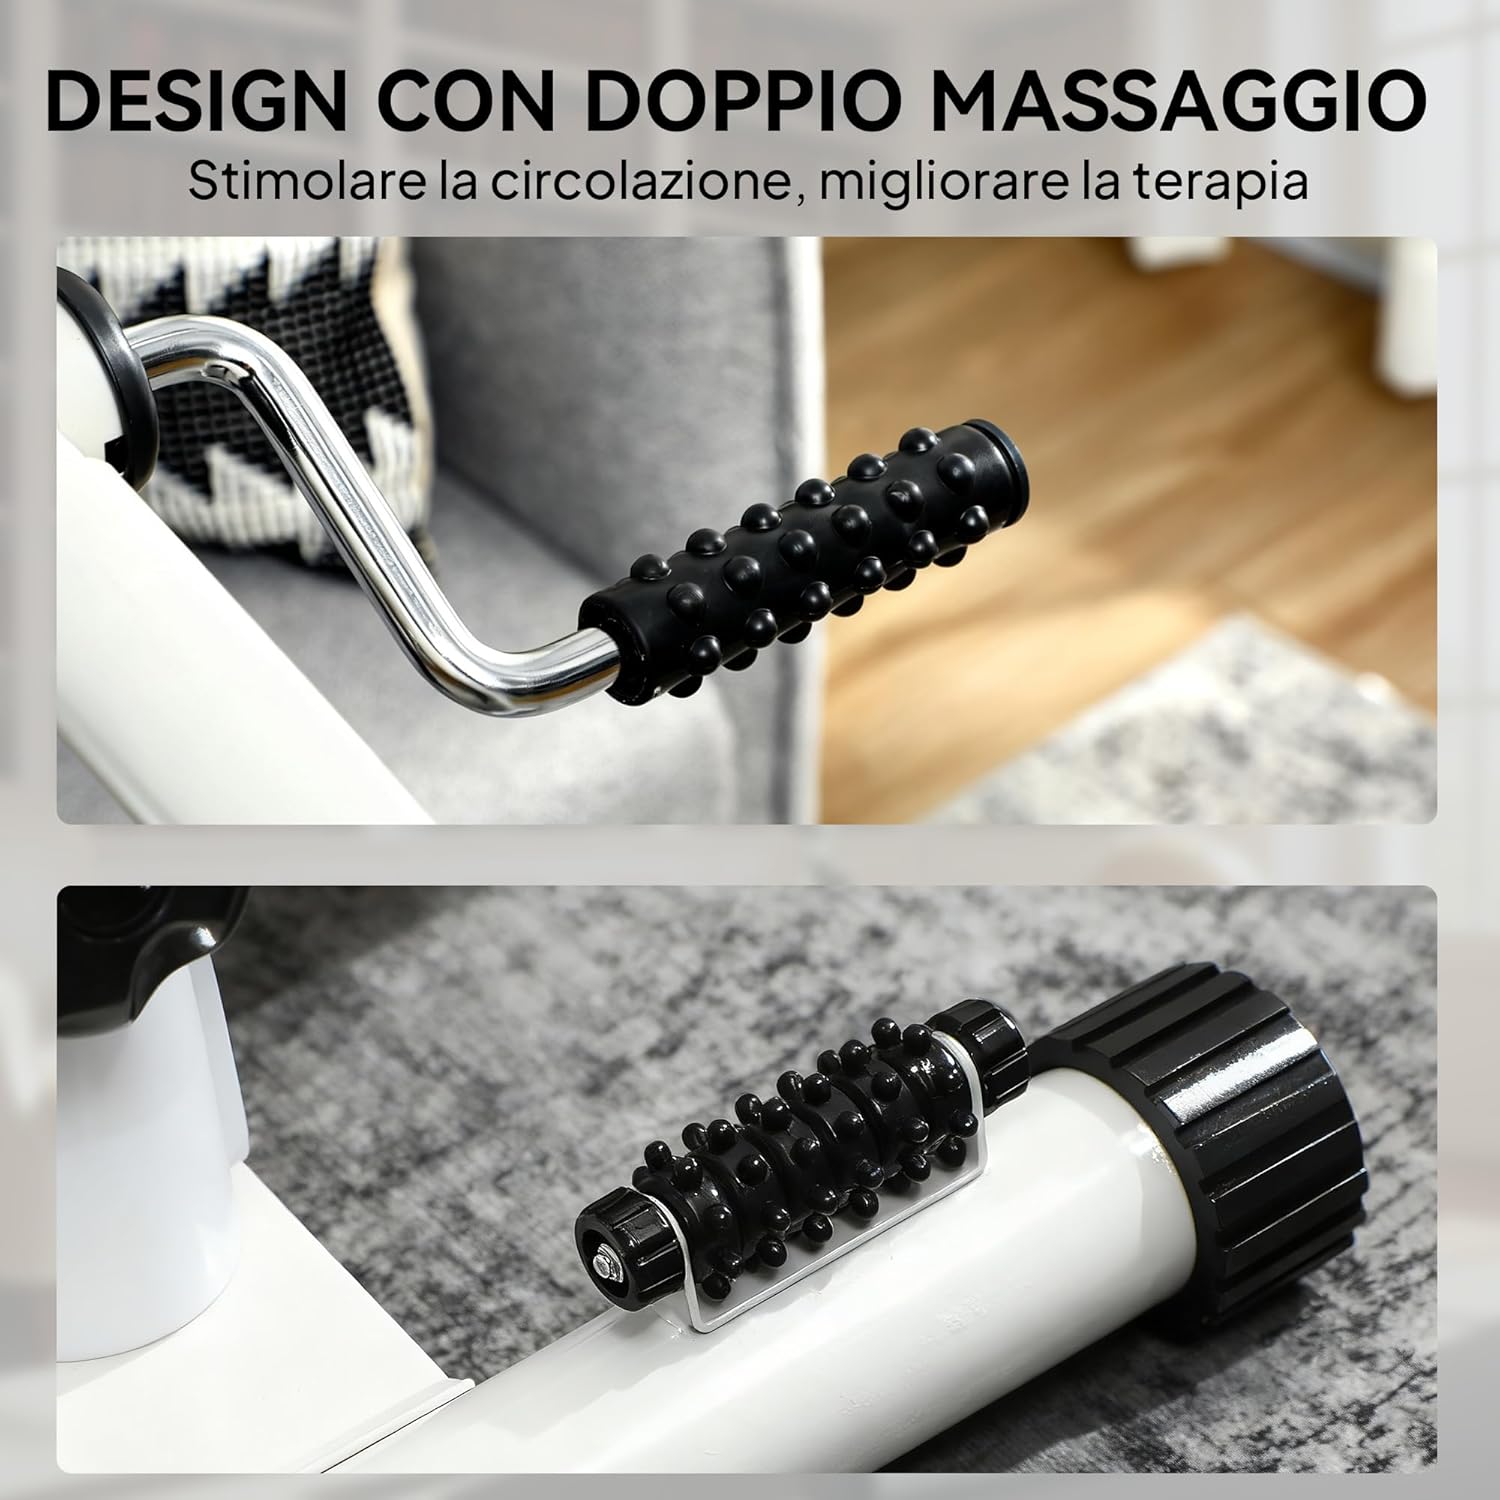
Figure 6: Integrated massaging grips on handlebars and pedals.
7. Maintenance
Regular maintenance will prolong the life of your exerciser.
- Cleaning: Wipe down the exerciser with a damp cloth after each use to remove sweat and dust. Do not use abrasive cleaners.
- Inspection: Periodically check all nuts, bolts, and moving parts to ensure they are secure and functioning correctly. Tighten any loose fasteners.
- Storage: Store the exerciser in a cool, dry place away from direct sunlight and extreme temperatures.
8. Troubleshooting
If you encounter any issues, refer to the following common problems and solutions.
- Squeaking Noise: Check for loose parts and tighten them. Apply a small amount of silicone-based lubricant to moving joints if necessary.
- Display Not Working: Ensure the AAA battery is correctly installed and has sufficient charge. Replace the battery if needed.
- Resistance Not Changing: Verify that the resistance knob is properly engaged and turning freely. Check for any obstructions.
- Unit Feels Unstable: Ensure the exerciser is on a flat, level surface and all feet are making full contact. Check that all assembly bolts are tightened.
If problems persist, contact customer support.
9. Specifications
| Feature | Specification |
|---|---|
| Model Number | A90-396V00WT |
| Overall Dimensions (L x W x H) | 60 x 40 x 86-91 cm |
| Item Weight | 6 kg |
| Max Supported Weight | 120 kg |
| Material | Steel Alloy, Plastic |
| Color | White |
| Power Source | Pedal-powered (non-electric) |
| Display | LCD (Time, Distance, Count, Calories) |
| Battery (for LCD) | 1 x AAA (not included) |
| Features | Adjustable Resistance, Adjustable Height, Massaging Pedals/Handles, Non-slip Feet |

Figure 7: Product dimensions.
10. Product Videos
The following videos demonstrate the use and features of similar pedal exercisers. Please note that the exact product model may vary from the one shown in the videos, but the functionality is comparable.
Demonstration of Pedal Exerciser Use
Video 1: This video demonstrates the general operation and adjustability of a pedal exerciser, similar to the SPORTNOW model. It shows how to use it for both arm and leg exercises while seated.
Features of a Mini Cyclette
Video 2: This video highlights various features of a mini seated pedal exerciser, including resistance adjustment, display functions, and portability. It provides a visual guide to common functionalities.
Portable Leg Exerciser Demonstration
Video 3: A demonstration of a portable leg exerciser, showcasing its compact design and ease of use for lower body workouts. This video illustrates the convenience of such devices.
11. Warranty and Support
For warranty information or technical support, please refer to the contact details provided with your purchase documentation or visit the official SPORTNOW website. Keep your proof of purchase for any warranty claims.