1. Introduction
Thank you for choosing the SEDETA 32" Corner Electric Standing Desk. This desk is designed to provide an ergonomic and space-saving solution for your home office, gaming setup, or study area. Its electric height adjustment mechanism allows for seamless transitions between sitting and standing positions, promoting a healthier and more productive work environment. This manual will guide you through the assembly, operation, and maintenance of your new desk.

Image: The SEDETA Corner Standing Desk shown in both sitting and standing configurations, highlighting its ergonomic design.
2. Safety Information
- Read all instructions carefully before assembly and operation.
- Keep children and pets away from the desk during operation.
- Ensure all cables are properly managed to prevent entanglement or damage.
- Do not overload the desk beyond its specified weight capacity (200 lbs).
- Avoid placing liquids directly on the control panel or electrical components.
- If any parts are missing or damaged, do not attempt to assemble or operate the desk. Contact customer support immediately.
- Only use the provided power adapter and components.
- Do not disassemble or modify the desk's electrical components.
3. Package Contents
Please verify that all components are present before beginning assembly. If any parts are missing or damaged, contact SEDETA customer support.
- Desktop (Corner Shape)
- Desk Legs (2 units)
- Crossbar/Frame Components
- Electric Motor and Control Box
- Control Panel with LED Display
- Power Adapter and Cable
- Storage Drawer
- Headphone Hooks (2 units)
- Recessed Power Strip (with 3 AC outlets, 2 USB ports)
- Assembly Hardware (screws, bolts, Allen wrenches)
- Instruction Manual
4. Assembly Instructions
Follow these steps carefully to assemble your SEDETA Corner Electric Standing Desk. It is recommended to have two people for assembly.
4.1 Unpacking and Preparation
Unpack all components and lay them out on a clean, soft surface to prevent scratches. Identify all parts using the provided parts list.
4.2 Assembling the Frame
Attach the desk legs to the crossbar components. Ensure all screws are tightened securely. The frame is constructed from heavy-coated steel for stability.

Image: The robust steel frame of the desk undergoing a stability test, demonstrating its 200 lbs load capacity.

Image: Detailed view of the heavy-coated steel tube frame, highlighting its robust construction for durability.
4.3 Attaching the Desktop
Carefully place the desktop onto the assembled frame. Align the pre-drilled holes and secure the desktop with the provided screws. Ensure the desktop is oriented correctly for the corner placement.

Image: Dimensional diagram of the desk, illustrating its 32"L x 32"W top and height adjustment range.
4.4 Installing the Drawer and Hooks
Assemble the storage drawer according to its separate instructions, then slide it into the designated slot under the desktop. Attach the headphone hooks to the underside of the desk as desired.

Image: Detail of the integrated storage drawer and convenient headphone hooks.
4.5 Connecting Electrical Components
Connect the motor, control box, and control panel according to the wiring diagram in the separate assembly guide. Ensure all connections are firm. Plug the power adapter into the control box and then into a wall outlet.
5. Operating Instructions
5.1 Control Panel Overview
The control panel features an LED display, up/down arrows, three memory preset buttons (1, 2, 3), and a 'S' (Set) button.
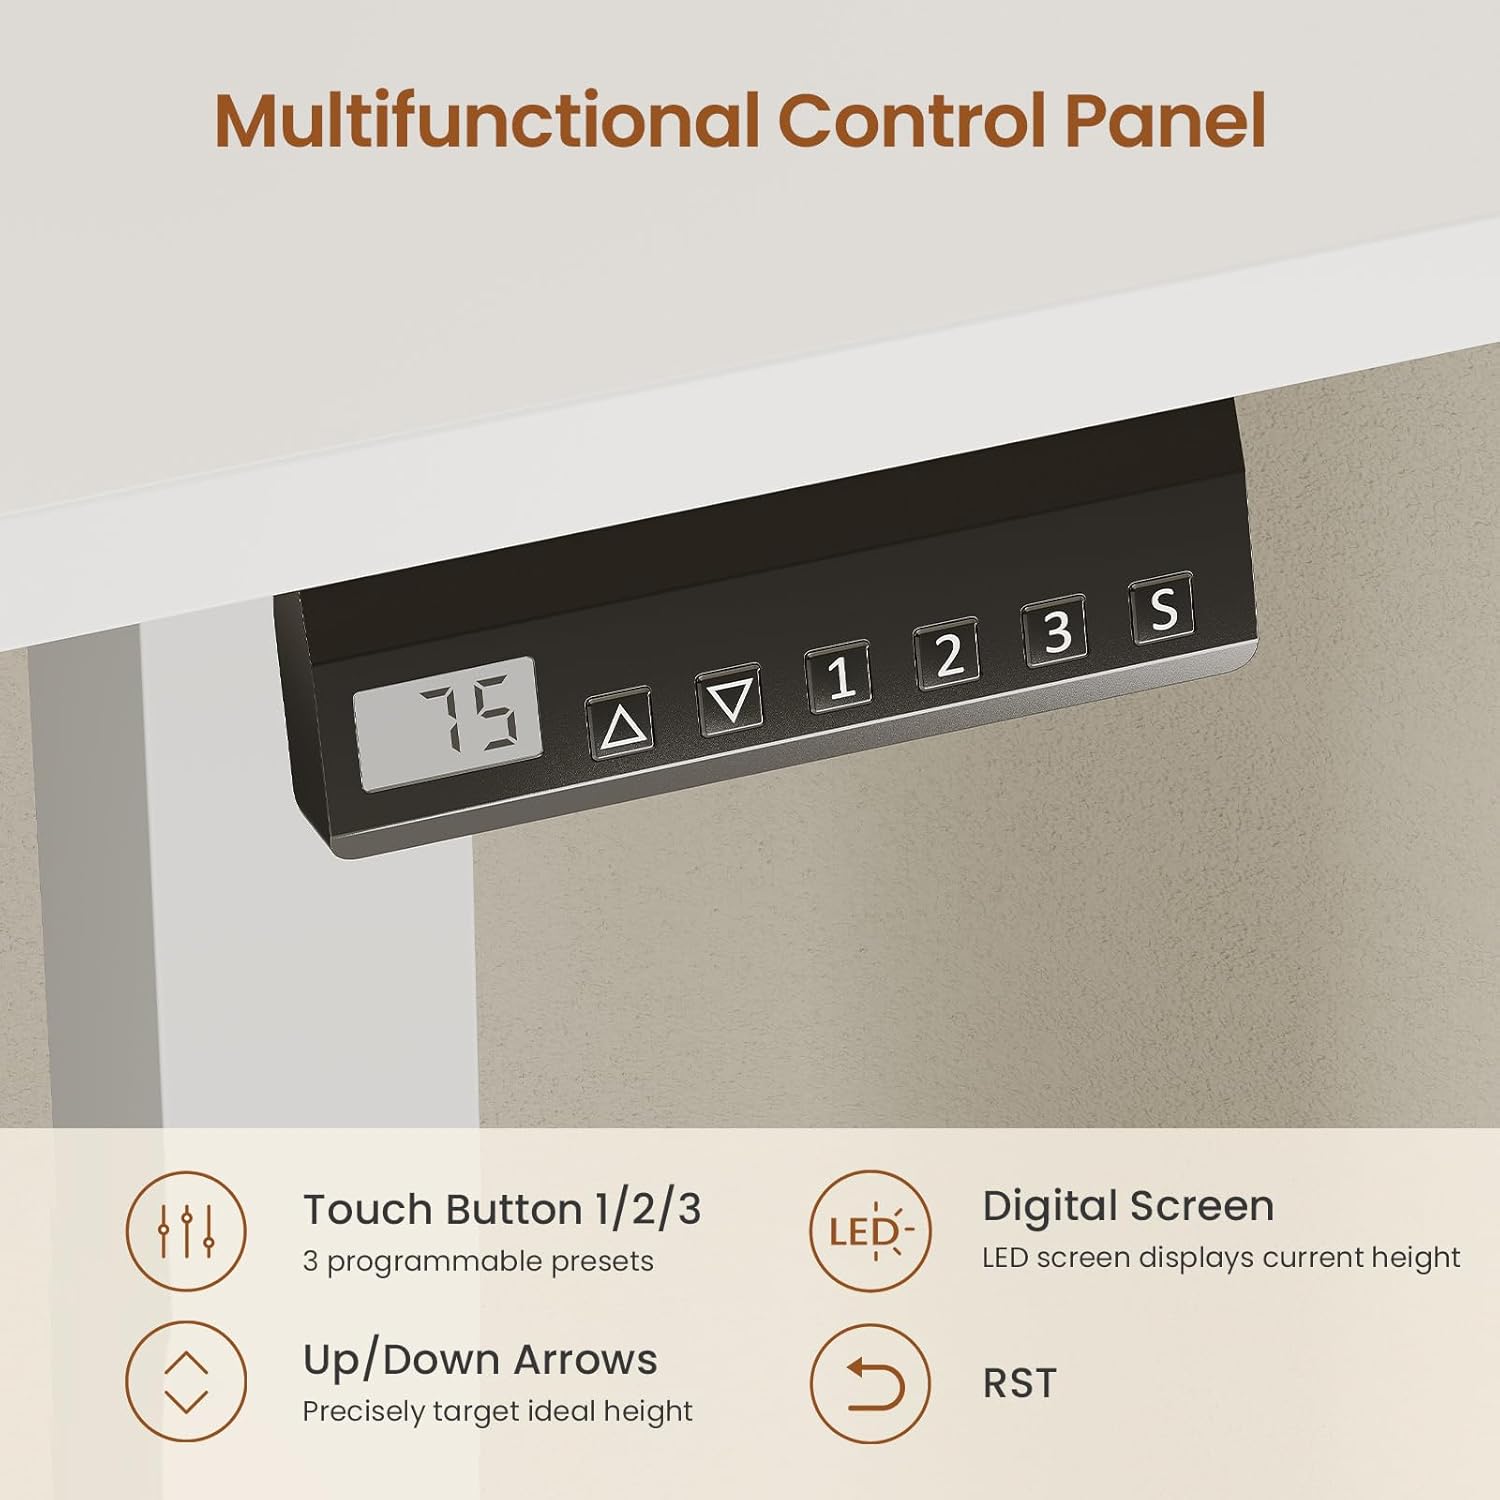
Image: The desk's control panel, detailing the digital screen, up/down arrows, and programmable preset buttons.
5.2 Adjusting Desk Height
Use the Up (▲) and Down (▼) arrow buttons to manually adjust the desk height. The LED display will show the current height in inches. The desk can be adjusted smoothly from 28.3 inches to 46.9 inches.

Image: Visual representation of the desk's height adjustment capabilities, showing the minimum and maximum heights.
5.3 Setting Memory Presets
- Adjust the desk to your desired height using the Up/Down arrows.
- Press the 'S' (Set) button. The LED display will show 'S-'.
- Within 3 seconds, press one of the memory preset buttons (1, 2, or 3). The display will show 'S-1', 'S-2', or 'S-3' to confirm the preset is saved.
- To recall a saved height, simply press the corresponding memory preset button (1, 2, or 3). The desk will automatically move to the saved position.
5.4 Using the Recessed Power Strip
The desk includes a built-in power strip with 3 AC outlets (120V/12A) and 2 USB ports (5V/2A). This allows for convenient charging and powering of your devices directly from the desktop.
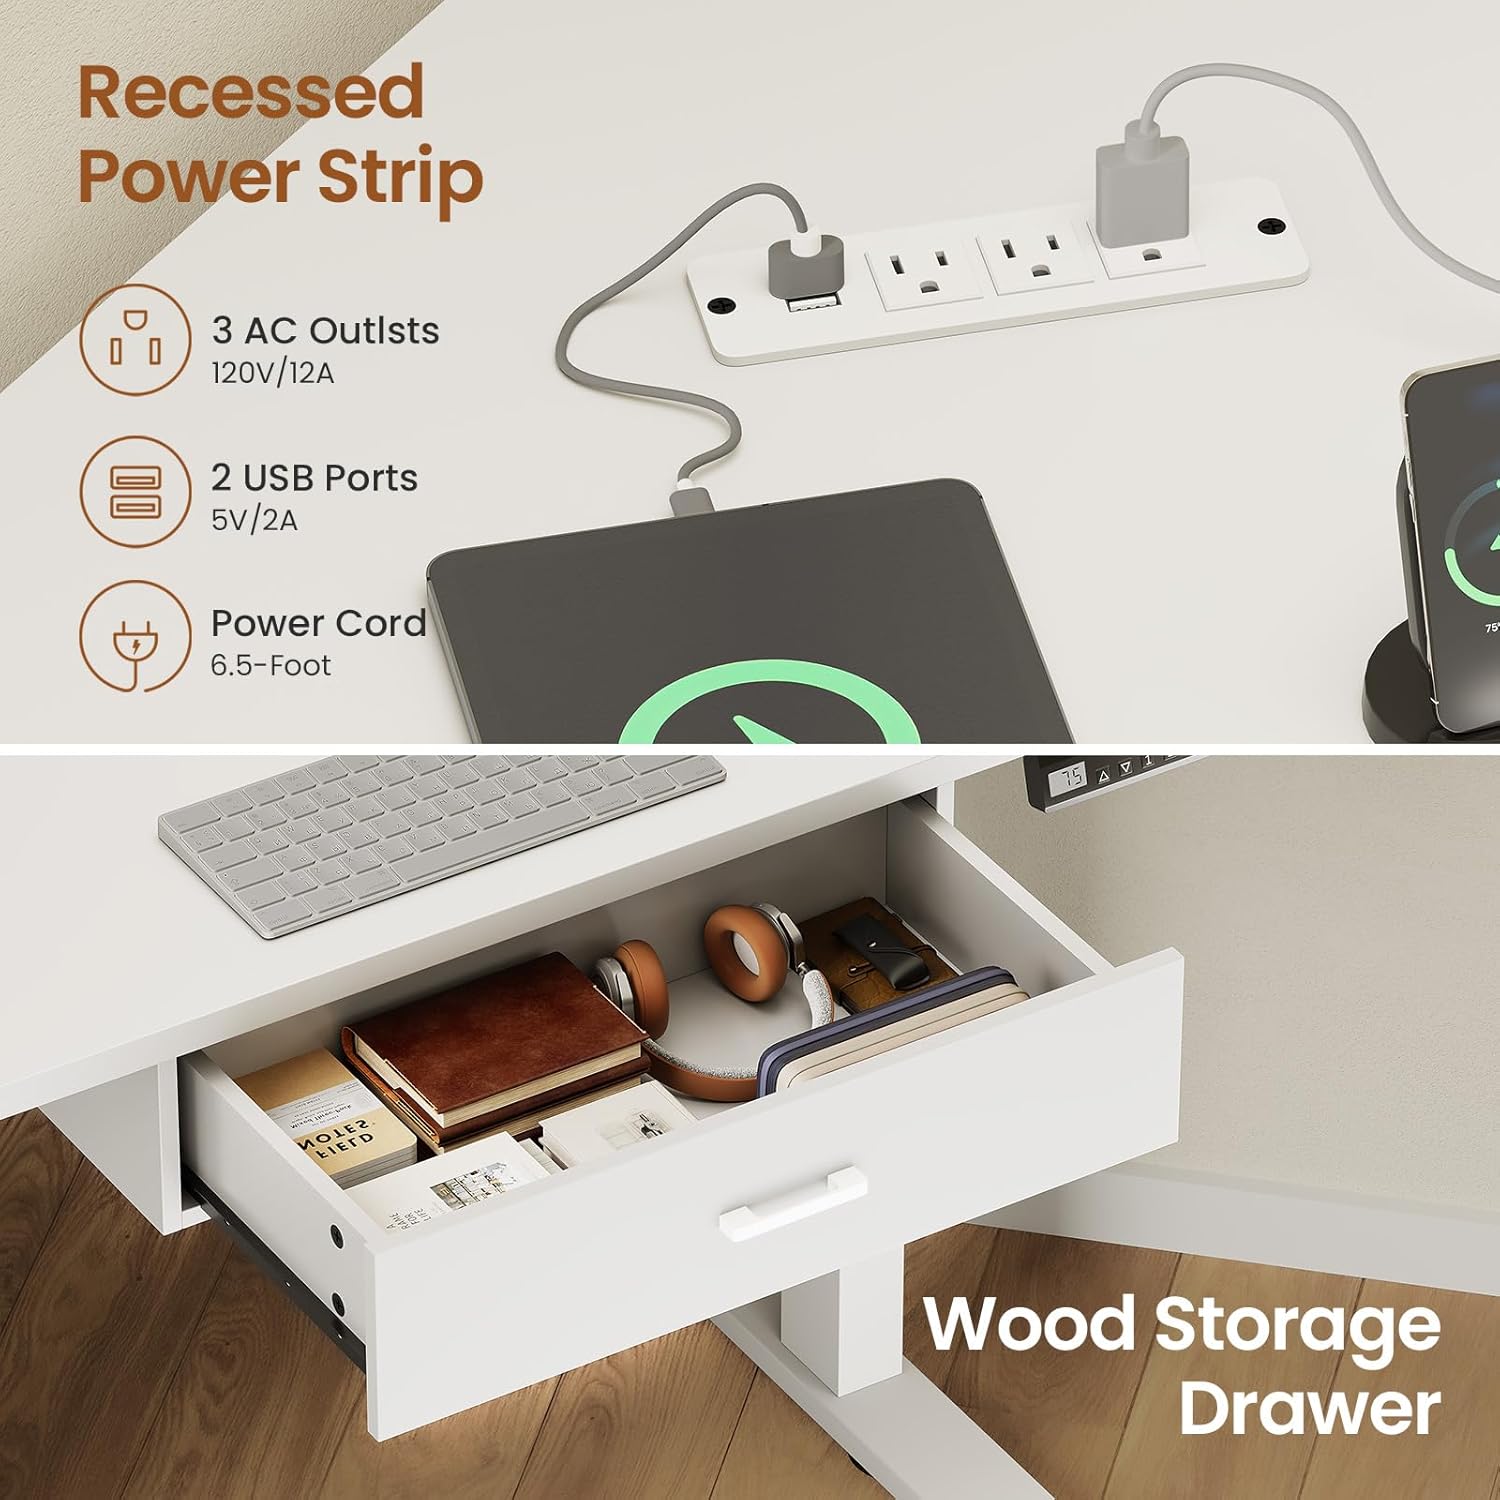
Image: The integrated recessed power strip with multiple outlets and USB ports for device connectivity.
5.5 Quiet Operation
The electric motor operates quietly, typically under 40 dB, ensuring minimal disturbance during height adjustments.

Image: Illustration of the desk's quiet operation, demonstrating that adjustments are made with minimal noise.
6. Maintenance
- Cleaning: Wipe the desktop and frame with a soft, damp cloth. Avoid abrasive cleaners or harsh chemicals.
- Cable Management: Regularly check and organize cables to prevent tangles and damage.
- Fasteners: Periodically check all screws and bolts to ensure they remain tight. Retighten if necessary.
- Motor Care: The electric motor is designed for long-term use and requires no special maintenance. Avoid obstructing the lifting mechanism.
7. Troubleshooting
| Problem | Possible Cause | Solution |
|---|---|---|
| Desk does not move. | Power cable disconnected; motor overload; control panel issue. | Check power connections. Reduce weight on desk. Reset the desk (see below). |
| Uneven height adjustment. | Obstruction; uneven load. | Remove any obstructions. Distribute weight evenly. Perform a reset. |
| Error code on display. | Specific system fault. | Refer to the full error code list in the detailed assembly manual or contact customer support. Often, a reset can resolve minor errors. |
7.1 Reset Procedure
If the desk encounters an issue or displays an error code, a reset may resolve the problem:
- Press and hold the Down (▼) button until the desk reaches its lowest position.
- Continue holding the Down (▼) button for approximately 5-10 seconds until the display shows 'RST' or the desk slightly lowers and then rises.
- Release the button. The desk is now reset.
8. Specifications
- Brand: SEDETA
- Model: B0GCZVDPVD
- Shape: Triangular (Corner)
- Product Dimensions (D x W x H): 32"D x 32"W x 28.3"H (minimum height)
- Height Adjustment Range: 28.3" to 46.9"
- Color: White
- Base Material: Alloy Steel
- Top Material Type: Engineered Wood
- Weight Capacity: 200 lbs
- Special Feature: Electric Standing, Integrated Drawer, Recessed Power Strip (3 AC outlets, 2 USB ports)
- Assembly Required: Yes
9. Warranty and Support
For warranty information, technical support, or to order replacement parts, please contact SEDETA customer service. Refer to your purchase documentation for specific warranty terms and contact details.
Customer Service: Please refer to the contact information provided with your product packaging or visit the official SEDETA website.