1. Introduction
This manual provides detailed instructions for the assembly, operation, and maintenance of your PRAISUN 35.4 Inch Record Player Stand. Please read this guide thoroughly before assembly and use to ensure proper function and safety. Keep this manual for future reference.
2. Safety Information
- Ensure all parts are present and undamaged before beginning assembly. Do not use if any parts are missing or defective.
- Assemble the stand on a soft, clean surface to prevent scratches.
- Do not overtighten screws during assembly, as this may damage the material.
- Place the stand on a level, stable surface to prevent tipping.
- Do not exceed the weight capacity of the shelves.
- For electrical components (power outlets, USB ports, LED lights), ensure the stand is connected to a properly grounded outlet. Do not overload the power strip.
- Keep liquids away from electrical outlets and devices.
3. Package Contents
Before assembly, verify that all components listed in the included assembly guide are present. The package typically includes:
- Wooden panels and shelves
- Solid wood legs
- Hardware kit (screws, dowels, cam locks, etc.)
- Power strip with AC outlets, USB, and USB-C ports
- LED light strip
- Metal record dividers
- Assembly tools (e.g., Allen wrench)
- Detailed assembly instructions
4. Assembly Instructions
The PRAISUN Record Player Stand is designed for straightforward assembly. Follow the step-by-step instructions provided in the separate assembly manual included with your product. All parts are clearly labeled to assist with identification.
- Unpack and Identify Parts: Carefully unpack all components and lay them out. Compare them against the parts list in your assembly guide to ensure everything is present.
- Assemble Frame: Begin by connecting the main frame components using the provided hardware. Pay attention to the orientation of each piece.
- Install Shelves and Cabinets: Secure the internal shelves and the fluted sliding cabinet doors according to the diagrams.
- Attach Legs: Fasten the solid wood legs to the base of the stand.
- Install Power Strip and LED Lights: Integrate the power strip into the designated cutout on the tabletop. Connect the LED light strip to its dedicated USB port located beneath the tabletop.
- Insert Record Dividers: Place the metal dividers into the center storage section.
- Cable Management: Utilize the integrated cable management holes to route and organize power cords for your audio equipment.

Figure 4.1: Fully assembled record player stand.
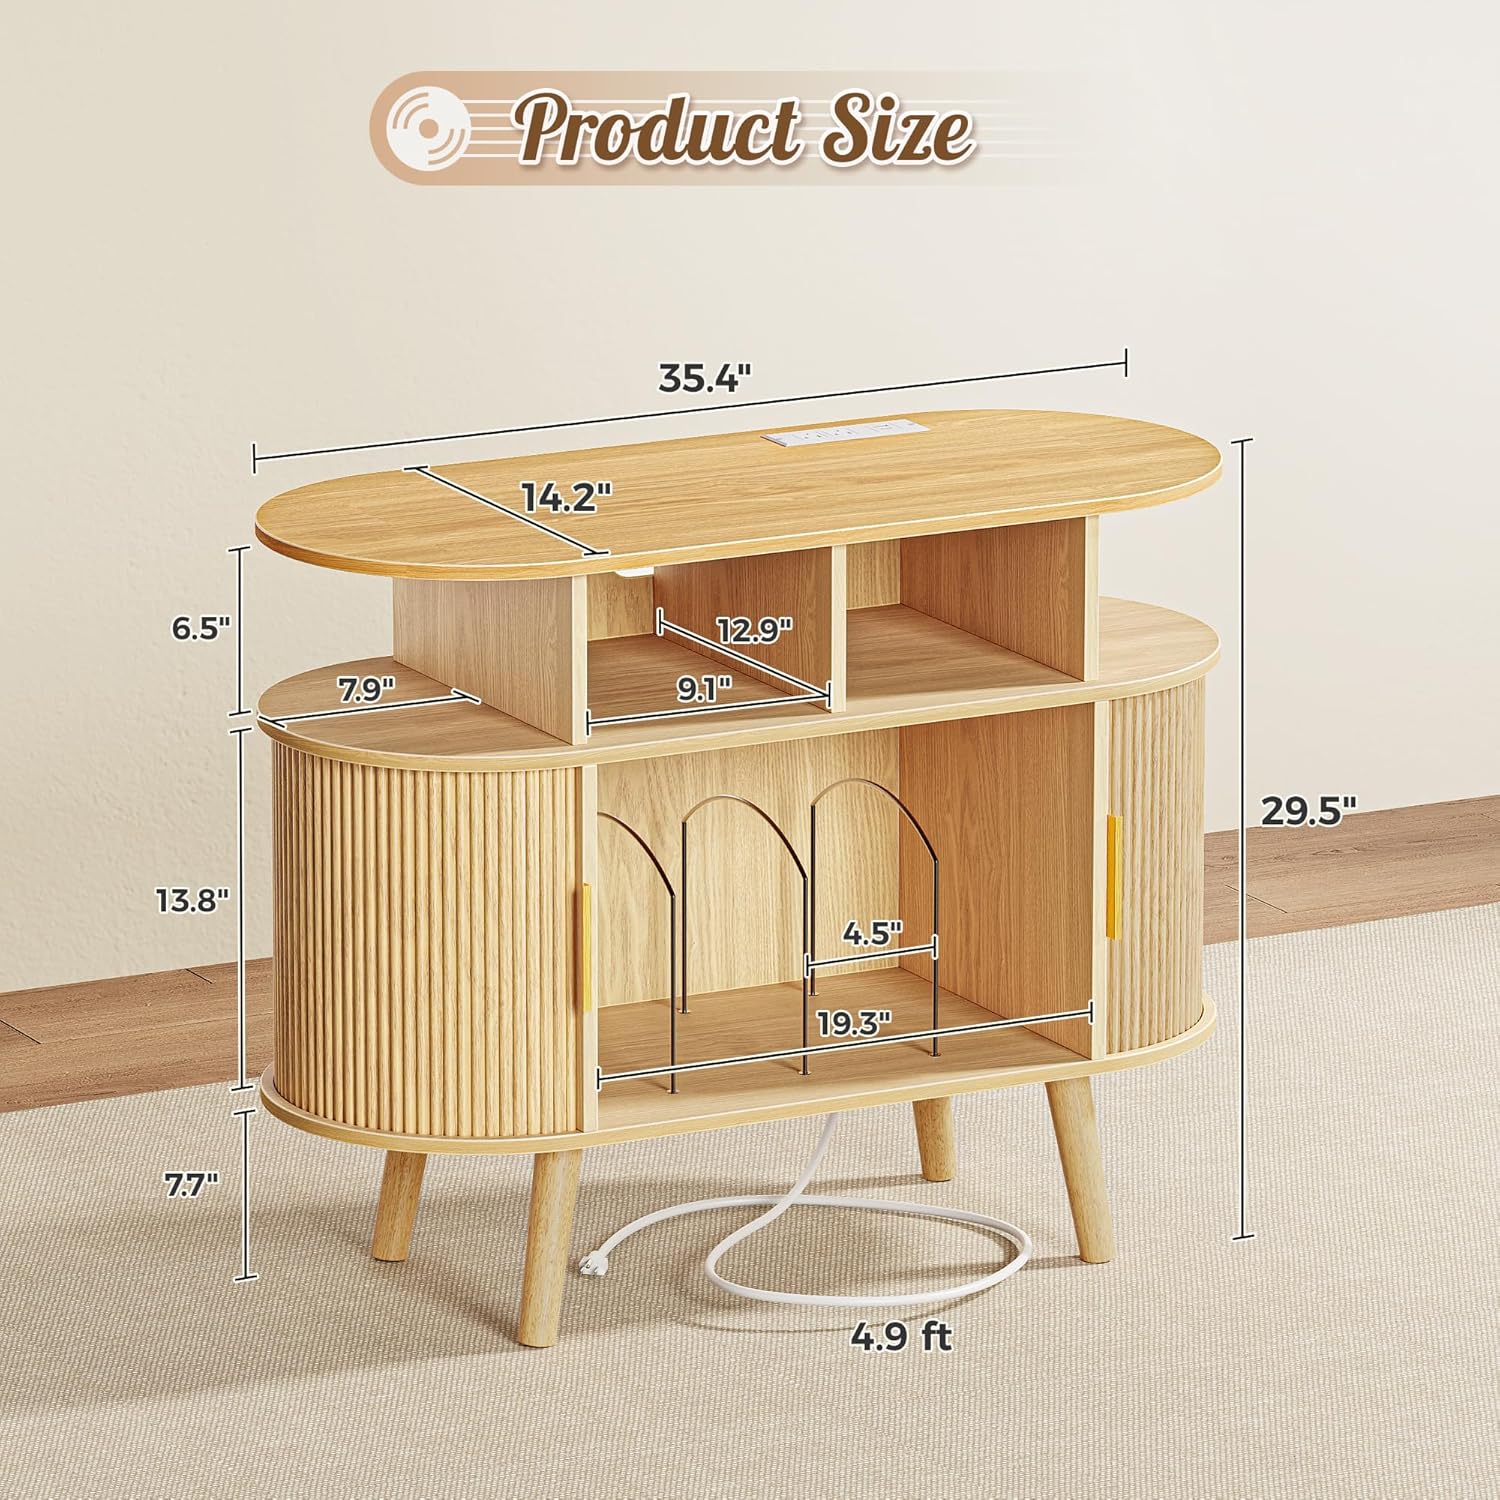
Figure 4.2: Product dimensions for placement planning.

Figure 4.3: Detailed features including cable management and record dividers.
5. Operating Instructions
5.1 Power Outlets and USB Ports
The integrated power strip provides convenient access to power for your electronic devices.
- AC Outlets: Two (2) 125V/12A AC outlets are available for powering turntables, speakers, CD players, or other compatible devices.
- USB Ports: Two (2) 5V/2A USB ports and one (1) 5V/2A USB-C port are provided for charging smartphones, tablets, or other USB-powered accessories.
- LED Light USB: A separate USB port is located beneath the tabletop specifically for the LED light strip, ensuring it does not occupy the desktop charging ports.
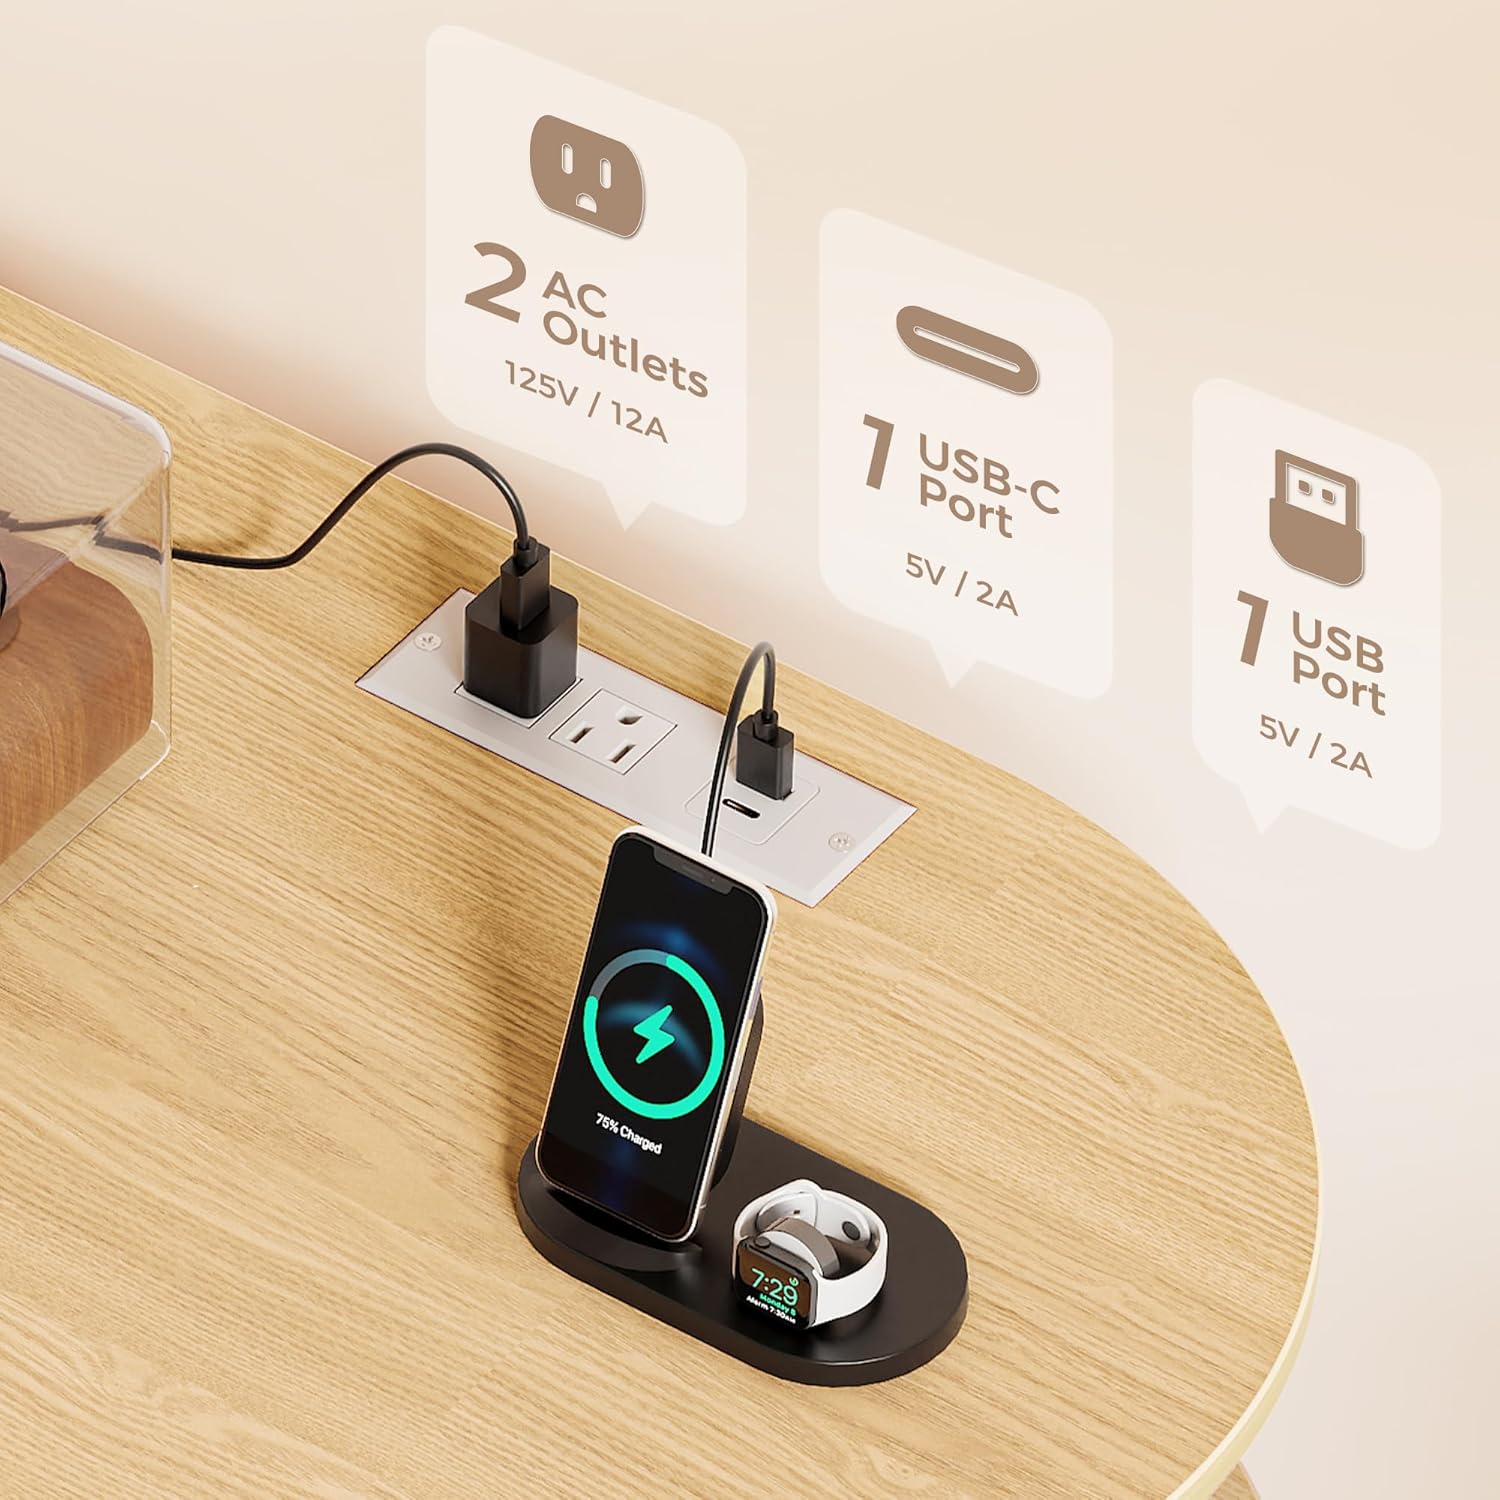
Figure 5.1: Integrated power outlets and USB ports.
5.2 3-Color LED Lighting
The built-in LED lighting system offers three distinct color modes to enhance your listening environment.
- Cool White: Provides a bright, crisp illumination.
- Warm White: Offers a soft, inviting glow.
- Mixed Light: A blend of cool and warm tones for balanced ambiance.
Refer to the assembly guide for specific instructions on how to activate and switch between the lighting modes, typically via a touch sensor or switch.

Figure 5.2: Three color lighting options.
5.3 Storage Options
The stand features multiple storage solutions for your media and accessories.
- Fluted Sliding Cabinets: Two side cabinets with sliding doors provide enclosed, dust-free storage for various items.
- Center Record Storage: The open center section, equipped with metal dividers, can hold up to 150 vinyl records.
- Open Shelves: Additional open shelves offer flexible space for audio equipment, books, or decorative items.

Figure 5.3: Multiple storage options.

Figure 5.4: Double-sided grid sliding door detail.
6. Maintenance
To maintain the appearance and longevity of your record player stand:
- Cleaning: Wipe surfaces with a soft, damp cloth. Avoid harsh chemicals or abrasive cleaners, which can damage the finish.
- Dusting: Regularly dust the stand to prevent buildup, especially on the fluted cabinet doors.
- Spills: Clean up spills immediately to prevent staining or damage to the wood finish.
- Electrical Components: Ensure the power strip and LED lights are kept dry. Do not attempt to repair electrical components yourself.
7. Troubleshooting
If you encounter issues with your PRAISUN Record Player Stand, consider the following:
- Assembly Difficulties: If screws do not fit or parts seem misaligned, double-check the part numbers against the assembly guide. Ensure you are using the correct hardware for each step. Do not force parts together.
- LED Lights Not Working: Verify that the LED light strip is properly connected to its dedicated USB port and that the power strip is plugged into a functional wall outlet. Check for any loose connections.
- Power Outlets Not Functioning: Ensure the main power cord is securely plugged into a working wall outlet. Check if the outlet itself is receiving power (e.g., by plugging in another device). Avoid overloading the power strip.
- Stand Instability: Confirm that all screws and fasteners are tightened securely. Ensure the stand is placed on a flat, level surface.
For persistent issues or missing/damaged parts, please contact customer support.
8. Specifications
| Brand | PRAISUN |
| Model | 35.4 Inch Record Player Stand |
| Color | Natural |
| Material | Durable Particle Board, Solid Wood Legs |
| Product Dimensions (D x W x H) | 14.2" x 35.4" x 29.7" |
| Power Outlets | 2 x AC Outlets (125V/12A) |
| USB Ports | 2 x USB Ports (5V/2A), 1 x USB-C Port (5V/2A) |
| LED Lighting | 3-Color (Cool White, Warm White, Mixed Light) |
| Record Storage Capacity | Up to 150 vinyl albums (center section) |
| Special Features | Fluted Sliding Cabinets, Cable Management Holes, Tapered Legs, Reinforced Base |
9. Warranty and Support
PRAISUN products are manufactured with quality and customer satisfaction in mind. For information regarding warranty coverage, please refer to the documentation included with your purchase or visit the official PRAISUN website.
If you require assistance with assembly, have questions about product features, or need to report missing/damaged parts, please contact PRAISUN customer support through the retailer where the product was purchased or via the contact information provided on the PRAISUN brand store page.
Online Support: Visit the PRAISUN Store on Amazon


