1. Introduction
The Generic Starlink Mini X Satellite Internet System provides high-speed, low-latency internet access in remote and mobile locations. This system is designed for portability, making it ideal for RVs, camping, and other off-grid scenarios where traditional internet services are unavailable. The bundle includes a compact satellite dish and a wireless router, offering a complete solution for your connectivity needs.
Key features include:
- All-in-One Bundle: Includes Dish, Kickstand, Power Cables, and Wireless Router.
- High-Speed, Low-Latency Internet: Advanced 4th Gen phased array antenna for stable satellite internet.
- Compact & Portable Design: Lightweight and travel-ready for various mobile setups.
- Quick Plug-and-Play Setup: Simple installation guided by an app.
- Built for Remote Connectivity: Designed for areas without cellular or cable coverage.
Video: Overview of the Starlink Mini X Bundle, showcasing the satellite dish and router components.
2. What's in the Box
Carefully unpack your Starlink Mini X system and verify that all components are present. The standard bundle includes the following items:
- Starlink Satellite Dish (with integrated WiFi)
- Mini Router
- Kickstand
- Power Supply
- DC Power Cable (15 m / 49.2 ft)
- Starlink Plug
- #7 Wood Screws (2x)
- Drywall Anchors (2x)
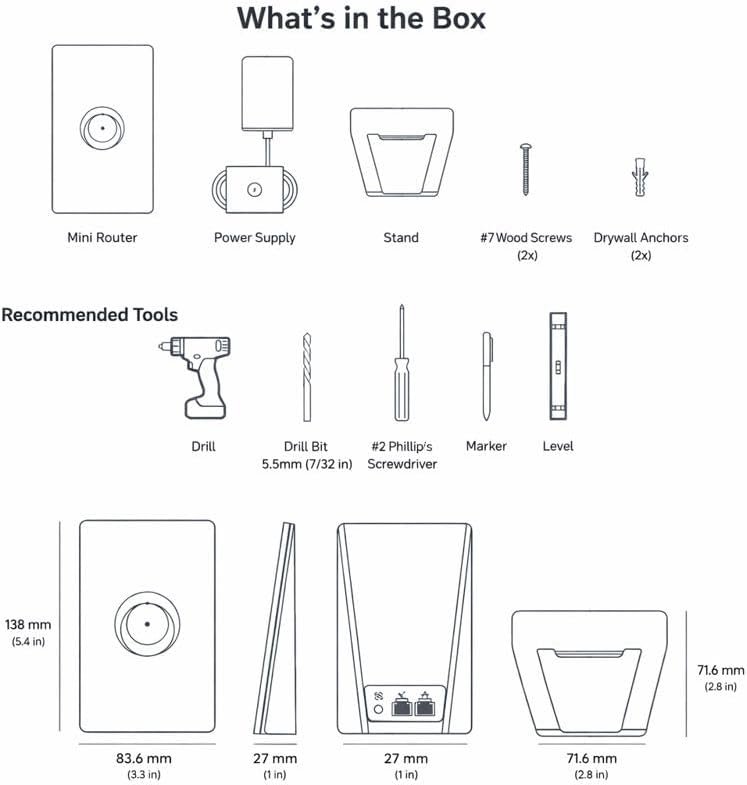
Image: Contents of the Starlink Mini X box and component dimensions.

Image: The Starlink Mini X Satellite Dish, Wireless Router, and packaging.
3. Setup Instructions
Follow these steps to set up your Starlink Mini X system. For optimal performance, ensure the satellite dish has a clear, unobstructed view of the sky.
- Download the Starlink App: Before beginning, download the official Starlink app from your device's app store. This app will guide you through the setup process and help you find the best placement for your dish.
- Assemble the Dish: Attach the kickstand to the Starlink satellite dish. Ensure it is securely fastened. If using a pipe adapter or flat mount (sold separately or included in specific bundles), follow their respective installation instructions.
- Position the Dish: Place the assembled dish in an outdoor location with a clear view of the sky. Use the Starlink app's 'Check for Obstructions' tool to confirm optimal placement.
- Connect Power: Connect the DC Power Cable to the satellite dish and then to the Power Supply. Plug the Power Supply into a standard 110V AC outlet.
- Connect the Router: Connect the Starlink Plug from the dish to the Mini Router. The router will automatically power on.
- Initial Boot-up: Allow the system a few minutes to power on and orient the dish. The dish will automatically adjust its angle to connect with Starlink satellites.
- Connect to WiFi: On your device (smartphone, tablet, laptop), connect to the Starlink WiFi network. The network name (SSID) and password can be found on the bottom of the Mini Router.
- Activate Service: Open the Starlink app and follow the on-screen prompts to activate your service and customize your WiFi network settings.

Image: Visual guide for connecting Starlink Mini X components.
Recommended Tools for Mounting (Optional)
If you plan to permanently mount your Starlink Mini X, the following tools may be required:
- Drill
- Drill Bit (5.5mm / 7/32 in)
- #2 Phillips Screwdriver
- Marker
- Level
4. Operating Instructions
Once your Starlink Mini X system is set up and connected, operating it is straightforward.
Connecting Devices
The Mini Router provides a Wi-Fi 6 network (Dual-Band, 802.11a compatible) for your devices. Simply connect your smartphones, tablets, laptops, or gaming consoles to the Starlink Wi-Fi network using the SSID and password you configured during setup via the Starlink app.
Using the Starlink App
The Starlink app is your primary interface for managing your internet system. Use it to:
- Monitor system status and performance.
- Check for obstructions and optimize dish placement.
- Adjust Wi-Fi settings (SSID, password, security protocol).
- Access support resources.
- Receive important updates and notifications.

Image: Starlink Mini X providing internet connectivity in a remote outdoor setting.

Image: Starlink Mini X enabling high-speed internet for remote work.
5. Maintenance
The Starlink Mini X system is designed for durability and minimal maintenance. However, following these guidelines will help ensure its longevity and optimal performance:
- Keep Clear of Obstructions: Regularly check the area around your satellite dish for any new obstructions (e.g., growing trees, new structures) that might block its view of the sky.
- Clean the Dish: If the dish surface becomes dirty, gently wipe it with a soft, damp cloth. Avoid using abrasive cleaners or harsh chemicals. Do not attempt to remove snow or ice manually if the dish is actively heating to melt it.
- Cable Management: Ensure all cables are securely connected and not pinched or damaged. Protect cables from environmental factors and potential physical damage.
- Software Updates: The system automatically updates its software. Ensure your system is powered on and connected to the internet periodically to receive these updates, which improve performance and add new features.
- Environmental Protection: While designed for outdoor use and tested for mobility in various weather conditions, avoid prolonged exposure to extreme conditions beyond its operating specifications.

Image: Starlink Mini X operating effectively in rainy conditions.
6. Troubleshooting
If you encounter issues with your Starlink Mini X system, try the following troubleshooting steps:
No Internet Connection
- Check Power: Ensure the Power Supply is plugged into a working outlet and the DC Power Cable is securely connected to both the dish and the power supply.
- Check Cable Connections: Verify that the Starlink Plug is firmly connected to the Mini Router.
- Clear View of Sky: Use the Starlink app to check for obstructions. Relocate the dish if necessary to ensure a clear view of the sky.
- Reboot System: Unplug the Power Supply from the outlet, wait 30 seconds, and then plug it back in. Allow several minutes for the system to reboot and reconnect.
- App Status: Check the Starlink app for system status messages or alerts.
Slow Internet Speed
- Obstructions: Even partial obstructions can degrade performance. Use the app to verify a clear line of sight.
- Router Placement: Ensure the Mini Router is centrally located and not obstructed by walls or large objects, which can interfere with Wi-Fi signal.
- Device Interference: Other wireless devices operating on similar frequencies can cause interference. Try moving your devices closer to the router or reducing other wireless activity.
- System Updates: Ensure your system has the latest software updates.
Cannot Connect to Wi-Fi
- Verify SSID/Password: Double-check that you are entering the correct Wi-Fi network name (SSID) and password.
- Router Power: Ensure the Mini Router is powered on (indicated by LED lights).
- Reboot Router: Unplug the router's power, wait 10 seconds, and plug it back in.
7. Specifications
| Feature | Specification |
|---|---|
| Brand | Generic |
| Model Name | STARLINK MINI X |
| Model Numbers | SL-MINI01, UTA-231, UTA-251 |
| Manufacturer | SpaceX |
| Connectivity Technology | Wi-Fi |
| Wireless Communication Standard | 802.11a |
| Wi-Fi Generation | Wi-Fi 6 |
| Frequency Band Class | Dual-Band |
| Security Protocol | WPA-PSK |
| Data Transfer Rate | 100 Megabytes Per Second |
| Maximum Upstream Data Transfer Rate | 75 Megabits Per Second |
| Number of Ports | 5 (on router) |
| LAN Port Bandwidth | 10/100 Mbps |
| Connectivity Range | 3200 Square Feet |
| Control Method | App |
| Voltage | 110 Volts |
| Item Dimensions (L x W x H) | 7"L x 4"W x 9"H |
| Color | White and Gray |

Image: Starlink Mini X Wireless Router.
8. Warranty and Support
Warranty Information
The Starlink Mini X Satellite Internet System comes with a 2-Year Warranty. This warranty covers manufacturing defects and ensures your product functions as intended under normal use. Please retain your proof of purchase for warranty claims.
Customer Support
For technical assistance, troubleshooting beyond this manual, or warranty inquiries, please refer to the official Starlink support resources available through the Starlink app or their official website. Ensure you have your product's model number (SL-MINI01, UTA-231, UTA-251) and serial number ready when contacting support.