1. Introduction
This manual provides essential instructions for the proper installation, operation, and maintenance of your CADDXFPV Eclipse Thermal FPV Camera, Model 384CA. This high-resolution thermal imaging camera is designed for integration into RC racing drones, offering advanced aerial observation capabilities. Please read this manual thoroughly before using the product to ensure optimal performance and safety.
2. Key Features
- FPV Thermal Camera: Specifically designed for high-performance aerial imaging and observation in RC racing scenarios.
- High-Resolution Imaging: Available in 384 resolution, delivering detailed thermal imaging for clear target recognition.
- HD Analog Technology: Utilizes a high-definition analog imaging system for stable and sharp image output during fast-paced FPV flights.
- RC Racing Drone Compatibility: Engineered for seamless integration with compatible RC racing drone models.
- Compact and Lightweight Design: Streamlined structure ensures minimal impact on drone speed and performance in competitive racing environments.
3. Package Contents
Verify that all items are present in your package:
- CADDXFPV Eclipse Thermal FPV Camera (Model 384CA)
- Connection Cable(s)
- Mounting Hardware (screws, standoffs - quantity may vary)
- User Manual (this document)
4. Safety Information
Please observe the following safety precautions to prevent damage to the product or injury to yourself:
- Power Supply: Ensure the camera is connected to a stable power source within the specified voltage range. Incorrect voltage can cause permanent damage.
- Installation: Always disconnect power from your drone before installing or removing the camera.
- Handling: Avoid touching the lens directly. Use a soft, clean cloth for cleaning if necessary.
- Environment: Do not expose the camera to extreme temperatures, moisture, or direct sunlight for prolonged periods.
- Modifications: Do not attempt to disassemble or modify the camera. This will void the warranty and may cause damage.
5. Product Components and Diagram
Familiarize yourself with the main components of your CADDXFPV Eclipse Thermal FPV Camera.
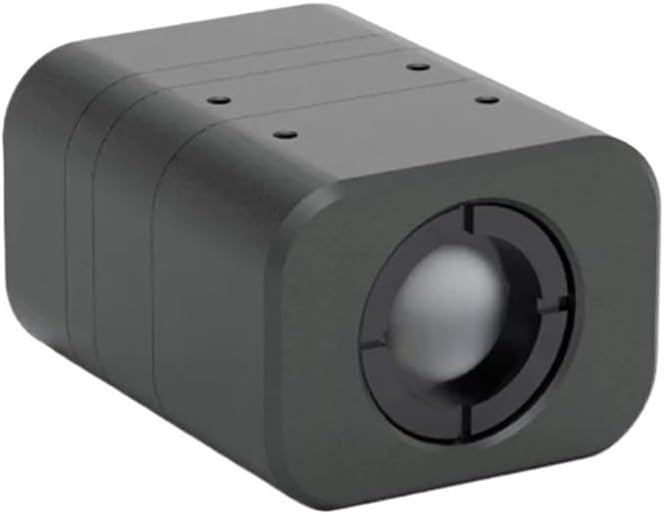
Figure 5.1: Front view of the CADDXFPV Eclipse Thermal FPV Camera, showing the thermal lens.

Figure 5.2: Another front view of the camera, highlighting the thermal lens assembly.

Figure 5.3: A slightly different angle of the camera's front, showing the compact housing.
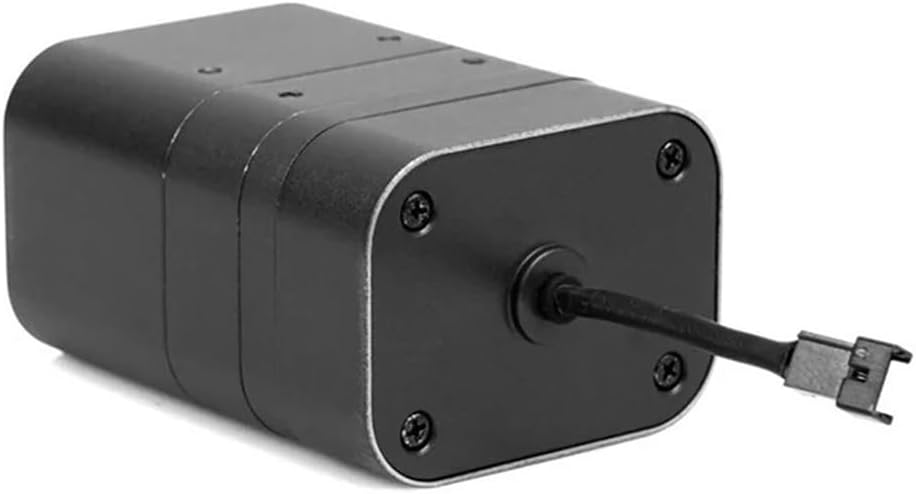
Figure 5.4: Rear view of the camera, illustrating the connection port and cable for power and video output.
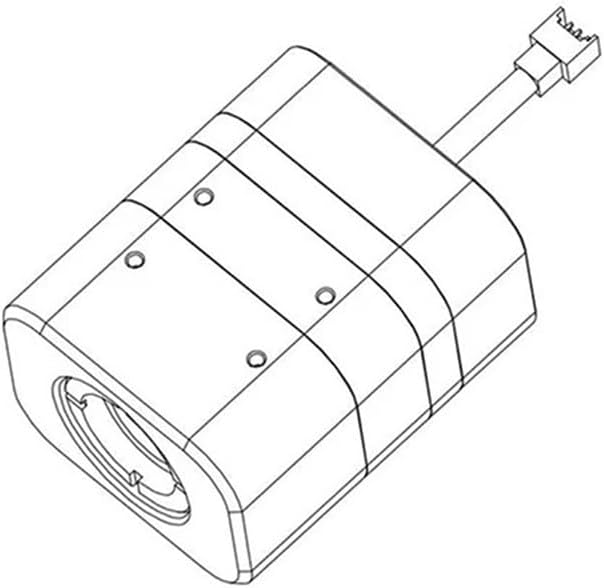
Figure 5.5: Technical line drawing of the camera, useful for understanding dimensions and mounting points.
The camera features a robust, compact housing designed to withstand the rigors of RC racing. The front houses the thermal imaging lens, while the rear provides the necessary connection points for integration into your drone's FPV system.
6. Setup and Installation
6.1 Mounting the Camera
- Identify a suitable mounting location on your RC racing drone that provides an unobstructed view and protects the camera from impact.
- Use the provided mounting hardware (screws, standoffs) to securely attach the camera to the drone frame. Refer to Figure 5.5 for potential mounting points.
- Ensure the camera is firmly fixed and does not vibrate, which could affect image quality.
6.2 Wiring Connections
The CADDXFPV Eclipse Thermal FPV Camera requires power and video signal connections to your drone's flight controller or video transmitter (VTX).
- Power Input: Connect the camera's power input wire (typically red) to a stable DC power source on your drone (e.g., 5V or 12V, depending on camera specifications and drone's power distribution board). Ensure polarity is correct.
- Ground: Connect the camera's ground wire (typically black) to the common ground of your drone's power system.
- Video Output: Connect the camera's video output wire (typically yellow or white) to the video input of your FPV video transmitter (VTX).
Note: Always consult your drone's flight controller and VTX manuals for specific wiring diagrams and voltage requirements. Incorrect wiring can damage components.
7. Operating Instructions
7.1 Initial Power-Up
- After completing all wiring and mounting, connect the main battery to your RC racing drone.
- Power on your FPV goggles or monitor.
- The thermal camera should automatically power on and transmit video to your FPV receiver.
- Observe the video feed for clear thermal imagery.
7.2 Thermal Imaging Basics
Thermal cameras detect infrared radiation (heat) emitted by objects, converting it into a visible image. Hotter objects typically appear brighter or in a different color spectrum depending on the camera's palette settings (if configurable). This allows for visibility in low-light conditions or through smoke/fog where traditional cameras struggle.
- Image Interpretation: Learn to interpret the thermal patterns. Different temperatures will be represented by varying shades or colors.
- Environmental Factors: Performance can be affected by extreme environmental conditions, such as heavy rain or direct heat sources.
8. Maintenance
8.1 Cleaning
- Lens: Gently clean the thermal lens with a soft, lint-free cloth. For stubborn dirt, use a lens cleaning solution specifically designed for optics. Avoid abrasive materials.
- Housing: Wipe the camera housing with a dry or slightly damp cloth. Do not use harsh chemicals or solvents.
8.2 Storage
When not in use, store the camera in a cool, dry place, away from direct sunlight and extreme temperatures. Protect the lens from scratches.
9. Troubleshooting
| Problem | Possible Cause | Solution |
|---|---|---|
| No video signal |
|
|
| Poor image quality / blurry image |
|
|
| Camera not powering on |
|
|
10. Specifications
| Feature | Detail |
|---|---|
| Model | CADDX Eclipse 384CA |
| Resolution | 384 (Thermal) |
| Imaging Technology | HD Analog |
| Application | RC Racing FPV Drones |
| Item Weight | 1.76 ounces (approx. 50g) |
| Package Dimensions | 3.94 x 3.94 x 3.94 inches (approx. 10 x 10 x 10 cm) |
11. Warranty and Support
This product is covered by a standard manufacturer's warranty against defects in materials and workmanship. The specific duration and terms of the warranty may vary by region and retailer. Please retain your proof of purchase for warranty claims.
For technical support, troubleshooting assistance, or warranty inquiries, please contact your retailer or the manufacturer's customer service department. Contact information can typically be found on the product packaging or the manufacturer's official website.


