1. Safety Information
Always prioritize safety when operating welding equipment. Failure to follow safety guidelines can result in serious injury or death.
- Eye Protection: Always wear a welding helmet with appropriate shade lenses to protect your eyes from intense light and UV radiation.
- Body Protection: Wear flame-resistant clothing, welding gloves, and protective footwear to prevent burns and electrical shock.
- Ventilation: Ensure adequate ventilation to remove welding fumes, which can be hazardous if inhaled.
- Electrical Safety: Never operate the welder in wet conditions. Ensure all connections are secure and the machine is properly grounded.
- Fire Prevention: Keep a fire extinguisher nearby. Remove flammable materials from the welding area.
- Overheating Protection: The machine is equipped with overheating protection. If the machine overheats, it will automatically shut down. Allow it to cool before resuming operation.

2. Product Overview
The YesRight ARC-200 is a portable 110V 200A Mini Stick Welder designed for both beginners and professionals. It features advanced IGBT inverter technology, providing stable and efficient welding performance. The machine includes intelligent Hot Start, Arc Force, and Anti-Stick functions to ensure easy arc ignition and consistent welding results.

3. Components and Controls
The ARC-200 features an intuitive control panel and essential accessories for immediate use.
3.1 Control Panel
The front panel includes a digital display and adjustment knobs for current and arc force.
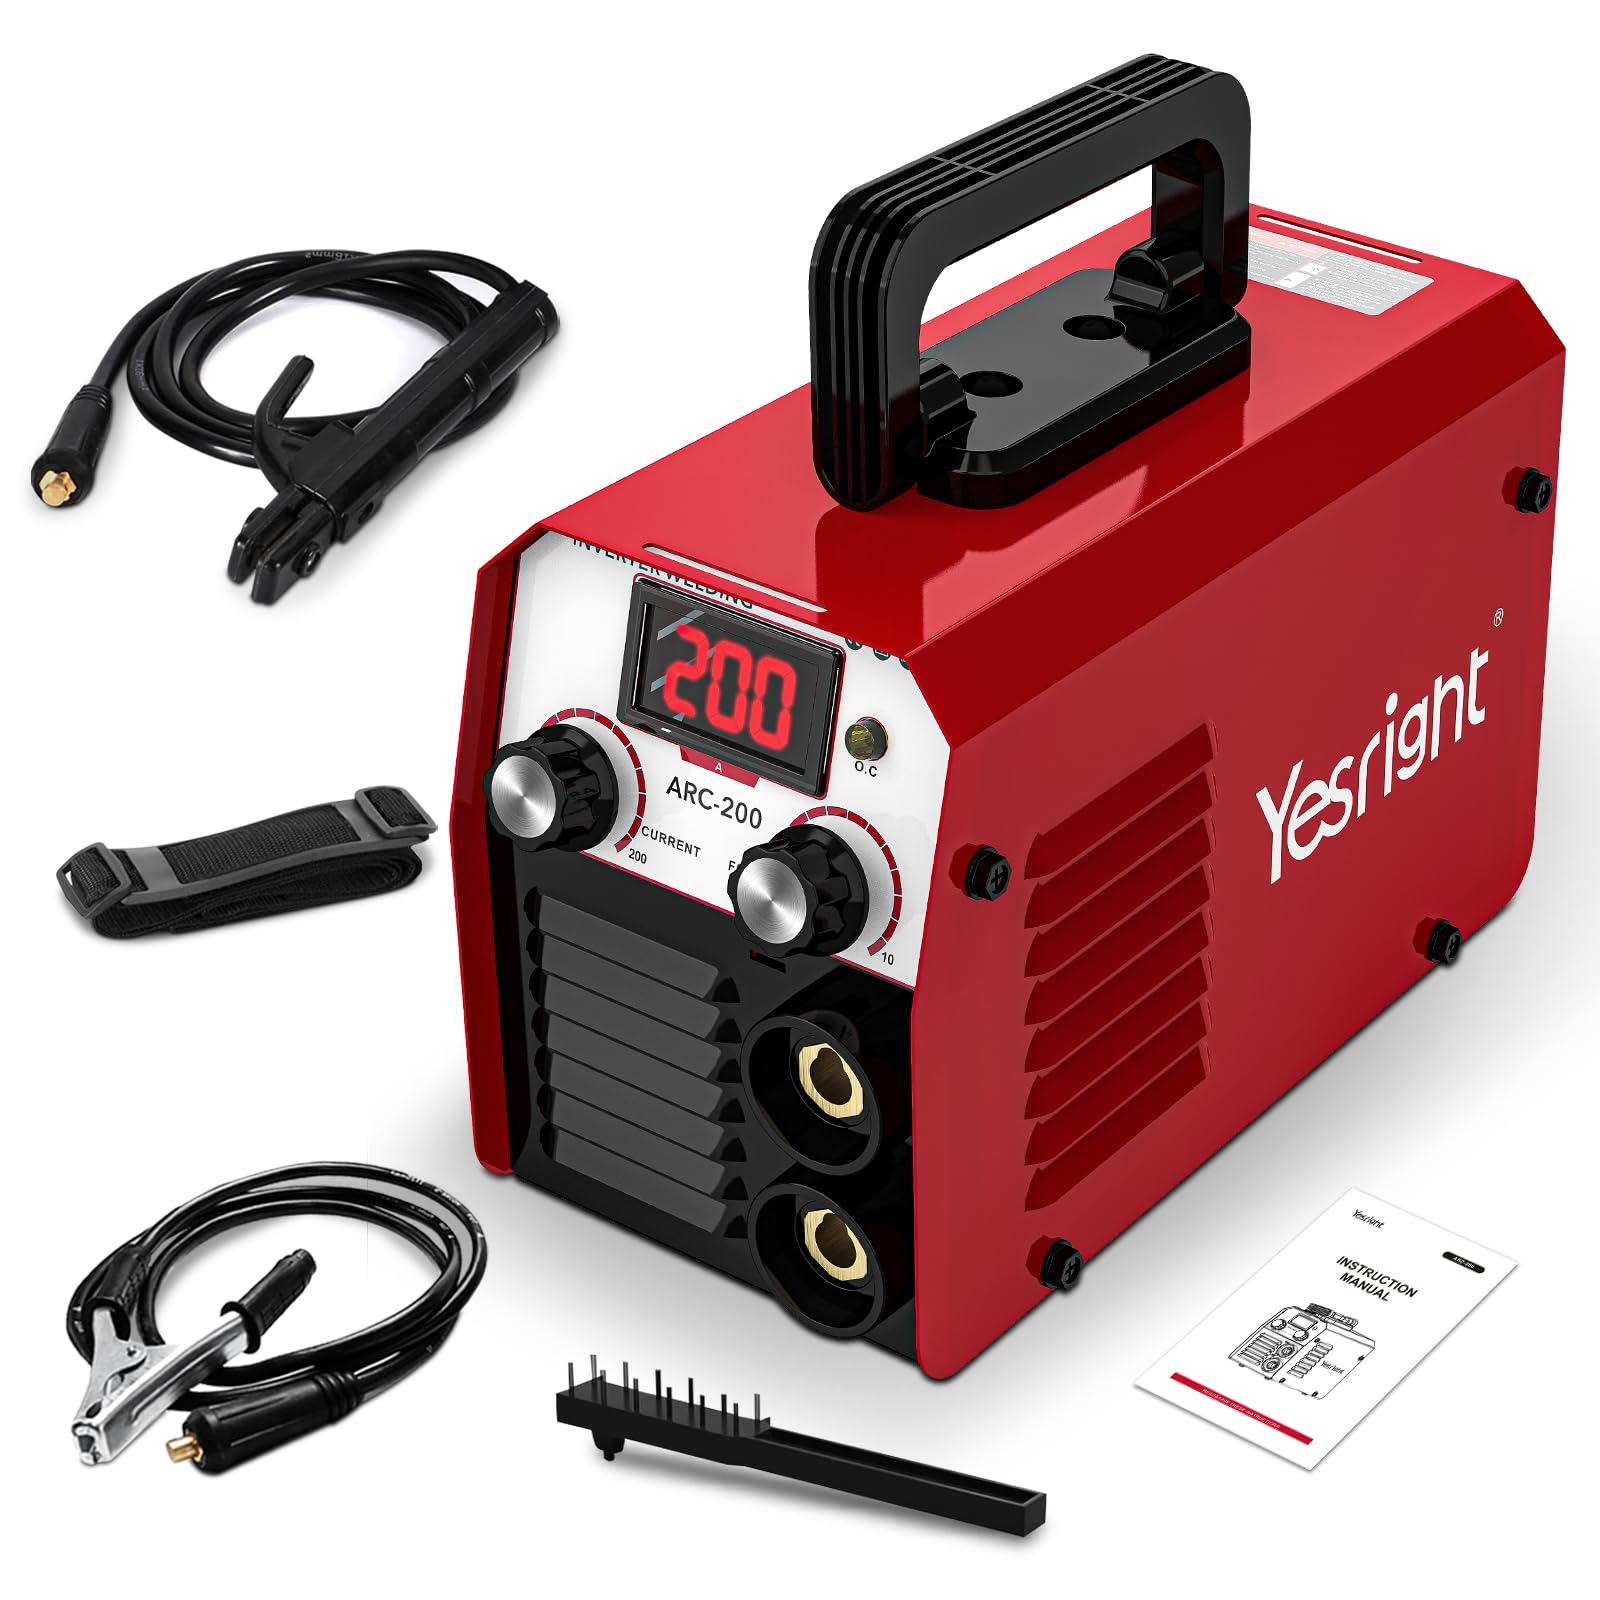
- Digital Display: Shows the set output current.
- Current Adjustment Knob: Adjusts the welding current from 20A to 200A.
- Arc Force Adjustment Knob: Adjusts the arc force for improved arc stability and penetration.
- Overheating Protection Indicator: Illuminates if the machine exceeds safe operating temperatures.
3.2 Included Accessories
The package typically includes the following items:
- 1x Electrode Holder
- 1x Ground Clamp
- 1x Hammer (for chipping slag)
- 1x Instruction Manual

4. Setup
Follow these steps to set up your YesRight ARC-200 welder:
- Unpack: Carefully remove all components from the packaging. Inspect for any damage.
- Connect Electrode Holder: Insert the electrode holder cable connector into the positive (+) terminal on the front panel and twist to secure.
- Connect Ground Clamp: Insert the ground clamp cable connector into the negative (-) terminal on the front panel and twist to secure.
- Power Connection: Connect the welder's power cord to a standard 110V AC power outlet. Ensure the outlet is properly grounded.
- Electrode Insertion: Insert the desired welding electrode into the electrode holder. The machine supports 2.5-3.2 mm (3/32"-1/8") electrodes.
5. Operating Instructions
Before operating, ensure you have read and understood all safety information.
5.1 Powering On and Adjusting Settings
- Turn On: Flip the power switch located on the rear or front panel to the 'ON' position. The digital display will illuminate.
- Set Current: Use the 'CURRENT' adjustment knob to set the desired welding amperage. Refer to electrode manufacturer guidelines for recommended settings.
- Adjust Arc Force: Use the 'FORCE' adjustment knob to fine-tune arc stability. Higher settings can help prevent the electrode from sticking.
5.2 Welding Process
The ARC-200 is equipped with features to simplify the welding process:
- Hot Start: This function automatically increases the current at the beginning of the weld to ensure easy arc ignition, especially with difficult-to-start electrodes.
- Arc Force: Automatically detects short circuits and increases current to prevent the arc from extinguishing, maintaining a stable arc.
- Anti-Stick: Reduces the current if the electrode sticks to the workpiece, allowing for easier removal and preventing damage to the electrode holder.
The machine is suitable for welding various metals, including iron, carbon steel, and alloy steel.

6. Maintenance
Regular maintenance ensures the longevity and optimal performance of your welder.
- Cleaning: Periodically clean the exterior of the machine with a dry cloth. Ensure ventilation openings are free from dust and debris.
- Cable Inspection: Regularly inspect welding cables, electrode holder, and ground clamp for any signs of wear, cuts, or damage. Replace damaged components immediately.
- Storage: Store the welder in a dry, clean environment away from direct sunlight and extreme temperatures.
7. Troubleshooting
Refer to the table below for common issues and their solutions.
| Problem | Possible Cause | Solution |
|---|---|---|
| Welder does not power on | No power supply; Faulty power cord/switch | Check power outlet and connections; Inspect power cord for damage. |
| Arc is difficult to strike or unstable | Incorrect current setting; Damp electrode; Poor ground connection; Insufficient arc force | Adjust current; Use dry electrodes; Ensure good ground contact; Increase arc force setting. |
| Electrode sticks frequently | Low current setting; Insufficient arc force; Improper welding technique | Increase current; Increase arc force; Improve welding technique; Utilize Anti-Stick feature. |
| Overheating indicator is on | Prolonged use; Blocked ventilation | Allow machine to cool down; Clear any obstructions from ventilation openings. |
8. Specifications
| Feature | Detail |
|---|---|
| Model Number | YESR-TEMU-MMA200 |
| Input Voltage | 110V AC |
| Output Current | 20-200A (Adjustable) |
| Electrode Diameter | 2.5-3.2 mm (3/32"-1/8") |
| Technology | IGBT Inverter |
| Features | Hot Start, Arc Force, Anti-Stick |
| Protection | Over-Heat, Over-Current, Over-Load, Over-Voltage |
| Item Weight | 3.99 pounds |
| Package Dimensions | 8.9 x 4.79 x 4.12 inches |
| Material | Metal |
9. Warranty and Support
9.1 Warranty Information
This product comes with a standard manufacturer's warranty. For specific details regarding warranty coverage, duration, and terms, please refer to the warranty card included with your product or contact YesRight customer service.
9.2 Customer Support
For technical assistance, troubleshooting beyond this manual, or warranty claims, please contact YesRight customer support through their official website or the contact information provided in your product packaging. When contacting support, please have your model number (YESR-TEMU-MMA200) and purchase date available.