1. Introduction
This manual provides detailed instructions for the setup, operation, and maintenance of your Geevon Wireless Weather Station with Atomic Clock, Model 256258. This device offers comprehensive environmental monitoring, including indoor and outdoor temperature and humidity, weather forecasts, barometric pressure, and an atomic clock with alarm functions. Please read this manual thoroughly before use to ensure proper functionality and longevity of your device.
2. What's in the Box
- Geevon Weather Station Main Unit
- TX19 Remote Outdoor Sensor
- Power Adapter
- User Manual (this document)
3. Key Features
- Large Color VA Display: Dual 5.9-inch display for clear visibility of time, date, temperature, and humidity.
- WWVB Atomic Clock with DST: Automatically synchronizes time and date with 7 selectable time zones.
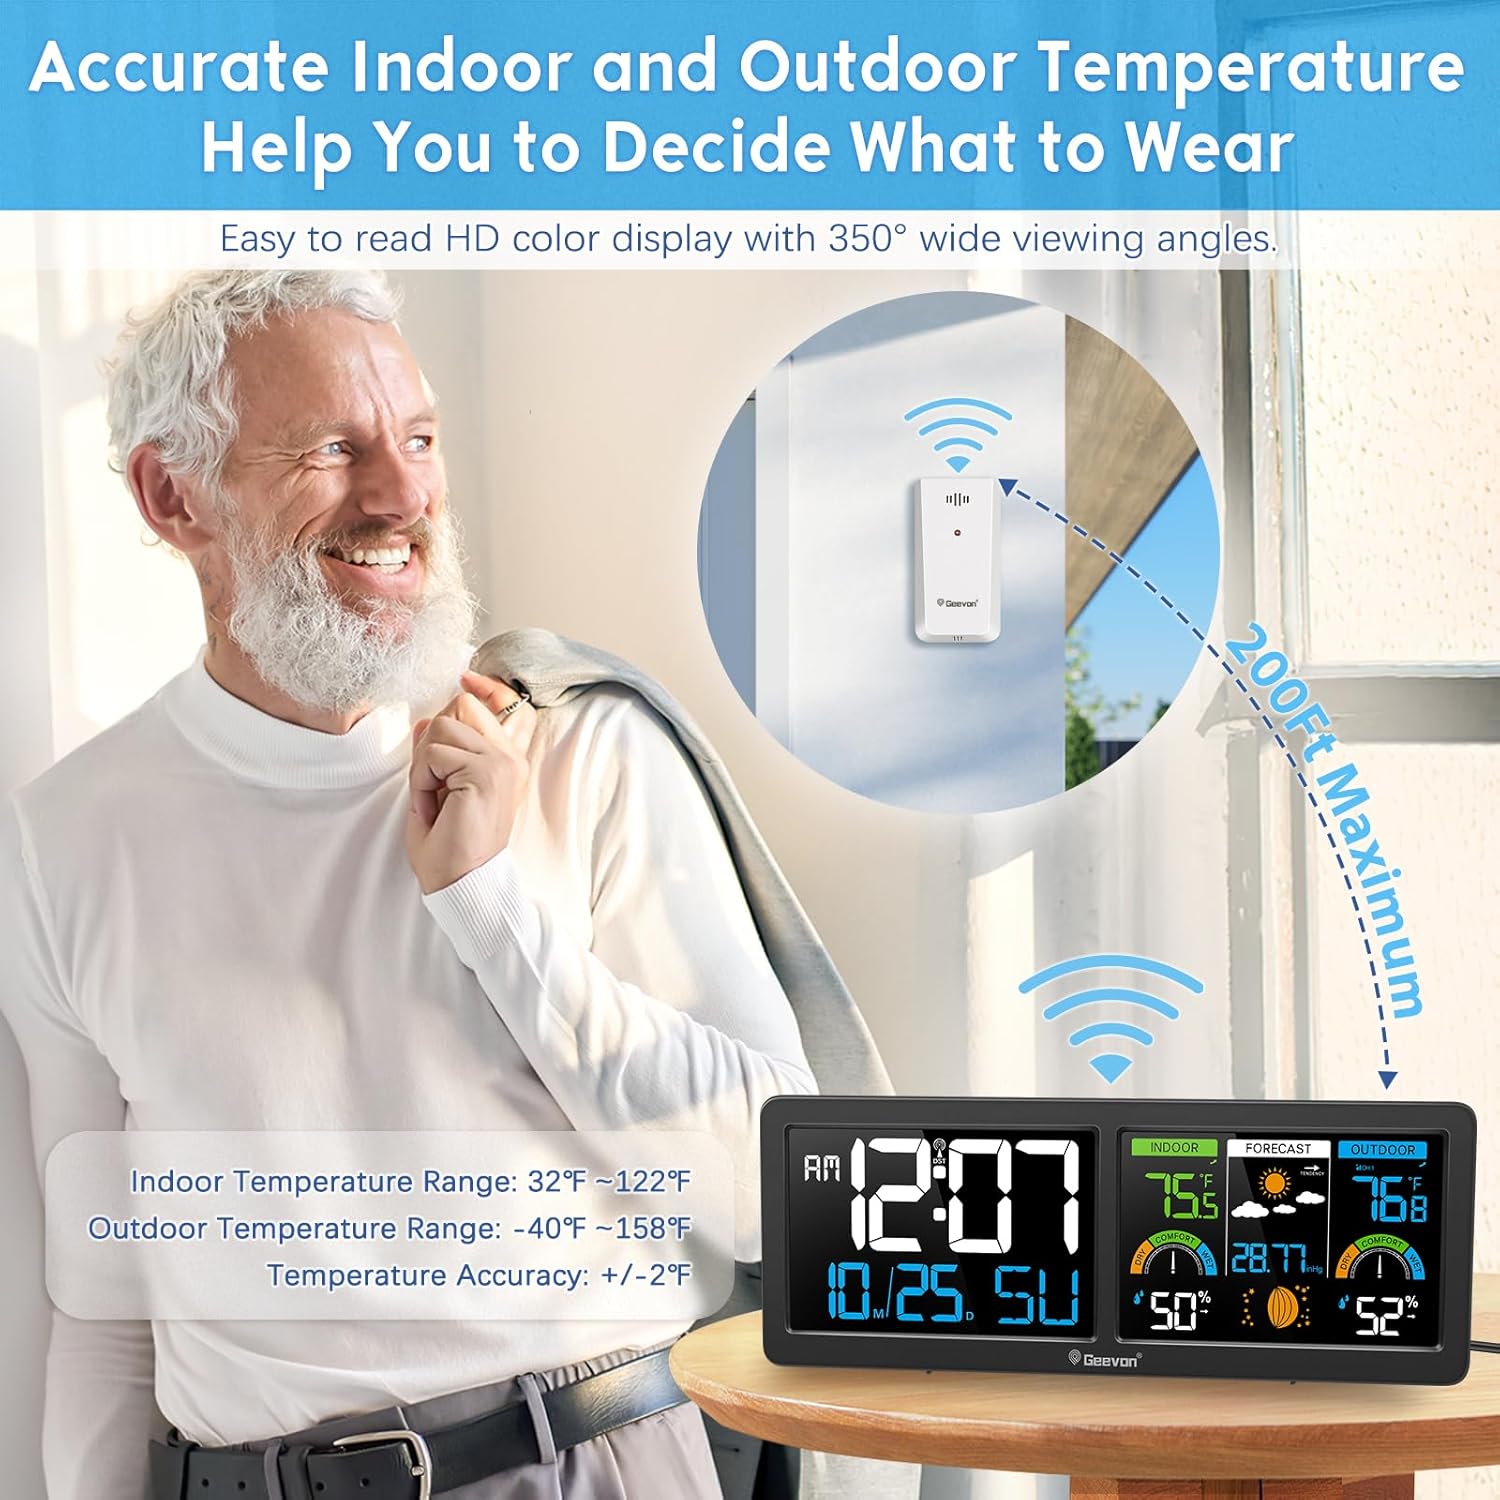
- 3-Channel Wireless Thermometer: Supports up to 3 remote sensors (one included) for monitoring multiple locations within 200ft/60m.
- Indoor/Outdoor Temperature & Humidity: Displays current, maximum, and minimum records with trend arrows.
- 12-Hour Weather Forecast: Predicts upcoming weather conditions based on barometric pressure changes.
- Barometric Pressure Display: Shows current atmospheric pressure.
- Comfort Indicator: Visual representation of indoor air comfort levels (Dry, Comfort, Wet).
- Moon Phases Display: Indicates the current lunar phase.
- Customizable Temperature Alerts: Set high/low temperature alarms for indoor or outdoor readings.
- Alarm Clock with Snooze: Integrated alarm function with a 5-minute snooze.
- Adjustable 3-Level Backlight: Offers Off, Low, and High brightness settings when powered by AC adapter.
- Dual Power Modes: Operates via AC power adapter or 3 AAA batteries (batteries not included).
- Mounting Options: Tabletop stand and wall-mount holes for versatile placement.
4. Setup Guide
4.1 Powering the Main Unit
- Insert 3 AAA batteries (not included) into the battery compartment on the back of the main unit. This provides backup power.
- Connect the included AC power adapter to the main unit and plug it into a power outlet. The display will light up.
Note: For continuous backlight and optimal display brightness, always use the AC power adapter. When operating on batteries only, the backlight will temporarily illuminate for 15 seconds after a button press to conserve power.
4.2 Setting Up the Remote Outdoor Sensor (TX19)
- Open the battery compartment of the TX19 remote sensor.
- Insert 2 AAA batteries (not included), ensuring correct polarity.
- Select a channel (1, 2, or 3) using the switch inside the battery compartment. Ensure this matches the channel selected on the main unit for outdoor readings. The default is Channel 1.
- Close the battery compartment. The sensor will begin transmitting data.

Back of the main unit with battery compartment and control buttons.

Geevon Weather Station displaying indoor and outdoor readings, with the remote sensor shown separately.
4.3 Pairing the Sensor and Main Unit
The main unit should automatically detect and pair with the remote sensor once both are powered on. If the outdoor readings do not appear or are incorrect:
- Ensure the remote sensor is within range (up to 200ft/60m line of sight) and not obstructed by large metal objects or thick walls.
- Press and hold the 'CH' button on the back of the main unit to initiate a new search for the sensor.
- Verify the channel switch on the remote sensor matches the channel displayed on the main unit.
4.4 Atomic Clock (WWVB) Setup
The weather station will attempt to receive the WWVB atomic clock signal automatically. This process typically occurs overnight. For successful synchronization:
- Place the main unit near a window, away from electronic interference.
- Ensure the correct time zone is set (refer to Section 5.2).
- The backlight may temporarily turn off during RCC signal reception.

The weather station automatically sets time via WWVB signal. Ensure correct time zone selection.
4.5 Placement
- Main Unit: Can be placed on a tabletop using its built-in stand or mounted on a wall using the integrated hanging holes.
- Remote Sensor: Place the outdoor sensor in a shaded, dry location, protected from direct sunlight and precipitation, to ensure accurate readings. Avoid placing it near heat sources or large metal objects.

Versatile placement options for the main unit.
Optimal placement for the outdoor sensor to ensure accurate readings.
5. Operating Instructions
5.1 Display Overview
The large VA color display is divided into several sections:
- Left Panel: Displays time (AM/PM), date (month/day), and day of the week.
- Middle Panel: Shows indoor temperature, indoor humidity, comfort level, barometric pressure, moon phase, and 12-hour weather forecast.
- Right Panel: Displays outdoor temperature, outdoor humidity, and comfort level.

Overview of the Geevon Weather Station's comprehensive display.
5.2 Adjusting Settings
Use the buttons on the back of the main unit to adjust settings:
- MODE Button: Press to cycle through display modes or enter setting mode.
- ALARM Button: Set or activate/deactivate the alarm.
- ALERT Button: Set temperature alerts.
- CH Button: Manually search for remote sensors or switch between multiple sensors (if more than one is connected).
- UP/DOWN Buttons: Adjust values during setting mode.
- C/F Button: Switch between Celsius and Fahrenheit temperature units.
5.3 Backlight Adjustment
When the main unit is powered by the AC adapter, the backlight has 3 adjustable levels (Off, Low, High). Lightly touch the top middle of the display to cycle through these brightness settings.

Adjustable backlight for optimal viewing in various lighting conditions.
5.4 Weather Forecast
The weather station predicts the weather for the next 12-24 hours based on changes in atmospheric pressure. The forecast icons include Sunny, Partly Sunny, Cloudy, and Rainy. This is a prediction and may not always be 100% accurate for all regions.

The weather station provides a 12-hour forecast based on barometric pressure trends.
5.5 Comfort Indicator
The comfort indicator displays the current indoor and outdoor comfort levels based on temperature and humidity. This helps you maintain an optimal environment.
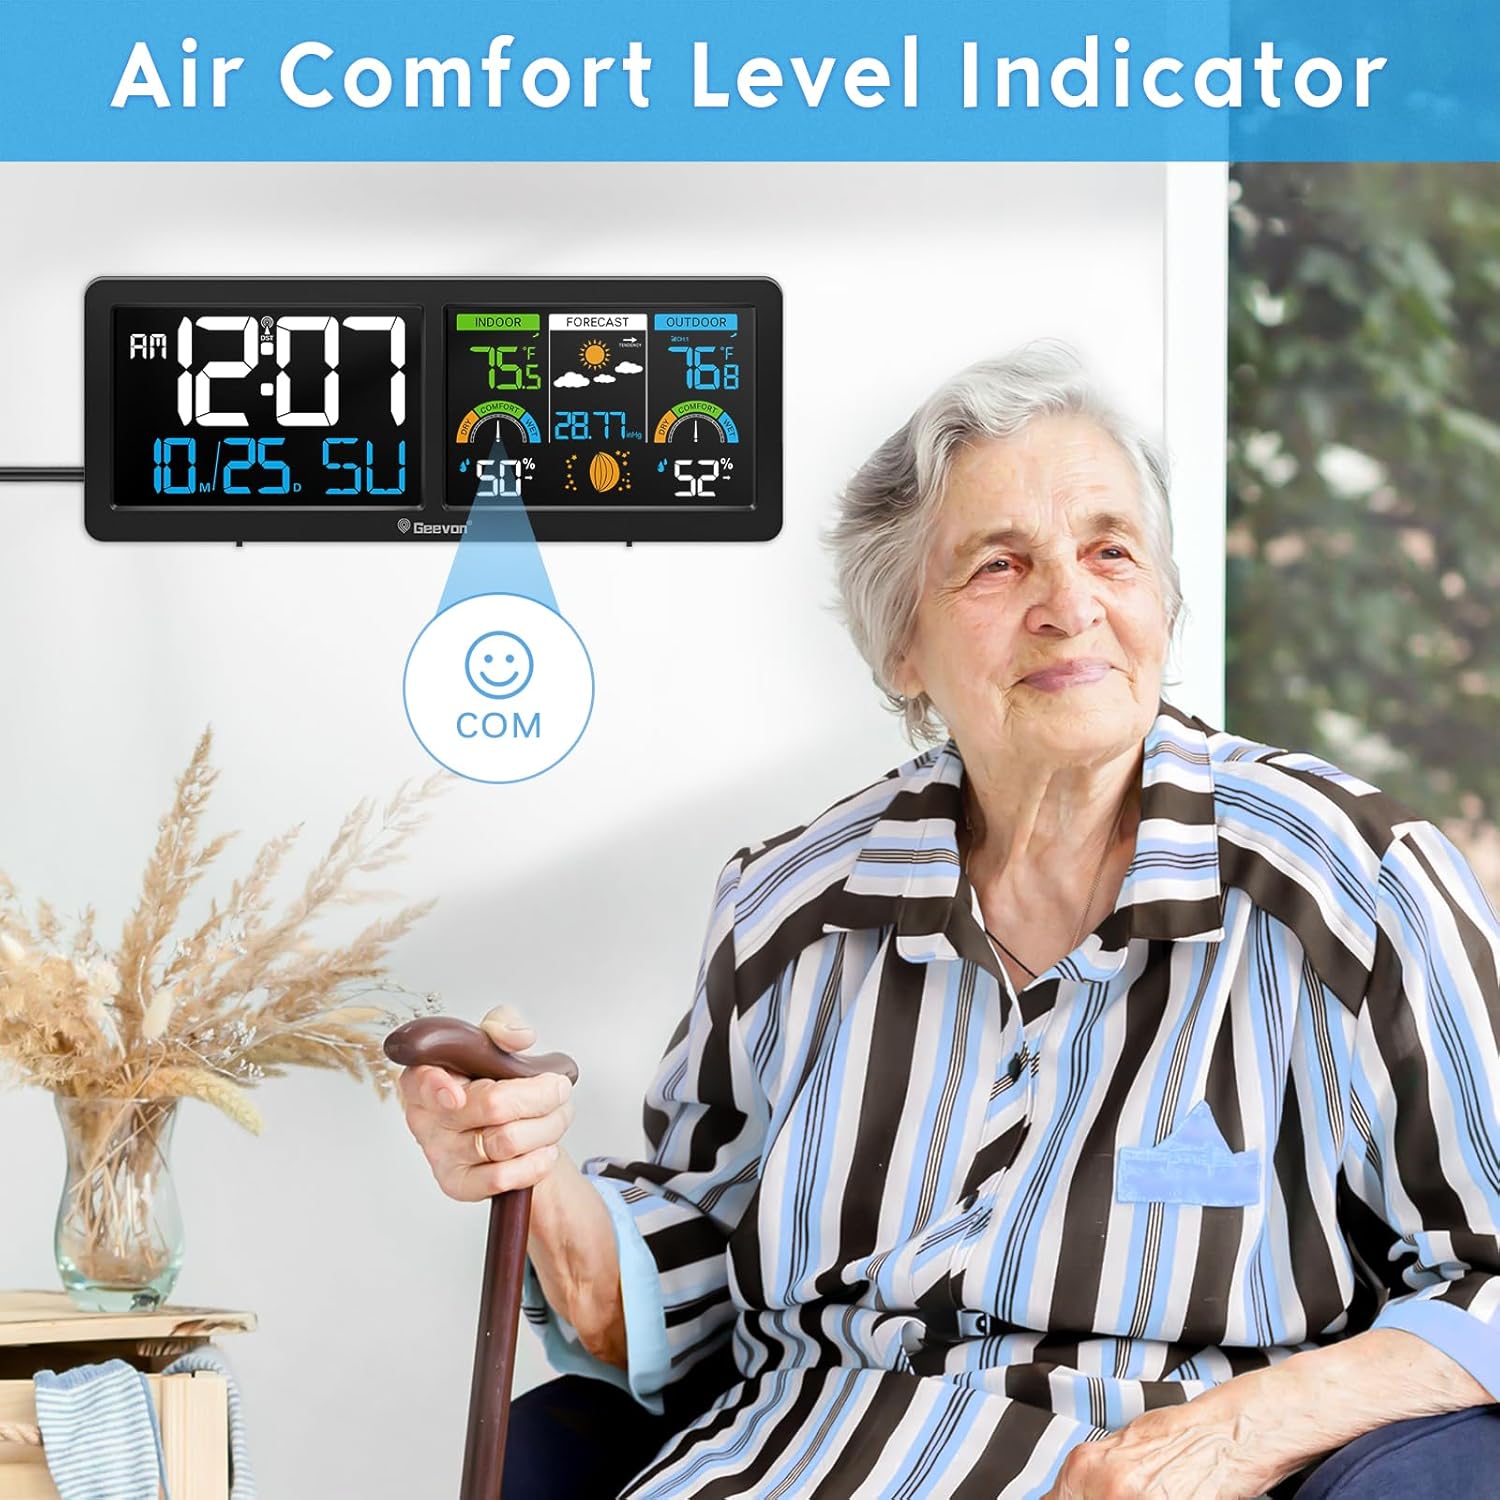
The comfort indicator helps assess indoor and outdoor environmental conditions.
6. Maintenance
- Cleaning: Wipe the display and unit with a soft, dry cloth. Avoid abrasive cleaners or solvents.
- Battery Replacement: Replace batteries in both the main unit and remote sensor when the low battery indicator appears on the display. Ensure correct battery type (AAA) and polarity.
- Sensor Protection: Ensure the remote sensor is protected from extreme weather conditions to prolong its lifespan.
7. Troubleshooting
| Problem | Possible Cause | Solution |
|---|---|---|
| No outdoor temperature/humidity reading | Sensor not paired, out of range, or low battery. | Check sensor batteries. Ensure sensor channel matches main unit. Press and hold 'CH' button on main unit to re-pair. Move sensor closer to main unit. |
| Atomic clock not synchronizing | Interference, incorrect time zone, or weak signal. | Ensure correct time zone is set. Place unit near a window, away from electronics. Allow overnight for signal reception. |
| Display is dim or off (on battery power) | Battery saving mode. | Plug in the AC power adapter for continuous, adjustable backlight. On batteries, backlight activates for 15 seconds after a button press. |
| Inaccurate outdoor readings | Sensor exposed to direct sunlight or rain. | Relocate the outdoor sensor to a shaded, protected area. |
8. Specifications
- Model Number: 256258
- Brand: Geevon
- Product Dimensions: 1"D x 11.2"W x 4.2"H
- Color: Black
- Material: Acrylonitrile Butadiene Styrene (ABS), Glass, Metal, Plastic
- Display Type: LCD (VA Color Display)
- Power Source: Corded Electric (AC adapter included) & Battery-powered (3x AAA for main unit, 2x AAA for sensor, not included)
- Connectivity Technology: Wireless (unspecified frequency)
- Wireless Transmission Range: Up to 200ft / 60m (open air)
- Indoor Temperature Range: 32°F ~ 122°F (0°C ~ 50°C)
- Outdoor Temperature Range: -40°F ~ 158°F (-40°C ~ 70°C)
- Temperature Accuracy: ±1°C (±2°F)
- Humidity Range: 20% ~ 95% RH
- Humidity Accuracy: ±5% RH
- Special Features: Adjustable Brightness, Alarm, Atomic Clock, Customizable Alert, Large Display, Moon Phase, Barometer, Comfort Indicator.
9. Warranty and Support
The Geevon Wireless Weather Station is typically covered by a 1-year manufacturer's warranty from the date of purchase. For warranty claims, technical support, or further assistance, please refer to the contact information provided on the product packaging or the official Geevon website. Keep your purchase receipt as proof of purchase.


