1. Introduction
This manual provides essential information for the safe and efficient operation, assembly, and maintenance of your VEVOR 15LB Push Broadcast Spreader, Model 2115. Please read and understand all instructions before using the product. Keep this manual for future reference.

Image: VEVOR 15LB Push Broadcast Spreader in use.
2. Safety Information
Always observe basic safety precautions when using this product to reduce the risk of injury. Failure to follow these instructions may result in personal injury or property damage.
- Read all instructions carefully before assembly and operation.
- Wear appropriate personal protective equipment, such as gloves and eye protection, especially when handling fertilizers or seeds.
- Ensure all fasteners are securely tightened before each use.
- Do not overload the hopper beyond its stated capacity.
- Keep children and pets away from the spreader during operation.
- Operate the spreader on level ground whenever possible to prevent tipping.
- Clean the spreader thoroughly after each use to prevent corrosion and material buildup.
3. Package Contents
Verify that all components are present before beginning assembly. If any parts are missing or damaged, contact VEVOR customer service.
- 1 x Manual
- 1 x Hopper
- 1 x Connecting Rod
- 2 x Wire Clips
4. Assembly Instructions
The VEVOR 15LB Push Broadcast Spreader is designed for quick and effortless assembly, with core components pre-assembled. Follow these steps:
- Step 1: Prepare the Base
Remove any screws or packaging materials from the main spreader unit and save any necessary hardware for subsequent steps. - Step 2: Install the Handle
Attach the handle assembly onto the cart spreader frame. Ensure the handle aligns correctly with the mounting points. - Step 3: Connect the Control Bar
Attach both ends of the connecting bar to the designated points on the handle and the spreader mechanism. - Step 4: Secure Mesh and Cover
Install the mesh screen inside the hopper and cover it with the transparent cover to protect contents from moisture and debris.
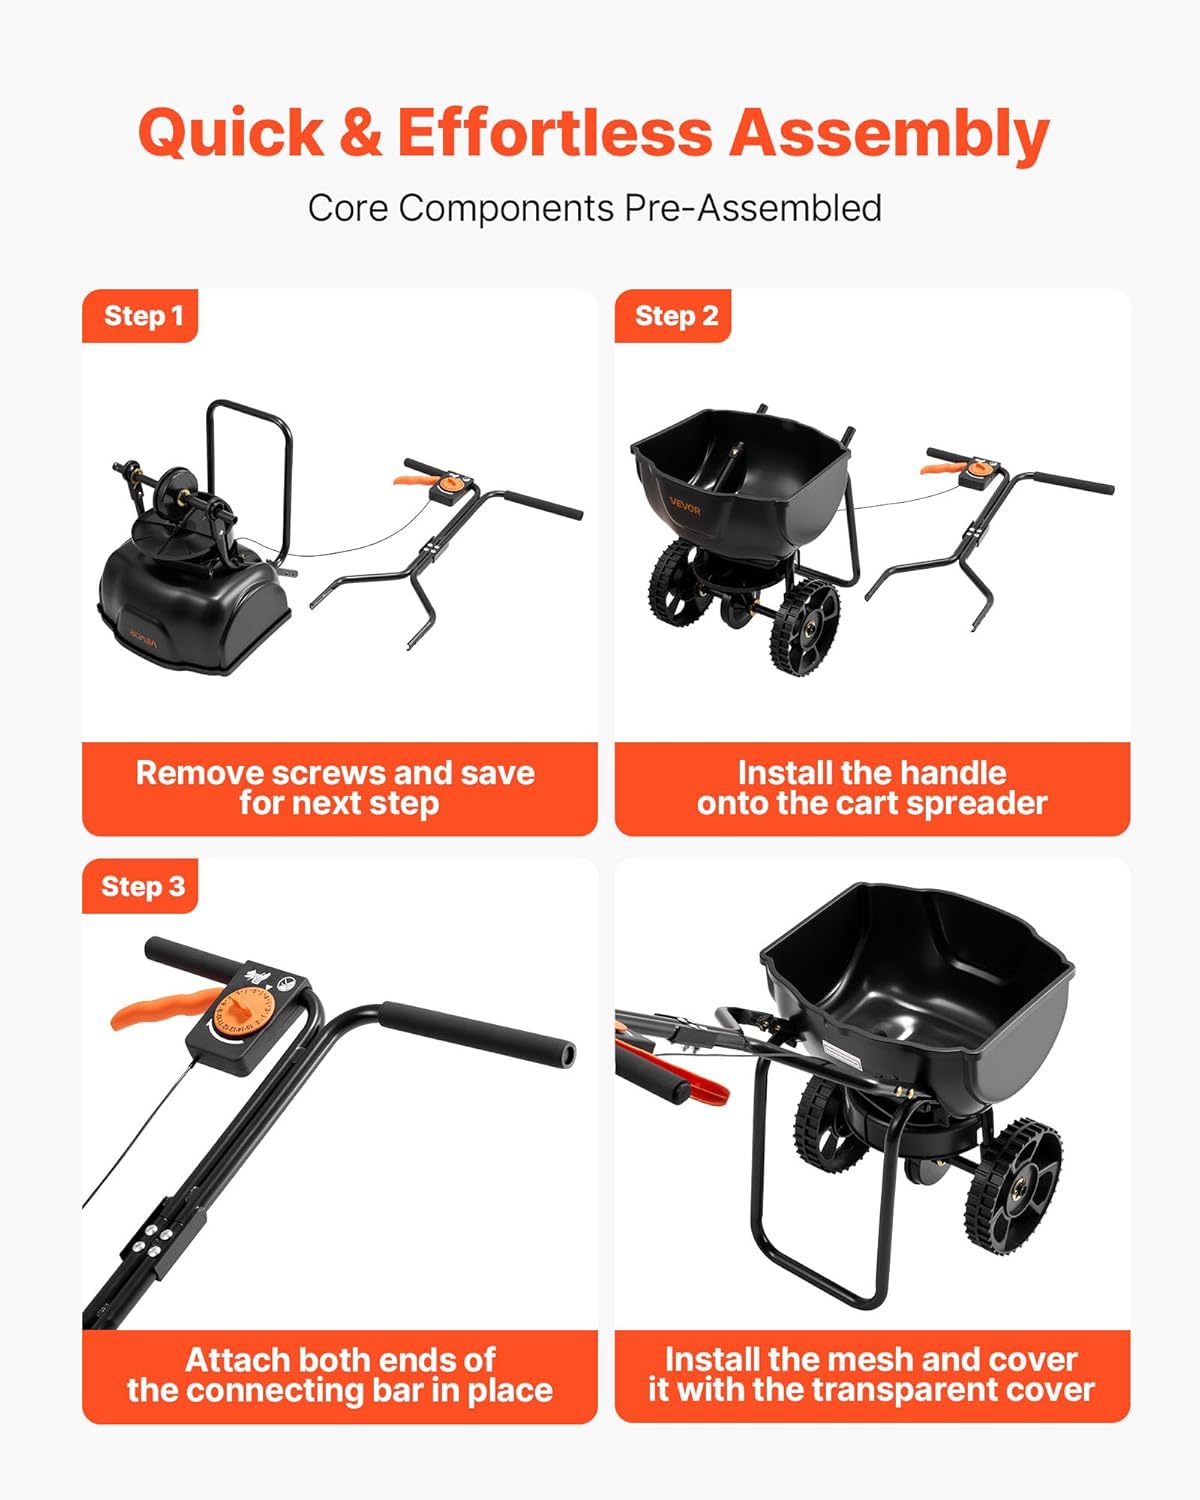
Image: Quick and Effortless Assembly Steps.
5. Operating Instructions
This spreader features a 9.8 ft broadcast width and 30-level spreading settings for precise material distribution. It is suitable for year-round use for seeding, fertilizing, and applying weed control.
5.1 Filling the Hopper
Ensure the flow control is in the closed position before adding material. Carefully pour your desired fertilizer, seed, or other granular material into the 15 lbs capacity hopper.

Image: Filling the spreader hopper with material.
5.2 Adjusting Spreading Settings
Use the adjustable flow control dial on the handle to select the desired spreading rate. The spreader offers 30 levels of adjustment for various material types and application needs. Refer to the material manufacturer's recommendations for optimal settings.

Image: Adjusting the spreading settings.
5.3 Spreading Material
Begin walking at a consistent pace, then engage the flow control lever to start spreading. Maintain a steady speed for even distribution. Release the flow control lever before stopping or turning to prevent over-application in one area. The triangular nylon agitator ensures even distribution.

Image: Efficient and even spreading in progress.
5.4 All-Terrain Use
The 10-inch pneumatic tires are designed to handle various outdoor conditions, including grass, gravel, and snow, providing smooth rolling and anti-slip performance.

Image: 10-inch all-terrain wheels for smooth rolling.
6. Maintenance
Proper maintenance ensures the longevity and optimal performance of your spreader.
- Cleaning: After each use, empty any remaining material from the hopper. Rinse the hopper and spreader mechanism thoroughly with water. Allow all parts to dry completely before storage.
- Lubrication: Periodically apply a light lubricant to moving parts, such as the axle and gearbox, to ensure smooth operation. The enclosed gearbox is designed to be rust-resistant.
- Storage: Store the spreader in a dry, covered area to protect it from the elements. The handle and hopper can detach for space-saving storage.
- Inspection: Regularly inspect the frame, wheels, and control cables for any signs of wear, damage, or loose connections. The powder-coated steel frame and UV-resistant, impact-resistant hopper are built for durability.
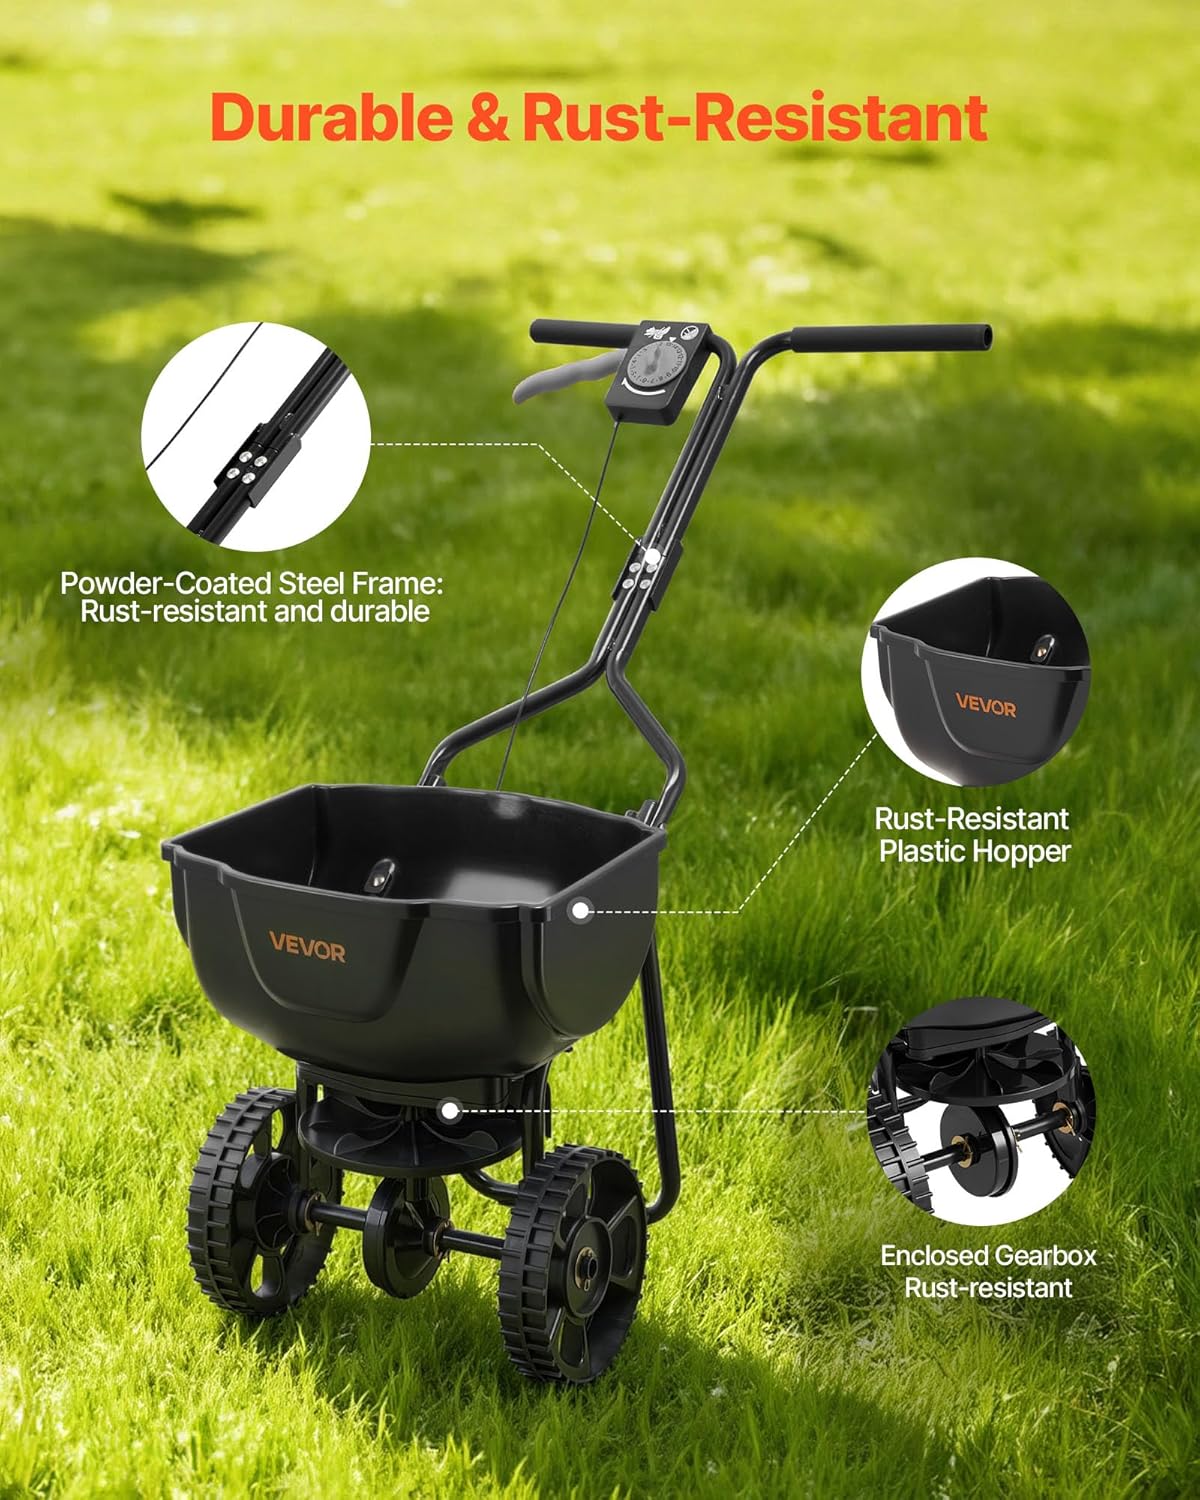
Image: Durable and rust-resistant components.
7. Troubleshooting
If you encounter issues with your spreader, refer to the following common problems and solutions:
- Uneven Spreading:
- Check if the flow control setting is appropriate for the material being used.
- Ensure the material is dry and free of clumps.
- Maintain a consistent walking speed during operation. - Material Not Dispensing:
- Verify that the flow control lever is fully open.
- Check for clogs in the hopper or spreader mechanism. Clear any obstructions.
- Ensure the agitator is rotating freely. - Difficulty Pushing:
- Check tire pressure if applicable (for pneumatic tires).
- Ensure wheels are free of debris and rotate smoothly.
- Do not overload the hopper. - Missing Parts During Assembly:
- Carefully re-check all packaging materials. If parts are genuinely missing, contact VEVOR customer support with your model number and purchase details.
8. Specifications
| Feature | Detail |
|---|---|
| Item Model Number | 2115 |
| Load Capacity | 15 lbs (6.8 kg) |
| Adjustable Settings | 30 levels |
| Spreading Width | 0-9.8 ft (0-3 m) |
| Hopper Dimensions | 14.96 x 13.77 x 7.87 inches (380 x 350 x 200 mm) |
| Wheel Diameter | 10 inches |
| Main Materials | Q195 Steel + ABS + Rubber |
| Net Weight | 9.26 lbs (4.2 kg) |
| Product Dimensions | 32.68 x 19.29 x 31.89 inches (830 x 490 x 810 mm) |
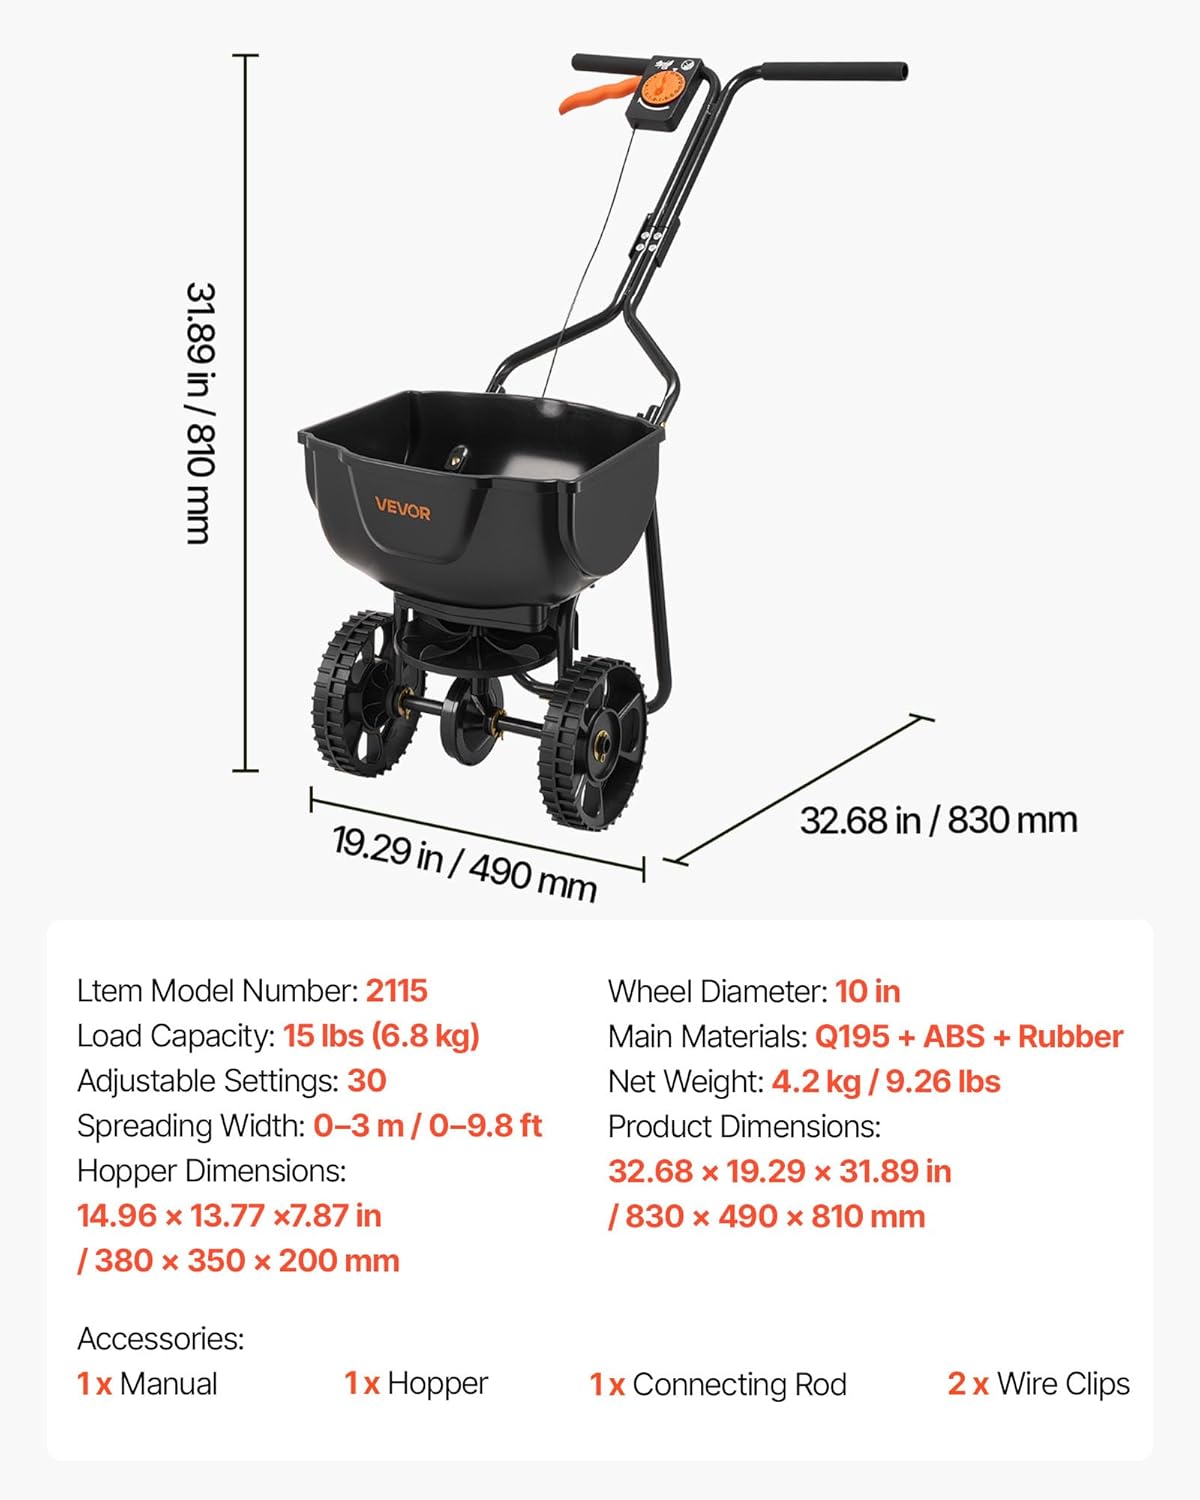
Image: Product dimensions and specifications.
9. Warranty and Support
For warranty information or technical support, please refer to the official VEVOR website or contact their customer service department. Keep your purchase receipt and model number (2115) handy for faster service.


