Introduction
Thank you for choosing the AstroAI L10 Mini Portable Air Compressor. This compact and efficient device is designed to provide quick and convenient inflation for various items, including car tires, bicycle tires, motorcycle tires, and sports balls. Please read this manual thoroughly before use to ensure safe operation and optimal performance.
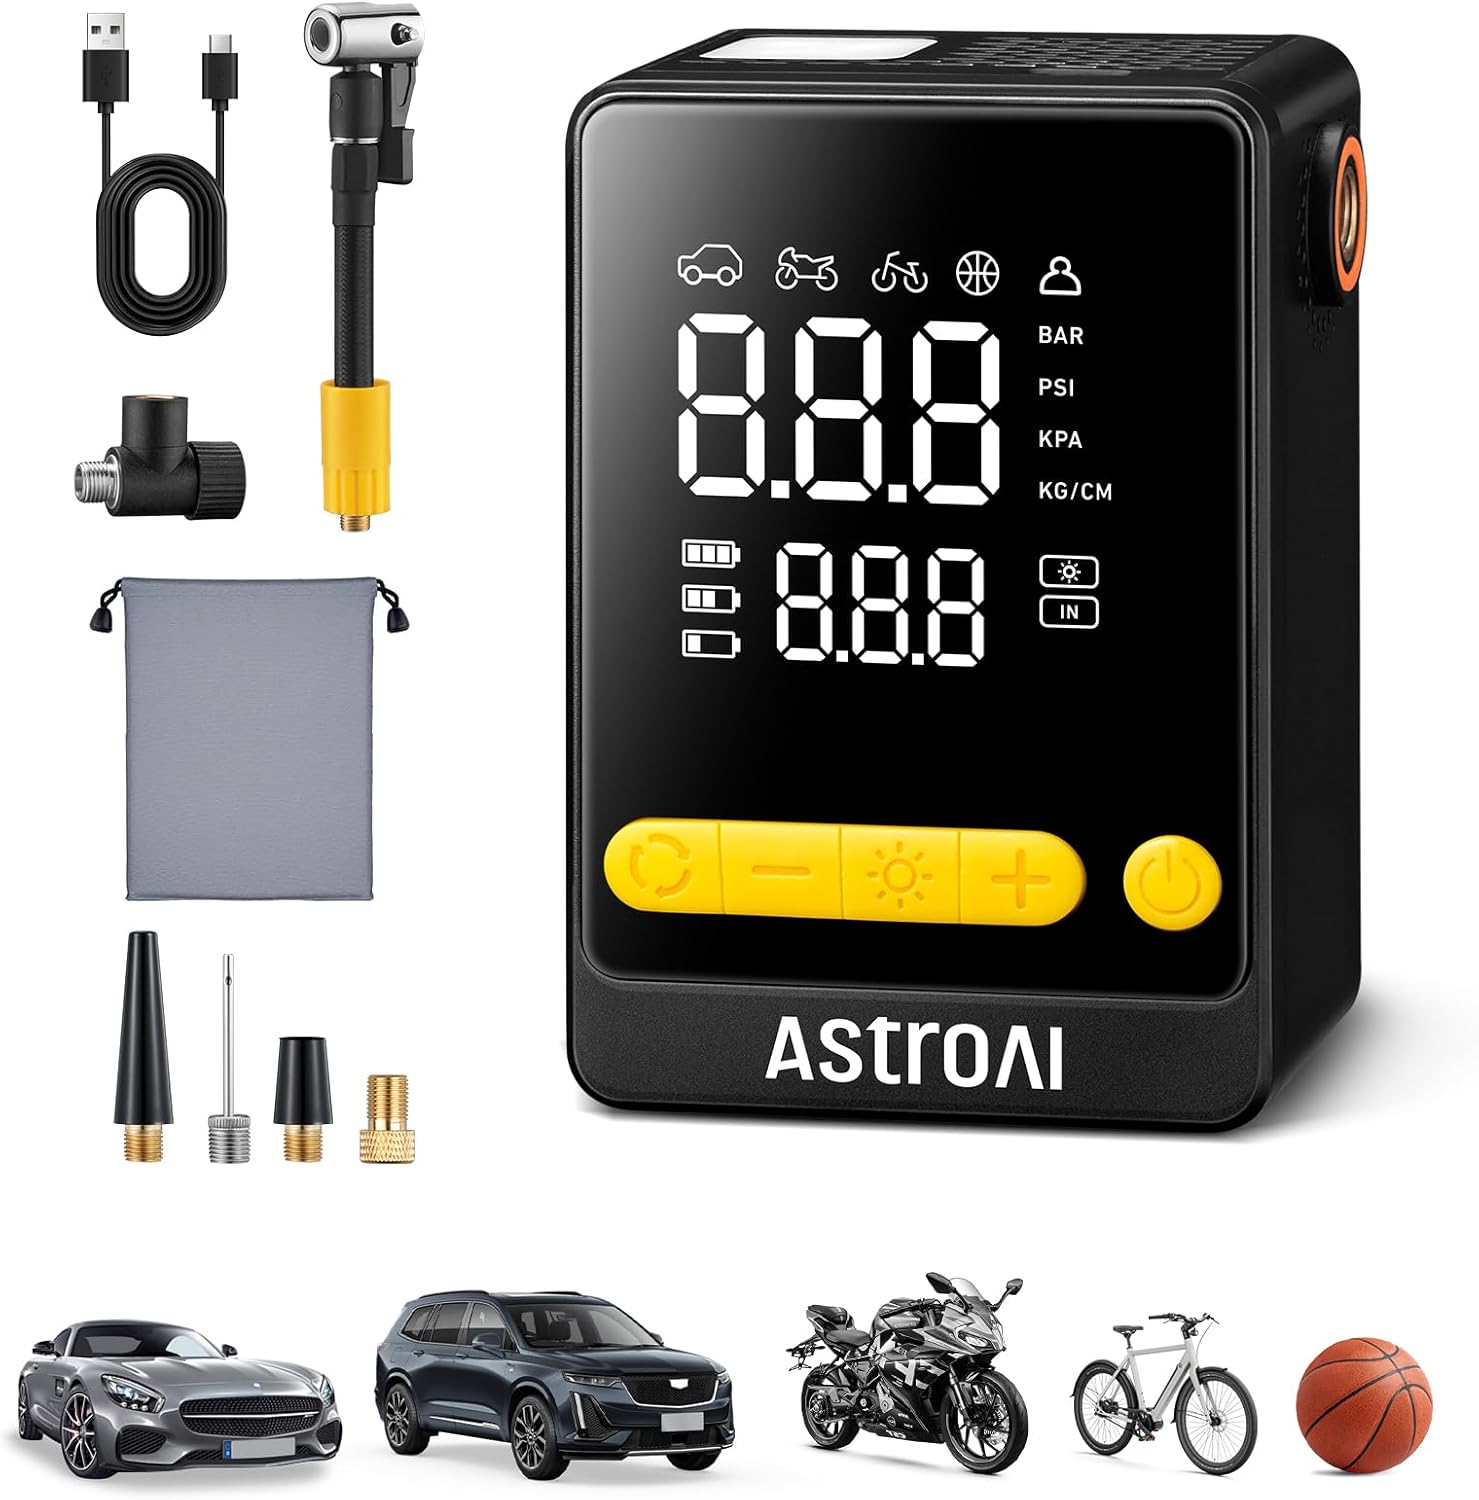
Figure 1: AstroAI L10 Mini Portable Air Compressor.
Product Features
- Fast Inflation: Inflates standard car tires (195/65 R15) from 30PSI to 36PSI in approximately 70 seconds.
- 360° Rotatable Hose: Features a flexible hose and air nozzle for easy connection to various valve angles without repositioning the device.
- Compact Design: Measures 3.9 × 2.6 × 1.8 inches and weighs less than 1 pound (447 grams), making it highly portable.
- 5 Preset Modes: Includes dedicated modes for cars, motorcycles, bicycles, and balls, plus a custom mode (3-150PSI adjustable).
- Auto Shutoff: Automatically stops inflation once the preset pressure is reached, preventing over-inflation.
- 3-Mode LED Flashlight: Integrated flashlight with Flashlight, Strobe, and SOS modes for visibility in low-light conditions.
- Maximum Pressure: Supports up to 150 PSI.

Figure 2: The AstroAI L10 Mini's compact, palm-sized design.

Figure 3: The 360° rotatable hose connector for easy attachment to tire valves.
Package Contents
- AstroAI L10 Mini Portable Air Compressor
- Air Hose with Schrader Valve Connector
- Presta Valve Adapter
- Ball Needle Adapter
- Swim Ring Nozzle Adapter
- USB-C Charging Cable
- Storage Bag
- User Manual

Figure 4: Included accessories for versatile inflation, including adapters for different valves and a storage bag.
Setup and Charging
Initial Charge
Before first use, fully charge the air compressor. Connect the provided USB-C charging cable to the charging port on the device and to a suitable USB power source (e.g., wall adapter, car charger, power bank). The battery indicator on the display will show charging status. A solid light indicates a full charge.
Attaching the Air Hose
Screw the air hose securely into the designated port on the air compressor. Ensure a tight connection to prevent air leakage. The 360° rotatable design allows for flexible positioning, making it easier to connect to various valve angles.
Operating Instructions
Power On/Off
- To power on, press and hold the power button for 1.5 seconds.
- To power off, press and hold the power button for 1.5 seconds again, or the device will automatically shut off after a period of inactivity.
Selecting Inflation Mode and Pressure
- Power on the device.
- Press the mode button to cycle through the 5 preset modes: Car, Motorcycle, Bicycle, Ball, and Custom.
- Once a mode is selected, the default pressure for that mode will be displayed. Use the '+' and '-' buttons to adjust the target pressure as needed. For custom mode, you can set any pressure between 3-150 PSI.
- Connect the air hose to the item you wish to inflate. Ensure the connection is secure.

Figure 5: The digital display allows selection of preset modes and adjustment of target pressure.
Starting and Stopping Inflation
- After setting the desired pressure and connecting the hose, press the inflation button to start the compressor.
- The compressor will automatically stop once the target pressure is reached.
- You can manually stop inflation at any time by pressing the inflation button again.

Figure 6: The air compressor connected to a car tire, actively inflating to the set pressure.
Using the LED Flashlight
- Press the flashlight button once for constant illumination (Flashlight mode).
- Press again for Strobe mode.
- Press a third time for SOS mode.
- Press a fourth time to turn off the flashlight.

Figure 7: The integrated LED flashlight provides illumination and emergency signaling options.
Maintenance
- Cleaning: Wipe the device with a soft, damp cloth. Do not use harsh chemicals or abrasive cleaners.
- Storage: Store the air compressor in a cool, dry place, away from direct sunlight and extreme temperatures. Use the provided storage bag to protect it from dust and damage.
- Battery Care: For optimal battery life, charge the device fully every 3-6 months if not in regular use.
Troubleshooting
| Problem | Possible Cause | Solution |
|---|---|---|
| Device does not turn on. | Low battery or device is off. | Charge the device fully. Press and hold the power button for 1.5 seconds to turn on. |
| No air is being pumped. | Hose not securely connected, wrong mode selected, or target pressure already reached. | Ensure hose is tightly connected. Verify correct mode and target pressure. Check if the item is already at the target pressure. |
| Inaccurate pressure reading. | Loose connection or sensor issue. | Ensure the hose is securely attached to the valve. If the issue persists, contact customer support. |
| Device overheats. | Continuous operation for too long. | Allow the device to cool down for at least 10-15 minutes before resuming operation. Avoid prolonged continuous use. |
Specifications
| Specification | Value |
|---|---|
| Brand | AstroAI |
| Model Number | AIRUN L10 Mini |
| Product Dimensions (L x W x H) | 3.9" x 2.6" x 1.8" |
| Power Source | Battery Powered |
| Maximum Pressure | 150 PSI |
| Voltage | 7.4 Volts (DC) |
| Unit Count | 1.0 Count |
Warranty and Support
The AstroAI L10 Mini Portable Air Compressor comes with a 2-Year Manufacturer Warranty. For warranty claims, technical support, or any questions regarding your product, please contact AstroAI customer service. You can typically find contact information on the official AstroAI website or through your purchase platform.
Video 8: Official product video demonstrating the features and ease of use of the AstroAI L10 Mini Portable Air Compressor.


