1. Introduction
The XTOOL IP500 is a professional diagnostic scan tool designed for Jeep, Dodge, and Chrysler vehicles. It offers comprehensive full system diagnostics, bi-directional control, and various special reset functions. This manual provides instructions for setting up, operating, maintaining, and troubleshooting your IP500 device.

Image 1.1: The XTOOL IP500 diagnostic tool, highlighting its key capabilities including bi-directional control, full system diagnostics, all services, and FCA CAN FD support.
2. Setup
2.1 Package Contents
Before starting, ensure all components are present:
- XTOOL IP500 Main Unit
- OBD2 Main Cable
- 12+8 Adapter Cable (for 2018+ FCA vehicles)
- Power Adapter (if applicable)
- User Manual (this document)
2.2 Connecting the Device
- Locate the vehicle's OBD2 port, typically under the dashboard on the driver's side.
- For most vehicles, connect the OBD2 Main Cable directly to the vehicle's OBD2 port and the IP500 device.
- For 2018 and newer FCA (Fiat Chrysler Automobiles) vehicles (Jeep, Dodge, Chrysler, RAM), use the included 12+8 Adapter Cable. Connect the 12-pin and 8-pin connectors to the vehicle's respective ports, then connect the OBD2 male connector of the adapter to the OBD2 female connector of the main cable, and finally to the IP500 device.
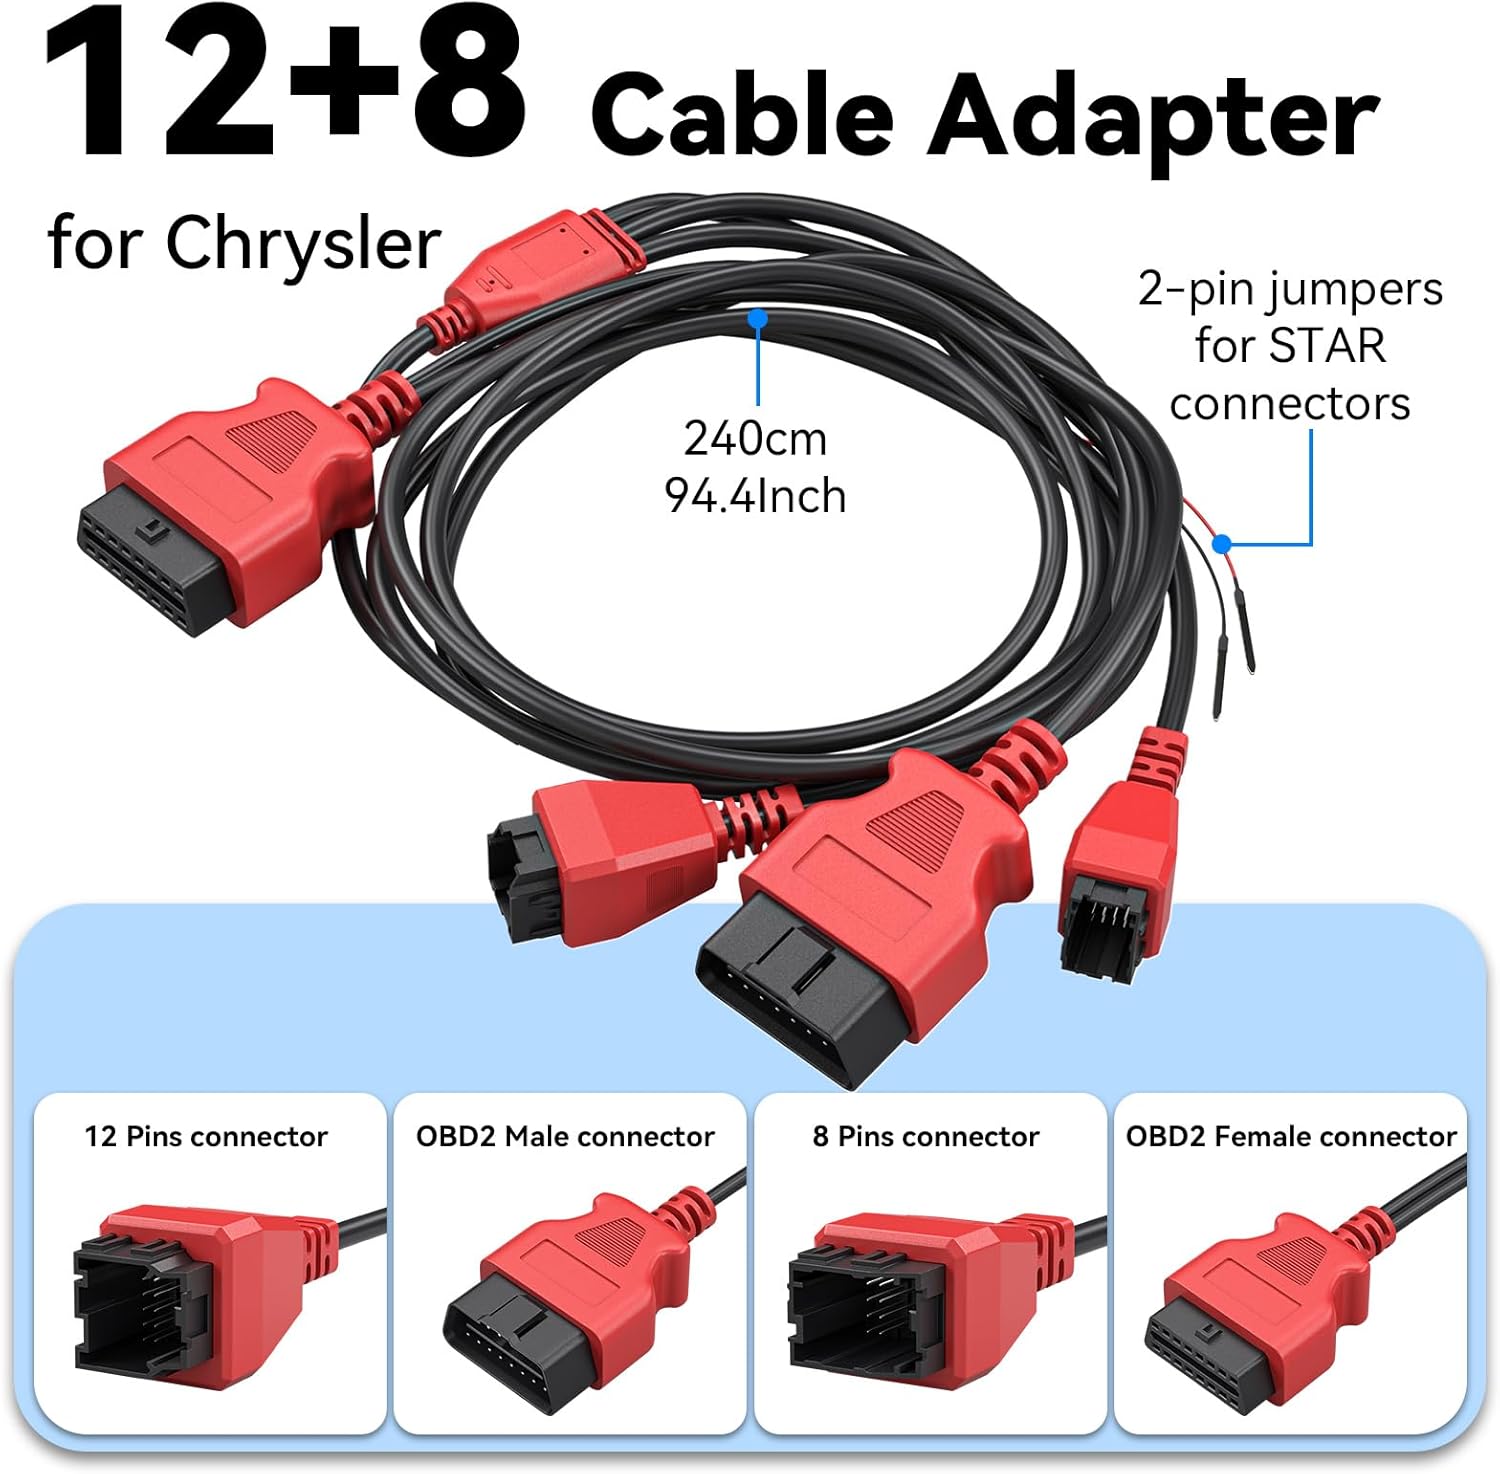
Image 2.1: Detailed view of the 12+8 Cable Adapter, illustrating its various connectors and overall length, essential for connecting to newer FCA vehicles.
2.3 Initial Power-On and Software Updates
- Once connected, the IP500 device should power on automatically. If not, press the power button.
- Follow the on-screen prompts to select your preferred language (23 languages supported).
- Connect the device to a Wi-Fi network.
- Navigate to the 'Updates' section on the main menu to download and install the latest software. Regular updates ensure optimal performance and vehicle compatibility.
3. Operating Instructions
3.1 Main Menu Navigation
The IP500 features a 5.45" HD touchscreen for intuitive navigation. The main menu typically includes options such as 'Auto Scan', 'Diagnosis', 'OBD II', 'Special Function', 'Updates', and 'More'.
3.2 Full System Diagnostics
This function allows you to access and diagnose all available electronic control modules within the vehicle. It supports comprehensive diagnostics for Fiat Group vehicles (Chrysler, Dodge, Jeep, RAM) from 1998 to 2024.
- Select 'Diagnosis' from the main menu.
- Choose the vehicle make and model.
- Perform an 'Auto Scan' or manually select specific systems (e.g., Engine, Transmission, ABS, Airbag, HVAC, Suspension, Headlamp, Audio, A/C).
- View live data streams, read and clear Diagnostic Trouble Codes (DTCs).

Image 3.1: The IP500 device displaying a diagnostic menu, with an overlay showing various vehicle systems it can diagnose, such as engine, airbag, and transmission.
3.3 Special Functions and Reset Services
The IP500 provides access to 18+ special functions for various vehicle maintenance and repair tasks, including those for 2018+ FCA vehicles using the 12+8 adapter.
- Select 'Special Function' from the main menu.
- Choose the desired service from the list. Common services include:
- EPB Reset: Electronic Parking Brake reset.
- SAS Reset: Steering Angle Sensor calibration.
- BMS Reset: Battery Management System reset.
- Headlight Adjustment: Adjusting headlight settings.
- Injector Coding: Coding new injector values.
- Throttle Matching: Throttle body relearn.
- ABS Bleeding: Performing ABS brake bleeding.
- Gearbox Matching: Transmission adaptation.
- Suspension System: Suspension calibration.
- Window Initialization: Window motor relearn.
- Seat Matching: Seat position calibration.
- Maintenance Light Reset: Resetting service indicators.
- A/F Settings: Air/Fuel ratio adjustments.
- Transport Mode: Deactivating/activating transport mode.

Image 3.2: A visual representation of the 'ALL RESET SERVICES' menu on the IP500, showing various available functions for vehicle maintenance.
3.4 Bi-Directional Control (Active Tests)
This feature allows the IP500 to send commands to vehicle components and receive feedback, enabling active testing of actuators and sensors. This helps in quickly pinpointing issues.
- Select 'Diagnosis' and then navigate to the specific system.
- Look for 'Active Test' or 'Bi-Directional Control' options.
- Examples of components that can be tested include: Windows, Mirrors, Injectors, Door Locks, Braking systems, Wipers, Headlights, and Horns.

Image 3.3: The IP500 illustrating bi-directional control capabilities, showing how it can command and receive feedback from various vehicle components.
3.5 Full OBD2 Functions
The IP500 supports all 10 modes of OBD2 testing, providing essential diagnostic information for emissions-related issues.
- Select 'OBD II' from the main menu.
- Available functions include:
- Read Codes: Retrieve current, pending, and permanent DTCs.
- Clear Codes: Erase DTCs and turn off the Malfunction Indicator Light (MIL).
- Live Data: View real-time data parameters.
- Freeze Frame: View a snapshot of vehicle operating conditions when an emission-related fault occurs.
- I/M Readiness: Check the readiness of the emission monitoring systems.
- O2 Monitor Test: Retrieve O2 sensor monitoring test results.
- On-Board Monitor Test: Retrieve results for emission-related powertrain components and systems.
- Component Test: Initiate a leak test for the vehicle's EVAP system.
- Vehicle Info: Retrieve vehicle identification number (VIN), calibration ID (CALID), and calibration verification number (CVN).

Image 3.4: The IP500's interface showing the comprehensive range of OBD2 functions available for vehicle diagnostics.
3.6 FCA Secure Gateway Access
For 2018+ FCA vehicles equipped with a Secure Gateway Module (SGM), the 12+8 adapter cable provides direct diagnostic access without requiring an FCA AutoAuth subscription. This allows full diagnostic capabilities on these newer models.

Image 3.5: The IP500 demonstrating FCA Secure Gateway Access, indicating its compatibility with 2018+ Chrysler, Dodge, and Jeep vehicles.
4. Maintenance
4.1 Cleaning the Device
Use a soft, damp cloth to clean the device's screen and body. Avoid using abrasive cleaners or solvents that could damage the surface.
4.2 Software Updates
Regularly check for and install software updates via Wi-Fi. These updates provide new vehicle coverage, bug fixes, and improved functionality. The IP500 offers free lifetime functional updates.
4.3 Storage
Store the device in a cool, dry place away from direct sunlight and extreme temperatures. Keep it in its protective case when not in use to prevent damage.
5. Troubleshooting
5.1 Device Not Powering On
- Ensure the device is correctly connected to the vehicle's OBD2 port.
- Check the vehicle's battery voltage; a low battery might prevent the device from powering up.
- Verify the OBD2 port fuse in the vehicle.
5.2 Communication Errors
- Confirm the ignition is in the ON position (engine off).
- Ensure the correct vehicle make, model, and year are selected in the device menu.
- For 2018+ FCA vehicles, verify the 12+8 adapter is correctly installed.
- Try connecting to a different vehicle to rule out a vehicle-specific issue.
5.3 Software Freezes or Slow Performance
- Restart the device.
- Ensure the software is up to date.
- Clear cache or temporary files if the option is available in device settings.
6. Specifications
| Feature | Description |
|---|---|
| Processor | 1.2GHz Dual-Core |
| Display | 5.45" HD Touchscreen |
| Battery | 3150mAh |
| Storage | 32GB |
| Operating System | Android-based |
| Vehicle Coverage | Fiat Group (Chrysler, Dodge, Jeep, RAM) 1998-2024; 2018+ FCA with 12+8 adapter |
| Languages | 23 languages supported |
| Updates | Free Lifetime Functional Updates |
7. Warranty and Support
7.1 Warranty Information
For detailed warranty information, please refer to the official XTOOL website or contact your point of purchase. The device includes free lifetime functional updates, ensuring ongoing software support.
7.2 Technical Support
If you encounter any issues or require technical assistance, please contact XTOOL customer support. Contact details can typically be found on the official XTOOL website or within the device's 'About' section.


