Yinker 17-inch LCD KVM Console (8-Port VGA) Instruction Manual
Model: 8 Port in
Introduction
This manual provides detailed instructions for the installation, operation, and maintenance of your Yinker 17-inch LCD KVM Console. This integrated unit features an 8-port VGA KVM switch, a 17-inch TFT LCD monitor, a 98-key US keyboard, and a smooth touchpad, designed to manage up to 8 computers or servers within a standard 19-inch 1U rack space.
The Yinker KVM Console offers a reliable and efficient solution for server management, combining essential control components into a single, space-saving device. Please read this manual thoroughly before installation and operation to ensure proper use and optimal performance.

Figure 1: Yinker 17-inch LCD KVM Console
What's in the Box
Carefully unpack the contents and ensure all items are present. If any items are missing or damaged, please contact Yinker Official support.
- 1 x Yinker 8 Port LCD KVM Console (integrated with 17-inch TFT LCD monitor, keyboard, and touchpad)
- 8 x KVM VGA Cables (5ft x4, 6ft x4)
- 1 x DVI Cable (25+4) 27"
- 1 x Power Adapter (DC 12V)
- 1 x User Manual

Figure 2: Package Contents
Video 1: Unboxing and Installation Overview of the Yinker 17-inch LCD Rack Mount KVM.
Setup Instructions
Follow these steps to properly install your Yinker LCD KVM Console into a 19-inch 1U rack.
1. Rack Mounting the KVM Moduler
- Carefully slide the KVM moduler (the rear unit with VGA ports) into the back of your 19-inch rack.
- Align the mounting rails of the moduler with the rack posts.
- Secure the rails to the rack posts using the provided screws. Ensure it is firmly in place.
2. Rack Mounting the Integrated Monitor Unit
- Slide the integrated monitor unit (front unit with LCD, keyboard, touchpad) into the rack, directly above or below the KVM moduler, ensuring proper alignment.
- Secure the front of the monitor unit to the rack posts using the provided screws.
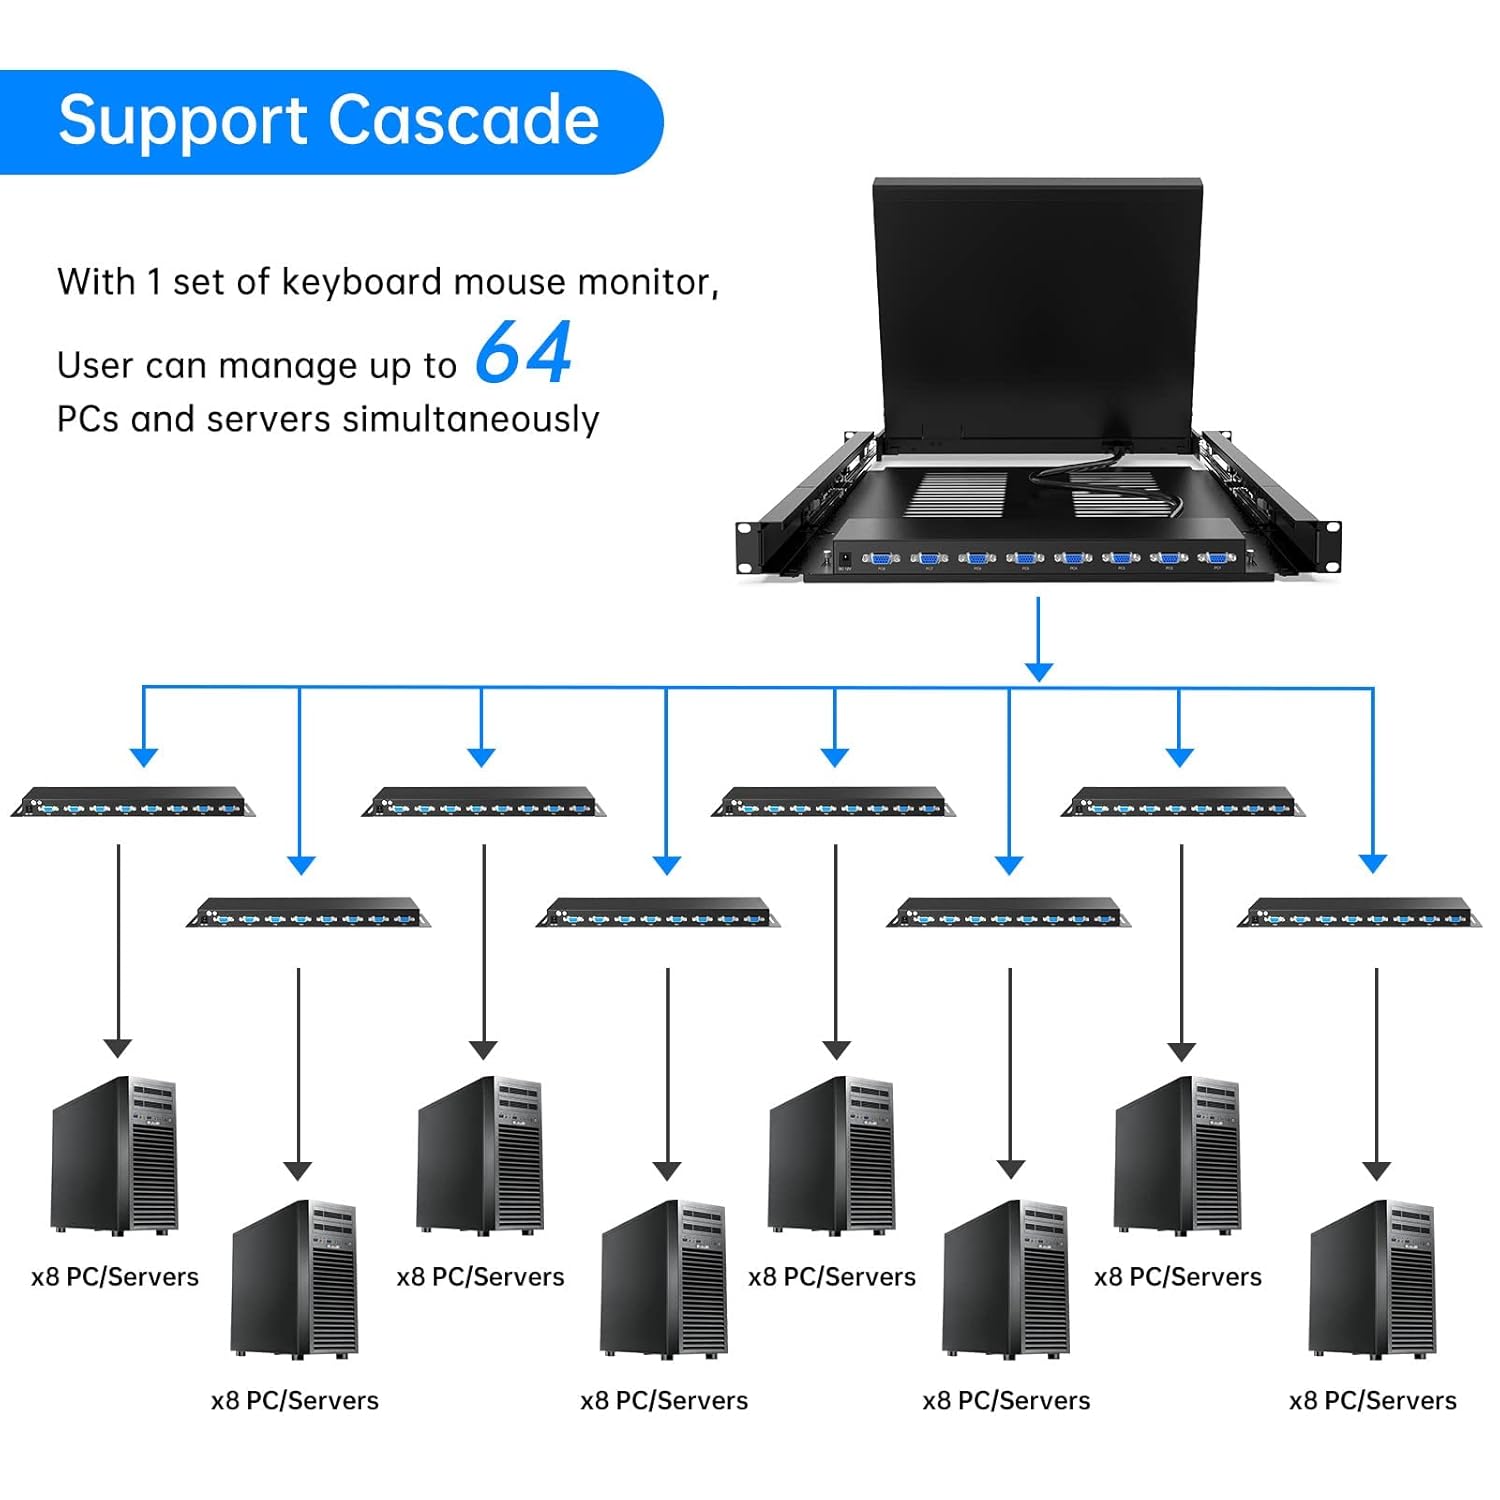
Figure 3: KVM Console in a Rack
3. Connecting Cables
- Connect KVM Moduler to Monitor Unit: Use the provided DVI cable to connect the KVM moduler to the integrated monitor unit. Note: Avoid hot-plugging the DVI cable to prevent potential damage.
- Connect Computers/Servers: Use the included VGA & USB 2-in-1 KVM cables to connect your computers/servers to the KVM moduler. Each cable has a VGA and a USB connector on one end (for the computer) and a single VGA connector on the other end (for the KVM moduler). Connect the VGA and USB ends to your host computer, and the single VGA end to the corresponding PC port on the KVM moduler (e.g., PC1, PC2, etc.).
- Power Connection: Connect the power adapter to the KVM moduler and then to a power outlet.
Video 2: Detailed Mounting and Switching Guide for Yinker 17-inch LCD Rack Mount KVM.
4. Power On
Once all connections are secure, power on all connected computers/servers. Then, turn on the KVM console using its dedicated on/off button. The display should activate, and you will be able to access your connected systems.
Operating Instructions
The Yinker LCD KVM Console provides three methods for switching between connected computers:
1. Panel Button Switch
Directly press the corresponding numbered buttons (PC1, PC2, etc.) on the front panel of the KVM console to switch to the desired computer. The illuminated buttons indicate the currently active port.

Figure 4: Multiple Switching Methods
2. Keyboard Hotkey Command
Utilize specific keyboard hotkey combinations to switch between computers without needing to reach the console's front panel. The manual includes built-in hotkey commands for convenient switching. Refer to the specific hotkey combinations provided in the included user manual for detailed instructions.

Figure 5: Hotkey Switching
3. OSD (On-Screen Display) Menu Switch
Access the OSD menu by pressing the dedicated OSD button on the console. Navigate through the menu using the keyboard or touchpad to select the desired computer port. This method provides a visual interface for managing your connections.

Figure 6: OSD Menu Switching
Cascade Support
This KVM console supports cascading, allowing you to manage up to 64 PCs and servers simultaneously with a single set of keyboard, mouse, and monitor. Refer to the detailed cascading instructions in the included user manual for configuration.

Figure 7: Cascade Support Diagram
Maintenance
To ensure the longevity and optimal performance of your Yinker LCD KVM Console, follow these maintenance guidelines:
- Cleaning: Use a soft, dry cloth to clean the exterior surfaces. For the screen, use a screen-specific cleaning solution and a microfiber cloth. Avoid abrasive cleaners or solvents.
- Ventilation: Ensure adequate airflow around the KVM console. Do not block ventilation openings.
- Environment: Operate the device in a clean, dry environment, away from extreme temperatures, humidity, and direct sunlight.
- Cable Management: Keep cables organized and free from kinks or excessive tension to prevent damage.
Troubleshooting
If you encounter issues with your Yinker LCD KVM Console, refer to the following common troubleshooting steps:
- No Display:
- Check all video cable connections (VGA, DVI) to ensure they are secure.
- Verify that the KVM console and all connected computers are powered on.
- Ensure the correct input port is selected on the KVM console.
- Keyboard/Mouse Not Responding:
- Check USB cable connections from the computers to the KVM moduler.
- Ensure the KVM console is powered on.
- Try switching to a different port and back.
- Switching Issues:
- Confirm that hotkey commands are being entered correctly.
- Attempt switching using the front panel buttons or the OSD menu.
- Restart the KVM console and connected computers.
- Resolution Problems:
- The KVM supports resolutions up to 1280x1024@60Hz. Ensure your computer's display settings are within this range.
- Update graphics drivers on your connected computers.
For persistent issues or advanced troubleshooting, please contact Yinker Official support.
Specifications
| Feature | Specification |
|---|---|
| Brand | Yinker |
| Model Number | 8 Port in |
| Display Size | 17-inch TFT LCD |
| KVM Ports | 8 Port VGA |
| Max Resolution | 1280x1024@60Hz |
| Keyboard | 98-key US keyboard |
| Pointing Device | Touchpad |
| Switching Methods | Panel Button, Keyboard Hotkey, OSD Menu |
| Rackmount Size | 1U 19-inch standard rack |
| Dimensions (L x W x H) | 23.62 x 18.9 x 1.77 inches |
| Mount Depth | 23.6 - 31.8 inches (suitable for 800mm-depth rack and larger) |
| Weight | 32.7 pounds |
| Compatible OS | Windows, DOS, Linux, Mac OS 8.6/9/10 |
| Connectivity Protocol | VGA |
| Material | Aluminum |
| International Protection Rating | IP54 |
Warranty and Support
For any questions, technical assistance, or warranty inquiries regarding your Yinker LCD KVM Console, please contact Yinker Official support. You can find contact information on the Yinker website or through your purchase platform. Please have your product model number and purchase details ready when contacting support.
Video 3: General overview of Yinker 17-inch LCD Rack Mount KVM products and solutions.