1. Introduction and Overview
Thank you for choosing the STEELITE 40V 17 Inch Electric Lawn Mower. This manual provides essential information for the safe and efficient operation, assembly, and maintenance of your new lawn mower. Please read it thoroughly before first use and keep it for future reference.
This cordless electric lawn mower is designed for medium to small yard care, offering a 17-inch cutting width. It features a powerful brushless motor, 6-position height adjustment, and a versatile 2-in-1 function for both bagging and mulching grass clippings. The unit is powered by two 20V 4.0Ah batteries, providing convenient, cord-free operation.
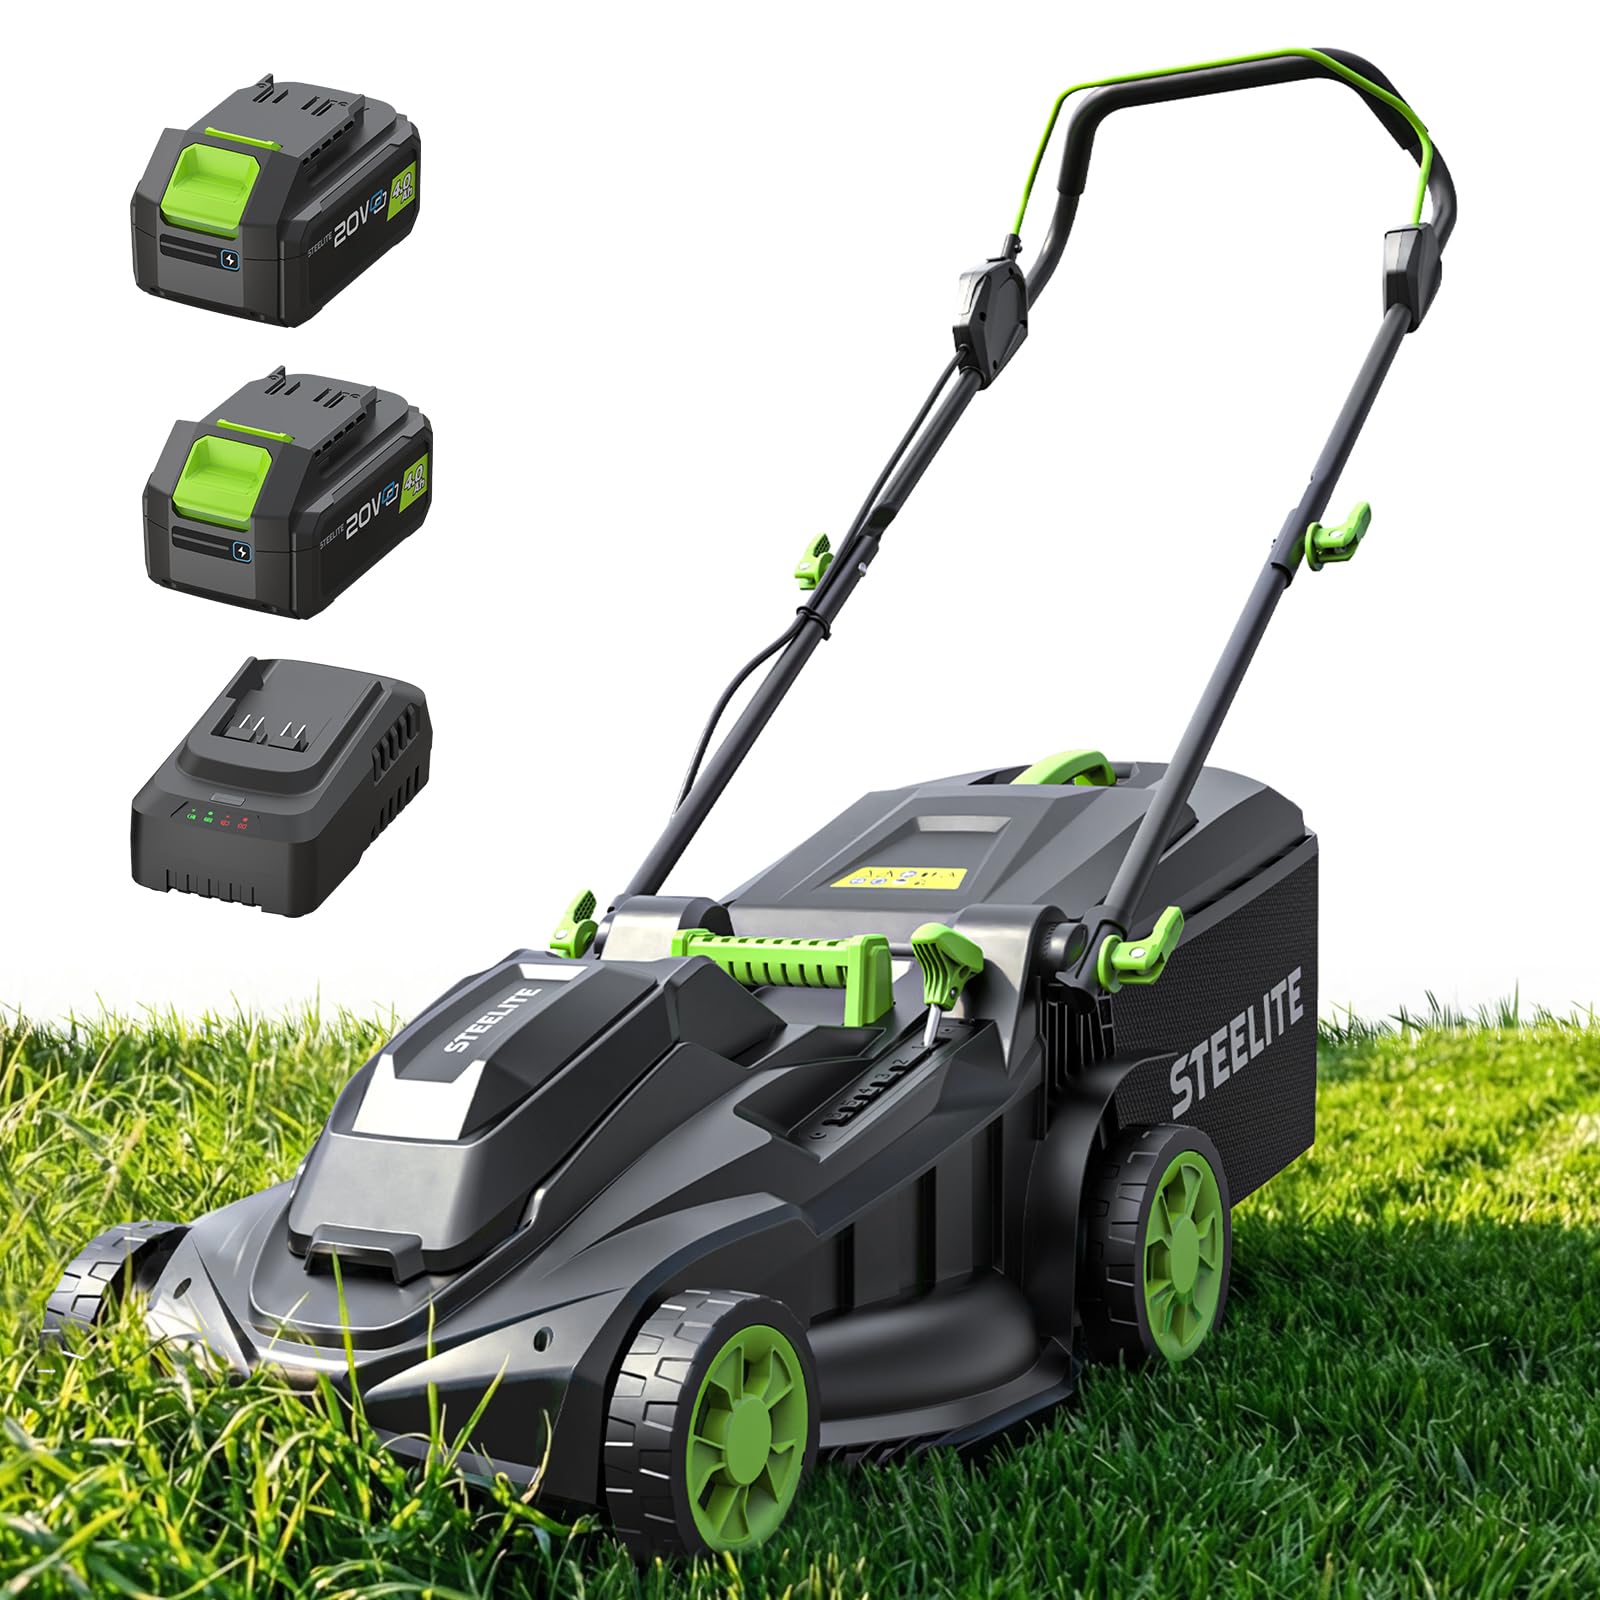
Image 1.1: STEELITE 40V 17 Inch Electric Lawn Mower.
2. Important Safety Information
WARNING: Read all safety warnings and instructions before operating this product. Failure to follow the warnings and instructions may result in electric shock, fire, and/or serious injury.
- Always wear appropriate personal protective equipment, including eye protection, hearing protection, and sturdy footwear.
- Keep children, bystanders, and pets away from the operating area.
- Do not operate the mower in wet conditions or rain.
- Inspect the area for objects that could be thrown by the blade before mowing.
- Ensure all guards and safety devices are in place and functioning correctly before each use.
- Disconnect the battery pack before cleaning, performing maintenance, or when the mower is not in use.
- Use only the specified battery packs and charger provided by Steelite.
3. Package Contents
Carefully unpack all items and ensure you have received everything listed below. If any parts are missing or damaged, contact customer service.
- 1x STEELITE 17-inch Battery Powered Lawn Mower
- 2x 20V 4.0Ah Lithium-Ion Batteries
- 1x Battery Charger
- 1x 40L Grass Collection Bag (requires assembly)
- 1x Mulch Plug
- 1x User Manual
4. Assembly Instructions
Follow these steps to assemble your STEELITE Electric Lawn Mower.
4.1 Handle Assembly
- Unfold the lower handle section and secure it using the quick-assembly set levers on both sides. Ensure they are tightened securely.
- Attach the upper handle section to the lower handle using the provided bolts and knobs. Ensure the handle is firm and stable.

Image 4.1: The mower handle with the 2-step quick start mechanism.
4.2 Grass Collection Bag Assembly
- Assemble the plastic base and metal frame of the grass bag. Secure them with the provided screws and washers.
- Fit the fabric bag over the assembled frame and base, ensuring it is securely attached around the edges.
- Lift the rear discharge flap of the mower and hook the assembled grass bag onto the mower's rear housing. Ensure it is seated correctly.

Image 4.2: The 11-gallon grass collection bag.
4.3 Battery Installation
- Open the battery compartment cover located on top of the mower.
- Insert both 20V 4.0Ah battery packs into their respective slots until they click into place.
- Close the battery compartment cover securely.

Image 4.3: Two 20V 4.0Ah batteries ready for insertion.
4.4 Assembly Video Guide
For a visual guide on assembly, please watch the following video:
Video 4.1: Installation guide for the STEELITE 17 inch 2-in-1 electric lawn mower. This video demonstrates the steps for assembling the handle, grass bag, and inserting the battery packs.
5. Operating Instructions
5.1 Charging the Batteries
Before first use, fully charge both 20V 4.0Ah batteries using the provided charger. Refer to the charger's manual for specific charging instructions and indicators.
5.2 Adjusting Cutting Height
The mower features a 6-position cutting height adjustment. To adjust:
- Ensure the mower is turned off and the battery packs are removed for safety.
- Locate the single lever on the side of the mower deck.
- Pull the lever outwards and move it forward or backward to select the desired cutting height (from 0.98" to 2.95").
- Release the lever to lock it into position. Ensure it is securely engaged before operating.

Image 5.1: The 6-position cutting height adjustment lever.
5.3 Starting the Mower
To start the mower:
- Ensure the battery packs are fully charged and correctly installed.
- Press and hold the safety lock-off button (usually on the handle).
- While holding the safety button, pull the ON/OFF trigger lever towards the handle. The motor will start.
- Release the safety lock-off button once the motor is running.
To stop the mower, simply release the ON/OFF trigger lever.
5.4 Bagging and Mulching Functions
Your mower offers two grass management options:
- Bagging: Attach the grass collection bag as described in Section 4.2. Grass clippings will be collected in the bag for easy disposal. Monitor the bag and empty it when full to maintain optimal performance.
- Mulching: For mulching, ensure the grass collection bag is removed and the mulch plug is inserted into the rear discharge opening. The mulch plug will redirect clippings back into the lawn as fine particles, providing natural nutrients.

Image 5.2: The 2-in-1 function for bagging or mulching.
6. Maintenance
Regular maintenance ensures the longevity and optimal performance of your lawn mower.
- Cleaning: After each use, disconnect the battery packs and clean the mower deck, blade, and grass bag. Use a damp cloth; do not use water jets or harsh chemicals.
- Blade Inspection: Regularly inspect the cutting blade for sharpness and damage. A dull or damaged blade can affect cutting performance and mower efficiency. Replace or sharpen the blade as needed. Always wear heavy-duty gloves when handling the blade.
- Battery Care: Store batteries in a cool, dry place away from direct sunlight. Do not store fully discharged batteries for extended periods. Charge them periodically if not in use.
- Storage: Store the mower in a dry, secure location. The handle can be folded for compact storage.
7. Troubleshooting
If you encounter issues with your lawn mower, refer to the following common problems and solutions:
| Problem | Possible Cause | Solution |
|---|---|---|
| Mower does not start. | Battery not charged or improperly installed. Safety button/lever not engaged. | Ensure batteries are fully charged and correctly inserted. Press safety button then pull trigger lever. |
| Poor cutting performance. | Dull or damaged blade. Cutting height too low for grass type. Grass bag full. | Inspect and sharpen/replace blade. Adjust cutting height. Empty grass bag. |
| Excessive vibration. | Damaged or unbalanced blade. Loose components. | Inspect blade for damage; replace if necessary. Check all fasteners for tightness. |
| Motor stops during operation. | Overload protection activated. Battery charge low. | Reduce load (raise cutting height, mow slower). Recharge or replace batteries. |
8. Specifications
| Feature | Detail |
|---|---|
| Power Source | Battery Powered (2x 20V 4.0Ah Lithium-Ion) |
| Motor Type | Brushless Motor (3400 RPM) |
| Cutting Width | 17 Inches |
| Cutting Height Adjustment | 6 Positions (0.98" to 2.95") |
| Grass Bag Capacity | 40 Liters (approx. 11 Gallons) |
| Functions | 2-in-1 Bagging & Mulching |
| Item Weight | 16.9 Kilograms (approx. 37.2 lbs) |
| Battery Average Life | Up to 30 minutes (varies with conditions) |
9. Warranty and Support
Your STEELITE 40V 17 Inch Electric Lawn Mower comes with a manufacturer's warranty. Please refer to the warranty card included in your package for specific terms and conditions.
For technical assistance, replacement parts, or warranty claims, please contact STEELITE customer support through the retailer where the product was purchased or visit the official STEELITE website.


