1. Introduction
This manual provides comprehensive instructions for the installation, operation, maintenance, and troubleshooting of the Generic Inspiron 580 580S Desktop Motherboard, model DH57M02. Please read this manual carefully before proceeding with installation or operation to ensure proper functionality and to prevent damage to the product or other components.
The DH57M02 motherboard is designed for optimal performance in desktop computing environments, offering a reliable foundation for your system.
2. Setup and Installation
2.1. Pre-installation Checklist
- Static Electricity Precautions: Always wear an anti-static wrist strap or frequently touch a grounded metal object before handling the motherboard or other components.
- Required Tools: Phillips head screwdriver, anti-static wrist strap, thermal paste (for CPU).
- Compatible Components: Ensure your CPU, RAM, and other peripherals are compatible with the DH57M02 motherboard. Refer to the specifications section for details.
2.2. Motherboard Installation
- Prepare the Case: Install the I/O shield into the rear opening of your computer case.
- Mount the Motherboard: Carefully align the motherboard with the standoffs in your case. Gently lower the motherboard into place, ensuring the I/O ports align with the I/O shield. Secure the motherboard with screws.
- Install CPU: Open the CPU socket lever. Align the CPU with the socket (match the triangle/arrow indicators). Gently place the CPU into the socket without force. Close the lever to secure the CPU. Apply a thin, even layer of thermal paste to the CPU's heat spreader.
- Install CPU Cooler: Mount the CPU cooler according to its manufacturer's instructions, ensuring good contact with the CPU.
- Install RAM: Open the clips on the RAM slots. Align the RAM module with the slot (notch alignment). Press down firmly on both ends until the clips snap into place.
- Connect Power Supply: Connect the 24-pin ATX power connector and the 4-pin or 8-pin CPU power connector from your power supply to the motherboard.
- Connect Storage Devices: Connect SATA data cables from your storage drives (HDD/SSD) to the SATA ports on the motherboard. Connect power cables from the power supply to the drives.
- Connect Front Panel Cables: Connect the power switch, reset switch, HDD LED, power LED, and USB/audio headers from your case to the corresponding pins on the motherboard. Refer to the motherboard diagram for correct pin assignments.
- Install Expansion Cards: If using a dedicated graphics card or other expansion cards, insert them into the appropriate PCIe slots and secure them.
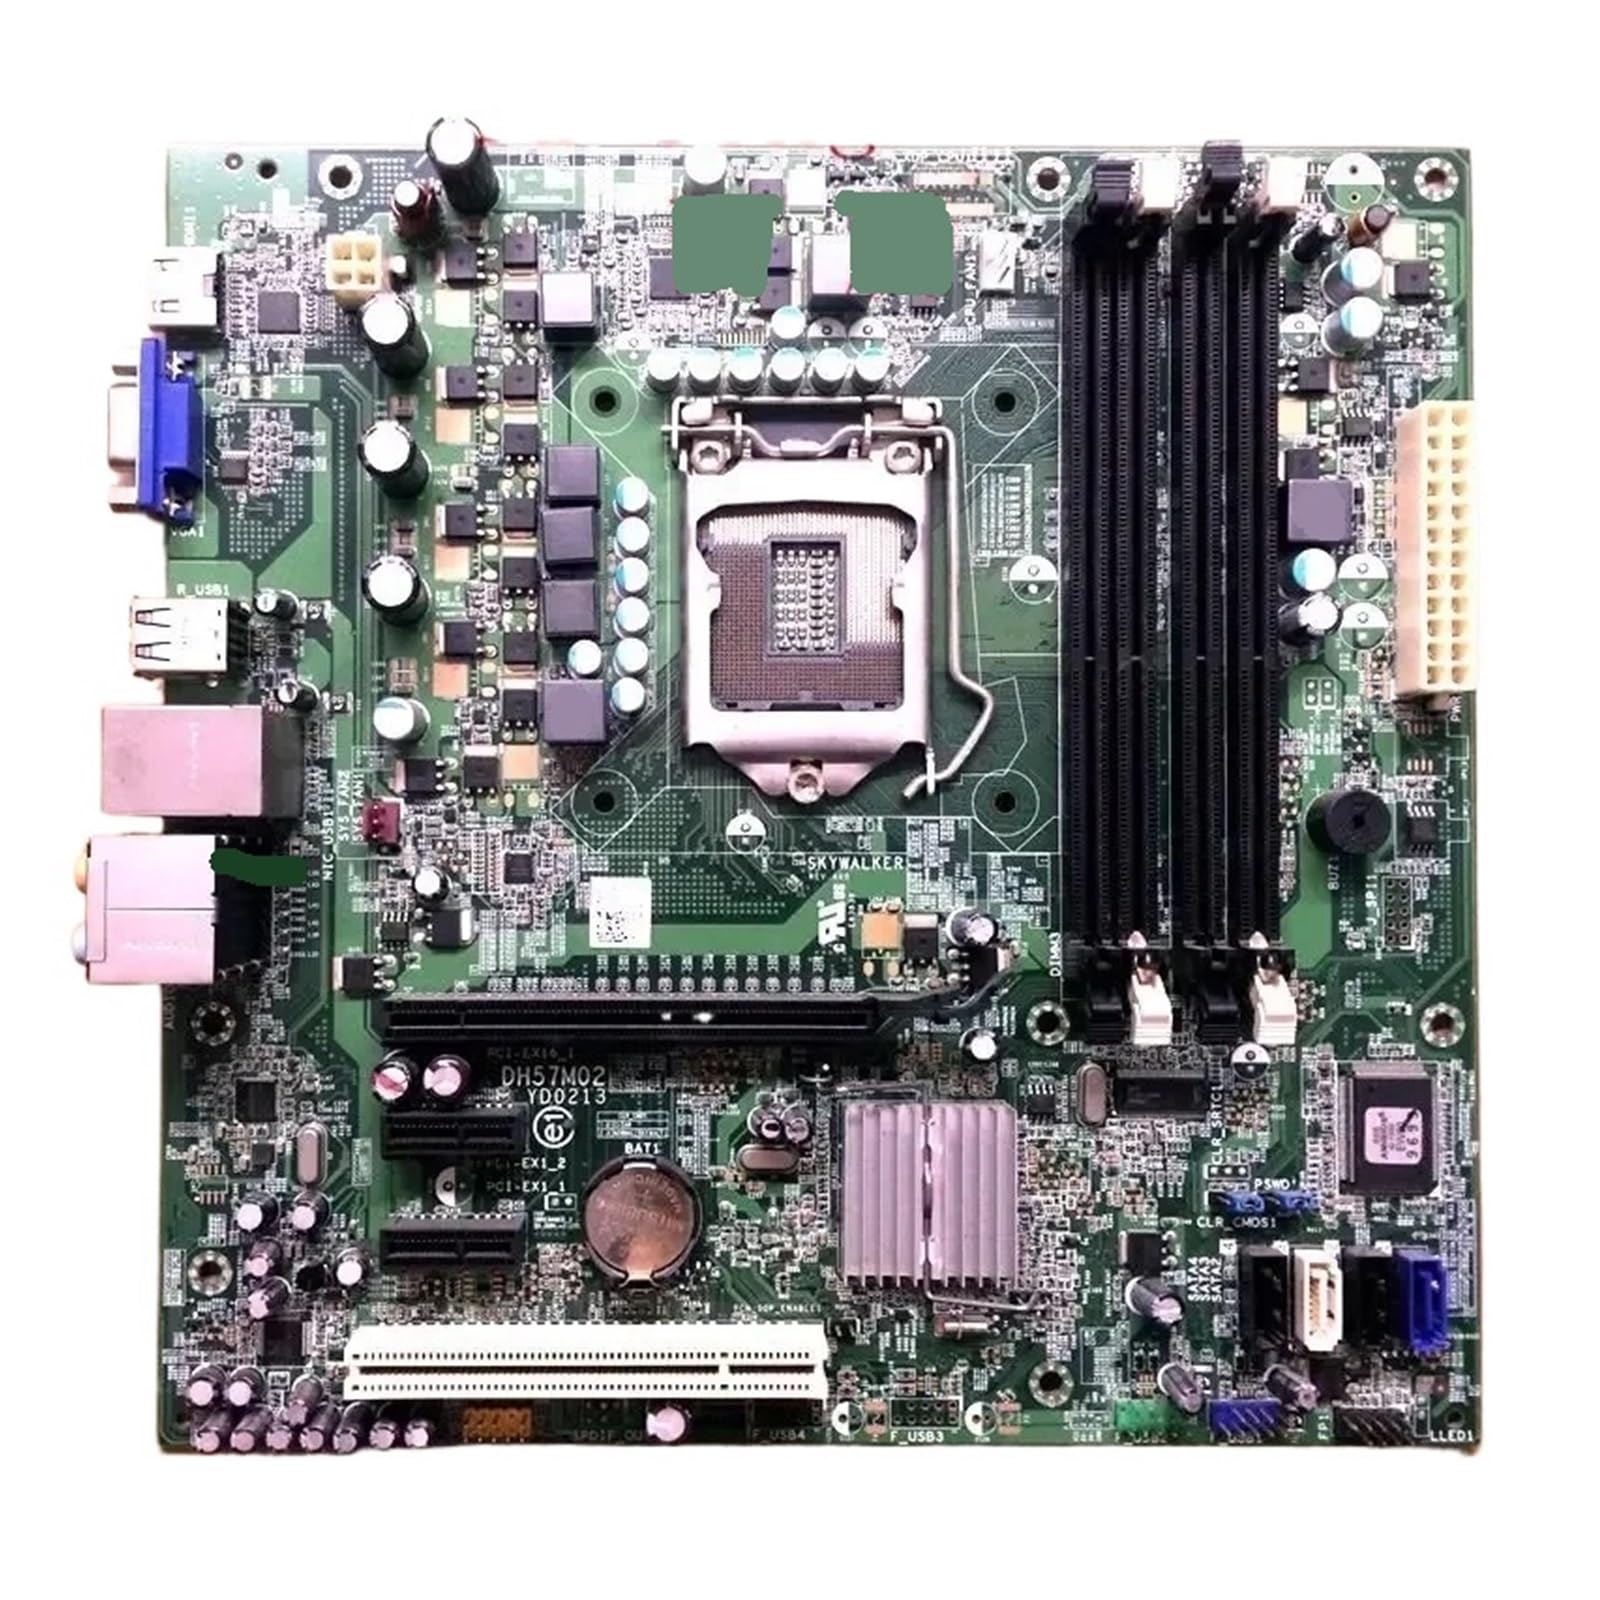
Figure 1: Generic Inspiron 580 580S Desktop Motherboard DH57M02. This image shows the overall layout of the motherboard, including CPU socket, RAM slots, and various connectors.
2.3. Initial Boot and BIOS/UEFI Configuration
- First Power On: After connecting all components, connect your monitor, keyboard, and mouse. Power on the system.
- Access BIOS/UEFI: During startup, repeatedly press the designated key (commonly DEL, F2, F10, or F12) to enter the BIOS/UEFI setup utility.
- Basic Settings: Verify system time and date, check detected CPU and RAM, and configure boot order to install your operating system.
- Save and Exit: Save your changes and exit the BIOS/UEFI. The system will restart.
3. Operating Instructions
3.1. Operating System Installation
Once the motherboard is installed and basic BIOS/UEFI settings are configured, proceed with installing your preferred operating system (e.g., Windows, Linux) from a bootable USB drive or DVD.
3.2. Driver Installation
After OS installation, install the necessary drivers for the motherboard's chipset, audio, network, and any integrated graphics. These drivers are typically available on the manufacturer's website or included with your operating system.
3.3. System Power Management
- Power On: Press the power button on your computer case.
- Shut Down: Use the operating system's shutdown function.
- Restart: Use the operating system's restart function.
4. Maintenance
4.1. Cleaning
- Dust Removal: Regularly clean dust from inside your computer case, especially around the CPU cooler, RAM, and expansion slots, using compressed air. Ensure the system is powered off and unplugged before cleaning.
- Component Inspection: Periodically inspect cables and connectors for secure connections and signs of wear.
4.2. BIOS/UEFI Updates
BIOS/UEFI updates can provide improved compatibility, stability, and new features. Refer to the motherboard manufacturer's website for the latest updates and detailed instructions on how to perform them. Exercise caution during BIOS/UEFI updates, as an interruption can render the motherboard inoperable.
4.3. Driver Updates
Keep your system drivers updated to ensure optimal performance and compatibility. Download the latest drivers from the component manufacturers' official websites.
5. Troubleshooting
5.1. Common Issues and Solutions
- No Power:
- Check power supply connections to the motherboard (24-pin ATX, 4/8-pin CPU).
- Ensure the power supply switch is ON.
- Verify the front panel power switch cable is correctly connected to the motherboard.
- No Display:
- Ensure the monitor is connected to the correct video output (integrated graphics or dedicated GPU).
- Reseat the graphics card (if applicable) and RAM modules.
- Try booting with only one RAM stick.
- System Fails to Boot / Boot Loops:
- Clear CMOS (refer to motherboard manual for jumper/button location).
- Check CPU and RAM installation.
- Disconnect all non-essential peripherals and try booting.
- Overheating:
- Ensure CPU cooler is properly installed and making good contact.
- Verify case fans are functioning and providing adequate airflow.
- Clean dust from heatsinks and fans.
5.2. Diagnostic Beep Codes
If your system emits a series of beeps during startup, these are diagnostic codes indicating a hardware issue. Refer to the motherboard's specific beep code documentation (often found on the manufacturer's support website) to interpret these codes and identify the problematic component.
6. Specifications
| Feature | Detail |
|---|---|
| Brand | Generic |
| CPU Socket | BGA 1023 |
| Compatible Devices | Gaming Console |
| RAM Memory Technology | DDR |
| Chipset Type | AMD 480 |
| Memory Clock Speed | 1 GHz |
| Platform | 3DO |
| CPU Model | Alpha |
| RAM Memory Maximum Size | 1 GB |
| Memory Slots Available | 1 |
| Package Dimensions | 0.39 x 0.39 x 0.39 inches |
| Item Weight | 1.76 ounces |
| Manufacturer | Generic |
| ASIN | B0G8T75BYM |
| Date First Available | December 19, 2025 |
7. Warranty and Support
This product is covered by a standard manufacturer's warranty. For specific warranty terms and conditions, please refer to the documentation provided with your purchase or contact the retailer. For technical support, troubleshooting assistance beyond this manual, or inquiries regarding replacement parts, please contact the product manufacturer or your point of purchase.
Note: Unauthorized modifications or improper installation may void your warranty.