1. Introduction
Thank you for choosing the DXZ A3 UV DTF Printer with Laminator. This all-in-one device is designed for high-quality UV DTF printing and laminating, suitable for a wide range of materials. This manual provides essential information for setting up, operating, maintaining, and troubleshooting your printer to ensure optimal performance and longevity.
2. Product Overview and Key Features
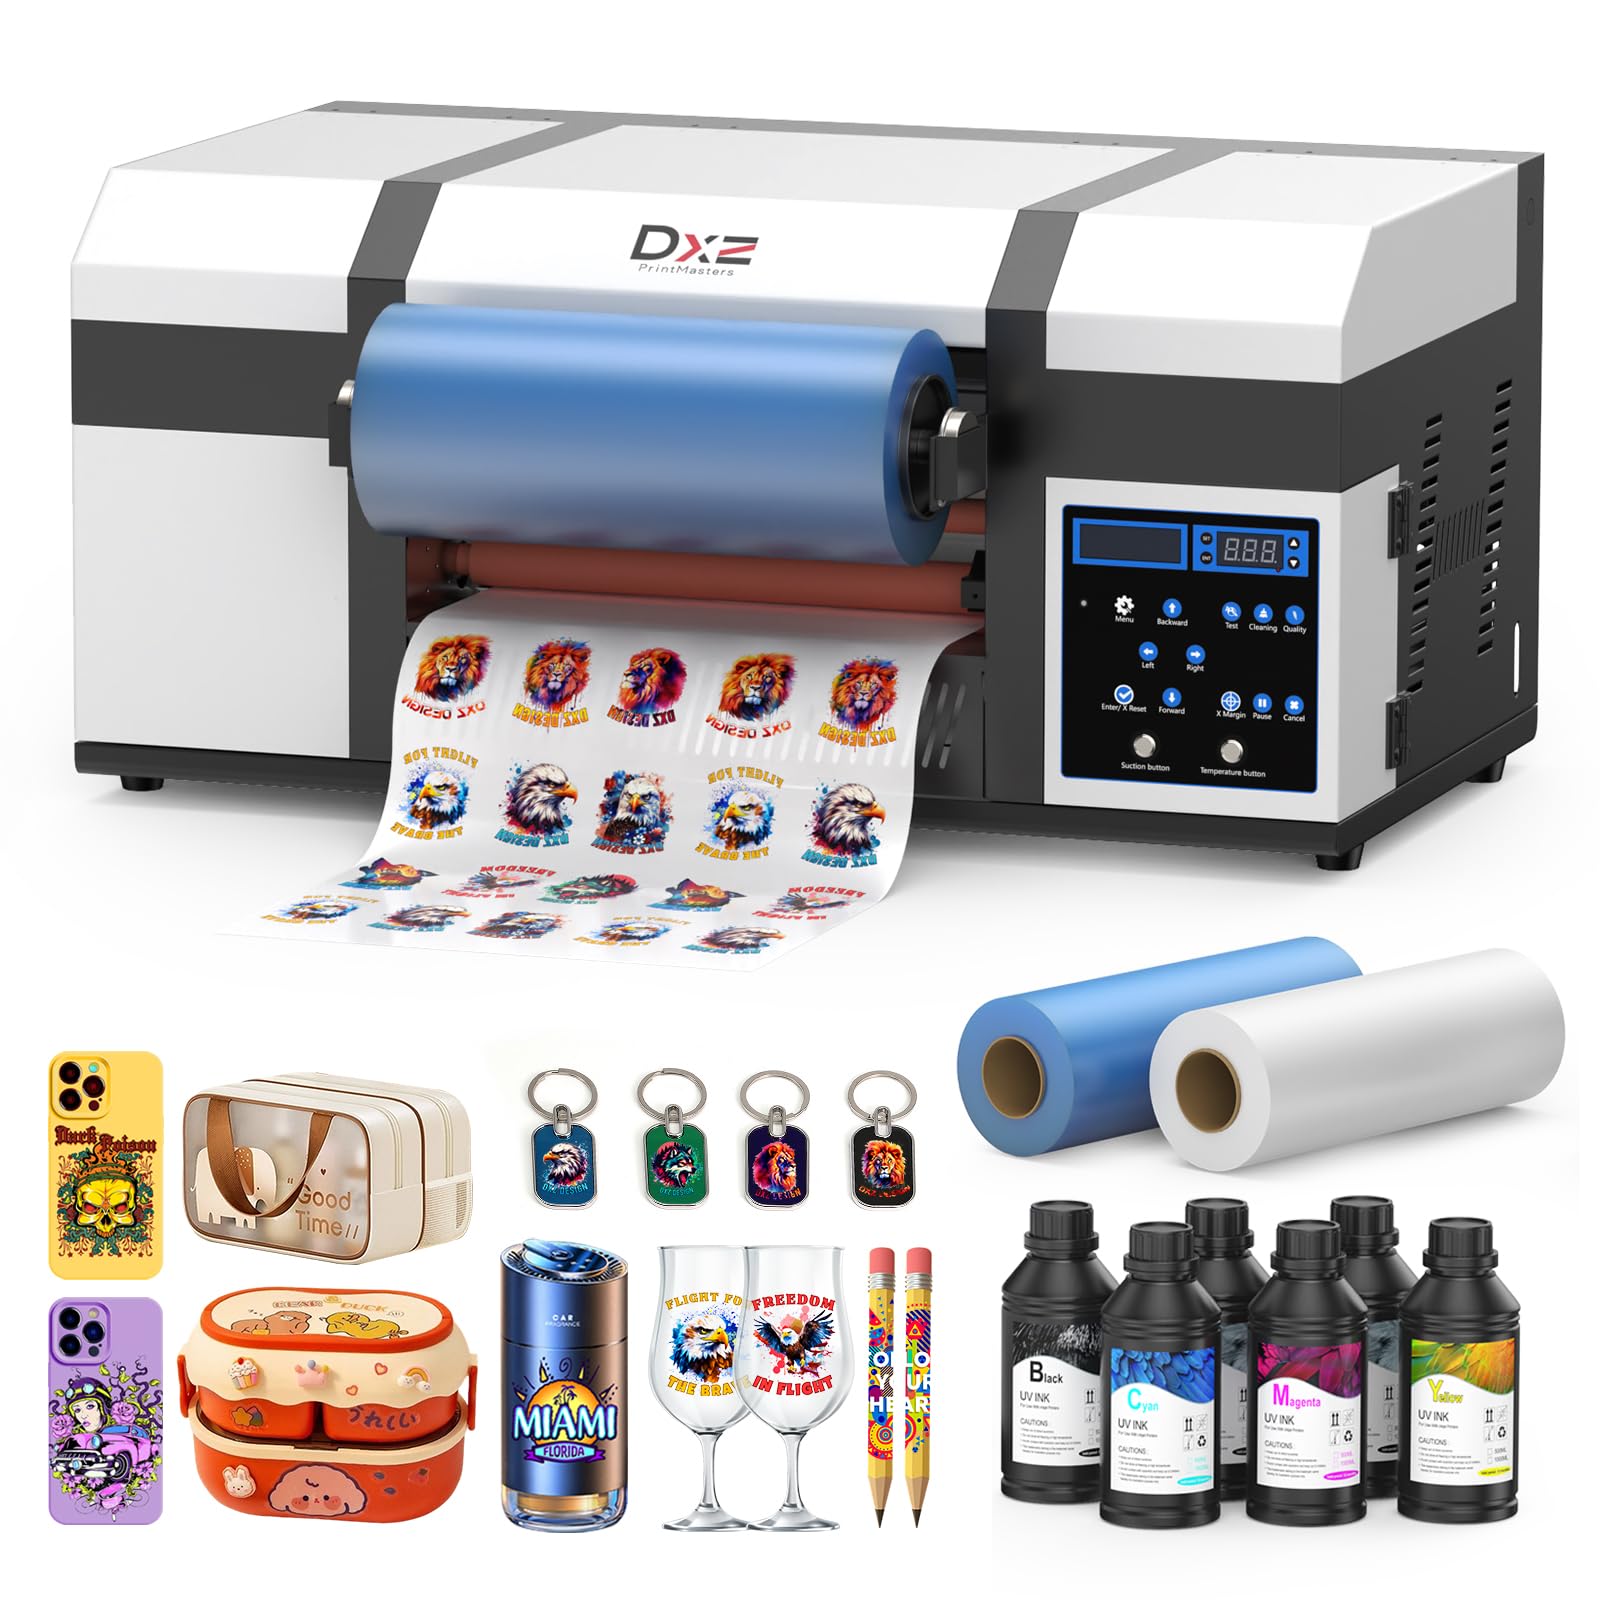
The DXZ A3 UV DTF Printer integrates printing and laminating functions into a single unit, streamlining the production of custom stickers and decals.
2.1 All-in-One Integrated Design
This printer combines film peeling, printing, and lamination in a single machine. It prints directly onto A film and automatically laminates with B film, eliminating the need for manual film transfer. This design ensures streamlined production and ready-to-use output.

2.2 Dual XP600 Print Heads
Equipped with two high-performance Epson XP600 print heads, the printer offers ultra-fast, high-resolution printing with 12-channel CMYKWV output. This configuration ensures vibrant colors, sharp detail, and enhanced productivity for high-volume and high-detail production.

2.3 Advanced UV Multi-Layer Printing
The printer supports integrated printing with an adhesive layer, white base, vibrant color, and glossy varnish in one process. This delivers vivid colors, exceptional durability, and a premium, professional finish.

2.4 Versatile Custom Sticker Maker
Create high-quality decals for various surfaces including metal, wood, plastic, glass, and leather. Ideal for branding, packaging, gifts, DIY crafts, and decoration, these stickers adhere strongly to both flat and curved surfaces.

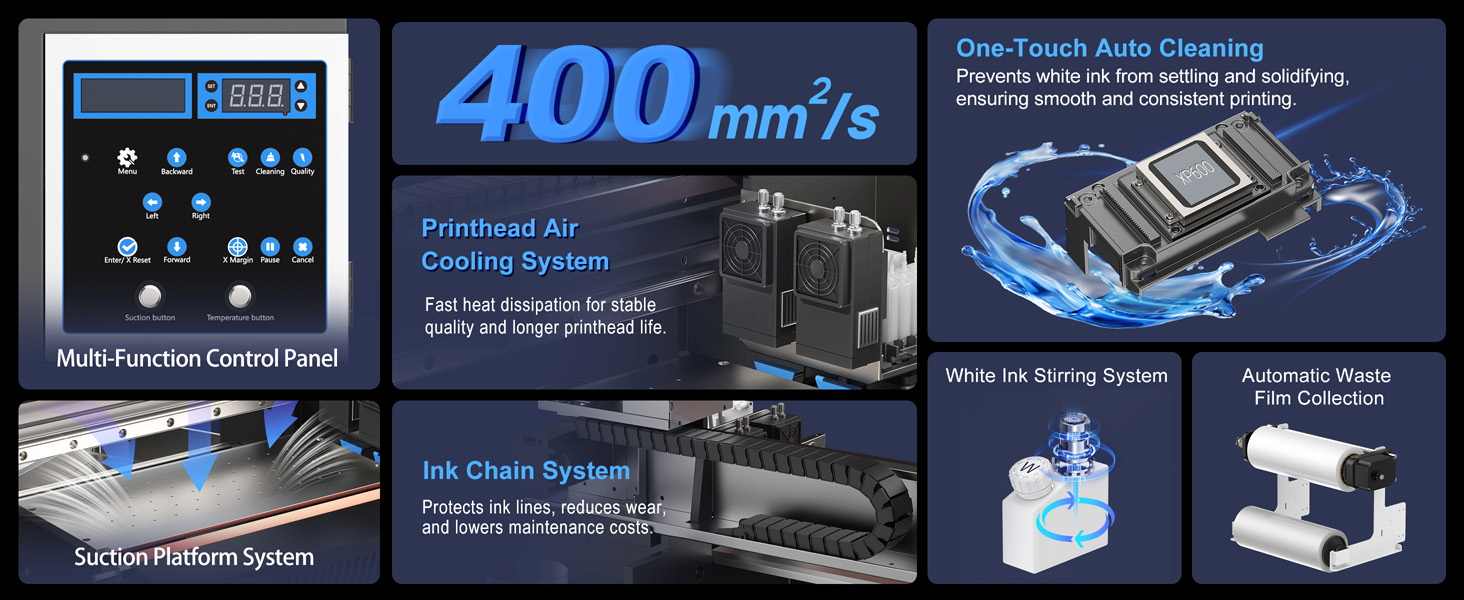
2.5 White Ink Stirring & Auto Cleaning System
Continuous white ink agitation and automatic cleaning functions are integrated to minimize nozzle blockages and extend print head lifespan, ensuring smooth operation and reduced maintenance.

3. Setup
Before operating your DXZ A3 UV DTF Printer, ensure all components are correctly installed and connected.
3.1 Unpacking and Initial Placement
Carefully remove the printer from its packaging. Place the printer on a stable, level surface with adequate space for operation and maintenance. Ensure proper ventilation around the unit.
3.2 Film Roll Installation Process
Follow these steps to install the A and B film rolls:
- First, install the A film. Feed the adhesive layer into the machine, and the protective layer into the waste film collection holder.
- Next, pass the inner layer of the B film through the laminating device and align it with the adhesive layer of the A film.
3.3 Ink and Software Installation
Install the UV inks into their respective reservoirs. Connect the printer to your PC via USB. Install the provided RIP software (Atusums Rip) on your computer. Refer to the software manual for detailed installation instructions.

4. Operating Instructions
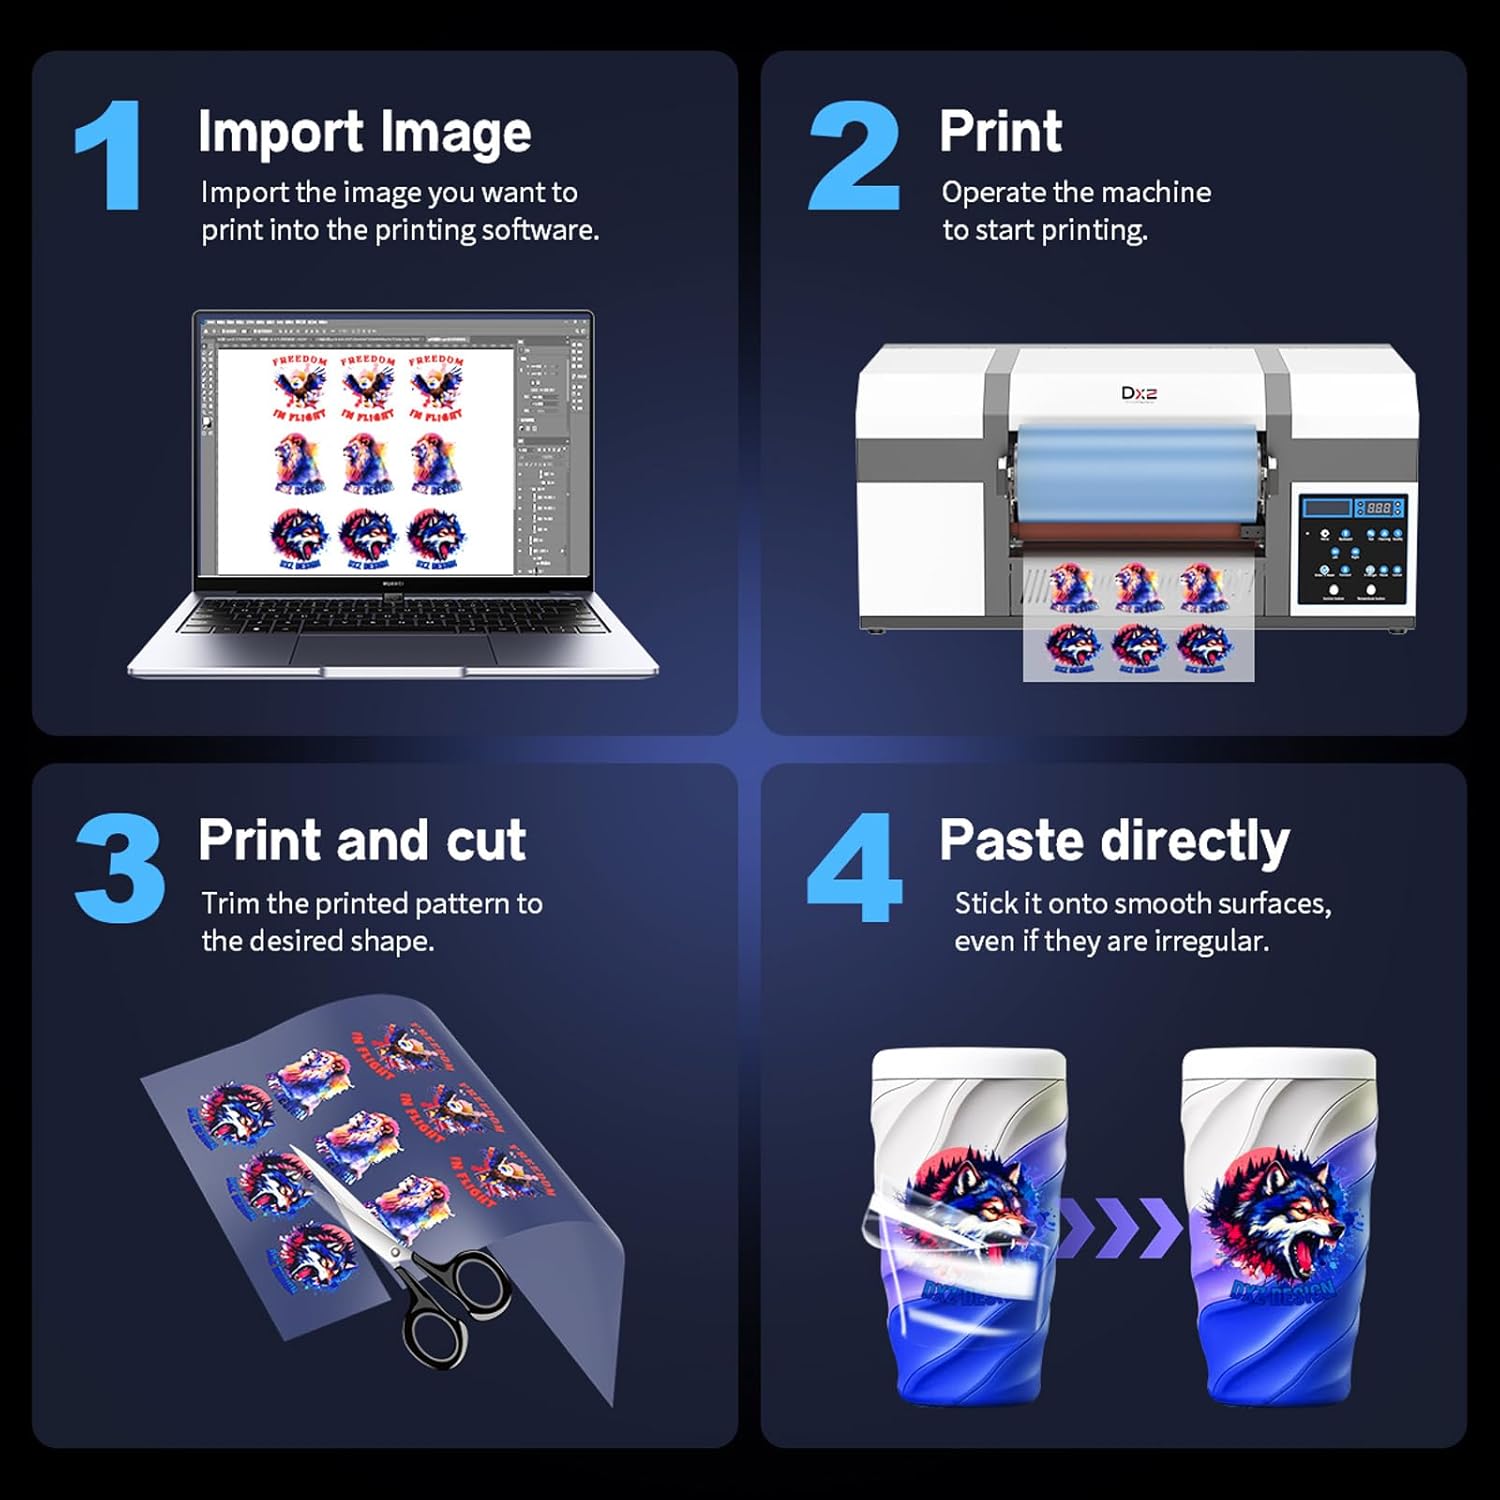
Follow these steps to create and apply your custom UV DTF stickers:
- Import Image: Import the desired image into the printing software on your computer.
- Print: Operate the machine to start the printing process. The printer will print the image onto the A film and automatically laminate it with the B film.
- Trim and Cut: Once printed and laminated, trim the pattern to your desired shape using scissors or a cutting tool.
- Paste Directly: Peel the backing from the sticker and apply it directly onto smooth or irregular surfaces.
Video 1: Demonstration of the DXZ A3 UV DTF Sticker Printer in operation, showing the ease of use for creating custom stickers.
Video 2: Overview highlighting the DXZ A3 UV DTF Printer as an excellent choice for beginners, showcasing its user-friendly features.
5. Maintenance
Regular maintenance ensures the longevity and optimal performance of your DXZ A3 UV DTF Printer.
5.1 White Ink Stirring System
The printer features a continuous white ink agitation system. Ensure this system is always active to prevent white ink from settling and solidifying, which can lead to nozzle blockages.
5.2 Auto Cleaning Function
Utilize the one-touch auto cleaning function regularly. This helps to clear any ink residue from the print heads and maintain print quality. Refer to the control panel for initiating the cleaning cycle.
5.3 Printhead Air Cooling System
The integrated printhead air cooling system helps dissipate heat, contributing to stable print quality and extending the printhead's operational life. Ensure the cooling vents are not obstructed.
5.4 Ink Chain System
The ink chain system protects ink lines, reduces wear, and lowers maintenance costs. Periodically inspect the ink chain for any signs of damage or obstruction.
6. Troubleshooting
This section addresses common issues you might encounter with your DXZ A3 UV DTF Printer.
6.1 Poor Print Quality
- Issue: Streaks or missing lines in prints.
Solution: Perform a print head cleaning cycle. Check ink levels and replace cartridges if necessary. Ensure the white ink stirring system is active. - Issue: Colors appear dull or inaccurate.
Solution: Verify that the correct color profile is selected in your RIP software. Ensure UV lamps are functioning correctly.
6.2 Film Feed Issues
- Issue: Film is not feeding smoothly or is jamming.
Solution: Check for any obstructions in the film path. Ensure film rolls are correctly installed and aligned. Verify tension settings for the film rolls.
6.3 Printer Not Responding
- Issue: Printer does not respond to commands.
Solution: Check power connections and ensure the printer is turned on. Verify USB cable connection to the computer. Restart both the printer and the computer. Ensure printer drivers and software are correctly installed and up-to-date.
For persistent issues, please refer to the dedicated support section or contact customer service.
7. Specifications
Detailed technical specifications for the DXZ A3 UV DTF Printer.

| Feature | Specification |
|---|---|
| Brand | DXZ |
| Model Name | A3 UV DTF Printer |
| Connectivity Technology | USB |
| Printing Technology | Inkjet |
| Special Feature | High-quality printhead |
| Color | White |
| Printer Output | Color |
| Maximum Print Speed (Color) | 0.97 pages per minute |
| Max Printspeed Monochrome | 0.98 pages per minute |
| Item Weight | 151 Pounds |
| Printer Output Type | Color |
| Item Dimensions (D x W x H) | 34.2"D x 20.8"W x 24.8"H |
| Print Media | Back print film |
| Compatible Devices | PC |
| Ink Color | CMYKWV |
| Additional Printer Functions | All In One |
| Maximum Media Size | A3 |
| Paper Size | A3 |
| Dual-sided printing | No (Simplex) |
| Built-In Media | Printer, Ink, Film, Software, Manual |
| Specific Uses For Product | Sticker and decal printing, branding, packaging, gifts, DIY crafts, decoration |
| Manufacturer | DXZ |
8. Warranty and Support
Your DXZ A3 UV DTF Printer comes with comprehensive support and warranty coverage.
8.1 Warranty Information
- 1 Year Warranty: Covers non-consumable parts.
- 6 Month Warranty: Applies to the printhead (up to 1 printhead).
8.2 Technical Support
Enjoy lifetime one-on-one engineer support to guide you through setup, operation, and any technical queries. For assistance, please contact our support team.
