1. Introduction
This manual provides essential instructions for the installation, operation, and maintenance of the Generic M8400T IS7XM V1.0 Desktop Motherboard. This board is designed for LGA 1155 processors and supports DDR3 memory. Please read this manual thoroughly before proceeding with any installation or operation to ensure proper functionality and safety.
2. Safety Information
Always observe the following safety precautions:
- Disconnect power before installing or removing any components.
- Wear an anti-static wrist strap to prevent electrostatic discharge (ESD) damage to components.
- Handle the motherboard by its edges to avoid touching sensitive components.
- Ensure proper ventilation within the computer case to prevent overheating.
- Do not expose the motherboard to moisture or extreme temperatures.
3. Product Overview
The Generic M8400T IS7XM V1.0 Desktop Motherboard is engineered for optimal performance and reliable operation. It features a robust design with high-quality materials, ensuring longevity and stability for your computing needs.
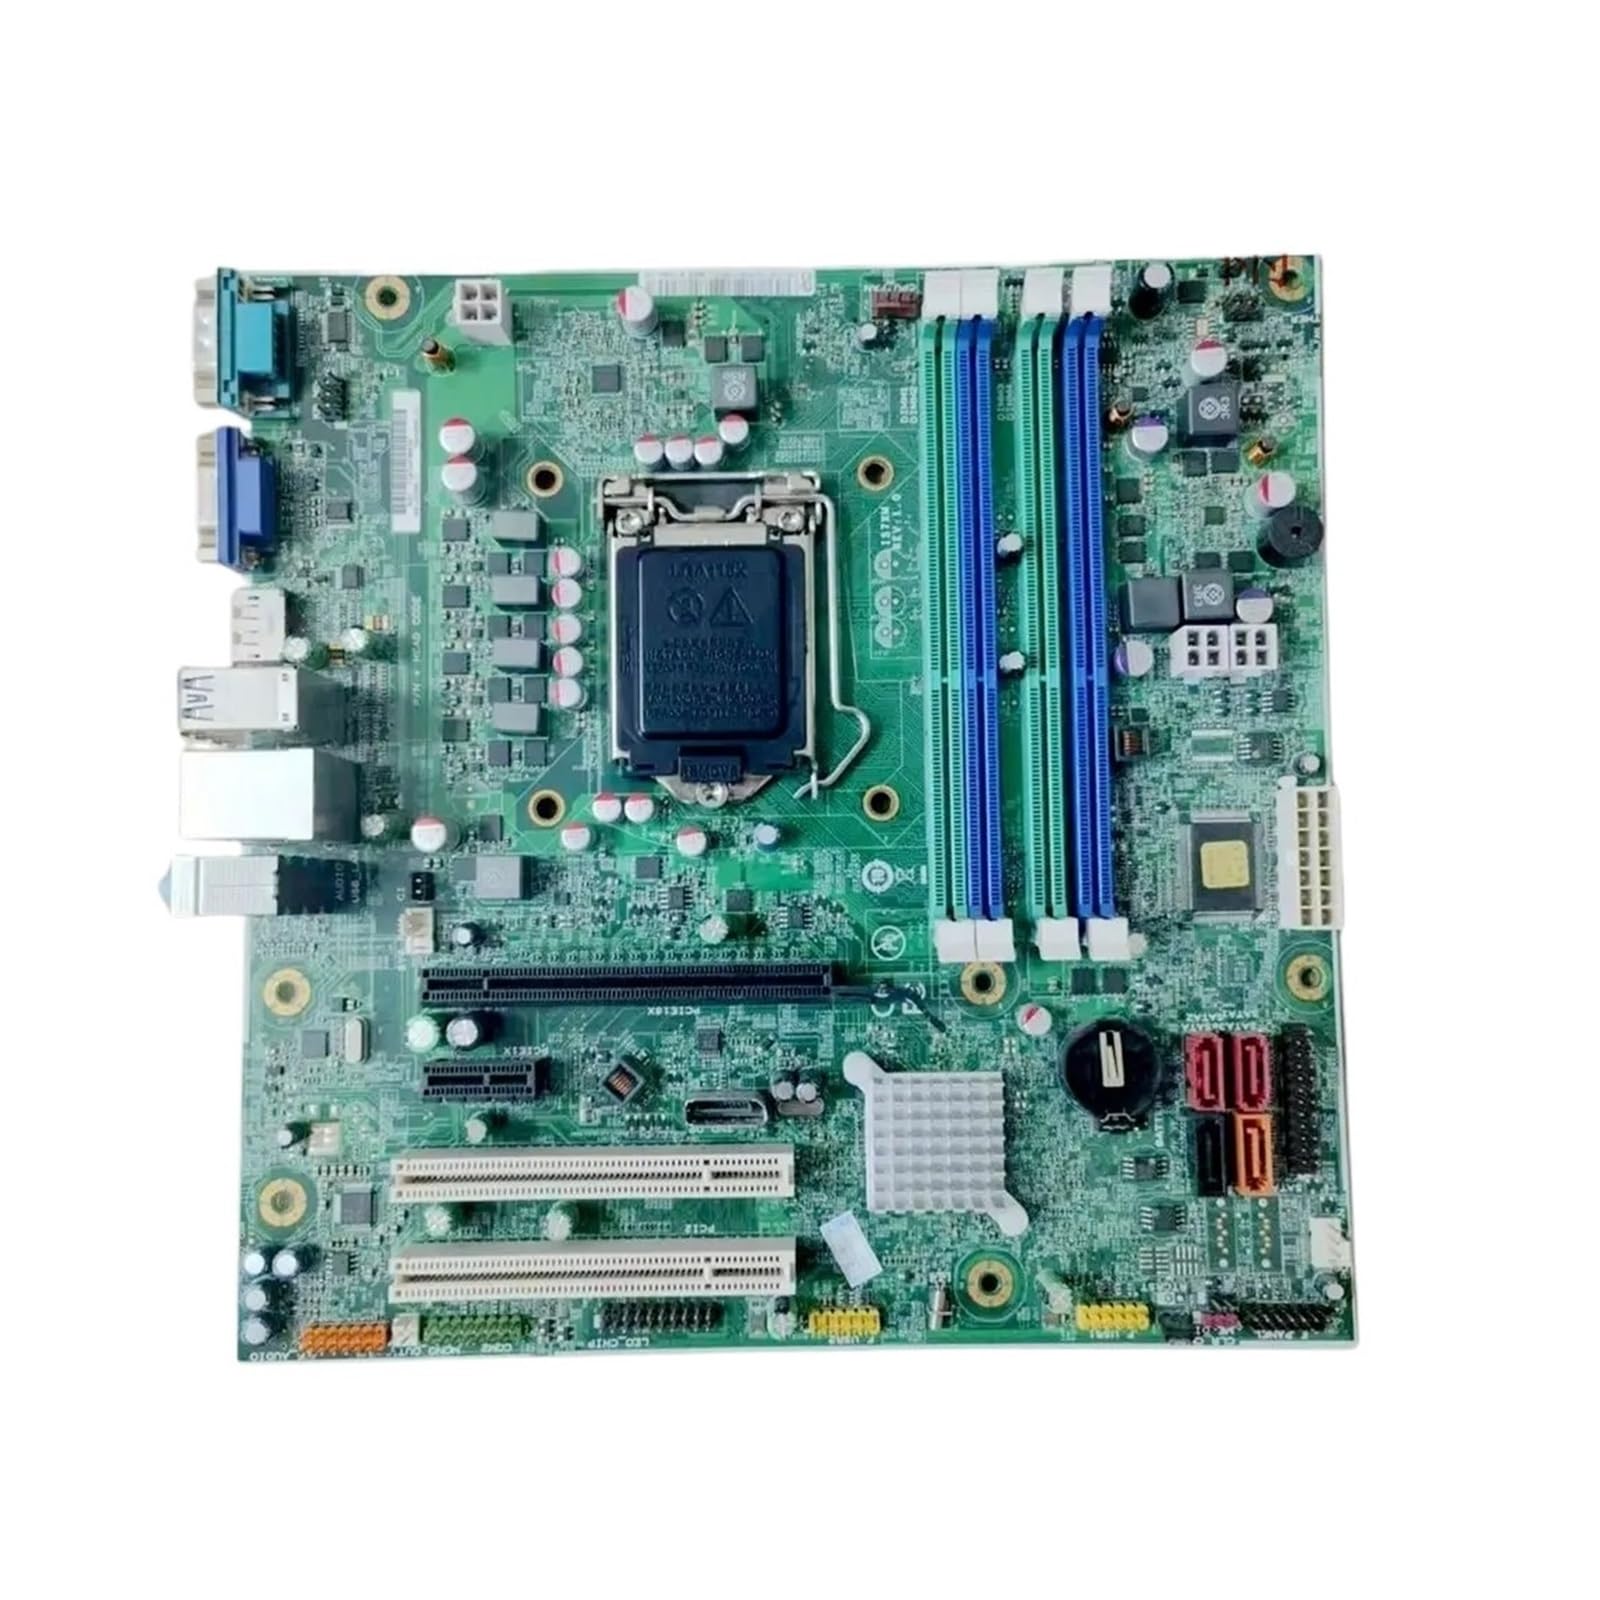
Figure 3.1: An overhead view of the Generic M8400T IS7XM V1.0 Desktop Motherboard, showcasing its various components including the CPU socket, RAM slots, expansion slots, and I/O ports.
4. Setup and Installation
This motherboard is designed for straightforward installation, making it suitable for DIY enthusiasts. Follow these steps for proper component installation:
4.1. CPU Installation
- Locate the LGA 1155 CPU socket on the motherboard.
- Open the CPU socket lever and lift the metal load plate.
- Carefully align the CPU with the socket, ensuring the gold triangle on the CPU matches the triangle on the socket.
- Gently place the CPU into the socket without forcing it.
- Close the load plate and secure it with the lever.
- Apply thermal paste to the CPU and install the CPU cooler according to its manufacturer's instructions.
4.2. RAM Installation
The motherboard features one DDR3 memory slot.
- Open the clips at both ends of the DDR3 memory slot.
- Align the notch on the DDR3 memory module with the notch in the slot.
- Insert the memory module firmly into the slot until the clips snap into place.
4.3. Storage Device Installation
Connect your SATA storage devices (HDD/SSD) to the available SATA ports on the motherboard using SATA data cables. Ensure power cables from your power supply are also connected to the storage devices.
4.4. Power Supply Connection
Connect the 24-pin ATX power connector and the 4-pin or 8-pin CPU power connector from your power supply to the corresponding ports on the motherboard.
4.5. Expansion Card Installation
Insert any necessary expansion cards (e.g., graphics cards, network cards) into the appropriate PCIe slots. Ensure they are seated firmly and secured with a screw to the computer case.
5. Operating Instructions
After all components are installed and connected, you can power on your system:
- Connect your monitor, keyboard, and mouse to the appropriate I/O ports.
- Connect the power cord to the power supply and a wall outlet.
- Press the power button on your computer case.
- The system should boot up, and you can proceed with operating system installation if it's a new build.
Refer to your operating system's documentation for specific installation and usage instructions.
6. Maintenance
Regular maintenance ensures the long-lasting reliability and durability of your motherboard and overall system:
- Dust Removal: Periodically clean dust from the motherboard and components using compressed air. Ensure the system is powered off and unplugged before cleaning.
- BIOS Updates: Check the manufacturer's website for BIOS updates. Updating the BIOS can improve system stability and compatibility. Follow update instructions carefully.
- Cable Management: Ensure internal cables are neatly managed to improve airflow and prevent interference.
- Environmental Control: Operate the system in a clean, dry environment with stable temperatures to prevent component degradation.
7. Troubleshooting
If you encounter issues, refer to the following common troubleshooting steps:
| Problem | Possible Cause | Solution |
|---|---|---|
| System does not power on. | Loose power connections, faulty power supply, incorrect front panel wiring. | Check all power cables (24-pin ATX, CPU power), ensure power supply is switched on, verify front panel header connections. |
| No display output. | Graphics card not seated correctly, monitor cable loose, faulty monitor. | Reseat the graphics card, check monitor cable connections, test with a different monitor if possible. |
| System beeps repeatedly. | RAM or CPU issue. | Reseat RAM modules, ensure CPU is correctly installed. Consult motherboard beep codes for specific diagnostics. |
| Operating system fails to load. | Corrupt OS, faulty storage drive, incorrect boot order. | Check BIOS/UEFI boot order, test storage drive, consider reinstalling OS. |
8. Specifications
Below are the technical specifications for the Generic M8400T IS7XM V1.0 Desktop Motherboard:
| Feature | Detail |
|---|---|
| Brand | Generic |
| Model Number | IS7XM V1.0 |
| CPU Socket | LGA 1155 (Note: Product title specifies LGA 1155, which is used for installation instructions.) |
| RAM Memory Technology | DDR3 |
| Memory Slots Available | 1 |
| RAM Memory Maximum Size | 1 GB (Note: This capacity is unusually low for a DDR3 motherboard.) |
| Memory Clock Speed | 1 GHz |
| Processor Type (Example) | Alpha (Note: Actual compatibility depends on the specific LGA 1155 CPU generation.) |
| Batteries Required | No |
| Country of Origin | China |
| Dimensions (Parcel) | 1 x 1 x 1 cm; 50 g (Note: These are shipping parcel dimensions, not motherboard dimensions.) |
9. Warranty and Support
For warranty information and technical support, please refer to the retailer or manufacturer's official website. Keep your proof of purchase for any warranty claims.
For further assistance, contact the seller directly through the platform where the product was purchased.


