1. Introduction
The KAMRUI Pinova P1 Mini PC is a compact and powerful desktop computer designed for various applications including business, home office, online education, and home entertainment. It features an AMD Ryzen 4300U processor, 16GB RAM, and a 256GB SSD, preloaded with Windows 11 Pro. Its small form factor and versatile connectivity options make it suitable for diverse computing needs.

Image: The KAMRUI Pinova P1 Mini PC, showcasing its compact design in a modern workspace.
2. What's in the Box
- 1 x P1 Mini PC
- 1 x DP & HDMI Cable
- 1 x Power Adapter
- 1 x User Manual
- 1 x VESA Mount

Image: A visual representation of the KAMRUI Mini PC and all its included accessories, such as the power adapter, HDMI cable, VESA mount, and user manual.
3. Product Overview
3.1. Key Features
- Processor: AMD Ryzen 4300U (4C/4T, 4MB cache, up to 3.7GHz)
- Memory: 16GB DDR4 RAM
- Storage: 256GB M.2 SSD (expandable up to 2TB)
- Operating System: Windows 11 Pro
- Graphics: AMD Radeon Graphics (4K@60Hz HD Display)
- Connectivity: 2.4GHz+5GHz Dual Band WiFi 5, Gigabit Ethernet, Bluetooth 4.2
- Display Output: Triple screen linkage (HDMI, DP, Type-C)
- Compact Design: 5.06 x 5.06 x 2.01 inches, VESA mountable
3.2. Ports and Interfaces
The KAMRUI Pinova P1 Mini PC offers a comprehensive set of ports for various peripherals and display connections.
- Front Ports: Power Button, 3.5mm Audio Jack, 2 x USB 3.2 Gen1 Type-A, 1 x USB 3.2 Gen1 Type-C
- Rear Ports: DC In, 1 x HDMI 2.0, 1 x DP 1.4, 1 x RJ45 Gigabit Ethernet, 4 x USB 3.2 Gen1 Type-A
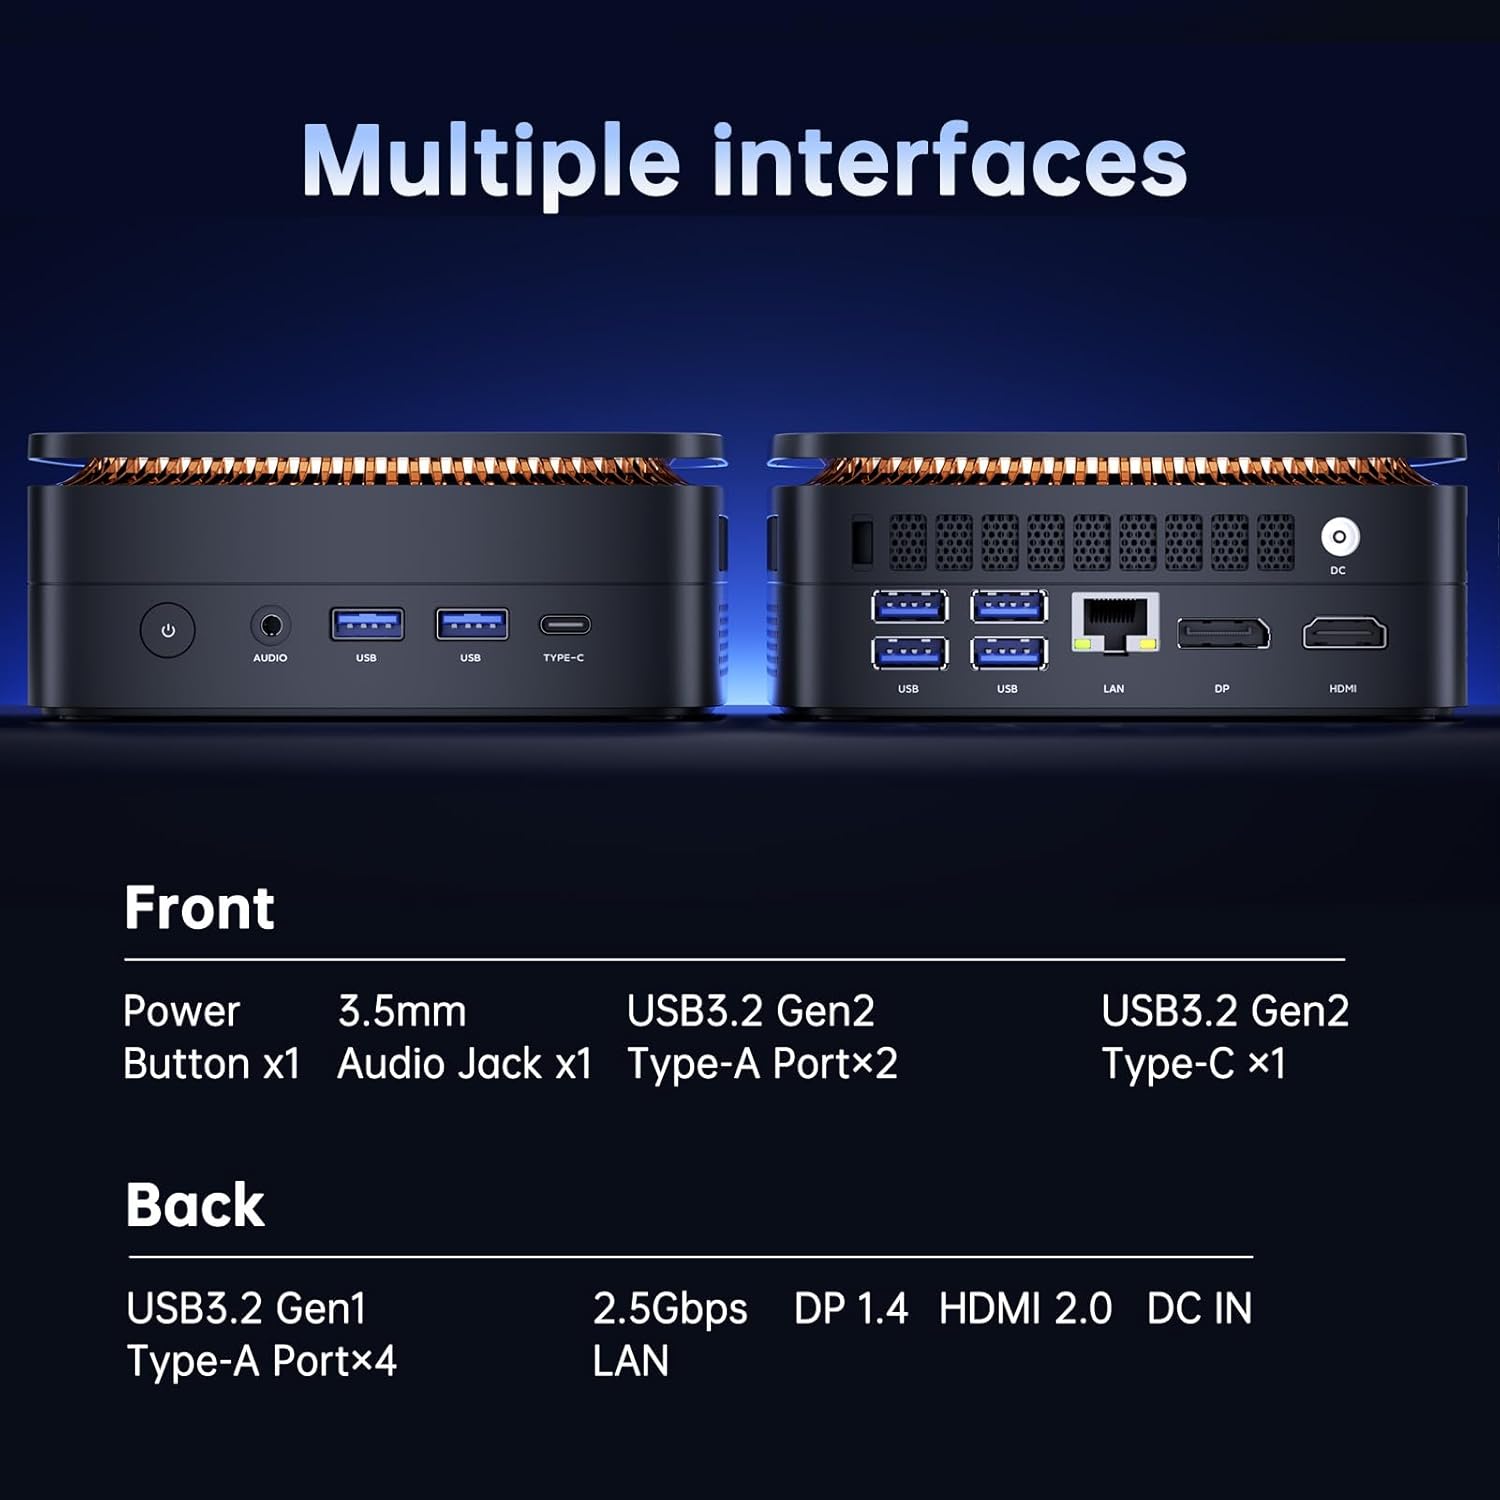
Image: Detailed view of the KAMRUI Pinova P1 Mini PC, highlighting and labeling all front and rear ports for easy identification.
4. Setup Instructions
4.1. Connecting to a Display
- Connect your monitor(s) to the Mini PC using the provided HDMI cable, a DisplayPort (DP) cable, or a USB-C to display cable. The Mini PC supports up to three 4K displays simultaneously.
- Ensure your display is set to the correct input source (HDMI, DP, or USB-C).

Image: The KAMRUI Pinova P1 Mini PC connected to three external monitors, demonstrating its triple 4K display capability.
4.2. Connecting Peripherals
- Connect your keyboard and mouse to the available USB ports.
- For wired internet, connect an Ethernet cable to the RJ45 port. For wireless, the Mini PC has built-in Dual Band WiFi 5.
- Connect any audio devices (headphones, speakers) to the 3.5mm audio jack.
4.3. Powering On
- Connect the power adapter to the DC IN port on the Mini PC and then plug it into a power outlet.
- Press the Power Button on the front of the Mini PC. The system will boot up automatically.
Video: A demonstration of the KAMRUI Mini PC's boot process, showing the initial power-on sequence and loading of the operating system.
4.4. VESA Mounting
The KAMRUI Pinova P1 Mini PC can be mounted on the back of a monitor using the included VESA bracket to save desk space.
- Attach the VESA bracket to the back of your monitor using screws.
- Align the Mini PC with the bracket and secure it using the provided screws.
Video: Instructions on how to use the VESA mounting bracket to attach the KAMRUI Mini PC to the back of a monitor, optimizing desk space.
5. Operating Instructions
5.1. Initial Windows Setup
Upon first boot, follow the on-screen instructions to complete the Windows 11 Pro setup, including language, region, network connection, and user account creation.
5.2. Connecting to Wi-Fi
- Click the Wi-Fi icon in the taskbar.
- Select your desired network from the list and click "Connect".
- Enter the network security key (password) if prompted.
5.3. Auto Power On Setting
The Mini PC supports an auto power-on feature, which can be configured in the BIOS settings.
- Power on the Mini PC and repeatedly press the Del key to enter the BIOS settings.
- Navigate to the "Boot" section using the arrow keys.
- Locate the "Wake system from S5" option and set it to "Fixed Time" or "Enabled" as per your requirement.
- Adjust the wake-up hour and minute.
- Save changes and exit the BIOS.
Video: A step-by-step guide on how to access the BIOS settings and configure the auto power-on feature for the KAMRUI Mini PC.
6. Maintenance
- Keep the Mini PC in a well-ventilated area to ensure proper heat dissipation. The device features dual air vents for 180° convection cooling.
- Regularly update Windows and drivers to maintain optimal performance and security.
- Clean the exterior with a soft, dry cloth. Avoid liquid cleaners directly on the device.

Image: An internal view of the KAMRUI Mini PC, illustrating its 180° convection cooling system with dual air vents for efficient heat dissipation.
7. Troubleshooting
- No Display: Ensure all display cables are securely connected and the monitor is set to the correct input. Try a different cable or port.
- No Power: Verify the power adapter is correctly connected to both the Mini PC and a working power outlet.
- Wi-Fi Issues: Check if Wi-Fi is enabled in Windows settings. Restart your router and the Mini PC.
- Slow Performance: Close unnecessary applications. Check for background updates. Ensure adequate ventilation.
8. Specifications
| Feature | Detail |
|---|---|
| Processor | AMD Ryzen 4300U (4C/4T, up to 3.7GHz) |
| RAM | 16GB DDR4 SODIMM (2 x 8GB, clocked @ 3200 MHz) |
| Storage | 256GB M.2 SSD |
| Graphics | AMD Radeon Graphics (4K@60Hz) |
| Operating System | Windows 11 Pro |
| Wireless Connectivity | Dual Band WiFi 5 (802.11a/b/g/n/ac), Bluetooth 4.2 |
| Wired Connectivity | 1 x RJ45 Gigabit Ethernet port |
| Video Output | 1 x HDMI 2.0, 1 x DP 1.4, 1 x USB 3.2 Gen1 Type-C (supports 4K@60Hz) |
| USB Ports | 6 x USB 3.2 Gen1 Type-A, 1 x USB 3.2 Gen1 Type-C |
| Audio | 1 x 3.5mm Audio Input/Output |
| Dimensions | 5.06 x 5.06 x 2.01 inches |
| Weight | 2.79 pounds |
9. Warranty and Support
KAMRUI offers lifetime technical support and a 5-year satisfaction service for the Pinova P1 Mini PC. For any issues or inquiries, please contact KAMRUI customer support.
- Email: support@kamrui.com
- Phone: +1-833-670-1528 (US Mon-Fri 9am-5pm EST)
You can also find support by logging into your Amazon account, navigating to "Your orders," and selecting "Ask Product Question" for your KAMRUI Mini PC purchase.

Image: KAMRUI customer support details, including email and phone number, for assistance with your Mini PC.