1. Introduction
Thank you for choosing the VOCOO 15.7" Digital Wall Timer and Clock. This device is designed to provide clear time display, versatile countdown and count-up timer functions, and customizable alarm settings for various environments such as offices, homes, kitchens, gyms, and classrooms. Please read this manual carefully to ensure proper setup and operation.
2. What's Included
Verify that all components are present in the package:
- VOCOO 15.7" Digital Wall Timer and Clock
- Remote Control
- 16.4ft Power Cord
- 5V/2A Power Adapter
- 3 x AAA Batteries (for memory backup)
- 2 x AAA Batteries (for remote control)
- User Manual (this document)
3. Setup
3.1 Power Connection
- Connect the 16.4ft power cord to the DC 5V input port on the back of the timer.
- Plug the 5V/2A power adapter into a standard electrical outlet. The timer will power on automatically.
3.2 Memory Backup Battery Installation
The timer uses 3 AAA batteries (included) to retain settings during power outages. This ensures that time, colors, and alarms are preserved without reprogramming.
- Locate the battery compartment on the back of the timer.
- Open the compartment cover.
- Insert 3 AAA batteries, observing the correct polarity (+/-).
- Close the battery compartment cover securely.

Image: Illustration of memory backup battery installation. The diagram shows the timer connected to power and the location for AAA batteries to preserve settings during power loss.
3.3 Remote Control Battery Installation
The remote control requires 2 AAA batteries (included).
- Open the battery compartment on the back of the remote control.
- Insert 2 AAA batteries, ensuring correct polarity.
- Close the compartment cover.
3.4 Mounting and Placement
The timer can be wall-mounted or placed on a desk.
- Wall Mounting: Use the keyhole slots on the back of the timer to hang it securely on screws (not included) in your desired wall location.
- Desk Placement: Place the timer on a flat, stable surface.
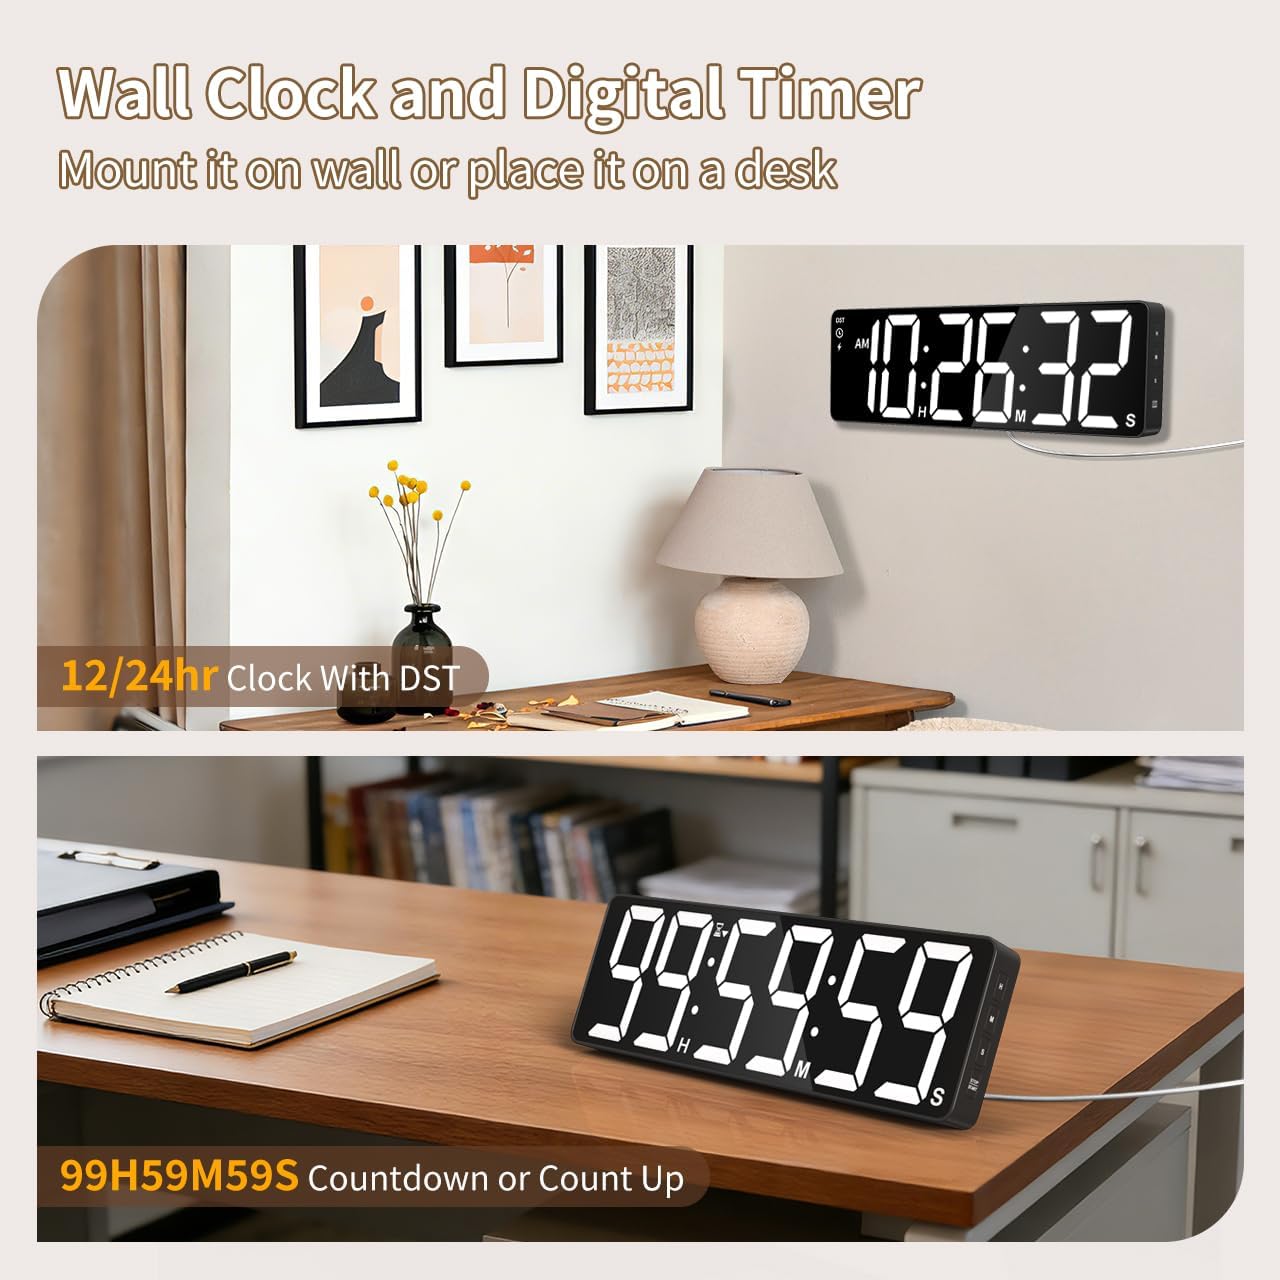
Image: Examples of the digital timer's placement, showing it mounted on a wall and resting on a desk, illustrating its versatility.
4. Operating Instructions
The timer can be operated using the buttons on the device or the included remote control.

Image: Overview of the timer's physical buttons and the remote control, highlighting their functions for easy operation.
4.1 Basic Clock Settings
Upon initial power-on or after a full power loss without backup batteries, the clock may need to be set.
- Set Time: Press the SET button on the remote or device. Use the number buttons (0-9) on the remote or the UP/DOWN buttons on the device to adjust hours and minutes. Press SET again to confirm.
- 12/24 Hour Format: Press the 12/24H button on the remote to switch between 12-hour (with AM/PM indicator) and 24-hour formats.
- Daylight Saving Time (DST): The timer features automatic DST adjustment. Ensure the DST setting is enabled if your region observes it. Refer to the remote control for a dedicated DST button or a combination key press.
4.2 Brightness Adjustment
The display has 3 brightness levels.
- Press the BRIGHTNESS button on the remote or device to cycle through the available brightness levels (Dim, Medium, Bright).
4.3 Color Selection
Choose from 18 color options for the display digits.
- Press the LIGHT COLOR button on the remote or device to cycle through 8 solid colors, 3 RGB fixed colors, and 7 RGB gradient colors.

Image: Visual representation of the 18 color options and 3 brightness levels (Dim, Medium, Bright) available for the timer's display.
4.4 Timer Functions (Countdown/Count Up)
The timer supports both countdown and count-up modes, up to 99 hours, 59 minutes, and 59 seconds.
- Set Countdown: Press TIMER on the remote. Use the number buttons (0-9) to input the desired time (HH:MM:SS). Press START/PAUSE to begin.
- Count Up (Stopwatch): Press TIMER and then CLEAR to set the timer to 00:00:00. Press START/PAUSE to begin counting up.
- Pause/Resume: Press START/PAUSE during an active timer to pause or resume.
- Reset: Press RESET to clear the current timer setting.
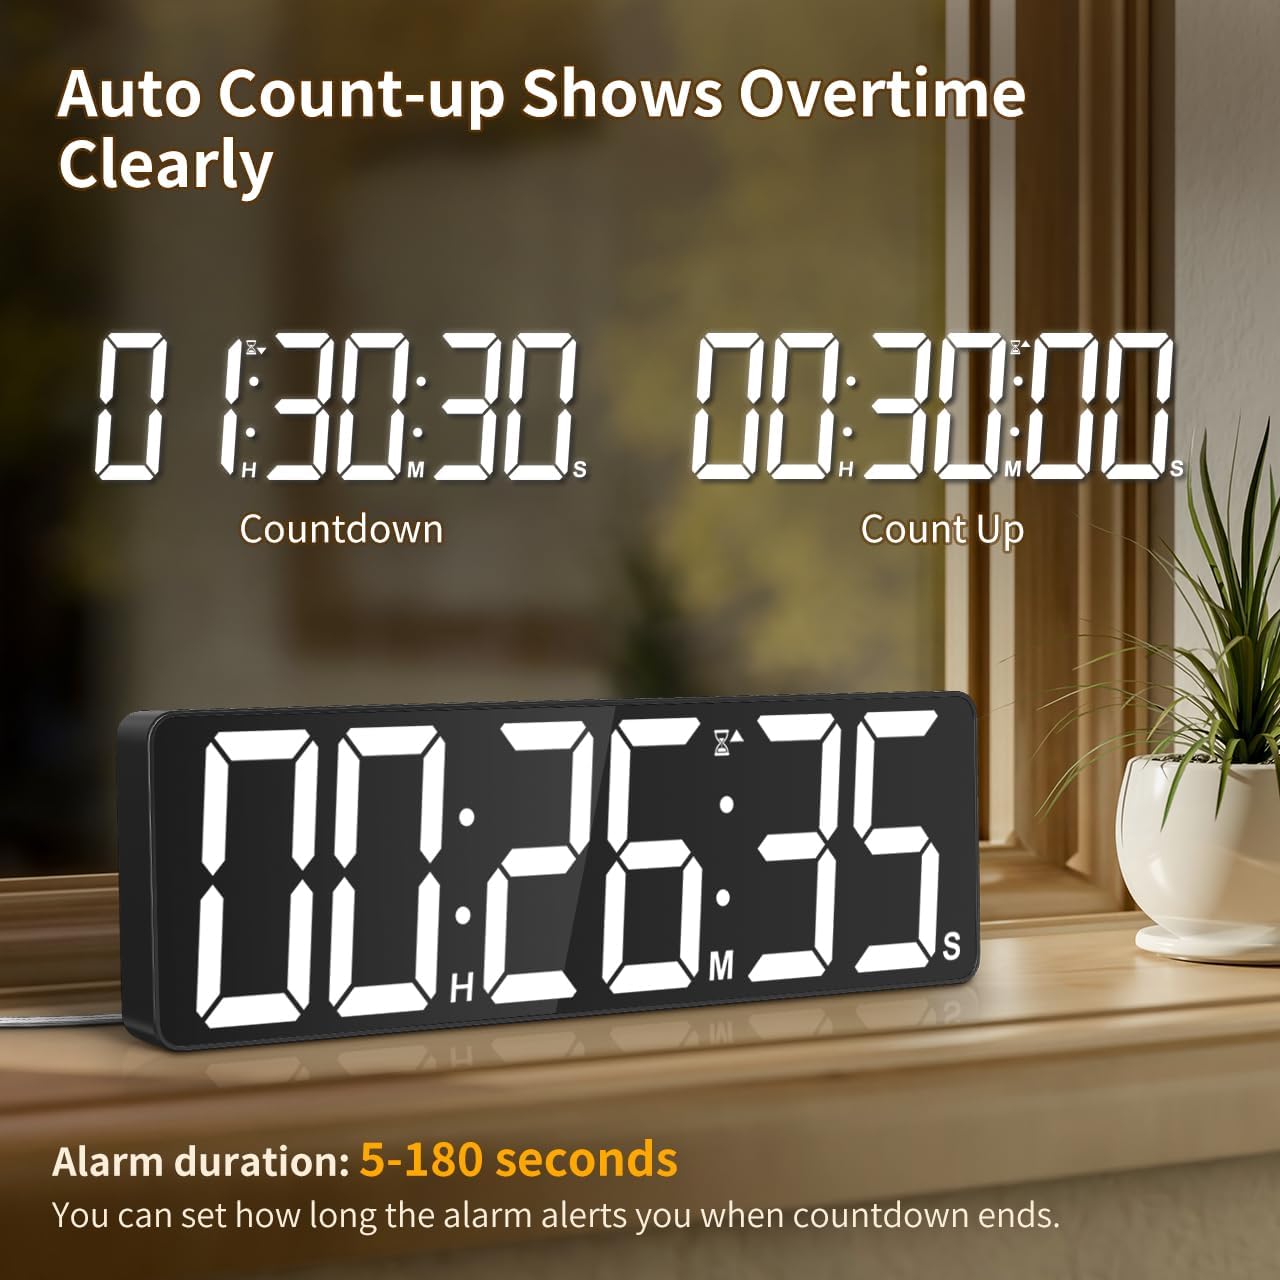
Image: The timer showing a countdown from 01:30:30 and an automatic count-up to 00:30:00 after a countdown finishes, indicating overtime tracking.
4.5 Quick-Set Shortcuts
The remote control includes 6 one-touch shortcut buttons for common timer durations:
- 3 minutes
- 5 minutes
- 15 minutes
- 25 minutes
- 30 minutes
- 5 hours
Press the desired shortcut button to instantly set and start a countdown.
4.6 Alarm Settings
The timer offers 6 distinct ringtones and 4 adjustable volume levels.
- Set Alarm: Press ALARM on the remote. Use number buttons to set the alarm time. Press ALARM again to confirm.
- Select Ringtones: Press the RINGTONE button on the remote to cycle through the 6 available tones (Buzzer, Melody 1-5).
- Adjust Volume: Press the VOLUME button on the remote to cycle through 4 volume levels (L01-L04) or L00 for silent mode (digits flash).
- Alarm Duration: The alarm duration can be set from 5 to 180 seconds. Refer to the remote control for specific buttons or combination presses to adjust this setting.
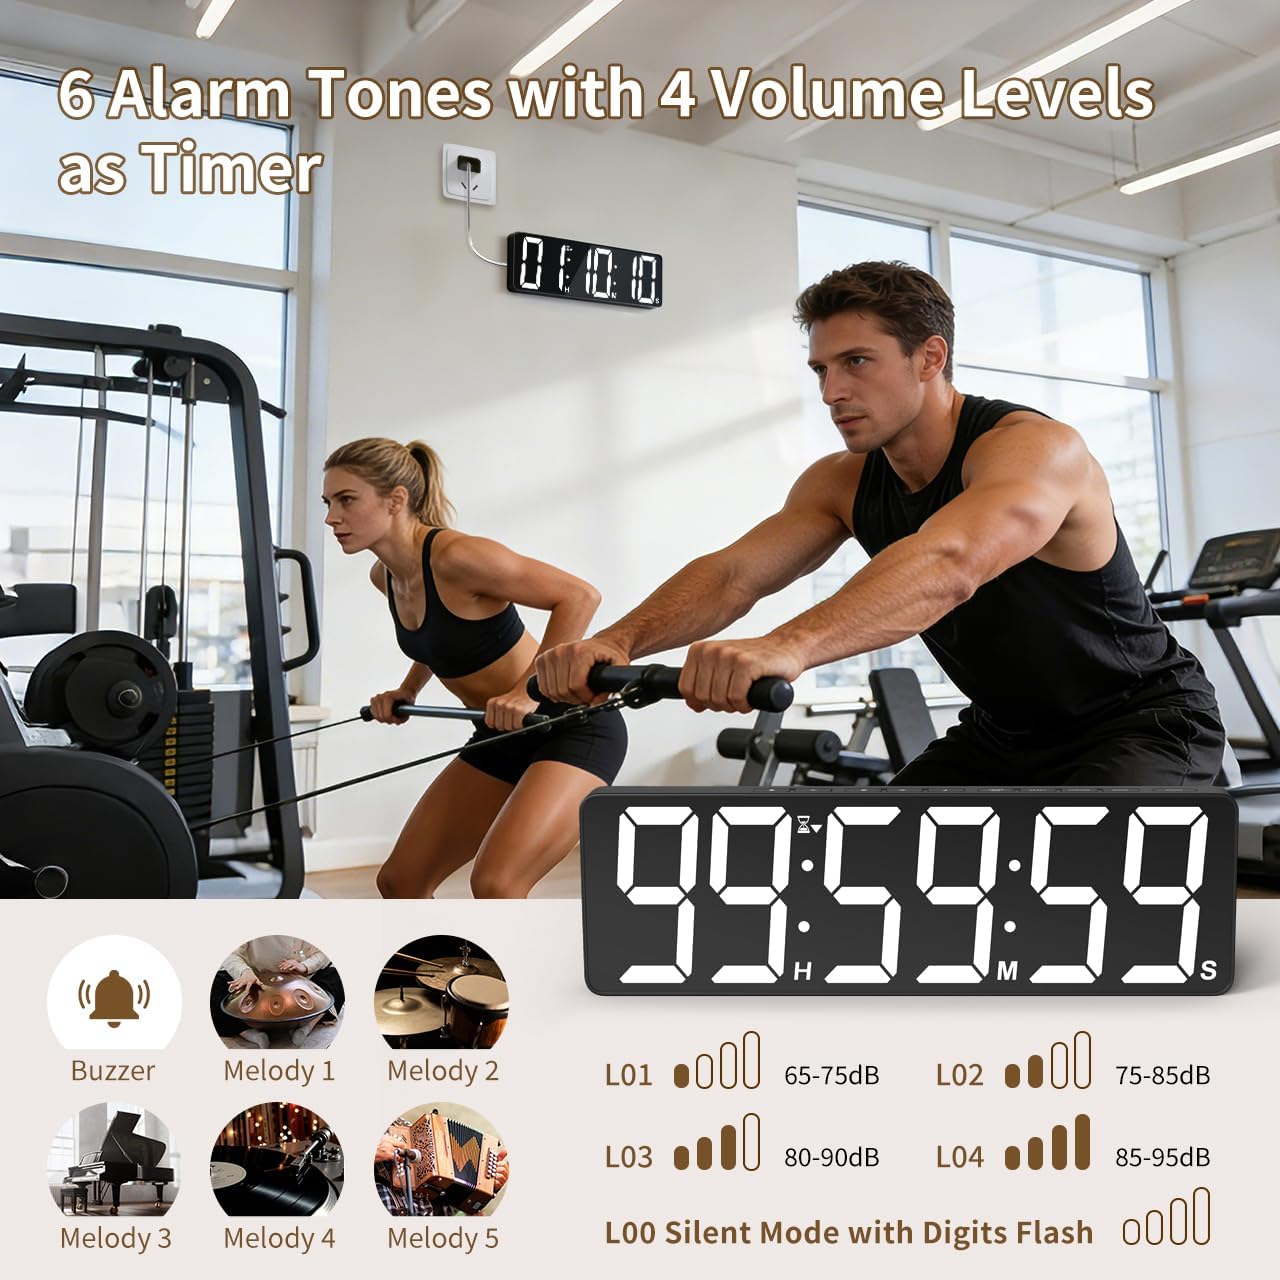
Image: Visual guide to the 6 alarm tones (Buzzer, Melody 1-5) and 4 volume levels (L01-L04), including a silent mode (L00) with flashing digits.
5. Maintenance
5.1 Cleaning
To clean the timer, gently wipe the display and casing with a soft, dry cloth. Do not use abrasive cleaners, solvents, or spray directly onto the device.
5.2 Battery Replacement
- Memory Backup Batteries: Replace the 3 AAA batteries in the main unit annually or if you notice settings are not retained during power outages.
- Remote Control Batteries: Replace the 2 AAA batteries in the remote control when its range or responsiveness decreases.
Always dispose of used batteries according to local regulations.
6. Troubleshooting
- Timer not powering on: Ensure the power adapter is securely connected to both the timer and a working electrical outlet. Check if the outlet is functional.
- Remote control not working: Check if the remote control batteries are correctly installed and not depleted. Ensure there are no obstructions between the remote and the timer. The remote has a range of 30ft+.
- Settings lost after power outage: Verify that the 3 AAA memory backup batteries are installed correctly and are not depleted. Replace them if necessary.
- Display is dim or colors are incorrect: Adjust the brightness level using the BRIGHTNESS button. Cycle through color options using the LIGHT COLOR button.
- Alarm not audible: Check the alarm volume setting using the VOLUME button on the remote. Ensure it is not set to L00 (silent mode).
7. Specifications
| Model Number | 6247 |
| Display Type | LED |
| Screen Size | 15.7 inches |
| Digit Height | 4.1 inches |
| Color Options | 18 (8 solid, 3 RGB fixed, 7 RGB gradients) |
| Brightness Levels | 3 |
| Timer Range | Up to 99 hours, 59 minutes, 59 seconds |
| Alarm Ringtones | 6 |
| Alarm Volume Levels | 4 + Silent Mode |
| Alarm Duration | 5-180 seconds |
| Power Input | 5V/2A DC |
| Power Cord Length | 16.4 ft (5 meters) |
| Memory Backup | 3 x AAA batteries (included) |
| Remote Control Batteries | 2 x AAA batteries (included) |
| Remote Control Range | 30ft+ |
| Product Dimensions (D x W x H) | 3.7D x 38W x 12H Centimetres |
| Item Weight | 820 Grams |
| Material | Acrylonitrile Butadiene Styrene |
8. Warranty and Support
For warranty information or technical support, please refer to the contact details provided with your purchase or visit the official VOCOO website. Keep your purchase receipt for warranty claims.