1. Introduction
Thank you for choosing the MLMLANT Handheld Steam Cleaner. This manual provides essential information for the safe and efficient operation of your steam cleaner. This powerful 1050W device is designed for multi-surface cleaning, utilizing high-temperature steam to effectively clean and sanitize without harsh chemicals. Please read these instructions carefully before first use and retain them for future reference.
2. Important Safety Information
Always observe basic safety precautions when using electrical appliances to reduce the risk of fire, electric shock, or injury.
- Hot Steam Hazard: The steam cleaner produces high-temperature steam (up to 221°F / 105°C). Avoid direct contact with steam to prevent burns.
- Safety Lock: The steam button is equipped with a safety lock to prevent accidental steam release. Always engage the safety lock when not actively steaming or when storing the unit.
- Safety Cap: The water tank features a safety cap. Do not attempt to open the safety cap while the unit is pressurized or hot. Allow the unit to cool down and release any residual pressure before opening.
- Water Level: Do not exceed a water level of 280ml when filling the tank to avoid splashing hot water during operation. The maximum tank capacity is 350ml, but filling to 250ml-280ml is recommended for safe operation.
- Chemical-Free: This appliance is designed for chemical-free cleaning. Do not add any detergents, cleaning solutions, or other chemicals to the water tank, as this can damage the unit and pose safety risks.
- Children and Pets: Keep the steam cleaner out of reach of children and pets, especially during operation.

Image: The MLMLANT Handheld Steam Cleaner highlighting its safety cap, 350ml water tank capacity, and indicator light. A safety tip warns not to exceed 280ml water to prevent hot water splashing.
3. Product Components
Familiarize yourself with the main components of your MLMLANT Handheld Steam Cleaner:
- Safety Cap: Secures the water tank opening.
- Short Spray Nozzle: Standard nozzle for general steam application.
- Steam Button with Safety Lock: Activates steam release and locks for safety.
- Power Cord and Plug: Connects the unit to an electrical outlet.
- Power LED (Indicator Light): Illuminates when the unit is heating up.

Image: An annotated view of the MLMLANT Handheld Steam Cleaner, pointing out key components such as the safety cap, short spray nozzle, steam button with safety lock, power cord, and power indicator light.
4. Package Contents
Your MLMLANT Handheld Steam Cleaner comes with a 9-piece accessory kit for versatile cleaning:
- Extended Nozzle
- Nozzle with Brush
- Bent Nozzle
- Funnel
- Measuring Cup
- Nozzle for Door & Window (Glass-Cleaning Accessory)
- Towel Sleeve (for Fabric-Cleaning Accessory)
- Brush Plate (for Fabric-Cleaning Accessory)
- Long Nozzle (Cone-Shaped Nozzle)

Image: The MLMLANT Handheld Steam Cleaner displayed alongside its complete set of 9 versatile cleaning attachments, including various nozzles, brushes, and a measuring cup.
5. Setup and First Use
- Fill Water Tank: Unscrew the safety cap counter-clockwise. Use the provided measuring cup and funnel to fill the water tank with clean tap water. Do not exceed the recommended 280ml fill line to prevent hot water splashing. The maximum capacity is 350ml.
- Secure Cap: Screw the safety cap back on clockwise until it is tightly sealed.
- Attach Nozzle: Select the desired nozzle or accessory and securely attach it to the steam cleaner.
- Plug In: Plug the power cord into a grounded electrical outlet. The power LED indicator light will illuminate, indicating the unit is heating.
- Heat Up: Allow 3-5 minutes for the unit to heat up and build steam pressure. The indicator light may turn off once ready, or remain on depending on the model.
- Test Steam: Before cleaning, direct the nozzle away from people and surfaces, then press the steam button to release a short burst of steam to ensure it's ready.
Video: This video demonstrates the application scenarios of the MLMLANT Handheld Steam Cleaner, including filling the water tank, plugging in the unit, and showing the steam output. It also illustrates various cleaning tasks with different attachments.
6. Operating Instructions
Once the unit is heated, you can begin cleaning. Press and hold the steam button to release steam. Release the button to stop steaming. For continuous steam, some models may have a lock feature on the steam button.
General Cleaning Tips:
- Always test steam on an inconspicuous area first, especially on delicate surfaces.
- Hold the nozzle close to the surface for best results.
- Wipe away loosened dirt and moisture with a clean cloth after steaming.
Accessory Usage:
- Bent Nozzle: Ideal for cleaning toilets, sink edges, and other hard-to-reach corners.
- Glass-Cleaning Accessory: Attach the squeegee to clean windows, mirrors, and glass surfaces.
- Fabric-Cleaning Accessory (with Towel Sleeve): Use for upholstery, sofas, mattresses, and clothing to refresh fabrics and remove mites.
- Round Brushes: Excellent for scrubbing stubborn grime on stovetops, grout lines, and tiles.
- Extended Nozzle: Provides extra reach for cleaning kitchen appliances, tight spaces, and car interiors.
- Cone-Shaped Nozzle (Long Nozzle): Delivers concentrated steam for tough spots like car rims, grills, and heavily soiled areas.

Image: A collage showing the MLMLANT Handheld Steam Cleaner with various attachments being used for different cleaning tasks, including a bent nozzle for toilets, a glass-cleaning accessory for windows, a fabric-cleaning accessory for sofas, round brushes for stovetops, an extended nozzle for kitchen areas, and a cone-shaped nozzle for car rims.
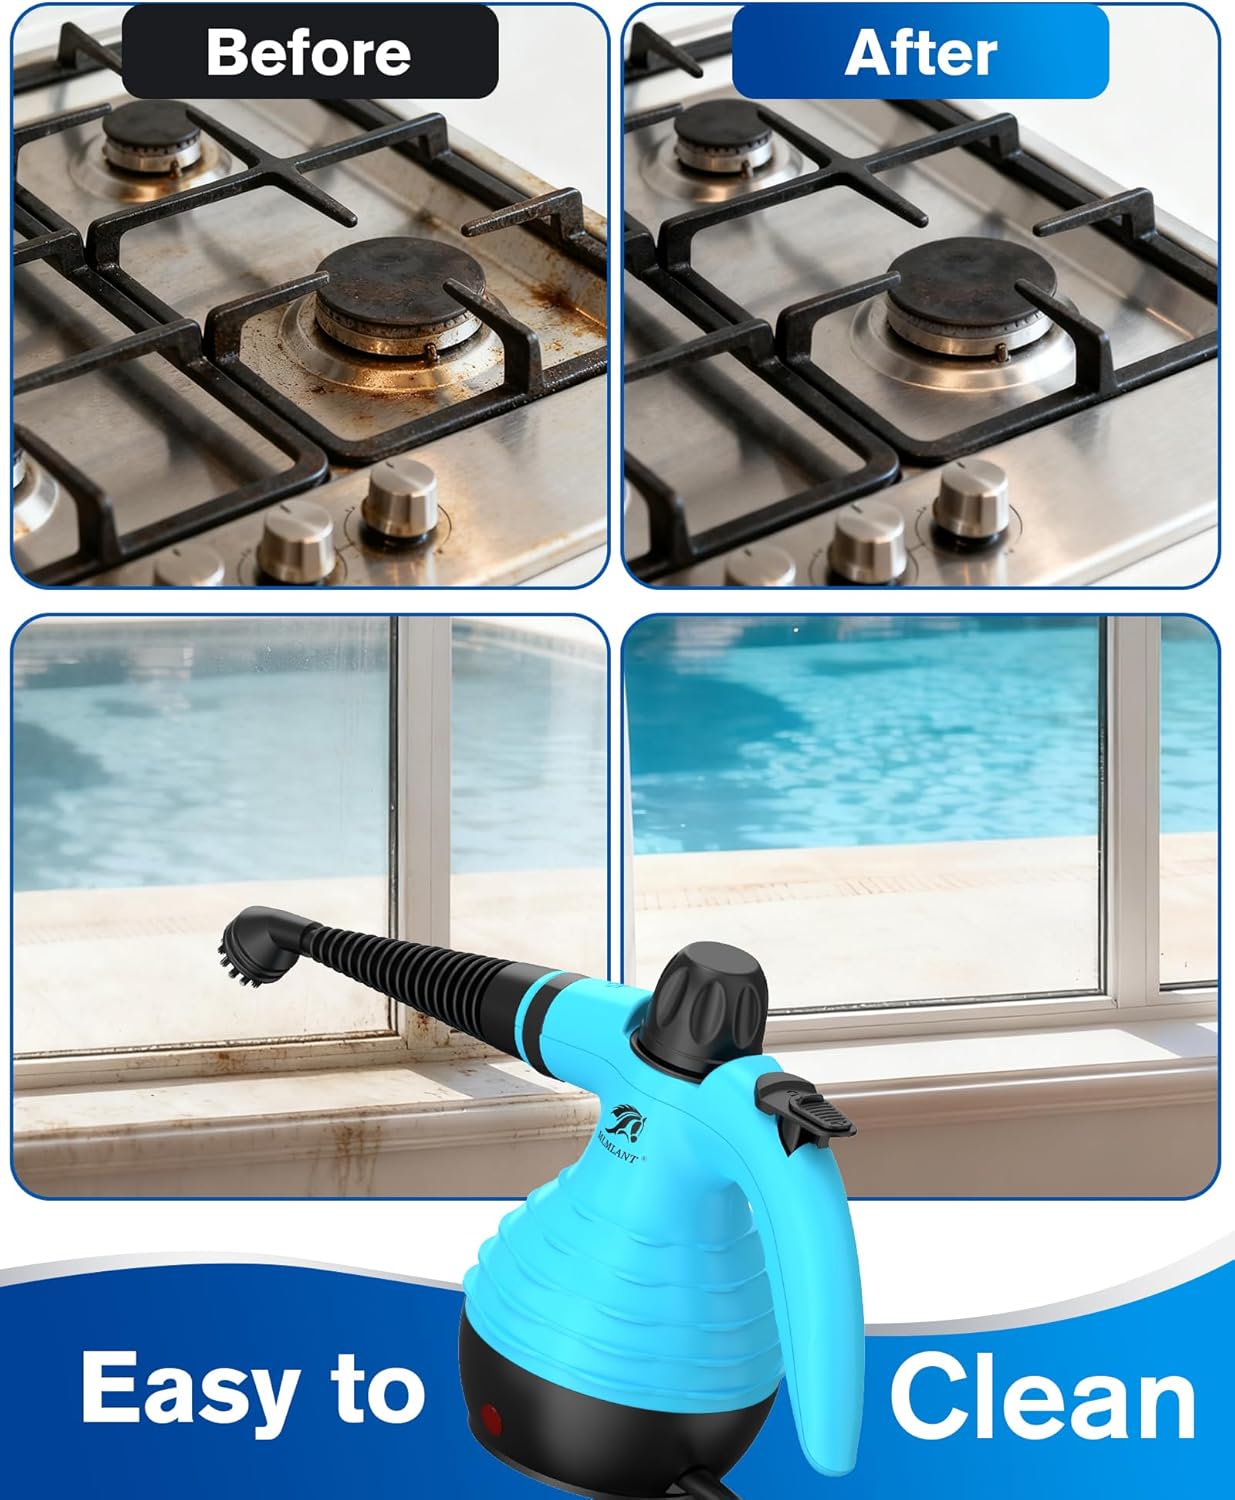
Image: Before and after comparison photos demonstrating the effectiveness of the MLMLANT Handheld Steam Cleaner on a dirty stovetop and a grimy window frame, showing significant cleaning results.

Image: The MLMLANT Handheld Steam Cleaner being used in a home environment, emphasizing its chemical-free operation and safety around children and pets.
7. Maintenance
Regular maintenance ensures optimal performance and longevity of your steam cleaner.
- Empty Water Tank: After each use, unplug the unit and allow it to cool completely. Carefully unscrew the safety cap and empty any remaining water from the tank.
- Clean Accessories: Wash all accessories with warm, soapy water and rinse thoroughly. Allow them to air dry before storing.
- Wipe Down Unit: Wipe the exterior of the steam cleaner with a damp cloth. Do not immerse the unit in water.
- Storage: Store the steam cleaner and its accessories in a cool, dry place, out of reach of children.
8. Troubleshooting
If you encounter issues with your MLMLANT Handheld Steam Cleaner, refer to the following common solutions:
How to open the safety cap before using it again:
If the safety cap is difficult to open after use, it may be due to residual pressure or heat. Follow these steps:
- Unplug the unit: Ensure the steam cleaner is disconnected from the power source.
- Release Steam: Press the steam button to release any remaining steam pressure.
- Wait: Allow the unit to cool down for 3 to 5 minutes.
- Open Cap: Press down on the safety cap and turn it counter-clockwise to open.
- Refill: Wait a few more minutes before adding water to ensure the unit has cooled sufficiently.

Image: A visual guide illustrating the four steps to safely open the safety cap of the MLMLANT Handheld Steam Cleaner, including unplugging, releasing steam, waiting, and turning the cap counter-clockwise.
9. Specifications
| Brand | MLMLANT |
| Model Name | SC1123 |
| Wattage | 1050W |
| Water Tank Capacity | 350ML (250ML-280ML recommended fill) |
| Continuous Running Time | 10 minutes or more |
| Item Weight | 3.87 pounds |
| Package Dimensions | 10.16 x 9.45 x 5.94 inches |
| Special Feature | Electric Stovetop Compatible |
| Surface Recommendation | Floor, Window, Door, Ceramic, Vinyl, Laminate, Granite, Marble, Hardwood |
10. Warranty and Support
For warranty information or technical support, please refer to the contact details provided with your purchase or visit the official MLMLANT website. Keep your purchase receipt as proof of purchase.