
Introduction
This manual provides essential instructions for the installation, operation, and maintenance of your new Generic Refrigerator Ice Maker, part number WPW10251076CM. This ice maker is designed as a replacement part for various Whirlpool refrigerator models, including GSF26C4EXW00, GSF26C4EXW02, GSF26C4EXY00, GSF26C5EXY00, GSS26C4XXA00, and GSS26C4XXB00, among others. Please read this manual thoroughly before installation and use to ensure proper function and safety.
Safety Information
- Always disconnect power to the refrigerator before attempting any installation, repair, or maintenance.
- Wear appropriate personal protective equipment, such as gloves, during installation.
- Ensure all connections are secure and properly seated to prevent leaks or electrical hazards.
- If you are unsure about any step, consult a qualified appliance technician.
- Keep children and pets away from the work area during installation.
What's in the Box
Your package should contain the following item:
- Ice Maker (Part Number WPW10251076CM)
This ice maker features a 4-pin wire harness and a 6-cube ice mold. It is a direct replacement for part numbers WPW10251076, AP6017832, W10122576, W10251076, and PS11751133.
Setup and Installation
- Disconnect Power: Unplug the refrigerator from the electrical outlet or turn off the circuit breaker supplying power to the refrigerator.
- Access Ice Maker: Locate the existing ice maker in your freezer compartment. Depending on your refrigerator model, you may need to remove shelves or the ice bucket to access it.
- Remove Old Ice Maker: Carefully disconnect the wire harness and any water lines attached to the old ice maker. Unscrew or unclip the old ice maker from its mounting brackets and remove it.
- Install New Ice Maker: Position the new ice maker (WPW10251076CM) in the freezer compartment. Secure it using the existing mounting brackets and screws.
- Connect Wiring: Connect the 4-pin wire harness from the refrigerator to the new ice maker. Ensure the connection is firm and secure.
- Connect Water Line (if applicable): If your model has a separate water line connection to the ice maker, reattach it securely.
- Restore Power: Plug the refrigerator back into the electrical outlet or turn on the circuit breaker.
- Initial Operation: Allow the freezer to reach its operating temperature. The ice maker will not produce ice until the freezer temperature is below 10°F. A new unit may take up to 24 hours to produce its first batch of ice.
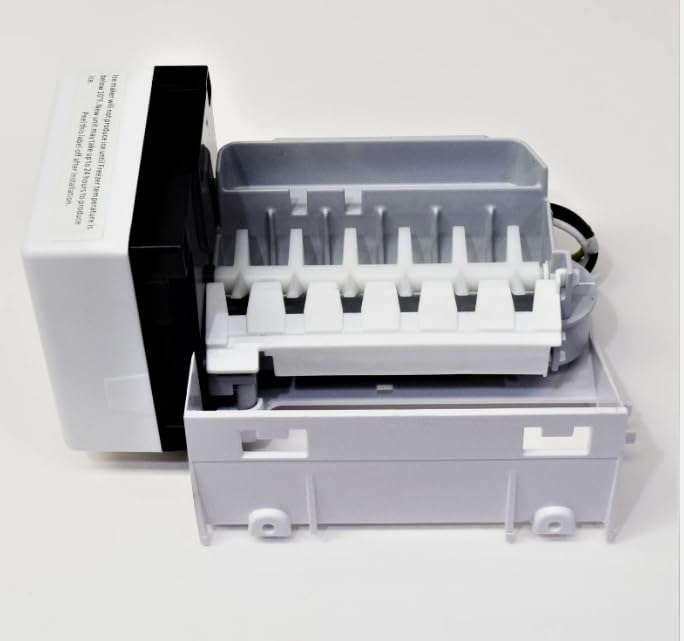
Image Description: A close-up view of the Generic Refrigerator Ice Maker, showing its internal components including the ice mold and ejector mechanism. A white label on the front of the unit reads: "Ice maker will not produce ice until Freezer temperature is below 10°F. New unit may take up to 24 hours to produce ice. Peel this label off after installation." This label provides critical information for the initial setup and operation of the ice maker.
Important Note: Peel off the informational label from the ice maker after installation.
Operating Instructions
Once installed and power is restored, the ice maker will begin its cycle automatically. Ensure the ice bucket is properly positioned to collect ice.
- First Ice Production: As noted during installation, the freezer must reach a temperature below 10°F for the ice maker to activate. The first batch of ice may take up to 24 hours to produce.
- Ice Level Control: The ice maker typically has an arm or sensor that detects the ice level in the bucket. When the bucket is full, the ice maker will temporarily stop production and resume when ice levels drop.
- Discard First Batches: It is recommended to discard the first few batches of ice produced to flush out any potential manufacturing residues from the water lines and ice maker components.
Maintenance
- Regular Cleaning: Periodically clean the ice maker and ice bucket with a mild soap and water solution. Rinse thoroughly and dry before reinstallation. Do not use abrasive cleaners or harsh chemicals.
- Water Filter: If your refrigerator has a water filter, ensure it is replaced according to the refrigerator manufacturer's recommendations to maintain optimal ice quality and prevent mineral buildup in the ice maker.
- Inspect for Leaks: Occasionally check for any signs of water leaks around the ice maker and water line connections.
Troubleshooting
| Problem | Possible Cause | Solution |
|---|---|---|
| No ice production |
|
|
| Slow ice production |
|
|
| Small or hollow ice cubes |
|
|
For issues not listed here, or if troubleshooting steps do not resolve the problem, contact a qualified appliance technician.
Specifications
| Brand | Generic |
| Model Name | Icemaker |
| Model Number (Part) | WPW10251076CM |
| Product Dimensions (D x W x H) | 13"D x 7"W x 7"H |
| Capacity | 6 Cube Ice Mold |
| Voltage | 120 volts |
| Wire Harness | 4 Pin |
| Replacement For | WPW10251076, AP6017832, W10122576, W10251076, PS11751133 |
Warranty and Support
For warranty information regarding this Generic Refrigerator Ice Maker, please refer to the documentation provided by your retailer or contact the manufacturer directly. Specific warranty terms may vary.
For technical support or further assistance, please contact the seller or a qualified appliance repair professional.