
1. Introduction
This manual provides instructions for the assembly, operation, and maintenance of your Hot Wheels Monster Trucks Build & Customize Metal Construction Kit. This kit allows you to construct two unique monster trucks: Tiger Shark and Demo Derby, using durable metal components and included tools. Please read these instructions carefully before beginning assembly to ensure proper use and enjoyment.
2. Safety Information
- Age Recommendation: This product is designed for ages 6 and up. Not suitable for children under 3 years due to small parts which may present a choking hazard.
- Adult Supervision: Adult supervision is recommended during assembly and play, especially for younger children.
- Small Parts: The kit contains small parts. Keep them out of reach of infants and pets.
- Tool Use: Use the provided tools carefully. Do not use excessive force when tightening screws.
- Sharp Edges: While components are designed for safety, exercise caution with metal edges during assembly.
3. Package Contents
Verify that all components listed below are present in your kit before beginning assembly:
- (2) Buildable Monster Trucks (Tiger Shark & Demo Derby)
- Metal construction pieces
- Oversized wheels and tires
- Assembly tools (wrench, screwdriver)
- Sticker sheets for customization
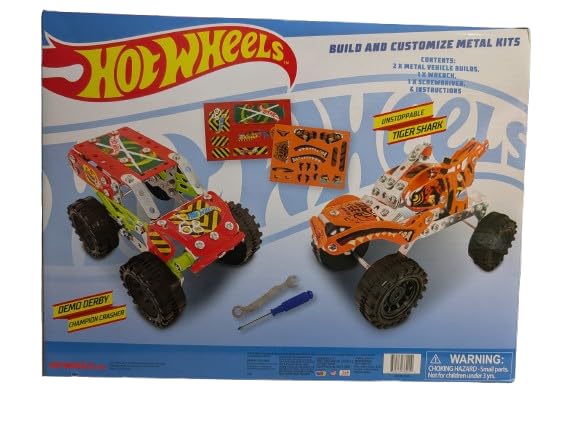
Image 3.1: The complete Hot Wheels Monster Trucks Build & Customize Metal Construction Kit box, showing both Tiger Shark and Demo Derby trucks, tools, and stickers.
4. Setup and Assembly
Follow these steps to assemble your monster trucks:
4.1. Step 1: Identify Components
Unpack all parts and lay them out on a clean, flat surface. Familiarize yourself with the different metal plates, beams, screws, and nuts. Separate the components for each truck if desired, as the kit includes parts for two distinct models.
4.2. Step 2: Assemble the Chassis
Begin by constructing the main chassis frame for each truck. Use the provided screws and nuts to connect the metal beams and plates according to the visual guides. Ensure all connections are secure but do not overtighten, as this may strip the threads.

Image 4.1: The assembled Demo Derby monster truck, showcasing its red and green metal construction and large wheels.

Image 4.2: The assembled Tiger Shark monster truck, featuring its orange and black design with tiger-themed details.
4.3. Step 3: Attach Wheels
Once the chassis is complete, attach the oversized wheels and tires to the axles. Ensure the wheels spin freely and are securely fastened to prevent them from detaching during play.

Image 4.3: A close-up view of an oversized monster truck wheel and tire, with the 'Demo Derby' label visible in the background.
4.4. Step 4: Apply Stickers
Customize your monster trucks using the included sticker sheets. Apply stickers to the designated areas or wherever you wish to personalize your creations. Ensure surfaces are clean and dry before applying stickers for best adhesion.
5. Operating Your Monster Trucks
Your Hot Wheels Monster Trucks are now ready for action. These trucks are designed for imaginative play and can be used on various indoor and outdoor surfaces. They are built for durability and can withstand impacts typical of monster truck play.
- Racing: Set up a race track and compete with friends.
- Crashing: The robust metal construction allows for high-impact play.
- Customization: Experiment with different sticker placements or even swap parts between your Tiger Shark and Demo Derby trucks for unique combinations.
6. Maintenance
- Cleaning: Wipe the trucks with a dry or slightly damp cloth to remove dust and dirt. Avoid using harsh chemicals or abrasive cleaners.
- Storage: Store the trucks in a cool, dry place away from direct sunlight when not in use.
- Check for Loose Parts: Periodically inspect the trucks for any loose screws or nuts. Tighten them gently with the provided tools if necessary to maintain structural integrity.
7. Troubleshooting
| Problem | Possible Cause | Solution |
|---|---|---|
| Truck parts are loose. | Screws or nuts have loosened during play. | Use the provided tools to gently tighten all screws and nuts. Do not overtighten. |
| Wheels do not spin freely. | Axle connections are too tight or obstructed. | Loosen the screws holding the wheels slightly. Check for any debris obstructing the axle. |
| Difficulty assembling a specific part. | Incorrect orientation or misalignment of parts. | Refer to the visual guides on the packaging. Ensure parts are aligned correctly before tightening. Seek adult assistance if needed. |
8. Specifications
| Feature | Detail |
|---|---|
| Model Name | Monster Trucks Build & Customize |
| Brand | Generic |
| Manufacturer | RMS |
| Manufacturer Part Number | VS |
| Age Range Description | Youth (Ages 6+) |
| Material Type | Plastic (for some components), Metal (for construction pieces) |
| Item Weight | 2 Pounds |
| Item Dimensions | 16 x 1 x 12 inches (packaging) |
| Batteries Required | No |
| Included Components | (2) Buildable Monster Trucks (Tiger Shark & Demo Derby), Metal construction pieces, Oversized wheels and tires, Assembly tools, Sticker sheets |
9. Warranty Information
Specific warranty details for this product are not provided in the available information. Please refer to the product packaging or contact the retailer or manufacturer directly for any warranty-related inquiries.
10. Customer Support
If you have any questions, require assistance with assembly, or encounter issues not covered in this manual, please contact the manufacturer or the retailer from whom you purchased the product. Keep your purchase receipt and product model information (Model VS) handy when contacting support.