1. Introduction
This manual provides instructions for the installation, operation, and maintenance of the Generic Washing Machine Water Inlet Valve Kit. This kit is designed to ensure stable water flow and dependable washing performance in compatible Sears Kenmore washing machines. It serves as an efficient replacement part to restore proper water regulation, addressing common issues such as weak water flow, filling problems, or inconsistent water supply.
The kit includes a universal washer water solenoid valve, a mounting bracket, and necessary screws. It is compatible with 3/8" or 1/2" outlets (with adapter) and standard garden hose fittings on the inlet side (hot & cold).
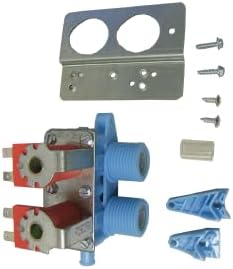
Figure 1.1: Components of the Water Inlet Valve Kit. This image displays the main valve assembly, a metal mounting bracket, several screws, and blue plastic adapters, all essential for installation.
2. Setup and Installation
Safety First: Before beginning any installation, ensure the washing machine is disconnected from its power source and the water supply is turned off. Failure to do so can result in electric shock or water damage.
Required Tools:
- Screwdriver (Phillips and/or flathead)
- Pliers or adjustable wrench
- Bucket and towels (for water spills)
- Work gloves
Installation Steps:
- Disconnect Power and Water: Unplug the washing machine from the electrical outlet. Turn off the hot and cold water supply valves to the washing machine.
- Drain Hoses: Place a bucket behind the washer and disconnect the hot and cold water inlet hoses from the back of the machine. Allow any residual water to drain into the bucket.
- Access the Valve: Depending on your washing machine model, you may need to remove the back panel or top panel to access the existing water inlet valve. Refer to your washing machine's service manual for specific access instructions.
- Disconnect Old Valve:
- Carefully disconnect the electrical wiring harness from the solenoids on the old valve.
- Disconnect any internal hoses or tubes attached to the valve.
- Unscrew and remove the mounting screws securing the old valve to the washer chassis.
- Remove Old Valve: Once all connections and fasteners are removed, carefully extract the old water inlet valve from the washing machine.
- Install New Valve:
- Position the new water inlet valve kit in the same location as the old valve. Use the provided mounting bracket and screws to secure it firmly to the washer chassis.
- Connect any internal hoses or tubes to the new valve's outlets. The valve is designed for 3/8" or 1/2" outlets (an adapter may be needed for 1/2").
- Reconnect the electrical wiring harness to the solenoids on the new valve. Ensure connections are secure.
- Reconnect Water Hoses: Attach the hot and cold water inlet hoses from your household supply to the standard garden hose fittings on the new valve. Hand-tighten first, then use pliers or a wrench for a snug fit, but do not overtighten.
- Restore Access Panels: Reattach any access panels or covers that were removed.
- Test for Leaks: Turn on the hot and cold water supply valves slowly. Check all connections for leaks. If leaks are present, tighten the connections further.
- Restore Power: Plug the washing machine back into the electrical outlet.
- Function Test: Run a short wash cycle to ensure the valve is functioning correctly and there are no leaks during operation.

Figure 2.1: Detailed view of the water inlet valve, showing the hot and cold water solenoids, threaded inlets, and the included mounting bracket and screws for secure installation.
3. Operation
The water inlet valve is a critical component that controls the flow of hot and cold water into your washing machine's tub. When the washing machine initiates a fill cycle, the control board sends an electrical signal to the solenoids on the valve. This signal opens the appropriate solenoid (hot, cold, or both) allowing water to flow into the tub until the desired water level is reached, as detected by the water level sensor.
The valve's design ensures precise water regulation, contributing to efficient washing performance and proper water temperature for various wash cycles.
4. Maintenance
Regular maintenance can help prolong the life of your water inlet valve and ensure optimal washing machine performance.
- Check for Leaks: Periodically inspect the water inlet hoses and valve connections for any signs of leaks. Address any leaks immediately to prevent water damage.
- Clean Inlet Screens: The water inlet valve typically has small screens (filters) at the hose connections to prevent sediment from entering the valve and washing machine. If water flow becomes restricted, turn off the water supply, disconnect the hoses, and clean these screens.
- Inspect Hoses: Check the condition of the hot and cold water inlet hoses. Replace any hoses that show signs of cracking, bulging, or wear.
- Avoid Overtightening: When reconnecting hoses, tighten them firmly but avoid overtightening, which can damage the plastic threads on the valve.
5. Troubleshooting
If your washing machine experiences water-related issues, the water inlet valve may be a contributing factor. Here are some common problems and potential solutions:
| Problem | Possible Cause | Solution |
|---|---|---|
| Weak Water Flow / Slow Fill | Clogged inlet screens, kinked water hoses, low household water pressure, faulty valve solenoid. | Check and clean inlet screens. Ensure hoses are not kinked. Verify household water pressure. If screens and hoses are clear, the valve may need replacement. |
| Washer Not Filling with Water | Water supply turned off, faulty water inlet valve, electrical issue to valve, lid switch problem. | Ensure water supply valves are fully open. Check for power to the valve solenoids during a fill cycle. If no power, investigate electrical connections or control board. If power is present but no water, replace the valve. |
| Washer Fills Continuously / Overfills | Stuck open water inlet valve, faulty water level pressure switch. | If the valve continues to fill even when the washer is off or after the desired level is reached, the valve is likely stuck open and requires replacement. Also, check the water level pressure switch. |
| Water Leaks from Valve Area | Loose hose connections, cracked valve housing, damaged O-rings or seals. | Tighten all hose connections. Inspect the valve body for cracks. If the valve itself is leaking, it needs replacement. |
If troubleshooting steps do not resolve the issue, it is recommended to consult a qualified appliance technician or contact customer support.
6. Specifications
- Part Number: 85805-01932
- Item Model Number: 85805-02067
- Style: Washing Machine Water Inlet Valve
- Number Of Pieces: 1 (Kit includes valve, mounting bracket, screws, and adapters)
- Product Dimensions: Approximately 1 x 1 x 1 inches (Valve assembly)
- Inlet Connections: Standard garden hose fittings (hot & cold)
- Outlet Connections: 3/8" or 1/2" (with adapter)
- Compatibility: Universal replacement for various Sears Kenmore washing machine models, including but not limited to 110.91110100, 110.91110110, 110.91121100, 110.91121110, 110.91210100, 110.91220100, 110.91250100, 110.91263100, 110.91263600, 110.91263800, 110.91264100.
7. Product Guarantee
This product is backed by a manufacturer's guarantee. We are committed to providing quality products and ensuring customer satisfaction. For specific details regarding the guarantee period and terms, please refer to the product packaging or contact the seller directly.
8. Support and Contact Information
If you have questions regarding the compatibility of this water inlet valve kit with your specific washing machine model, require assistance with installation, or encounter any issues not covered in this manual, please contact the seller or a qualified appliance repair technician.
When contacting support, please have your washing machine's full model number and the part number of this kit (85805-01932) readily available.

