1. Safety Information
Before operating your URLIFE T5 Folding Electric Bike, please read this manual thoroughly. Failure to follow instructions and safety warnings may result in serious injury or property damage. Always wear a helmet and appropriate safety gear. Adhere to all local traffic laws and regulations.
Pre-Ride Checklist:
- Brakes: Ensure front and rear brakes function correctly.
- Tires: Check tire pressure and condition for any damage.
- Battery: Verify battery is fully charged and securely locked in place.
- Lights: Confirm headlights, taillights, and turn signals are operational.
- Fasteners: Inspect all bolts, nuts, and quick-release levers for tightness.
- Handlebars & Seat: Ensure they are adjusted to a comfortable and secure position.
2. Product Overview
The URLIFE T5 is a versatile folding electric bike designed for adults, featuring a powerful motor, long-lasting battery, and full suspension for a comfortable ride across various terrains. Its foldable design enhances portability and storage convenience.
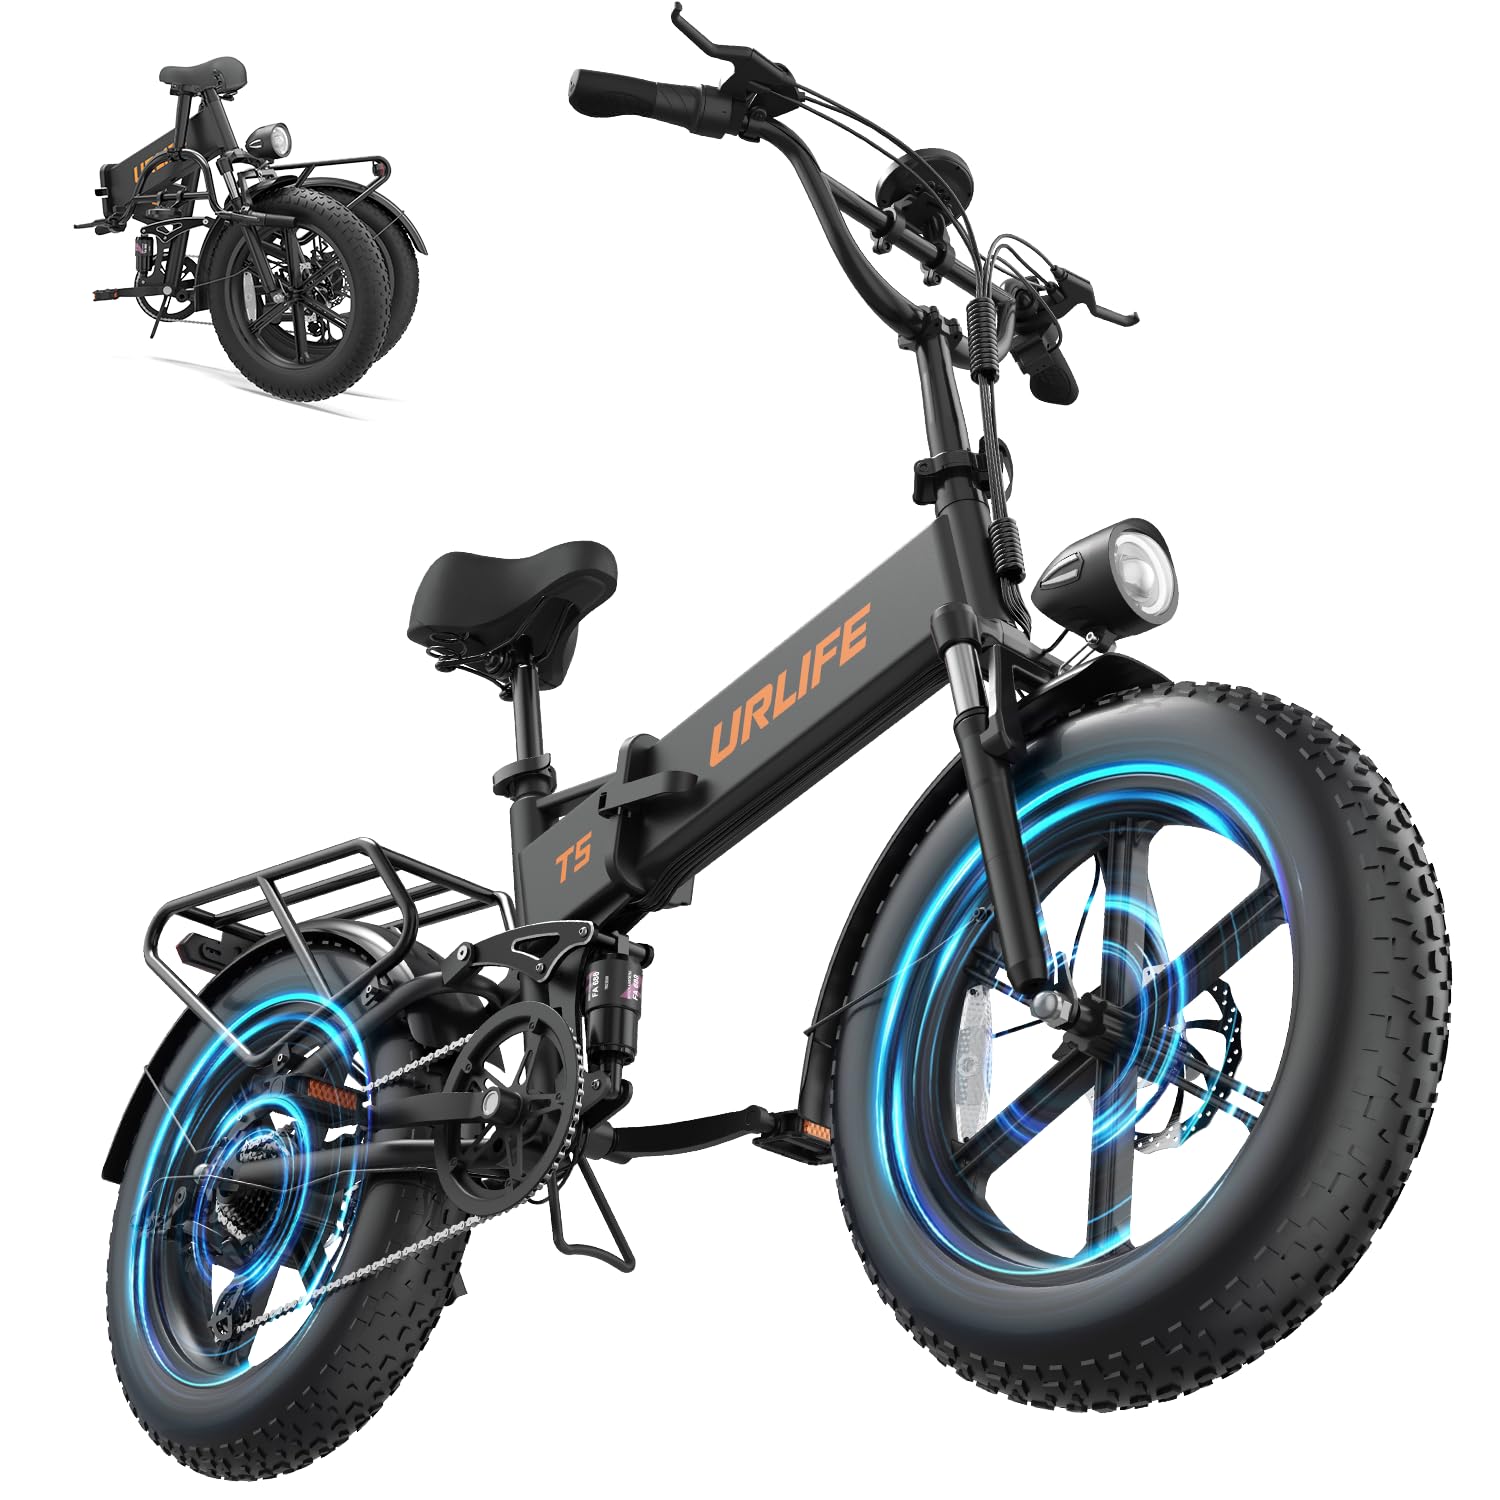
Figure 2.1: URLIFE T5 Folding Electric Bike (Black model).
Key Features:
- Powerful Motor: 1500W Peak Motor (80 Nm torque) for inclines up to 30°.
- Long-lasting Battery: Removable 48V 13AH battery offering 60-80 miles per charge.
- All-Terrain Tires: 20" x 4" puncture-resistant fat tires for superior traction and shock absorption.
- Full Suspension: Advanced quad-link shock absorption system for a smooth ride.
- LED Display: Clear display showing speed, battery level, mileage, and more.
- 7-Speed Gearing: Shimano 7-speed transmission system for adaptable riding.
- Safety Lighting: Integrated front/rear lights and turn signals.
- Foldable Design: Compact for easy transport and storage.
- Rear Rack: Oversized rear rack (400 x 190 mm) for cargo.
3. Assembly Instructions
The URLIFE T5 electric bike is 90% pre-assembled. Follow these steps or refer to the video guide for completing the assembly.
Video 3.1: URLIFE T5 All-Terrain Electric Bike Installation Guide. This video provides a visual walkthrough of the assembly process.
3.1 Unpacking and Component Check
Carefully remove the bike and all components from the packaging. Inspect for any damage during transit. Ensure all listed parts are present:
- Main bike frame (partially assembled)
- Front wheel
- Front fender
- Headlight
- Rear rack
- Saddle and seat post
- Pedals (Left and Right)
- Charger
- Tool kit (wrenches, hex keys)
- Keys for battery lock
3.2 Handlebar Installation
- Insert the handlebar stem into the head tube of the frame.
- Adjust the handlebar to your desired height and angle.
- Tighten the stem bolts securely using the provided hex key.
- Ensure the handlebar is aligned with the front wheel.
3.3 Front Fender and Headlight Installation
- Attach the front fender to the fork using the provided screws and tools.
- Mount the headlight to the designated bracket on the front fork.
- Connect the headlight cable to the main wiring harness.
3.4 Front Wheel Installation
- Carefully align the front wheel with the fork dropouts, ensuring the brake rotor slides into the caliper.
- Insert the quick-release skewer or axle through the wheel hub and fork.
- Securely tighten the nuts on both sides.
3.5 Rear Rack and Taillight Installation
- Attach the rear rack to the designated mounting points on the bike frame.
- Mount the taillight to the rear rack.
- Connect the taillight cable to the main wiring harness.
3.6 Saddle Installation and Adjustment
- Insert the seat post with the saddle into the seat tube of the frame.
- Adjust the seat height to ensure comfortable pedaling with a slight bend in your knee at the bottom of the pedal stroke.
- Secure the seat post with the quick-release lever.
3.7 Pedal Installation
Note: The pedals are marked 'L' for Left and 'R' for Right. The Left pedal tightens counter-clockwise, and the Right pedal tightens clockwise.
- Identify the 'R' pedal and thread it clockwise into the right crank arm. Tighten firmly with a wrench.
- Identify the 'L' pedal and thread it counter-clockwise into the left crank arm. Tighten firmly with a wrench.
3.8 Gas Pedal (Throttle) Installation
- Slide the throttle onto the right side of the handlebar.
- Secure it in place with the provided screw and hex key.
- Connect the throttle cable to the corresponding connector on the bike's wiring.
4. Operation Guide
4.1 Charging the Battery
The 48V 13AH battery can be charged while installed on the bike or removed. The charging port is located on the side of the battery housing.
- Locate the charging port on the bike frame or directly on the battery if removed.
- Connect the charger to the charging port, then plug the charger into a power outlet.
- A red light on the charger indicates charging is in progress. A green light indicates charging is complete.
- Charging typically takes 5-6 hours.

Figure 4.1: The removable 48V 13AH battery provides extended range.
4.2 Powering On/Off and LED Display
The LED display provides essential riding information and controls.
- Power On: Long press the power button on the handlebar control panel. The LED display will illuminate.
- Power Off: Long press the power button again.

Figure 4.2: The LED color display shows speed, battery level, and other vital information.
4.3 Controls and Functions
- Headlight: Single press the headlight button to turn on/off.
- Horn: Press the horn button to activate.
- Turn Signals: Use the left/right turn signal buttons to indicate direction.
- Assist Levels: Use the '+' and '-' buttons to cycle through pedal assist levels (typically 1-5).
- Throttle: Twist the gas pedal (throttle) on the right handlebar for electric-only propulsion.

Figure 4.3: Integrated front and rear lights enhance visibility and safety.
4.4 Riding Modes
The URLIFE T5 offers multiple riding modes to suit your preference and terrain:
- Pedal Assist Mode: Provides electric assistance as you pedal. Adjust assist levels for more or less power.
- Electric Mode (Throttle): Use the throttle for full electric power without pedaling.
- Manual Mode: Ride the bike like a traditional bicycle without any electric assistance.

Figure 4.4: The bike supports multiple riding modes for diverse experiences.
4.5 Folding the Bike
The URLIFE T5 features a smart foldable design for convenient storage and transport.
- Lower the seat post to its lowest position.
- Open the quick-release lever on the handlebar stem and fold the handlebars down.
- Locate the main frame hinge lever, open it, and fold the bike frame in half.
- Ensure all folding mechanisms are securely latched before transport.
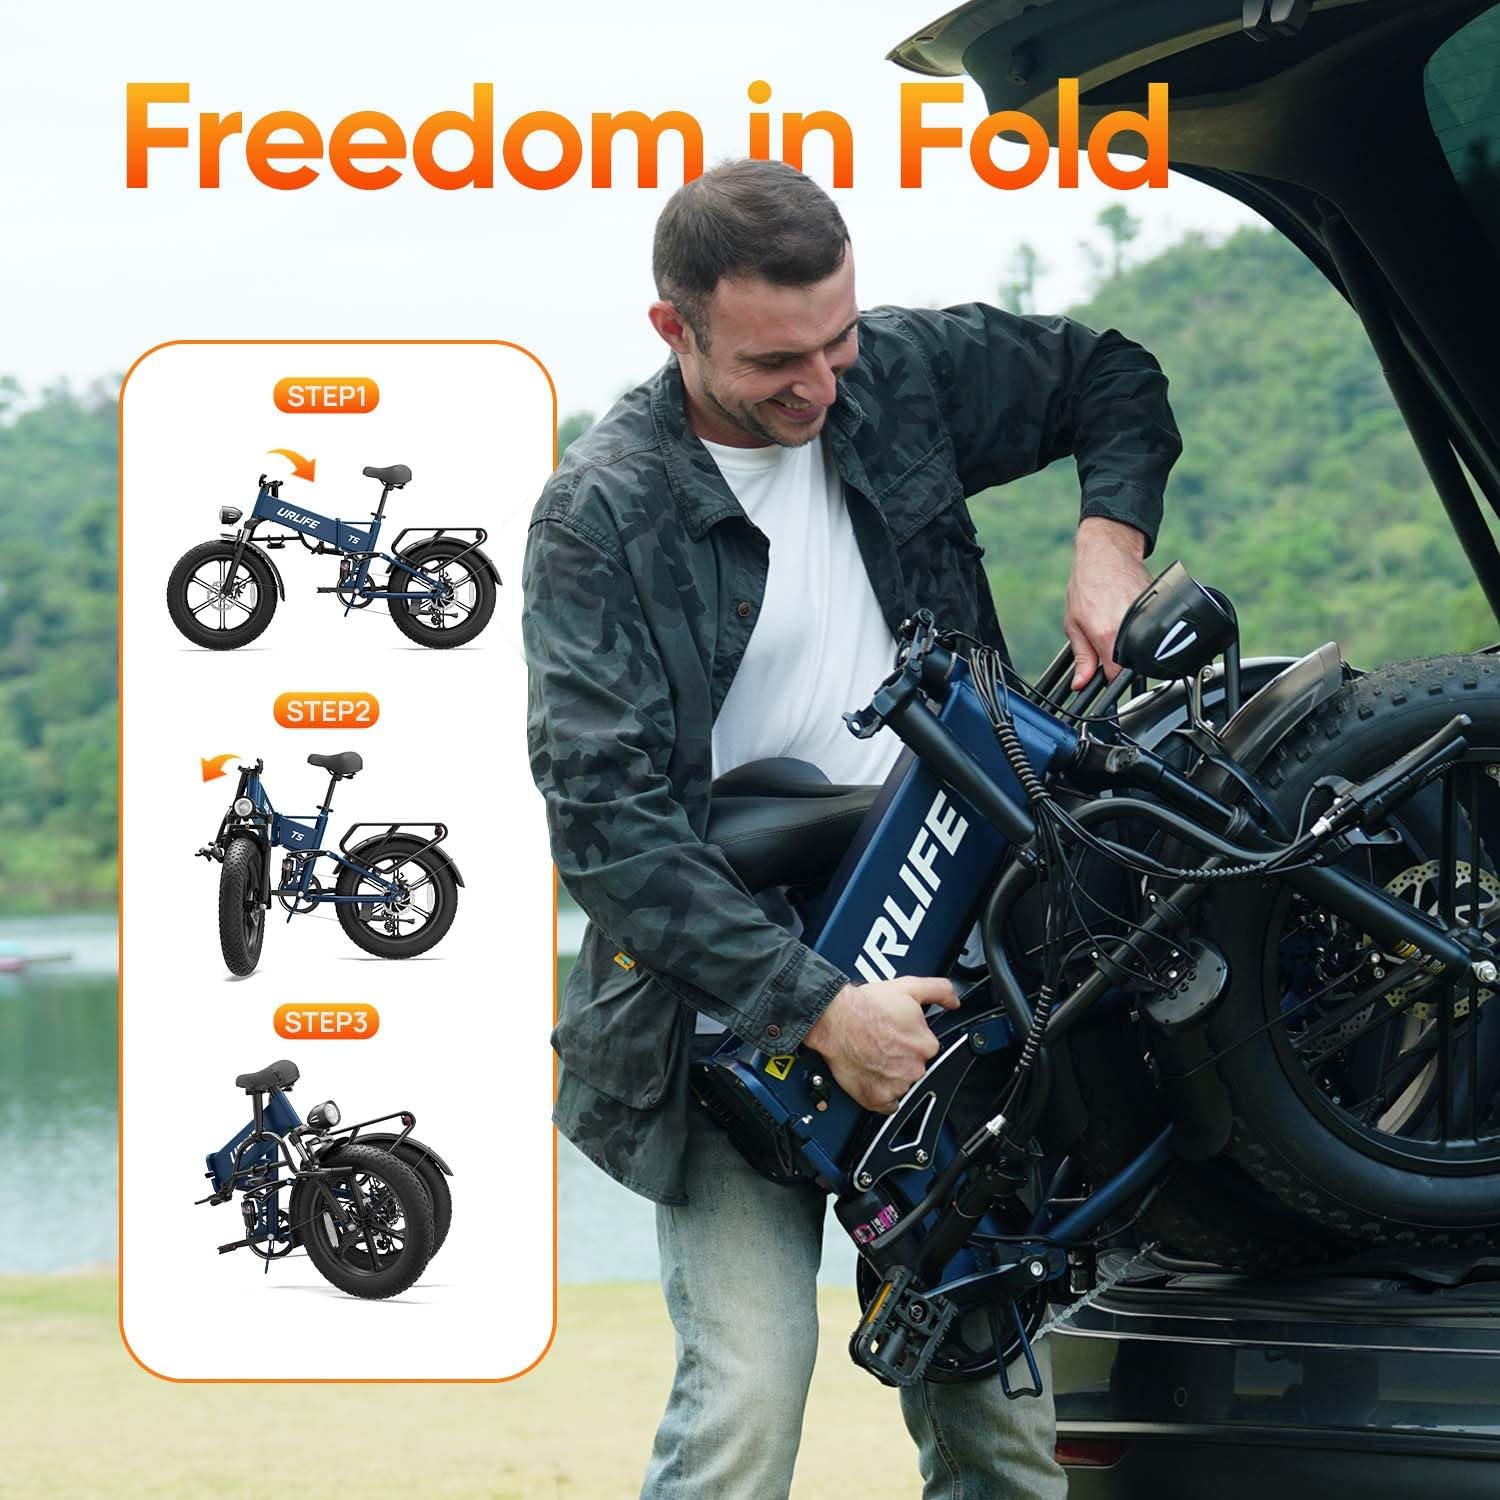
Figure 4.5: The bike's folding mechanism allows for compact storage.
5. Maintenance
Regular maintenance ensures the longevity and safe operation of your URLIFE T5 electric bike.
5.1 Battery Care
- Charge the battery regularly, even if not in use, to maintain its health.
- Avoid fully discharging the battery.
- Store the battery in a cool, dry place away from direct sunlight and extreme temperatures.
5.2 Tire Maintenance
- Check tire pressure before each ride. Maintain pressure within the recommended range (usually printed on the tire sidewall).
- Inspect tires for cuts, punctures, or excessive wear.

Figure 5.1: The 20" x 4" fat tires provide stability and comfort.
5.3 Brake System
- Regularly check brake pads for wear and replace them when necessary.
- Ensure brake levers are responsive and provide adequate stopping power. Adjust cable tension if needed.
5.4 Chain and Drivetrain
- Keep the chain clean and lubricated to prevent rust and ensure smooth gear changes.
- Inspect gears and derailleur for proper alignment and function.
5.5 General Cleaning
- Clean the bike regularly with a damp cloth. Avoid high-pressure washing directly on electrical components.
- Do not use harsh chemicals that could damage paint or components.
6. Troubleshooting
This section addresses common issues you might encounter with your URLIFE T5 electric bike.
| Problem | Possible Cause | Solution |
|---|---|---|
| Bike does not power on | Battery not charged or not properly seated; loose electrical connection. | Charge battery fully. Ensure battery is securely locked. Check all visible cable connections. |
| Motor not assisting | Low battery; assist level set to zero; brake levers engaged; motor cable disconnected. | Check battery level. Increase assist level. Ensure brake levers are fully released. Inspect motor cable connection. |
| Brakes feel weak or spongy | Worn brake pads; loose brake cable; air in hydraulic system (if applicable). | Inspect and replace brake pads. Adjust brake cable tension. Consult a professional for hydraulic brake issues. |
| Gears are not shifting smoothly | Derailleur misalignment; dirty/dry chain; damaged shift cable. | Clean and lubricate the chain. Adjust derailleur. If issues persist, seek professional assistance. |
| Unusual noises during ride | Loose components; worn bearings; brake rub. | Inspect all fasteners. Check wheel bearings. Adjust brake calipers to prevent rubbing. |
7. Specifications
| Feature | Specification |
|---|---|
| Model Name | T5 |
| Bike Type | Electric Bike |
| Age Range | Adult |
| Motor | 1500W Peak Motor, 80 Nm Torque |
| Battery | 48V 13AH Removable Lithium-ion |
| Range per Charge | 60-80 Miles |
| Charging Time | 5-6 hours |
| Wheel Size | 20 Inches (20" x 4" Fat Tires) |
| Frame Material | Carbon Steel |
| Suspension Type | Dual (Full Suspension with Quad-Link Shock Absorption) |
| Number of Speeds | 7-Speed (Shimano) |
| Brake Style | Dual Disc Brake |
| Electric Assist Type | Throttle Assist |
| Item Weight | 36 Kilograms (approx. 79.4 lbs) |
| Special Features | Adjustable Seat, Foldable, Multi-Speed, LED Display, Front & Rear Lights, Turn Signals, Rear Rack |
8. Warranty and Support
The URLIFE T5 Folding Electric Bike comes with a 1-Year Limited Warranty. This warranty covers manufacturing defects in materials and workmanship under normal use. Please retain your proof of purchase for warranty claims.
For any questions, concerns, or technical support, please contact URLIFE customer service. Provide photos or videos if applicable to help expedite the resolution of your issue. We guarantee a response within 24 hours.
For further assistance, please visit the official URLIFE website or contact your retailer.


