1. Introduction
Welcome to your new Polar Aurora 12X14 FT Metal Outdoor Storage Shed with Window. This manual provides detailed instructions for assembly, operation, and maintenance to ensure safe and efficient use of your storage solution. This heavy-duty galvanized steel shed offers ample space for gardening tools, outdoor equipment, and more, featuring lockable doors and four ventilation outlets for optimal functionality.

Image description: An interior view of the Polar Aurora storage shed, showcasing its spacious design with various tools and equipment neatly stored on shelves and hanging on the walls, demonstrating its utility as a work area or storage space.
2. Safety Information
- Read all instructions carefully before assembly and use.
- Assembly requires careful handling of components. It is recommended that at least two adults participate in the assembly process.
- Wear appropriate personal protective equipment (PPE) such as gloves and eye protection during assembly.
- Ensure the shed is assembled on a level, stable surface. Proper anchoring to the ground is essential for structural stability and to prevent wind damage.
- Keep children and pets away from the assembly area.
- Do not climb on the roof of the shed.
- Avoid storing flammable materials or chemicals inside the shed without proper ventilation and safety precautions.
- Regularly inspect the shed for any damage or loose components and address them promptly.
3. Package Contents
Your Polar Aurora 12X14 FT Metal Outdoor Storage Shed is delivered in multiple packages. Verify all parts are present against the provided parts list in your detailed manual before beginning assembly.
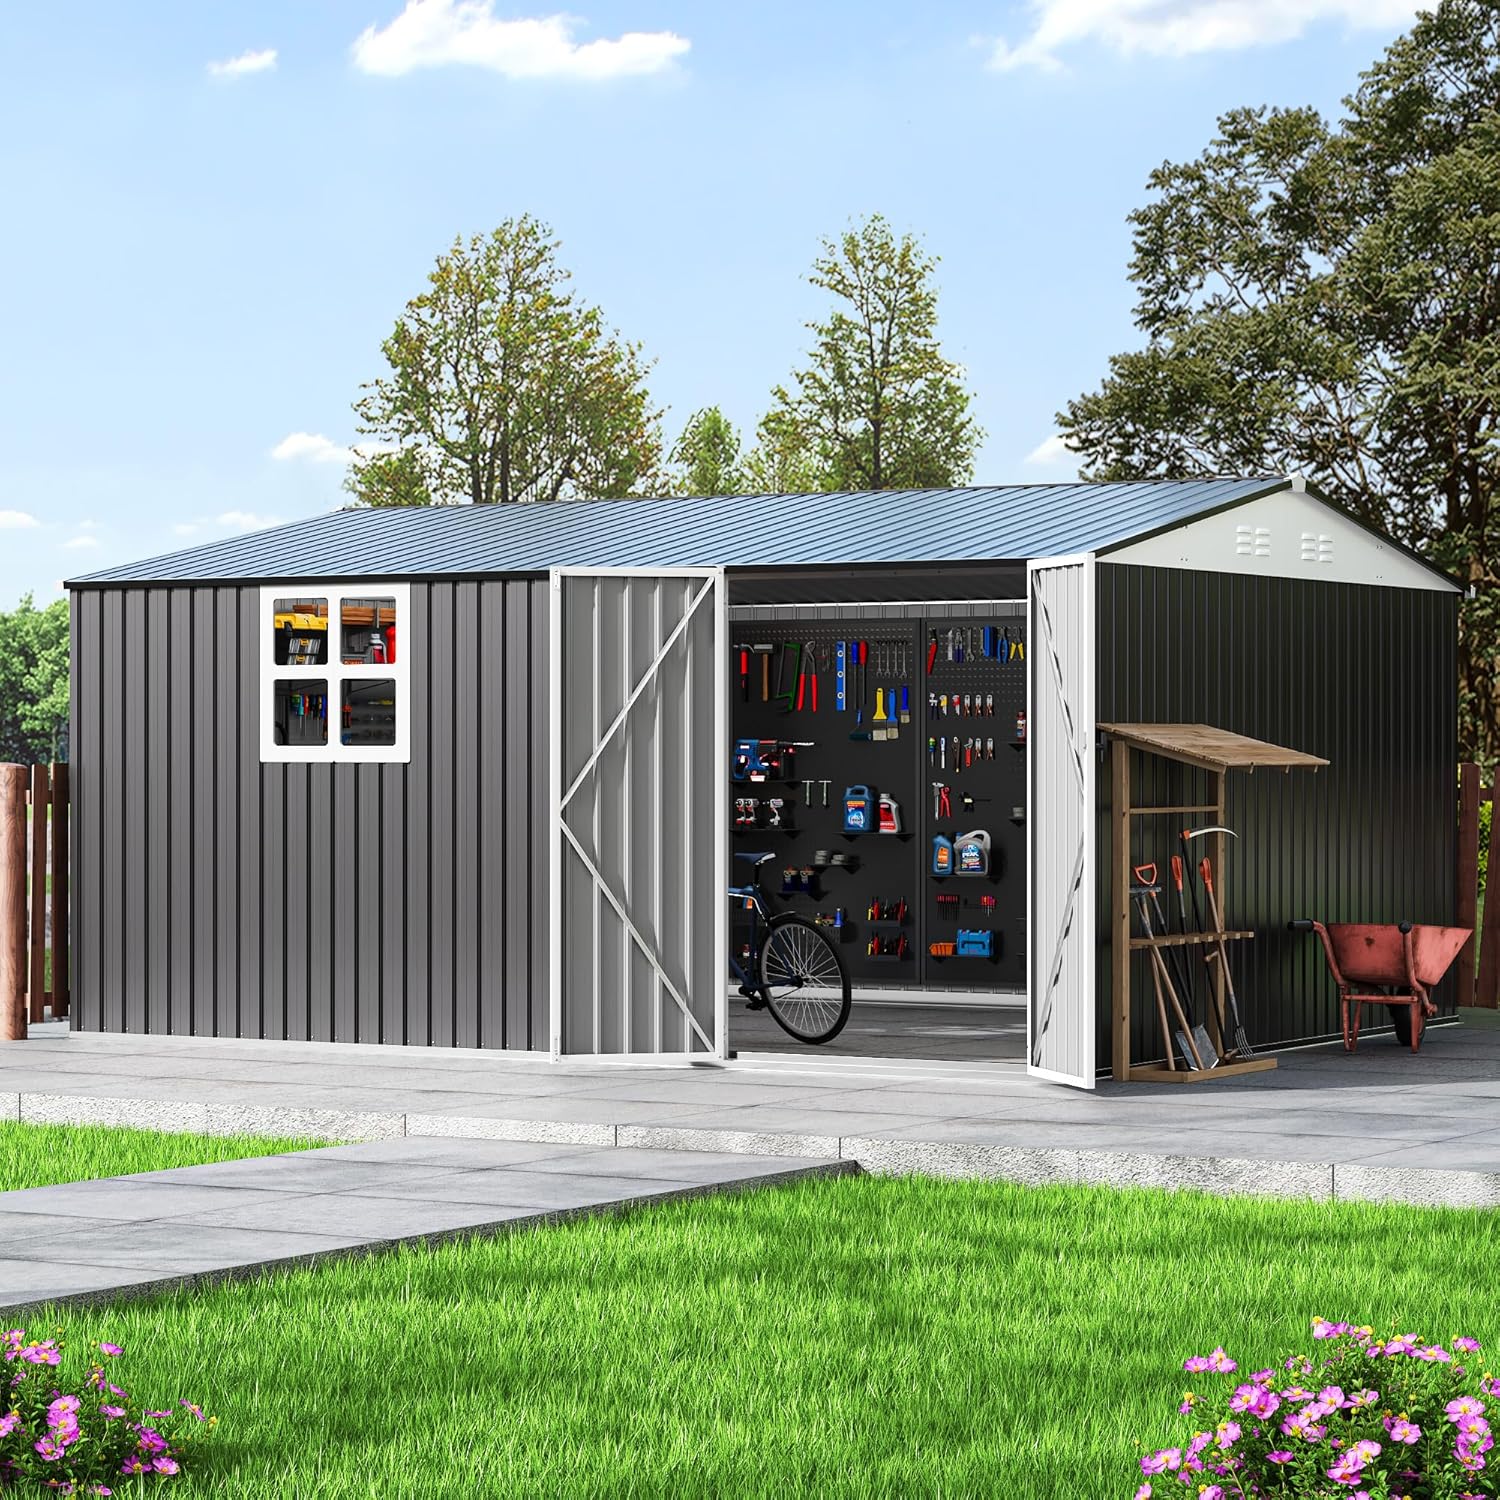
Image description: An illustration showing the shed's overall dimensions, two pairs of protective gloves, and three cardboard boxes, indicating that the product is shipped in multiple packages.
- Galvanized Steel Panels (Walls, Roof)
- Metal Frame Components (Beams, Supports)
- Double Doors with Lockable Latch
- Transparent Window
- 4 Ventilation Outlets
- Assembly Hardware (Screws, Washers, Nuts)
- Instruction Manual
- Gloves
4. Setup and Assembly
Assembly requires careful attention to detail and may take a day or more with assistance. It is highly recommended to have at least one helper.
4.1 Site Preparation
Choose a level and stable location for your shed. A solid foundation (e.g., concrete slab, wooden base) is crucial for stability and longevity. Ensure proper drainage around the site.

Image description: A white 6x8 FT shed is shown positioned on a raised wooden platform, illustrating a properly prepared and level base for installation.
4.2 Unpacking and Part Identification
Carefully unpack all boxes. Many metal panels are covered with a protective plastic film that should be removed during assembly. Organize parts by their labels as indicated in the detailed step-by-step instruction manual provided in the package.
4.3 Base Frame Assembly
Begin by assembling the base frame according to the manual. Ensure it is square and level before proceeding.
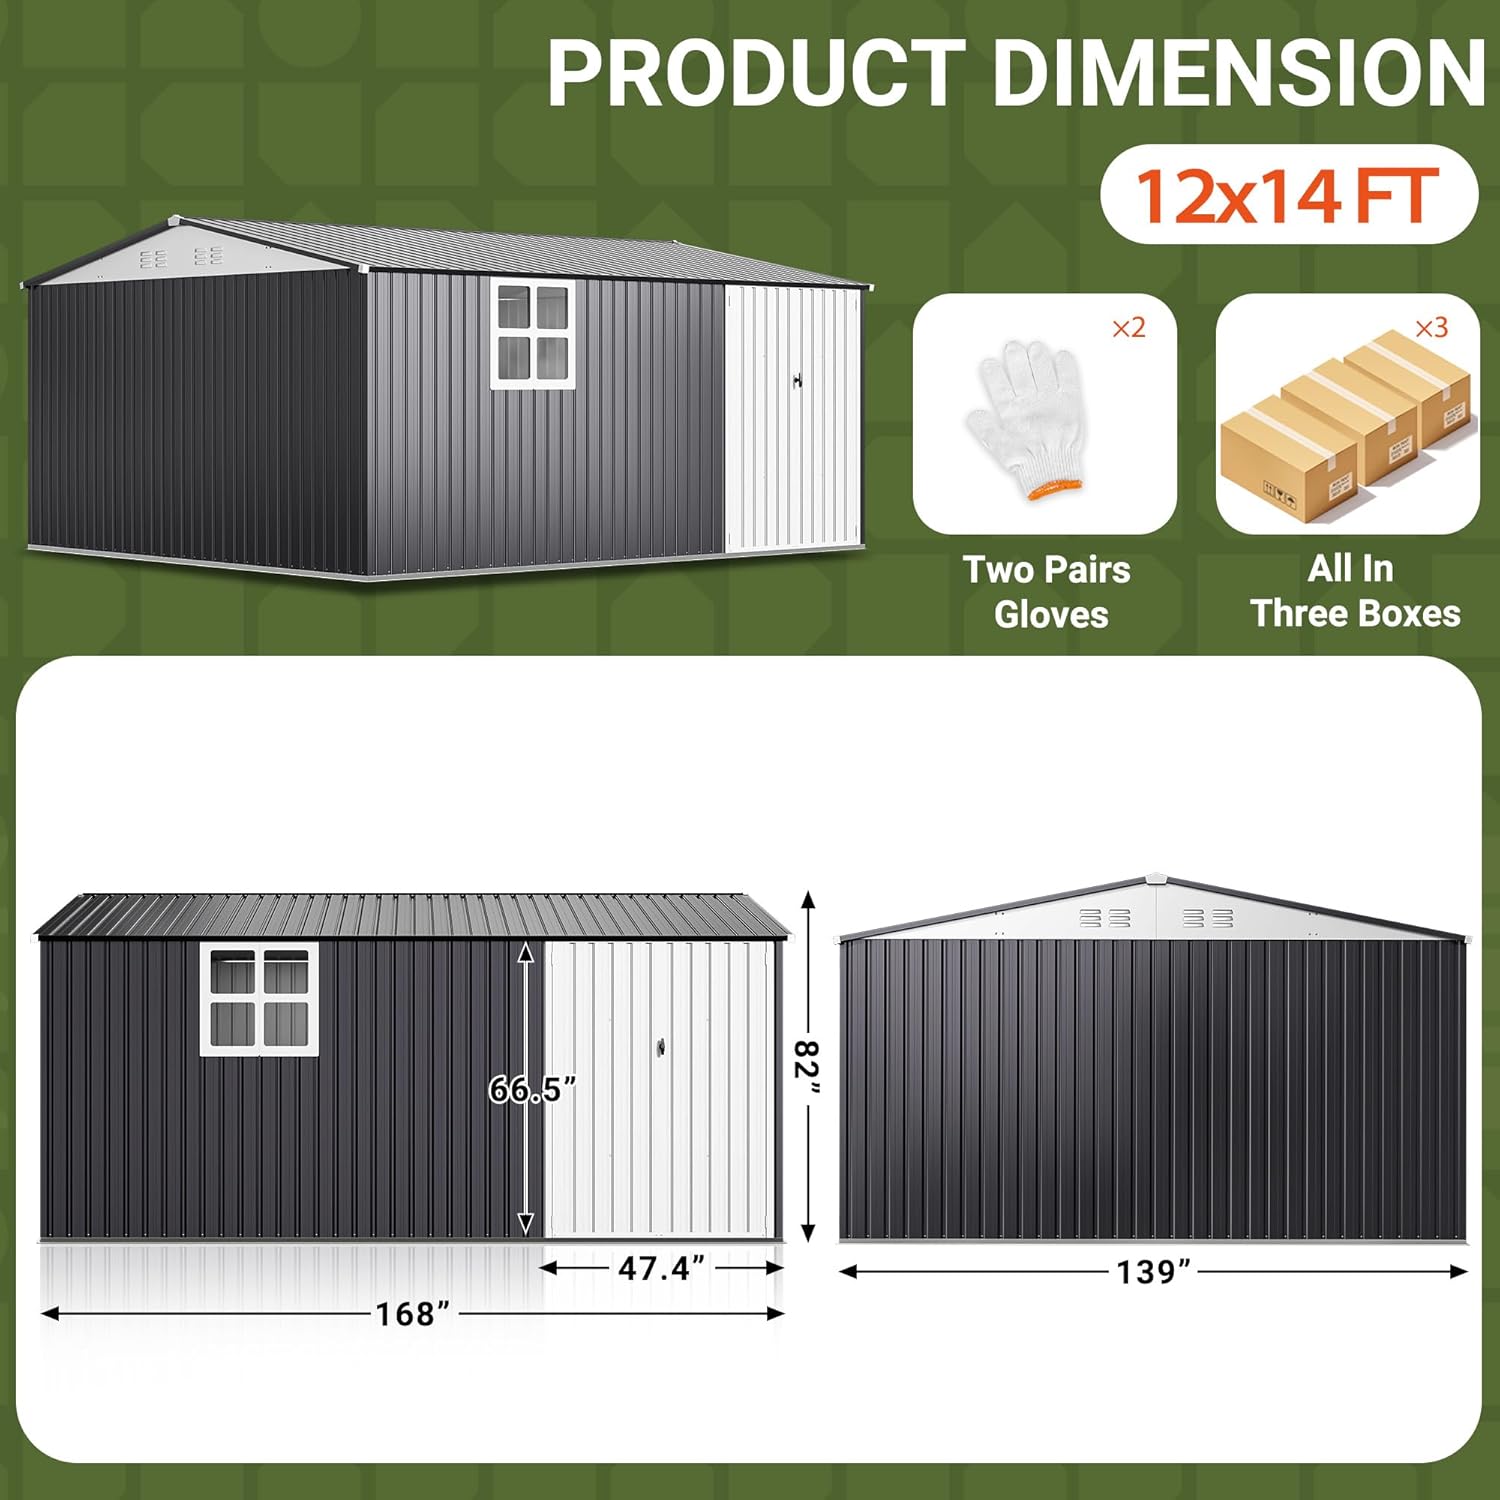
Image description: A close-up view of the shed's metal base frame components, highlighting the sturdy construction and pre-drilled holes for assembly.
4.4 Wall Panel Installation
Attach the galvanized steel wall panels to the base frame. Pay close attention to the orientation of each panel.
4.5 Door and Window Installation
Install the double doors and the transparent window. Ensure the doors operate smoothly and the lockable latch functions correctly.

Image description: A collage displaying key features: a secure door lock for enhanced security, a protective corner shell for durability, and two air vents for improved air circulation.
4.6 Roof Assembly
Assemble the roof structure, including the three sturdy beams and the sloping roof panels. The sloping design aids in water drainage.

Image description: A dual view showing the shed's water-shedding sloped roof from the exterior, designed to prevent water accumulation, and an interior shot highlighting the three sturdy beams that enhance the structure's stability and wind resistance.
4.7 Ventilation Outlets
Ensure the four ventilation outlets are properly installed to facilitate air circulation and prevent humidity buildup.
4.8 Anchoring
Securely anchor the shed to your prepared foundation to prevent movement due to wind or other external forces.
Helpful Tip from Customer Review:
"The washers are nylon and come in a 12x10 sheet. What I did was pull one row off the sheet, so I'd have like 10 or 12 of the washers together in a line. Then, when placing screws, I'd just hold the whole strip, put a screw into the last washer in the row, position it, and drive it in. Finally, I would yank on the strip of washers to break off the one that I just screwed down. This was easier and faster than trying to separate all the washers individually."
Important Note on Protective Plastic Film:
"All the painted metal pieces were covered in plastic. I strongly recommend that you remove this plastic... the plastic is imperfectly applied in places, and in these places where it isn't in contact with the metal, there's a chance water can get in there and sit. This metal is super-thin, folks. Even galvanized metal succumbs to rust eventually. Don't leave the plastic on."
5. Operating Instructions
5.1 Doors
The shed features lockable double doors for easy access and security. Ensure both doors are fully closed and the latch is engaged when not in use. A padlock (not included) can be added for extra security.
5.2 Ventilation
The four ventilation outlets promote air circulation, reducing humidity and preventing rust or mold inside the shed. Ensure these vents remain unobstructed for optimal performance.
6. Maintenance
- Cleaning: Regularly clean the exterior of the shed with mild soap and water to remove dirt and debris. Avoid abrasive cleaners that could damage the galvanized steel finish.
- Inspection: Periodically inspect all screws, bolts, and connections to ensure they are tight. Re-tighten any loose fasteners.
- Drainage: Keep the area around the shed clear of debris to ensure proper water drainage from the sloped roof.
- Rust Prevention: Although made of high-quality electro-galvanized steel, inspect for any signs of rust, especially in areas where the protective coating might have been scratched during assembly or use. Apply rust-inhibiting paint if necessary.
- Snow Removal: In areas with heavy snowfall, gently remove accumulated snow from the roof to prevent excessive weight and potential damage.
7. Troubleshooting
7.1 Missing or Damaged Parts
If you receive packages with missing or damaged parts, contact customer service immediately.
Customer Experience Note:
"We had one bag of washers and thinking that that's what all we needed, but really, there must have been a second bag. It didn't tell you how many bags you needed. It just told you the number of washers, and we didn't sit there and count 400 some washers."
7.2 Assembly Difficulties
The assembly process can be time-consuming and may require problem-solving skills. Refer to the detailed step-by-step manual. Having a helper is strongly recommended.
Customer Experience Note:
"The screws they give you are not self-tapping, so if you do have a fitment issue that keeps holes from coming into alignment, go get a self-tapping screw. The ones they give you will just spin and not dig in."
7.3 Leaks
Ensure all panels are correctly overlapped and all fasteners are tight. The sloped roof is designed for water shedding. If leaks occur, check for gaps or improperly sealed areas.

Image description: A close-up view of the shed's roof and side panel during rainfall, illustrating its waterproof and corrosion-resistant galvanized steel material designed to protect contents from the elements.
8. Specifications
| Feature | Detail |
|---|---|
| Brand | Polar Aurora |
| Model Number | MHJ-WSS1796-GY |
| Product Dimensions | 139"D x 168"W x 82"H (12x14 FT) |
| Material | Heavy-Duty Galvanized Alloy Steel |
| Color | Black |
| Door Style | Bi-Fold Double Door |
| Door Width | 47.4 Inches |
| Door Height | 66.5 Inches |
| Ventilation | 4 Vents |
| Window | Transparent Window |
| Water Resistance | Waterproof |
| UV Resistance | Yes |
| Assembly Required | Yes |

Image description: A detailed diagram illustrating the product dimensions of the 12x14 FT shed, including its depth (168"), width (139"), and height (82"), along with door width (47.4") and height (66.5").
9. Warranty and Support
Polar Aurora offers 24/7 professional customer service. If you have any questions or require assistance with your outdoor shed kit, please feel free to ask. We are committed to providing professional after-sales support and ensuring you have the best shopping experience.


