1. Safety Information
Please read all instructions carefully before assembly and use. Keep this manual for future reference.
- Ensure all components are present and undamaged before assembly. Do not use if any parts are missing or damaged.
- Assemble the chair on a soft, clean surface to prevent scratches.
- Do not overtighten screws during assembly, as this may damage the components.
- Keep children and pets away during assembly. Small parts can be a choking hazard.
- Do not stand on the chair or use it as a step stool.
- The maximum weight capacity for this chair is 180 kg (396 lbs). Do not exceed this limit.
- Avoid exposing the chair to direct sunlight or extreme temperatures to prevent material degradation.
- Regularly check all bolts and screws to ensure they are tight. Retighten as necessary.
2. Package Contents
Verify that all parts are included in your package before beginning assembly. If any parts are missing or damaged, please contact customer support.
- Backrest
- Seat Base
- Armrests (2)
- Gas Lift Cylinder
- Gas Lift Cover
- Star Base
- Casters (5)
- Mechanism Plate
- Lumbar Cushion
- Headrest Cushion
- Hardware Pack (screws, washers, Allen key)
3. Setup & Assembly Instructions
Follow these steps to assemble your Devoko Ergonomic Gaming Chair. It is recommended to have two people for assembly.
Step 1: Attach Casters to Star Base
Insert each of the five casters into the holes at the end of the star base until they click securely into place.
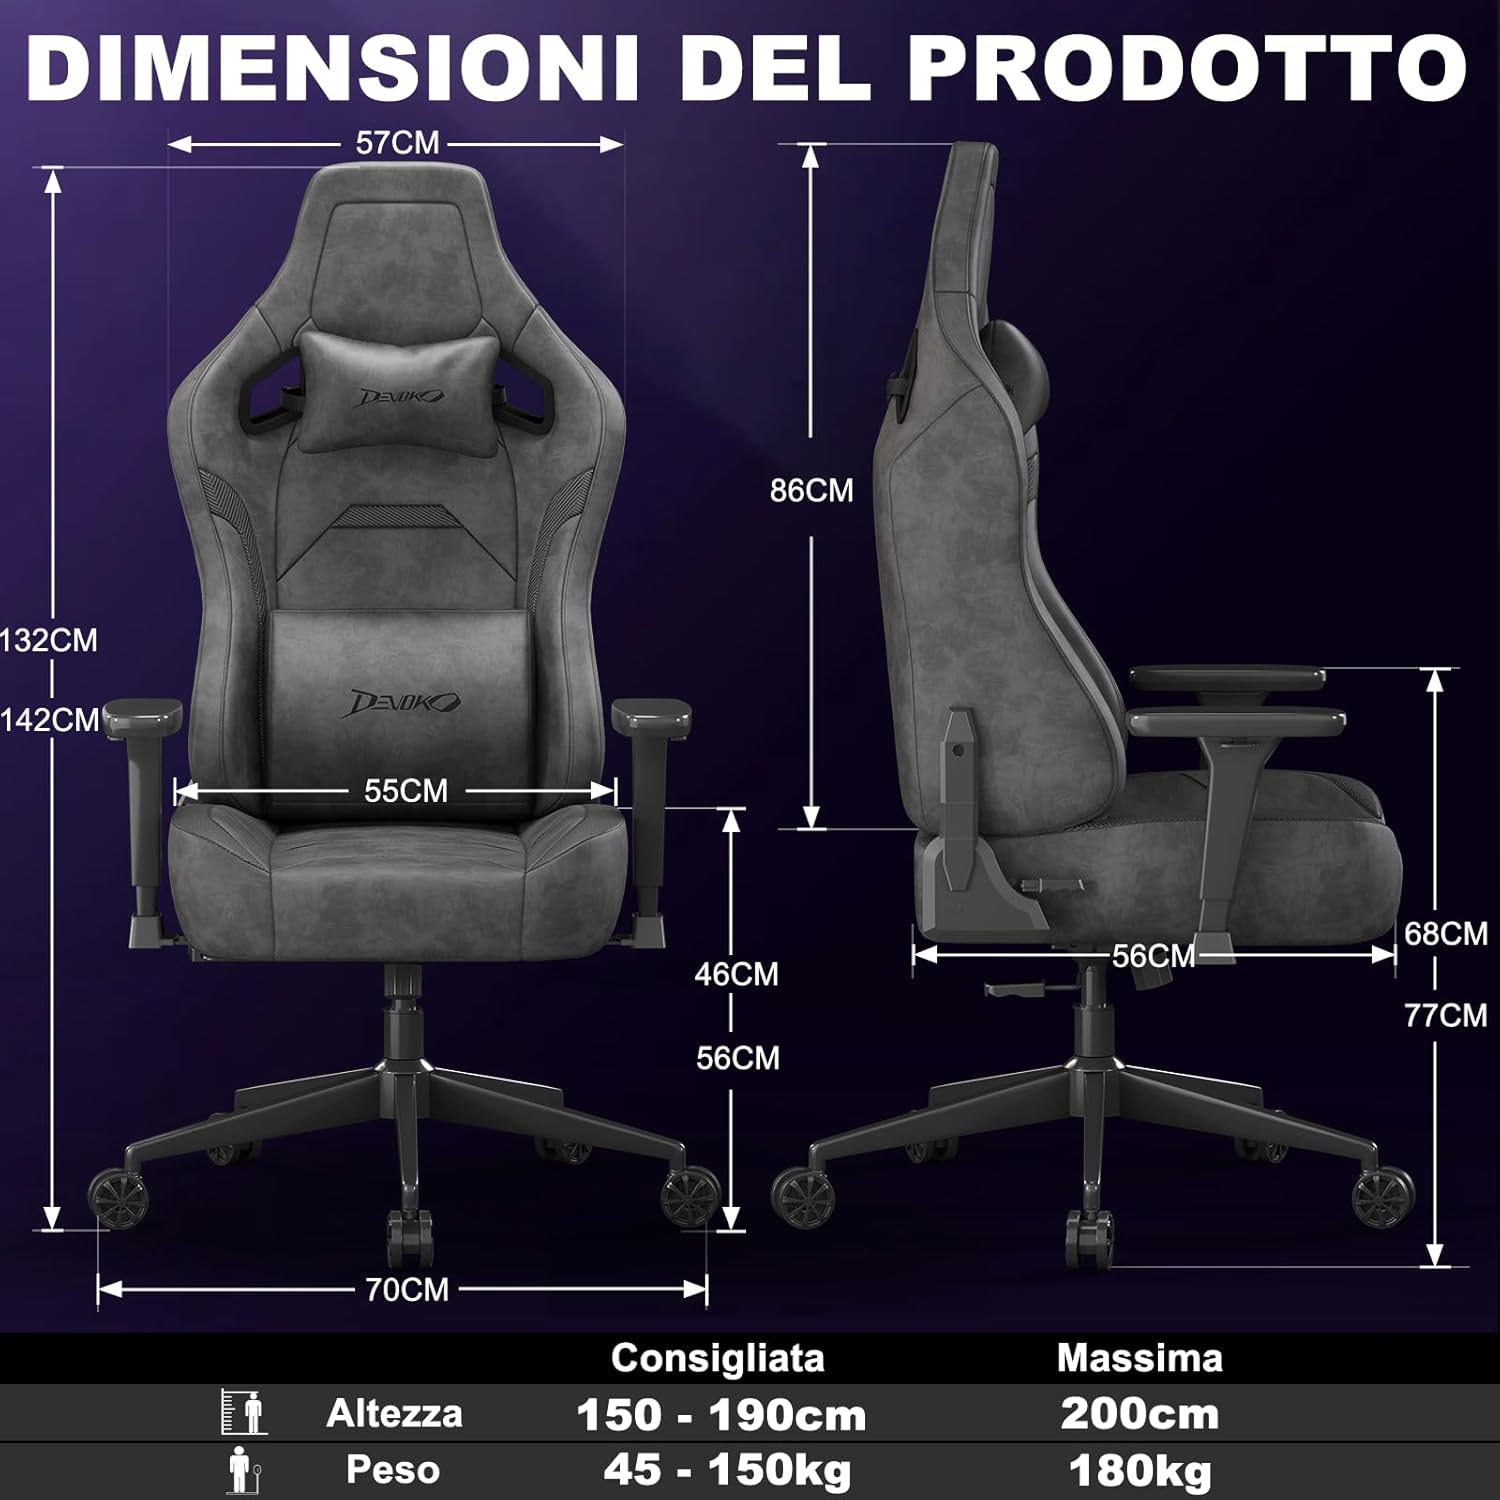
Image: A fully assembled Devoko gaming chair, showcasing its overall design and key features. This image provides a visual reference for the completed product.
Step 2: Install Gas Lift Cylinder
Place the gas lift cylinder into the center hole of the star base. Then, slide the gas lift cover over the cylinder.
Step 3: Attach Mechanism Plate to Seat Base
Align the mechanism plate with the pre-drilled holes on the underside of the seat base. Secure it with the provided screws, ensuring the front of the mechanism faces the front of the seat. Do not overtighten.
Step 4: Attach Armrests to Seat Base
Attach the armrests to the seat base using the designated screws. Pay attention to the "L" (left) and "R" (right) markings on the armrests.

Image: A close-up view of the chair's 3D adjustable armrests, illustrating their rotational, height, and forward/backward adjustment capabilities. This highlights a key feature for personalized comfort.
Step 5: Connect Backrest to Seat Base
Align the backrest with the brackets on the seat base and secure it with screws. Ensure a firm connection.
Step 6: Attach Seat Assembly to Gas Lift
Carefully place the assembled seat onto the gas lift cylinder, ensuring it is centered and stable.
Step 7: Install Cushions
Attach the headrest and lumbar cushions using their integrated straps. Adjust their positions for optimal comfort.

Image: An X-ray style view of the chair's adaptive lumbar support, showing how the movable cushion adjusts to support the upper, central, or lower back. This illustrates the ergonomic design for back comfort.
4. Operating Instructions
4.1 Seat Height Adjustment
To adjust the seat height, pull the lever located on the right side of the seat upwards. While seated, lift the lever to lower the seat. To raise the seat, lift the lever while standing or with minimal weight on the seat.
4.2 Backrest Recline Adjustment
To recline the backrest, pull the recline lever located on the right side of the chair (below the seat). Lean back to your desired angle (between 90° and 135°). Release the lever to lock the backrest in position. To return to an upright position, pull the lever and lean forward.

Image: A visual representation of the chair's recline functionality, showing three common angles: 90° for work/gaming, 110° for movies/series, and 135° for relaxation. This demonstrates the versatility of the recline feature.
4.3 Armrest Adjustments (3D)
- Height Adjustment: Press the button on the side of the armrest and move it up or down to your preferred height. Release the button to lock.
- Forward/Backward Adjustment: Slide the armrest pad forward or backward to find the optimal position for your arms.
- Rotation: Rotate the armrest pad left or right (up to 360°) to support your arms during various activities.
4.4 Lumbar and Headrest Cushion Adjustment
The lumbar and headrest cushions are adjustable. Slide them up or down along the backrest straps to find the most comfortable and supportive position for your back and neck.
5. Maintenance
- Cleaning Suede/Carbon Fiber Leather: For general cleaning, wipe with a soft, damp cloth. For tougher stains, use a mild soap solution and wipe gently, then dry immediately with a clean cloth. Avoid harsh chemicals or abrasive cleaners.
- Frame and Base: Wipe metal parts with a soft, dry cloth.
- Casters: Periodically clean hair and debris from the casters to ensure smooth movement.
- Fasteners: Regularly check all screws and bolts and tighten them if they have loosened over time.
- Avoid Direct Sunlight: Prolonged exposure to direct sunlight can cause fading and damage to the upholstery.
6. Troubleshooting
| Problem | Possible Cause | Solution |
|---|---|---|
| Chair wobbles or is unstable. | Loose screws or uneven assembly. | Check and tighten all screws. Ensure the chair is assembled on a flat surface. |
| Seat height adjustment not working. | Gas lift cylinder issue or lever mechanism stuck. | Ensure the lever is fully engaged. If the issue persists, contact customer support. |
| Backrest does not recline or lock. | Recline mechanism stuck or damaged. | Check for obstructions. Ensure the recline lever is fully operated. If damaged, contact support. |
| Casters not rolling smoothly. | Debris caught in casters. | Remove any hair, dust, or debris from the caster wheels. |
| Squeaking noises. | Loose connections or friction between parts. | Tighten all screws. Apply a small amount of silicone lubricant to moving parts if necessary (avoiding upholstery). |
7. Specifications

Image: A comprehensive diagram illustrating the various dimensions of the Devoko Ergonomic Gaming Chair, including height, width, depth, and recommended user height and weight.
- Brand: Devoko
- Model: Ergonomic Gaming Chair
- Material: Suede leather, Carbon fiber leather, High-density shaped foam, Metal base
- Color: Anthracite Grey (Note: Other colors may be available for different models)
- Overall Dimensions (Max Height): Approximately 70 cm (D) x 70 cm (W) x 143 cm (H)
- Backrest Dimensions: 57 cm (W) x 86 cm (H)
- Seat Dimensions: 55 cm (W) x 56 cm (D) x 12 cm (Thickness)
- Adjustable Seat Height: 10 cm range (e.g., 46 cm to 56 cm from floor)
- Recline Angle: 90° to 135°
- Armrests: 3D Adjustable (Height, Forward/Backward, Rotation)
- Gas Lift: Class 4
- Weight Capacity: Up to 180 kg (396 lbs)
- Recommended User Height: 150 cm - 200 cm
- Casters: Silent, floor-friendly wheels
8. Warranty & Support
Devoko products are designed for quality and durability. For specific warranty information regarding your purchase, please refer to the documentation included with your product or contact your retailer.
If you encounter any issues or have questions about your Devoko Ergonomic Gaming Chair, please contact Devoko customer support through the retailer where you purchased the product or visit the official Devoko website for contact details.
Customer Support: Please refer to your purchase receipt or the retailer's website for direct contact information.
Online Resources: For additional information and support, you may visit the Devoko Store on Amazon.