1. Introduction
Thank you for choosing the MELLCOM 36-Inch Charcoal Grill. This manual provides essential information for the safe assembly, operation, and maintenance of your grill. Please read all instructions carefully before use and retain this manual for future reference.
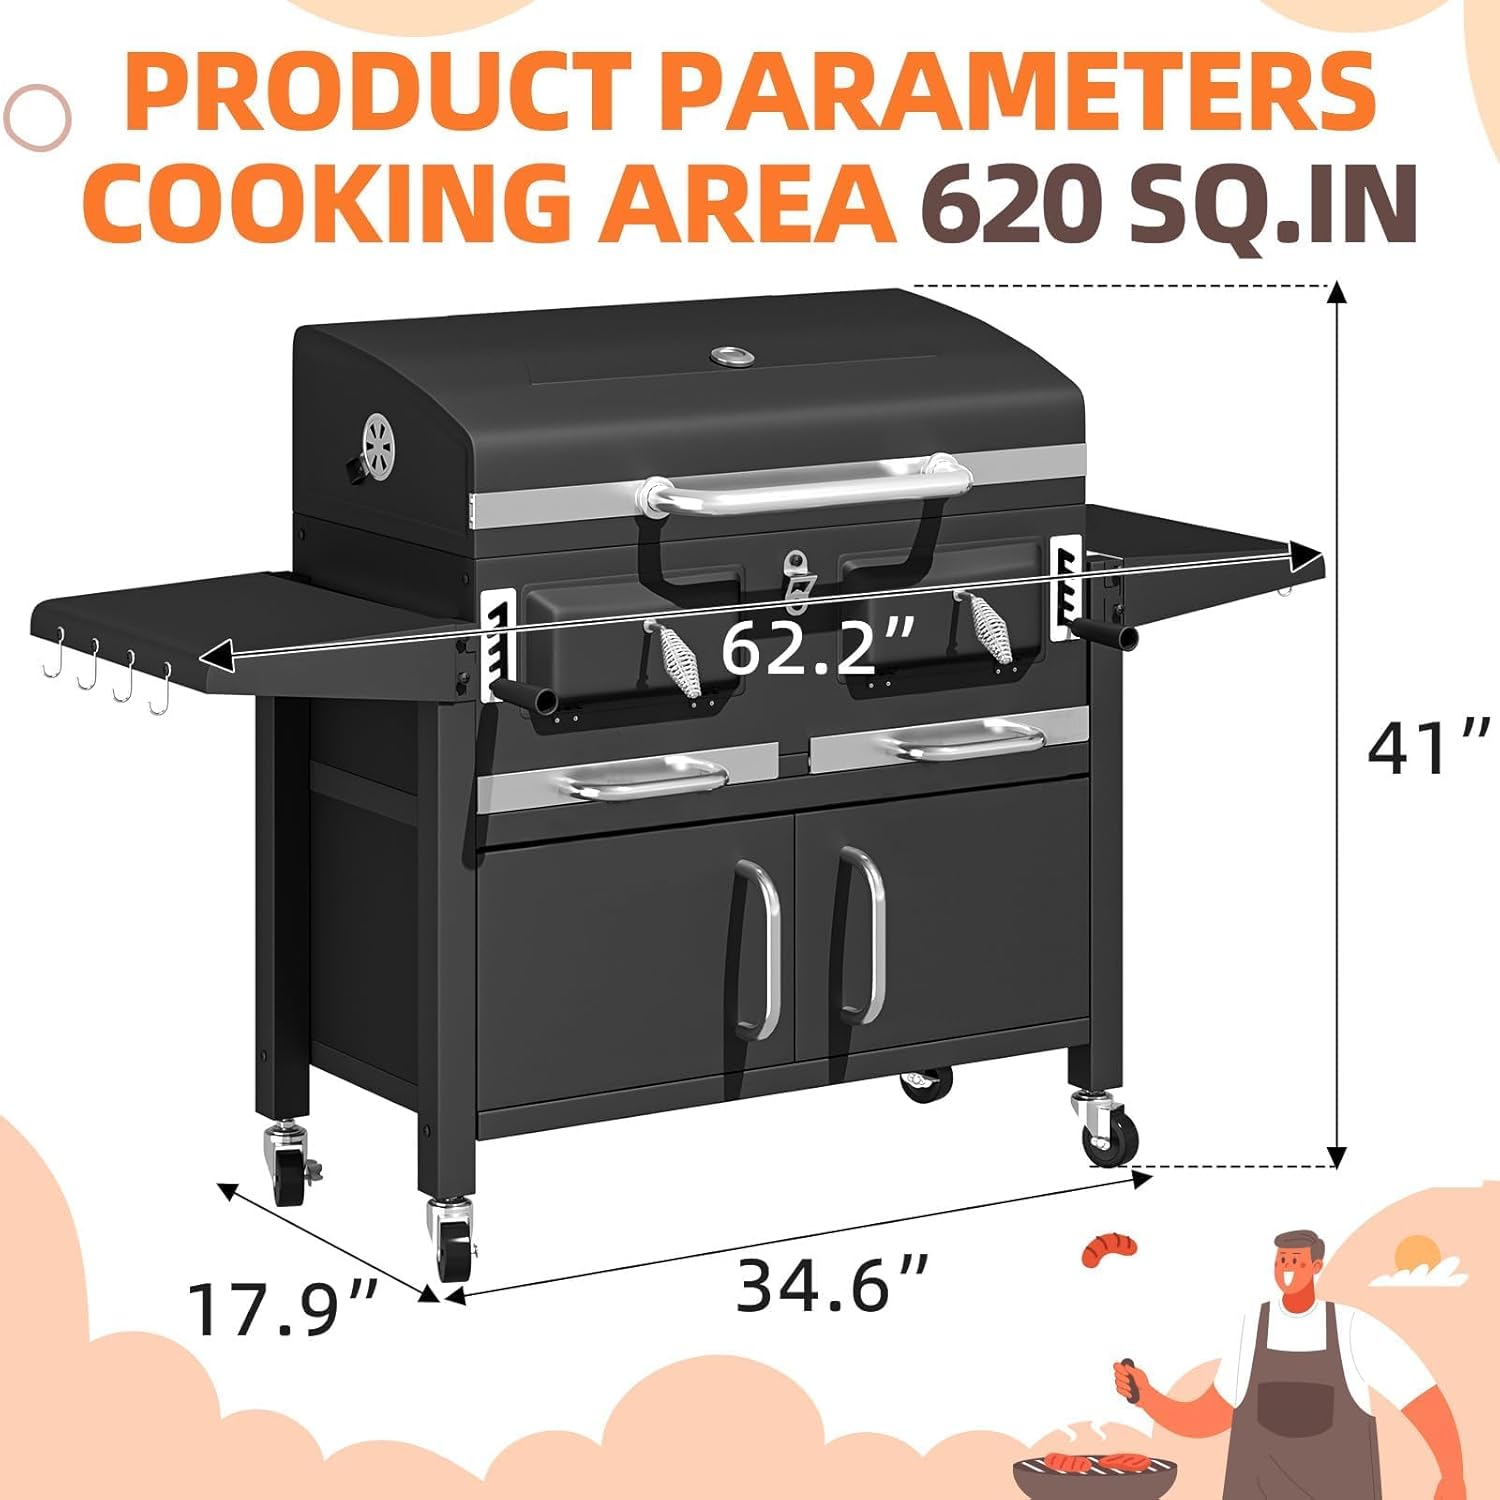
This charcoal grill features a large 620 sq.in cooking area, dual independent charcoal trays with 5-level height adjustment, a built-in thermometer, foldable side tables, and a spacious storage cabinet.
2. Safety Instructions
WARNING: Failure to follow these safety instructions could result in fire, explosion, or burn hazard, which could cause property damage, personal injury, or death.
- Always use the grill outdoors in a well-ventilated area. Never use indoors or in enclosed spaces.
- Keep children and pets away from the grill at all times.
- Do not move the grill while it is in use or contains hot charcoal.
- Use heat-resistant gloves when handling hot components.
- Ensure the grill is placed on a stable, level, non-combustible surface.
- Keep flammable materials at a safe distance from the grill.
- Never use gasoline, kerosene, or alcohol to light charcoal. Use only charcoal starter fluid or approved fire starters.
- Allow charcoal to cool completely before disposing of ash.
- Do not overload the charcoal trays.
- Regularly inspect the grill for any damage or loose parts.
3. Assembly Instructions
Assembly is required for this product. Please ensure all parts are present before beginning. Refer to the included hardware pack and diagrams for specific component identification. Two people are recommended for assembly.
- Unpack all components and verify against the parts list.
- Attach the legs and wheels to the main body of the grill. Ensure lockable casters are securely fastened.
- Assemble the storage cabinet doors and attach them to the lower section.
- Install the main grill body onto the assembled base.
- Attach the foldable side tables to the main grill body.
- Insert the charcoal trays and ash pans into their respective compartments.
- Place the cooking grates and warming rack into position.
- Ensure the built-in thermometer is correctly seated in the lid.
- Tighten all screws and bolts, but do not overtighten.

4. Operating Instructions
4.1 Charcoal Loading and Ignition
- Open the charcoal access doors located on the front of the grill.
- Place charcoal briquettes or lump charcoal into the individual charcoal trays. Do not overfill.
- Use an approved charcoal starter fluid or chimney starter to ignite the charcoal. Allow charcoal to ash over before placing food on the grates.
- Close the charcoal access doors once charcoal is lit.

4.2 Temperature Control
- Charcoal Tray Adjustment: Use the handles on the front of the grill to raise or lower the individual charcoal trays. Raising the trays increases heat intensity, while lowering them reduces it. There are 5 distinct levels for precise heat management.
- Air Vents: The grill features 4 adjustable air vents (2 on the lid, 2 on the sides). Open the vents to increase airflow and temperature, and close them to decrease airflow and temperature.
- Built-in Thermometer: Monitor the internal temperature of the grill using the thermometer integrated into the lid.

4.3 Cooking Area Usage
- The main cooking surface measures 34.6" L x 17.9" W, providing 620 sq.in of primary cooking space.
- Utilize the dual-zone design to cook different foods at varying temperatures simultaneously.
- The chrome-plated warming rack is ideal for keeping cooked food warm or toasting buns.
- The porcelain-enameled steel cooking grates are designed for durability and to prevent food from sticking.

4.4 Additional Features
- Foldable Side Tables: Use the two foldable side tables for extra workspace, holding plates, utensils, or seasonings.
- Storage Cabinet: The full-size storage cabinet beneath the grill provides secure storage for charcoal, tools, and accessories, protecting them from elements.
- Built-in Bottle Opener: A convenient bottle opener is integrated into the grill for ease of use.

5. Care and Maintenance
- Cleaning Grates: After each use, once the grates have cooled, clean them with a grill brush to remove food residue. For stubborn residue, wash with warm soapy water and rinse thoroughly.
- Ash Disposal: Allow charcoal to cool completely (at least 24 hours) before pulling out the individual ash pans for disposal. Dispose of ash in a non-combustible container.
- Exterior Cleaning: Wipe down the exterior surfaces with a damp cloth and mild detergent. Avoid abrasive cleaners that could damage the powder-coated finish.
- Storage: Store the grill in a dry, covered area when not in use to protect it from weather elements and prolong its lifespan.
- Rust Prevention: The grill is made of powder-coated iron for rust resistance. Regular cleaning and proper storage will help maintain its condition.
6. Troubleshooting
| Problem | Possible Cause | Solution |
|---|---|---|
| Difficulty igniting charcoal | Insufficient airflow; damp charcoal; improper starter fluid use. | Ensure air vents are open. Use dry charcoal. Follow starter fluid instructions or use a chimney starter. |
| Temperature too low/high | Charcoal tray height incorrect; air vents improperly adjusted. | Adjust charcoal tray height (raise for more heat, lower for less). Open air vents for higher temperature, close for lower. |
| Uneven cooking | Uneven charcoal distribution; inconsistent heat. | Distribute charcoal evenly in trays. Utilize dual-zone cooking for different heat requirements. Rotate food as needed. |
| Smoke leakage from lid | Lid not fully closed; excessive charcoal. | Ensure lid is properly seated. Do not overfill charcoal trays. |
7. Specifications
| Feature | Detail |
|---|---|
| Brand | MELLCOM |
| Model Name | 36 In Charcoal Grill |
| Model Number | BBQ-CG-04 |
| Product Dimensions | 17.9"D x 62.2"W x 41"H |
| Cooking Surface Area | 620 Square Inches (Primary) |
| Fuel Type | Charcoal |
| Material | Powder Coated Iron (Frame), Porcelain-Enameled Steel (Grates), Chrome-Plated (Warming Rack) |
| Special Features | Built-In Thermometer, Enclosed Cabinet, Individual Lifting Charcoal Trays, Foldable Side Tables, 4 Air Vents, Built-in Bottle Opener |
| Item Weight | 74.95 Pounds |
| Assembly Required | Yes |
| Indoor/Outdoor Usage | Outdoor |
8. Warranty and Support
MELLCOM provides after-sales support for this product. For warranty claims, technical assistance, or replacement parts, please contact MELLCOM customer service.
Please refer to your purchase documentation or the MELLCOM official website for the most current contact information and warranty details.


