1. Important Safety Information
Please read all instructions carefully before assembly and use. Retain this manual for future reference.
- Always unplug the vanity from the power source before assembly, disassembly, or cleaning.
- Exercise caution during assembly to avoid sharp edges and pinch points.
- Do not exceed the weight limits for the vanity desktop, shelves, or drawers. Overloading can cause instability or damage.
- Keep all electrical components, including the power outlet and LED light connections, dry and away from water or excessive moisture.
- Ensure the vanity is placed on a stable, level surface to prevent tipping.
- Install the anti-toppling device securely to a wall stud to prevent accidental tipping, especially in households with children or pets.
- Keep small parts and hardware out of reach of children during assembly.
2. Package Contents
Verify that all components listed below are present before beginning assembly. If any parts are missing or damaged, please contact customer support.
- Vanity Desk Panels and Hardware
- Mirror with Integrated LED Light
- Storage Stool Components
- Power Outlet Unit (2 AC, 1 USB, 1 Type-C)
- Hair Dryer Holder
- Assembly Instructions Manual
- Hardware Pack (screws, dowels, anti-toppling kit, etc.)
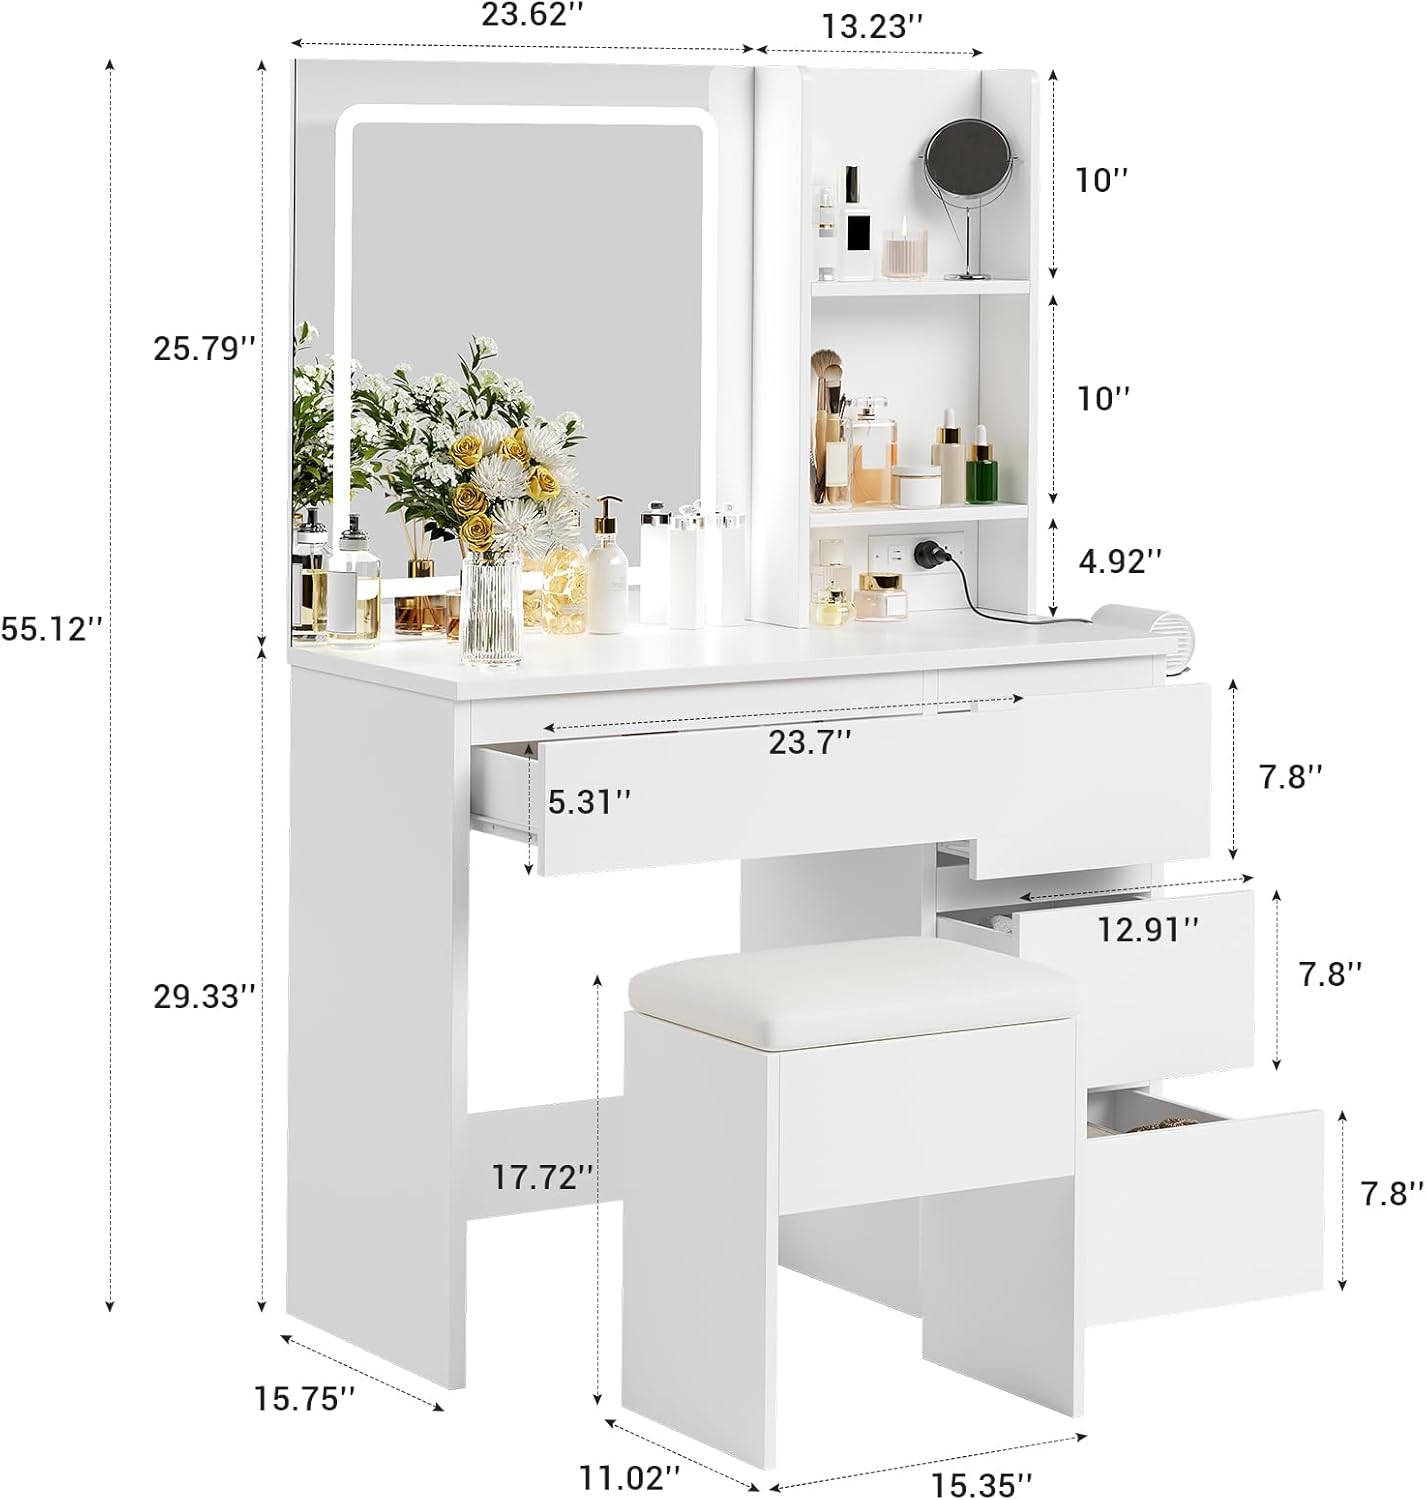
Image: Overview of vanity desk dimensions and key components.
3. Assembly Instructions
Assembly is required for this vanity desk. The estimated assembly time is approximately 45 minutes. Follow the detailed instructions provided in the separate assembly manual included in your package. Ensure all parts are correctly oriented and screws are tightened securely.
General Assembly Steps:
- Unpack and Identify Parts: Lay out all numbered parts and hardware. Refer to the parts list in the assembly manual.
- Assemble the Main Desk Frame: Connect the side panels and back panel using the provided hardware.
- Install Drawers: Assemble the drawer boxes and install the drawer slides into the desk frame. Insert the assembled drawers.
- Attach Mirror and Shelves: Secure the mirror unit and the open storage shelves to the main desk structure.
- Install Power Outlet: Mount the power outlet unit into its designated slot and connect its power cord.
- Attach Hair Dryer Holder: Secure the hair dryer holder to the side of the desk.
- Assemble Stool: Follow the separate instructions for assembling the storage stool.
- Secure Anti-Toppling Device: Attach the anti-toppling device to the back of the vanity and secure it to a wall stud using appropriate wall anchors. This step is crucial for safety.

Image: Multifunctional storage spaces, including drawers and open shelves.
4. Operating Instructions
4.1 LED Mirror Light
The integrated mirror features an LED light with adjustable settings.
- Power On/Off: Touch the designated sensor on the mirror surface to turn the LED light on or off.
- Adjust Lighting Mode: Briefly touch the sensor repeatedly to cycle through the three available color modes: Warm White, Warm Yellow, and Cool Light.
- Adjust Brightness (Dimmable): Press and hold the sensor to adjust the brightness level within the selected color mode. Release when the desired brightness is achieved.

Image: Three adjustable light modes (Cold White, Warm White, Warm Yellow) on the LED mirror.
4.2 Integrated Power Outlet
The vanity includes a built-in power outlet for convenient charging and powering of beauty tools.
- AC Outlets: Two 125V/12A AC outlets are provided for standard electrical devices.
- USB Port: One 5V/2.4A USB port is available for charging compatible devices.
- Type-C Port: One 5V/2.4A Type-C port is available for charging compatible devices.
- Power Cord: The vanity is equipped with a 4.92 FT power cord. Plug it into a standard wall outlet.

Image: Detail of the integrated power outlet with AC, USB, and Type-C ports.
4.3 Storage Features
The vanity offers various storage options to keep your items organized.
- Drawers: One large drawer and three compact drawers provide enclosed storage for cosmetics, jewelry, and other personal items.
- Open Shelves: Two open shelves are ideal for displaying frequently used items or decorative pieces.
- Stool Storage: The included stool features a hidden compartment for additional storage, suitable for larger items like a hair dryer or styling tools.
- Hair Dryer Holder: A dedicated holder on the side of the desk keeps your hair dryer easily accessible.
5. Maintenance
Proper care and maintenance will extend the life of your vanity desk.
- Cleaning: Wipe surfaces with a soft, damp cloth. Avoid using abrasive cleaners, harsh chemicals, or solvents, as these can damage the finish.
- Electrical Components: Ensure all electrical connections and the power outlet remain dry. Do not spray liquids directly onto electrical parts.
- Hardware: Periodically check all screws and fasteners to ensure they are tight. Re-tighten if necessary to maintain stability.
- Mirror Care: Clean the mirror surface with a glass cleaner and a soft, lint-free cloth.
6. Troubleshooting
If you encounter issues with your vanity desk, refer to the following common problems and solutions.
| Problem | Possible Cause | Solution |
|---|---|---|
| LED mirror light does not turn on. | No power connection; faulty touch sensor; damaged LED strip. | Ensure the vanity is plugged into a working power outlet. Check the power cord connection. Gently clean the touch sensor area. If the issue persists, contact customer support. |
| Power outlets (AC/USB/Type-C) are not working. | No power connection; internal wiring issue. | Verify the vanity's main power cord is securely plugged into a live wall outlet. Test the wall outlet with another device. If still not working, contact customer support. |
| Drawers do not slide smoothly or are misaligned. | Incorrect assembly; obstructions in slides; loose hardware. | Review assembly instructions for correct drawer slide installation. Check for any objects obstructing the slides. Ensure all drawer and slide screws are tightened. |
| Vanity feels unstable or wobbly. | Loose hardware; uneven floor; anti-toppling device not installed. | Check and tighten all assembly screws. Ensure the vanity is on a level surface. Install the anti-toppling device as instructed in the assembly manual. |
| Missing or damaged parts upon arrival. | Shipping damage; packaging error. | Do not proceed with assembly. Contact Patikuin customer support immediately with your purchase details and a description of the missing/damaged parts. |
7. Product Specifications
| Brand | Patikuin |
| Model Number | YN-C04 |
| Color | White |
| Material | Wood (Engineered Wood) |
| Product Dimensions (L x W x H) | 36.85" x 15.75" x 55.12" (93.6 cm x 40 cm x 140 cm) |
| Item Weight | 88 pounds (39.9 kg) |
| Mirror Dimensions | 23.6" x 25.8" (approx.) |
| LED Light Modes | 3 (Warm White, Warm Yellow, Cool Light) |
| Power Outlet | 2 AC Outlets (125V/12A), 1 USB Port (5V/2.4A), 1 Type-C Port (5V/2.4A) |
| Power Cord Length | 4.92 FT (1.5 m) |
| Assembly Required | Yes (approx. 45 minutes) |
| Stool Dimensions | 15.4" x 11" x 17.7" (approx.) |
8. Warranty and Support
For warranty information, product support, or to report missing/damaged parts, please contact Patikuin customer service. Refer to your purchase documentation for specific contact details or visit the official Patikuin website.
When contacting support, please have your model number (YN-C04) and proof of purchase readily available.