1. Product Overview
This manual provides essential information for the assembly, operation, and maintenance of your AECOJOY 16' x 12' Wall-Mounted Hard Top Gazebo. This gazebo is designed to provide a sheltered outdoor space, offering protection from sun and moderate weather conditions.
- Robust Construction: Features a hard top roof capable of withstanding approximately 7 inches of heavy snow (6 lbs/sq.ft) and winds up to 70 mph when properly anchored.
- Weather Protection: The inclined roof design and meticulous detailing ensure water resistance. The awning roof provides protection against harmful UV rays (UPF 50++) and rainwater.
- Wall-Mounted Design: Designed for secure attachment to a wall, providing enhanced stability compared to freestanding structures.
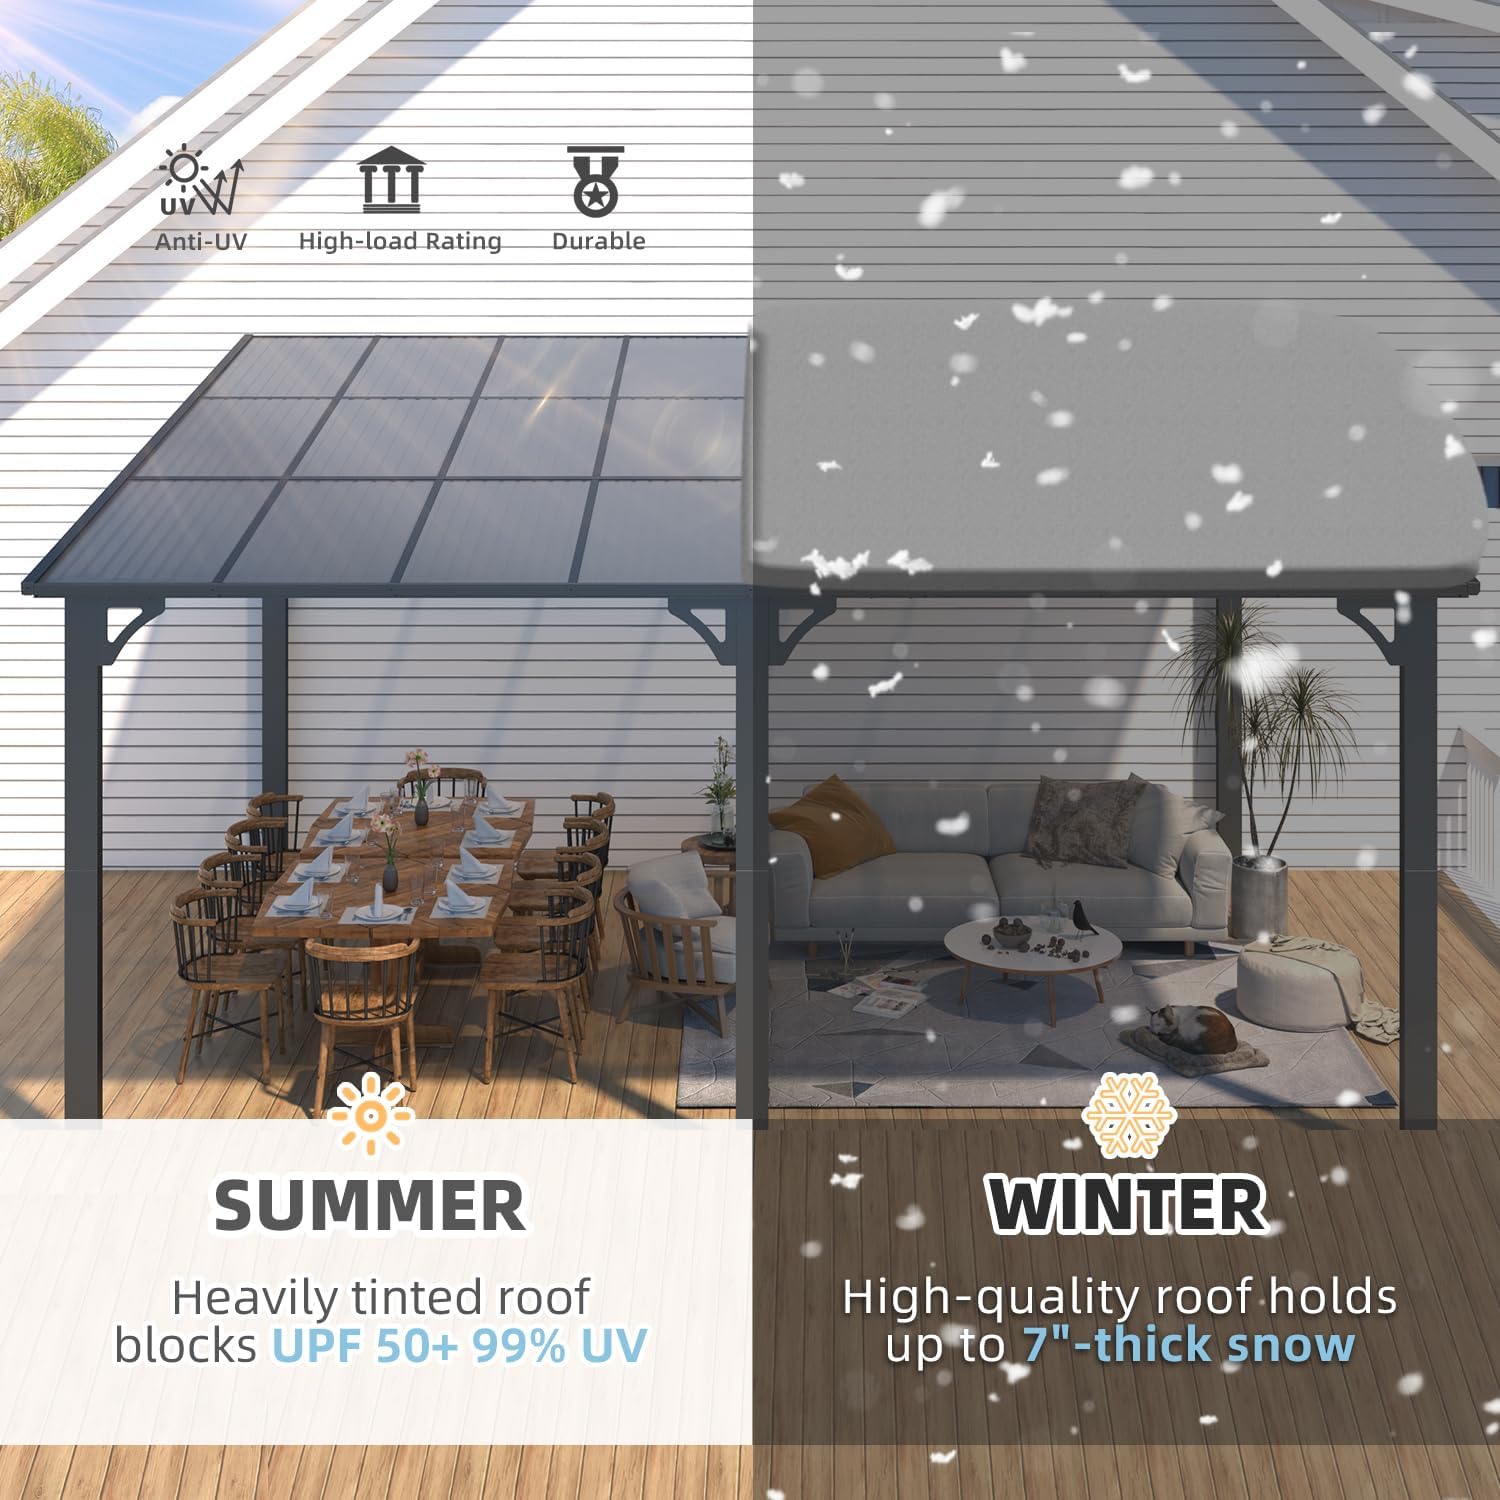
Image 1.1: The gazebo offers protection in both summer (UV blocking) and winter (snow load capacity).
2. Safety Information
Please read and understand all safety warnings and instructions before assembly and use. Failure to follow these instructions may result in injury or damage to the product.
- Secure Anchoring: Always ensure the gazebo is securely fixed to the ground and wall as instructed to prevent it from tipping over or being damaged in windy conditions. Use appropriate anchors for your specific ground and wall type.
- Weather Conditions: While designed for durability, it is recommended to exercise caution during extreme weather events such as severe storms, heavy snowfall exceeding capacity, or hurricane-force winds. Consider disassembling or reinforcing the structure if such conditions are anticipated.
- Assembly Safety: Assembly typically requires two or more people. Wear appropriate safety gear, such as gloves, during assembly. Keep children and pets away from the assembly area.
- Structural Integrity: Regularly inspect all connections and components for tightness and damage. Do not use the gazebo if any part is damaged or compromised.
- Fire Hazard: Keep all heat sources, including barbecues and outdoor heaters, at a safe distance from the gazebo structure and roof panels to prevent fire.
3. Package Contents
Before beginning assembly, verify that all parts listed in the included parts list are present and undamaged. Refer to the detailed parts diagram in your physical manual for identification. The product is typically shipped in multiple packages.
Important: Do not discard any packaging materials until assembly is complete and you have confirmed all parts are accounted for. Contact customer support immediately if any parts are missing or damaged.
4. Setup and Installation
This gazebo is designed for wall-mounted installation. Follow the step-by-step instructions provided in your physical manual. For visual guidance, refer to the video tutorials available on the product page.
4.1 Pre-Assembly Checks
- Ensure you have sufficient space for assembly and the final placement of the gazebo. Refer to the dimensions diagram below.
- Inspect all threaded holes for paint or debris and clear them if necessary to ensure smooth bolt insertion.
- Verify all bolts and nuts are present. While the manufacturer aims for complete kits, it is advisable to have spare hardware on hand if possible, as some nuts may have manufacturing imperfections.

Image 4.1: Product dimensions for planning installation space.
4.2 Frame Assembly
- Assemble the frame components according to the manual. When attaching arm and beam connectors (brackets), initially tighten bolts only finger-tight. This allows for minor adjustments when installing the roof panels.
- The frame features triangular structures and multiple keyholes for enhanced stability.

Image 4.2: Detail of the triangular structure and multiple keyholes for frame stability.
4.3 Wall Mounting and Anchoring
- The gazebo is designed to be attached to a wall. Each column has additional holes for wall attachment. The stable frame legs also have pre-drilled holes for floor attachment.
- Ensure the wall structure is capable of supporting the gazebo's weight and resisting wind forces. Use appropriate wall anchors (provided) for your specific wall material.
- Securely fix the gazebo to both the wall and the ground as instructed. Proper anchoring is critical for stability and safety.

Image 4.3: Stable frame leg with pre-drilled holes for floor attachment and wall stud connection points.
4.4 Roof Panel Installation
- The roof consists of sun panels. It is recommended to remove the protective film from each panel before installation, despite any conflicting instructions you may find. Removing the film after installation can be difficult.
- When inserting panels into connector slots, applying a solution of soap and water can facilitate easier sliding.
- Ensure the 'leak' holes on the panels are oriented upwards as indicated in the manual to ensure proper drainage.

Image 4.4: Close-up of the roof panels, highlighting flexible design for impact resistance and smooth drainage.
5. Operating Instructions
Once assembled and securely anchored, your AECOJOY gazebo provides a versatile outdoor living space. It is designed for use as a shaded area for relaxation, dining, or other outdoor activities.
- Shade and UV Protection: The heavily tinted roof panels block UV rays, providing a comfortable shaded environment.
- Rain Shelter: The waterproof design offers shelter from light to moderate rain.
- Snow Load: The hard top roof is engineered to handle up to 7 inches of heavy snow. However, it is advisable to clear excessive snow accumulation to prevent potential damage.
6. Maintenance
Regular maintenance will extend the life and appearance of your gazebo.
- Cleaning: Clean the frame and roof panels periodically with mild soap and water. Avoid abrasive cleaners or harsh chemicals that could damage the finish or materials. Rinse thoroughly with clean water.
- Hardware Check: Annually, or after severe weather, inspect all bolts, nuts, and anchoring points to ensure they remain tight and secure. Tighten any loose fasteners.
- Drainage: Ensure the roof panels and drainage channels are free from leaves, debris, or snow buildup to maintain effective water runoff.
- Damage Inspection: Periodically check for any signs of wear, corrosion, or damage to the frame or roof panels. Address any issues promptly to prevent further deterioration.
7. Troubleshooting
This section addresses common issues that may arise during assembly or use.
- Missing or Damaged Parts: If you discover missing or damaged parts upon unboxing, do not proceed with assembly. Contact AECOJOY customer support for replacements.
- Difficulty with Bolts/Nuts: If bolts are difficult to thread, check for paint in the threaded holes and clear it. If bolt heads strip easily, use appropriate tools and avoid over-tightening.
- Roof Panels Difficult to Install: Ensure protective film is removed from panels before attempting to slide them into slots. A soap and water solution can act as a lubricant.
- Gazebo Feels Wobbly: Ensure all frame connections are fully tightened. Verify that the gazebo is securely anchored to both the wall and the ground using appropriate hardware. For additional stability, consider adding extra bracing if not fully attached to a house structure.
- Water Leakage: Confirm that roof panels are correctly oriented with 'leak' holes facing upwards for proper drainage. Check for any gaps or misalignments in the roof panel installation.
8. Specifications
| Brand | AECOJOY |
| Model | 16' x 12' Wall-Mounted Hard Top Gazebo |
| Material | Aluminum, Metal, Sun Panels |
| Product Dimensions (L x W x H) | 192"L x 144"W x 96"H |
| Item Weight | 246.4 Pounds |
| Frame Material | Metal & Aluminum |
| Water Resistance Level | Waterproof |
| Shape | Rectangular |
| Ultraviolet Light Protection | UPF 50++ |
| Assembly Required | Yes |
9. Warranty and Support
AECOJOY stands behind its products. We offer maintenance and replacements for the product itself. A professional technical support team is available 24/7 to address any concerns related to installation, usage, or other inquiries.
For assistance, please refer to the contact information provided in your product packaging or visit the AECOJOY store page on Amazon.