Introduction
This manual provides detailed instructions for the assembly, operation, and maintenance of your Rolanstar Queen Bed Frame. This bed frame features a soft padded headboard, a built-in charging station, customizable RGB LED lighting, and ample under-bed storage. Please read this manual thoroughly before beginning assembly or operation to ensure proper use and longevity of your product.
Safety Information
- Always follow assembly instructions carefully.
- Ensure all screws and fasteners are securely tightened before use. Periodically check and re-tighten as necessary.
- Do not exceed the maximum weight capacity of 1200 lbs.
- Keep small parts away from children during assembly.
- Use only the provided power adapter for the charging station and LED lights.
- Avoid exposing electrical components to moisture.
Included Components
Verify that all components are present before starting assembly. Refer to the parts list provided in your packaging.
- Headboard
- Bed Frame (metal components and slats)
- Installation Manual
- Assembly Hardware (screws, bolts, tools)
- LED Light Strip and Remote Control
- Charging Station Unit
Setup and Assembly
Assembly is designed to be straightforward, typically taking around 30 minutes. It is recommended to assemble the bed frame with two people.
- Unpack and Identify Parts: Lay out all components on a clean, soft surface to prevent scratches. Identify each part using the included parts list.
- Assemble the Headboard: Attach the padded sections to the headboard frame. Ensure the LED light strip and charging station are correctly positioned and secured.
- Connect Side Rails: Attach the side rails to the headboard and footboard. Important: Do not fully tighten all screws until the entire frame is assembled. This allows for minor adjustments.
- Install Support Legs: Securely attach all support legs to the frame.
- Place Metal Slats: Position the metal slats across the frame. The embedded design ensures a secure fit for your mattress, preventing sliding.
- Final Tightening: Once all components are in place and aligned, fully tighten all screws and fasteners.
- Connect Power: Plug in the power adapter for the LED lights and charging station to a suitable power outlet.

Image: Components for quick assembly.

Image: Embedded design for secure mattress fit.
Video: Overview of the Rolanstar Bed Frame with Charging Station, demonstrating features and ease of setup.
Operating Instructions
LED Bed Lighting
The bed frame features customizable RGB LED lights with 20 colors and 21 dynamic modes. Use the included remote control to adjust settings:
- Power Button: Turn lights On/Off.
- Color Buttons: Select from 20 static colors.
- Mode Button: Cycle through 21 dynamic lighting modes.
- Speed +/-: Adjust the speed of dynamic modes (8 settings).
- Bright +/-: Adjust the brightness of static colors or dynamic modes (8 levels).
- Demo Button: Activate a demonstration of various colors and modes.

Image: LED lighting options controlled by remote.
Video: Demonstration of the Rolanstar Soft Padded Headboard bed frame, highlighting the LED lights and design.
Built-in Charging Station
The headboard includes a convenient charging station with 2 USB ports and 1 Type-C port.
- Connect your devices (phones, tablets, etc.) to the available USB or Type-C ports.
- Ensure the bed frame's power adapter is plugged into a live electrical outlet for the charging station to function.

Image: Built-in charging station with USB and Type-C ports.
Maintenance
- Cleaning: Wipe the metal frame with a damp cloth and mild detergent. For the upholstered headboard, use a fabric cleaner suitable for the material. Avoid harsh chemicals.
- Regular Checks: Periodically inspect all bolts and screws to ensure they remain tight. Re-tighten as needed to maintain stability and prevent noise.
- Electrical Components: Keep the charging station and LED lights free from dust and debris. Do not attempt to repair electrical components yourself.
Troubleshooting
| Problem | Possible Cause | Solution |
|---|---|---|
| Bed frame is wobbly or noisy. | Loose screws or bolts. | Check and tighten all assembly hardware. Ensure all parts are correctly aligned. |
| LED lights are not working. | Power cable disconnected; remote control battery low; LED strip damaged. | Ensure the power adapter is securely plugged into the wall and the bed frame. Replace remote control battery. If still not working, contact customer support. |
| Charging station is not working. | Power cable disconnected; device not compatible; charging station faulty. | Verify the bed frame's power adapter is plugged in. Test with a different device and cable. If issue persists, contact customer support. |
| Parts do not align during assembly. | Screws tightened prematurely; incorrect orientation of parts. | Loosen all screws, re-align parts, and then tighten gradually. Double-check the manual for correct part orientation. |
Specifications
- Size: Queen
- Model Number: hq-chj005-14
- Product Dimensions (L x W x H): 85.4" x 60" x 43"
- Material: Engineered Wood (Headboard), Heavy-Duty Metal (Frame)
- Color: Black
- Weight: 61.1 lbs
- Maximum Weight Recommendation: 1200 lbs
- Compatible Mattress Thickness: 6-10 inches (No Box Spring Needed)
- Charging Station: 2 USB ports (5V/2.4A), 1 Type-C port (5V/3A)
- LED Lights: RGB, 20 colors, 21 dynamic modes, 8 brightness levels, 8 speed settings
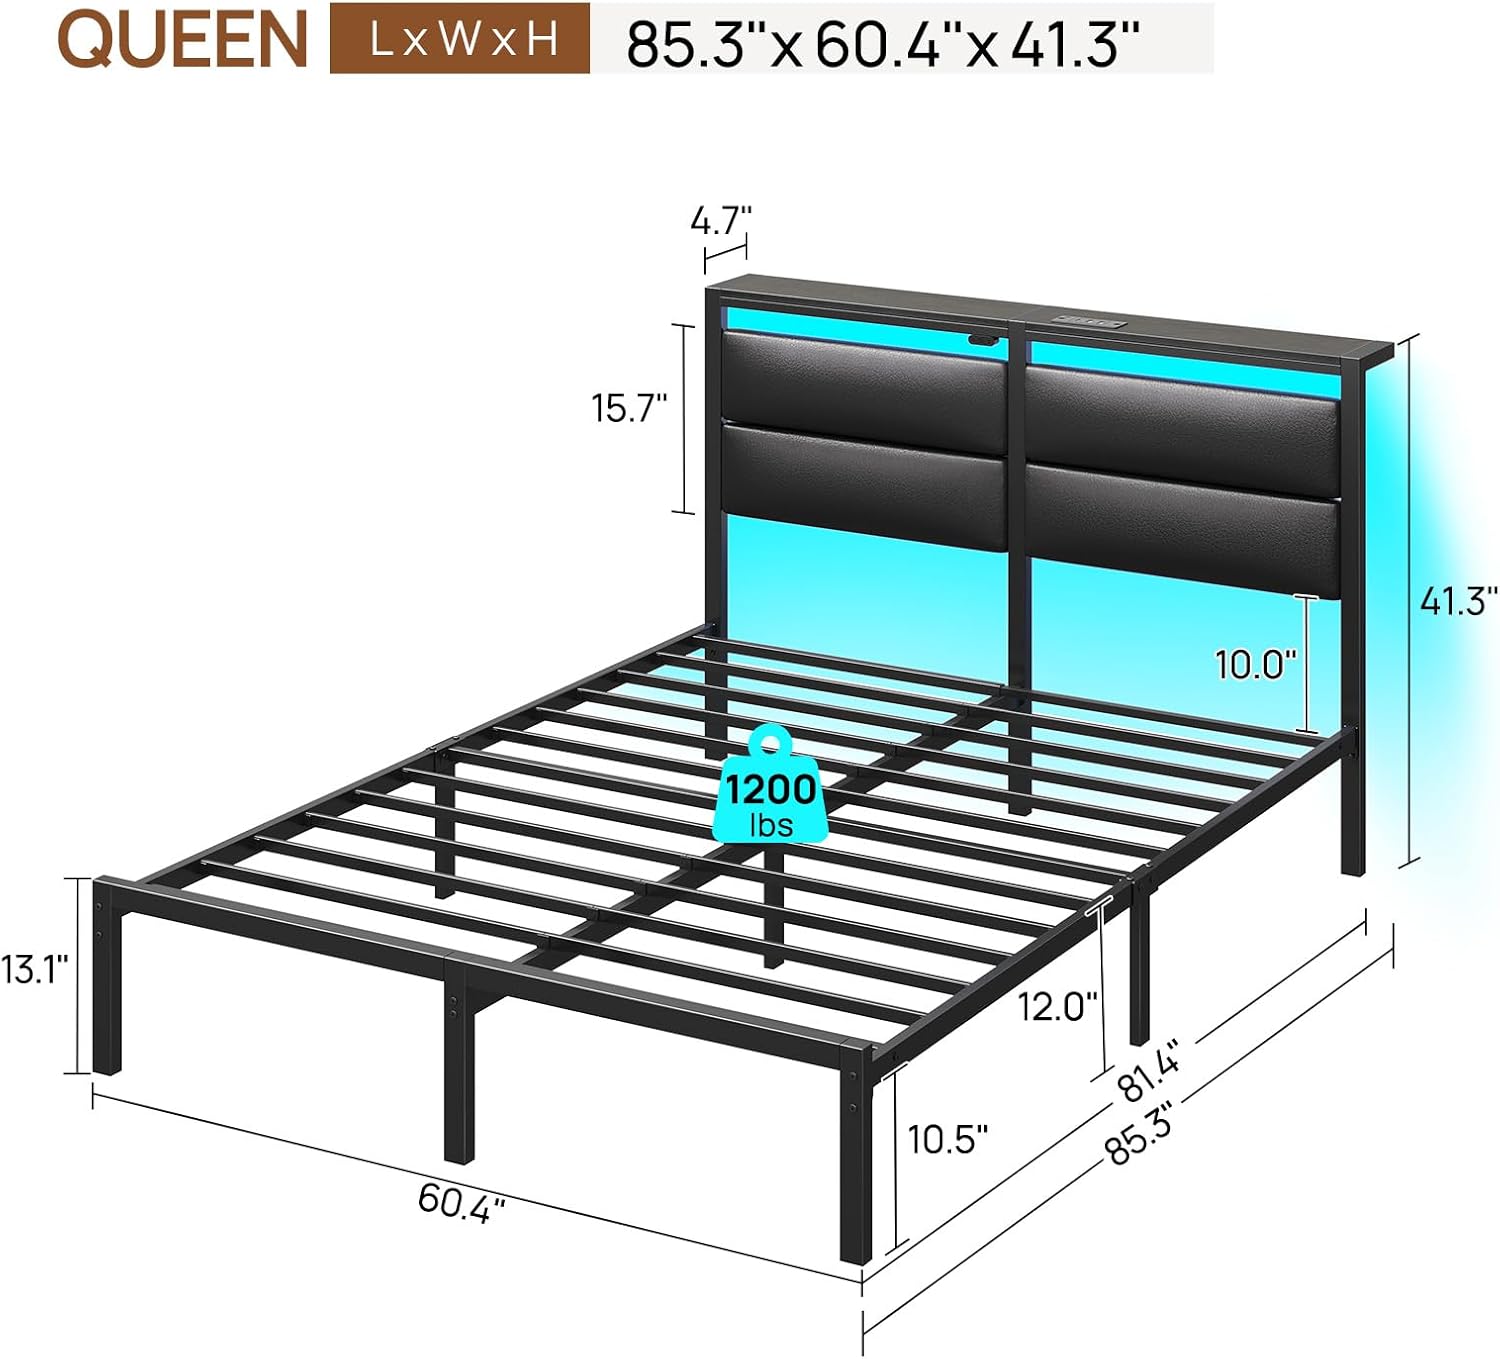
Image: Queen bed frame dimensions and weight capacity.

Image: Heavy-duty metal frame construction.

Image: Under-bed storage space.
Warranty and Support
For warranty information or technical support, please refer to the warranty card included with your product or contact Rolanstar customer service directly. Keep your purchase receipt for warranty claims.