1. Introduction
This manual provides essential information for the safe operation, installation, maintenance, and troubleshooting of your TROPOW 12000 BTU Portable Air Conditioner. Please read this manual thoroughly before using the appliance and retain it for future reference.
The TROPOW Portable Air Conditioner is a versatile 3-in-1 unit designed to provide powerful cooling, effective dehumidification, and efficient fan functions for rooms up to 550 sq.ft. It features quiet operation, multiple fan speeds, auto-swing, and a 24-hour timer for customizable comfort. Its portable design with built-in handles and caster wheels allows for easy movement between rooms.

Image 1.1: TROPOW Portable Air Conditioner with remote control.

Image 1.2: Unit designed for easy portability with handles and wheels.
2. Safety Information
Always follow basic safety precautions when using electrical appliances to reduce the risk of fire, electric shock, and injury. This section outlines critical safety guidelines.
- Ensure the power supply voltage and frequency match the specifications on the unit's rating label.
- Do not operate the unit if the power cord or plug is damaged. Contact qualified service personnel for repair.
- Keep the unit upright during transport and operation to prevent refrigerant leakage.
- Do not block air inlets or outlets. Maintain at least 20 inches (50 cm) clearance around the unit for proper airflow.
- Never insert fingers or foreign objects into the air vents or any openings.
- Unplug the unit from the power outlet before cleaning, performing maintenance, or when not in use for extended periods.
- This appliance is not intended for use by persons (including children) with reduced physical, sensory, or mental capabilities, or lack of experience and knowledge, unless they have been given supervision or instruction concerning use of the appliance by a person responsible for their safety. Children should be supervised to ensure they do not play with the appliance.
- Do not use the unit in wet areas such as bathrooms or laundry rooms where it may come into contact with water.
- Use only the accessories and parts supplied or recommended by the manufacturer.
3. Package Contents
Carefully unpack your portable air conditioner and verify that all the following items are present and in good condition. If any items are missing or damaged, please contact TROPOW customer support immediately.
- Portable Air Conditioner Unit
- Remote Control
- Exhaust Hose
- Window Seal Plate Kit (Adjustable Slide Bar, Exhaust Hose Adapters)
- Drain Hose
- User Manual
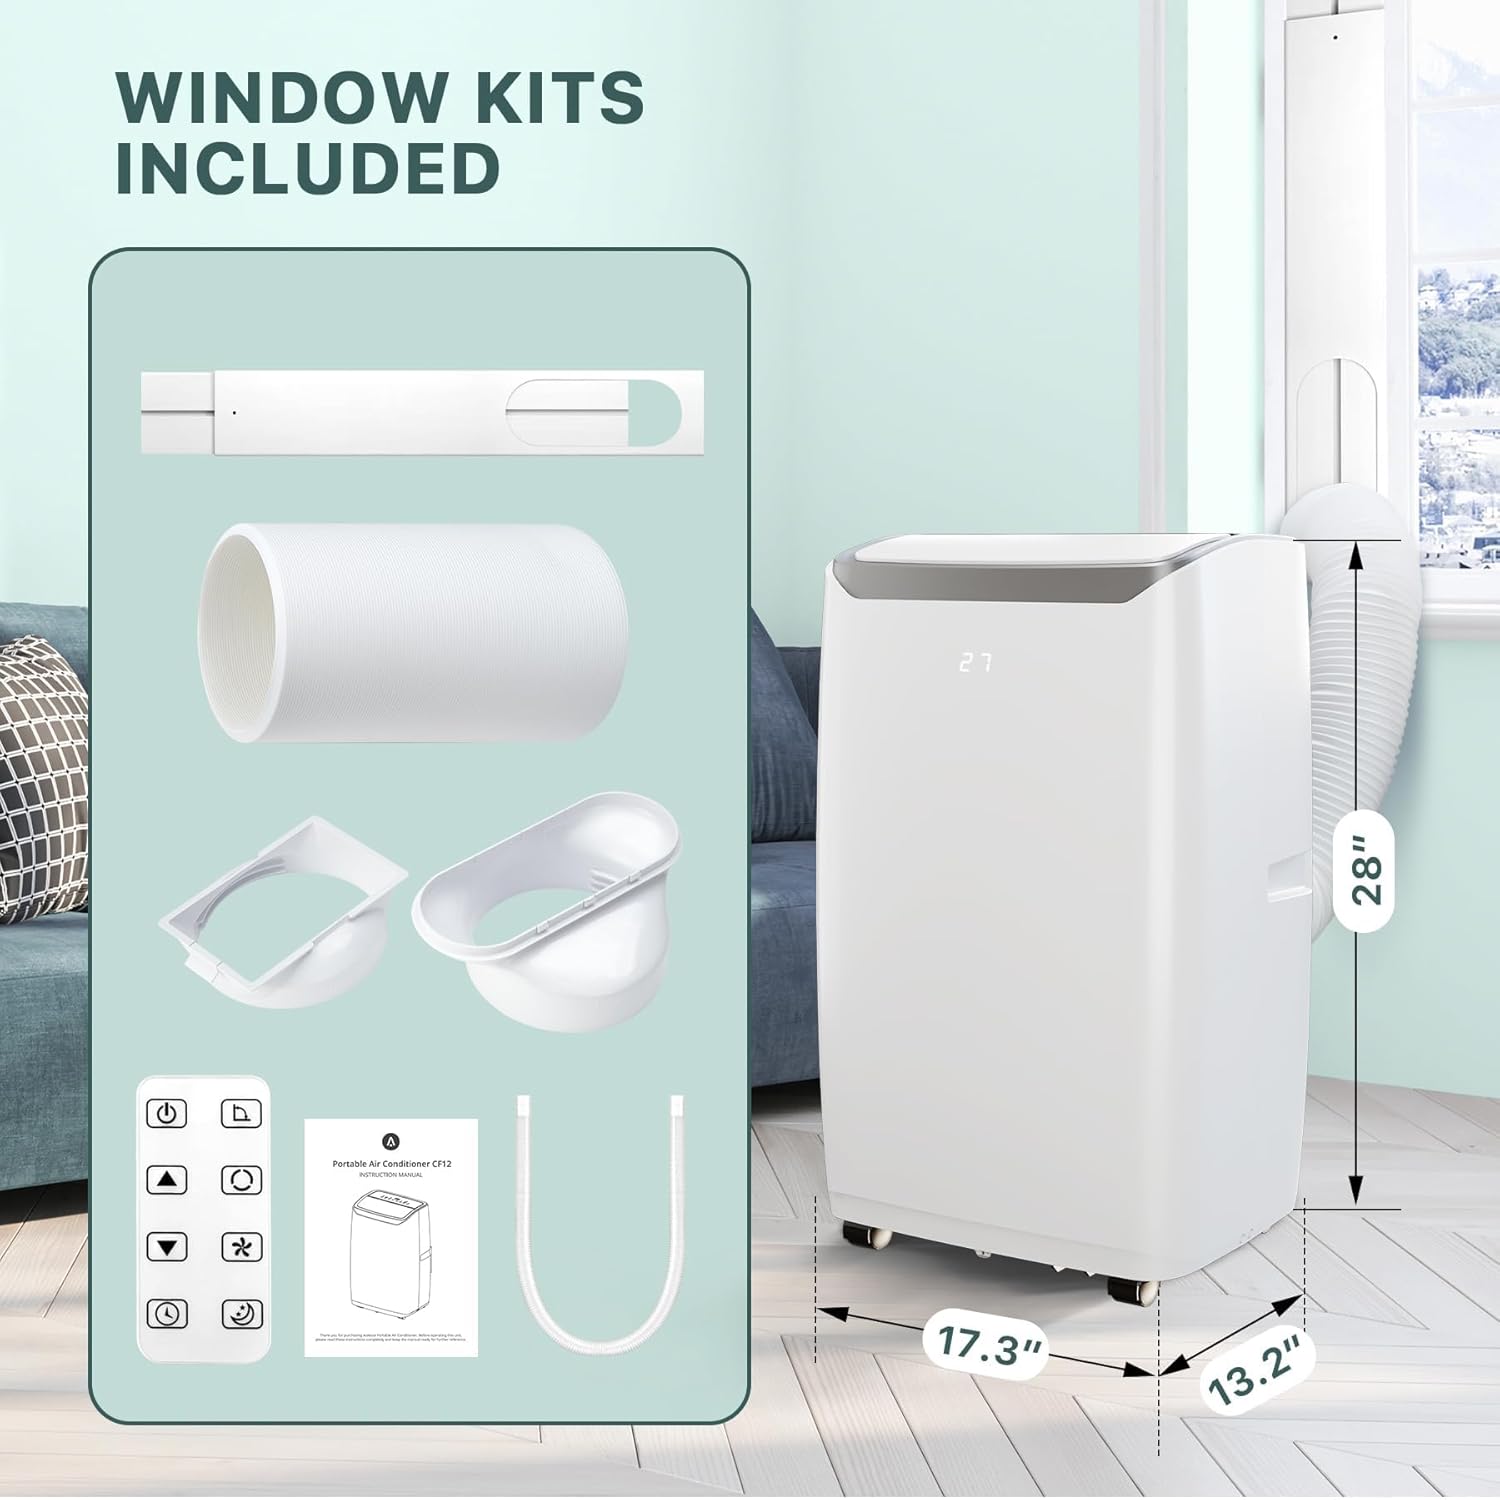
Image 3.1: Overview of the portable air conditioner unit and its included accessories.
4. Setup and Installation
Proper installation of the exhaust hose and window kit is essential for the efficient operation of your portable air conditioner. This unit is designed for use with a window exhaust system.
4.1 Window Kit Assembly and Installation
- Prepare the Window Panel: Adjust the window seal plate (slide bar) to match the length or height of your window opening and secure it with screws.
- Install the Window Panel: Place the assembled slide bar into the window track. Close the window firmly against the panel to secure it in place.
- Connect Exhaust Hose to Unit: Attach one end of the exhaust hose adapter to the exhaust outlet located on the back of the air conditioner unit. Twist clockwise until securely fastened.
- Connect Exhaust Hose to Window Panel: Attach the other end of the exhaust hose adapter to the opening in the window seal plate. Twist clockwise until securely fastened.
- Position the Unit: Ensure the portable air conditioner is placed on a flat, stable surface. Extend the exhaust hose as needed, keeping it as short and straight as possible to maximize cooling efficiency.

Image 4.1: Exhaust hose connected to the unit and properly installed in a window. Note the recommended 20-inch (50 cm) clearance from objects.
Important Considerations: The maximum length for the exhaust hose is approximately 59 inches (150 cm). Avoid bending or kinking the hose, as this can reduce efficiency and cause the unit to overheat. Maintain at least 20 inches (50 cm) clearance from walls or other objects to ensure proper airflow.
5. Operating Instructions
Your TROPOW Portable Air Conditioner can be conveniently operated using either the intuitive control panel on the unit or the included remote control.
5.1 Control Panel and Remote Control Overview

Image 5.1: Digital LED display panel with touch controls and the remote control.
The control panel features a clear digital LED display showing temperature and settings, along with touch-sensitive buttons for various functions. The remote control provides full functionality for convenient operation from across the room.
5.2 Operating Modes
Press the MODE button on the control panel or remote to cycle through the available operating modes:
- Cooling Mode: Provides powerful air conditioning for hot environments. Use the UP/DOWN buttons to set your desired temperature between 61°F and 88°F (16°C - 31°C).
- Dehumidify Mode: Effectively removes excess moisture from the air, helping to reduce humidity levels in damp conditions.
- Fan Mode: Circulates air without engaging the cooling compressor, providing a refreshing breeze suitable for milder weather.

Image 5.2: Illustrating the three versatile operating modes.
5.3 Fan Speed and Auto Swing
- Fan Speed: Press the SPEED button to select your preferred fan speed: Low, Medium, or High.
- Auto Swing: Press the SWING button to activate or deactivate the automatic louver swing function, which helps distribute air more evenly across the room.
5.4 Timer Function
The TIMER button allows you to program the unit to automatically turn on or off after a set period (up to 24 hours). Press the TIMER button, then use the UP/DOWN buttons to adjust the desired time in hourly increments.
5.5 Sleep Mode
Activate SLEEP mode for ultra-quiet operation and optimized energy consumption during nighttime. In this mode, the fan speed is automatically set to low, and the set temperature may gradually increase by a few degrees over several hours to maintain comfortable sleeping conditions while minimizing noise.
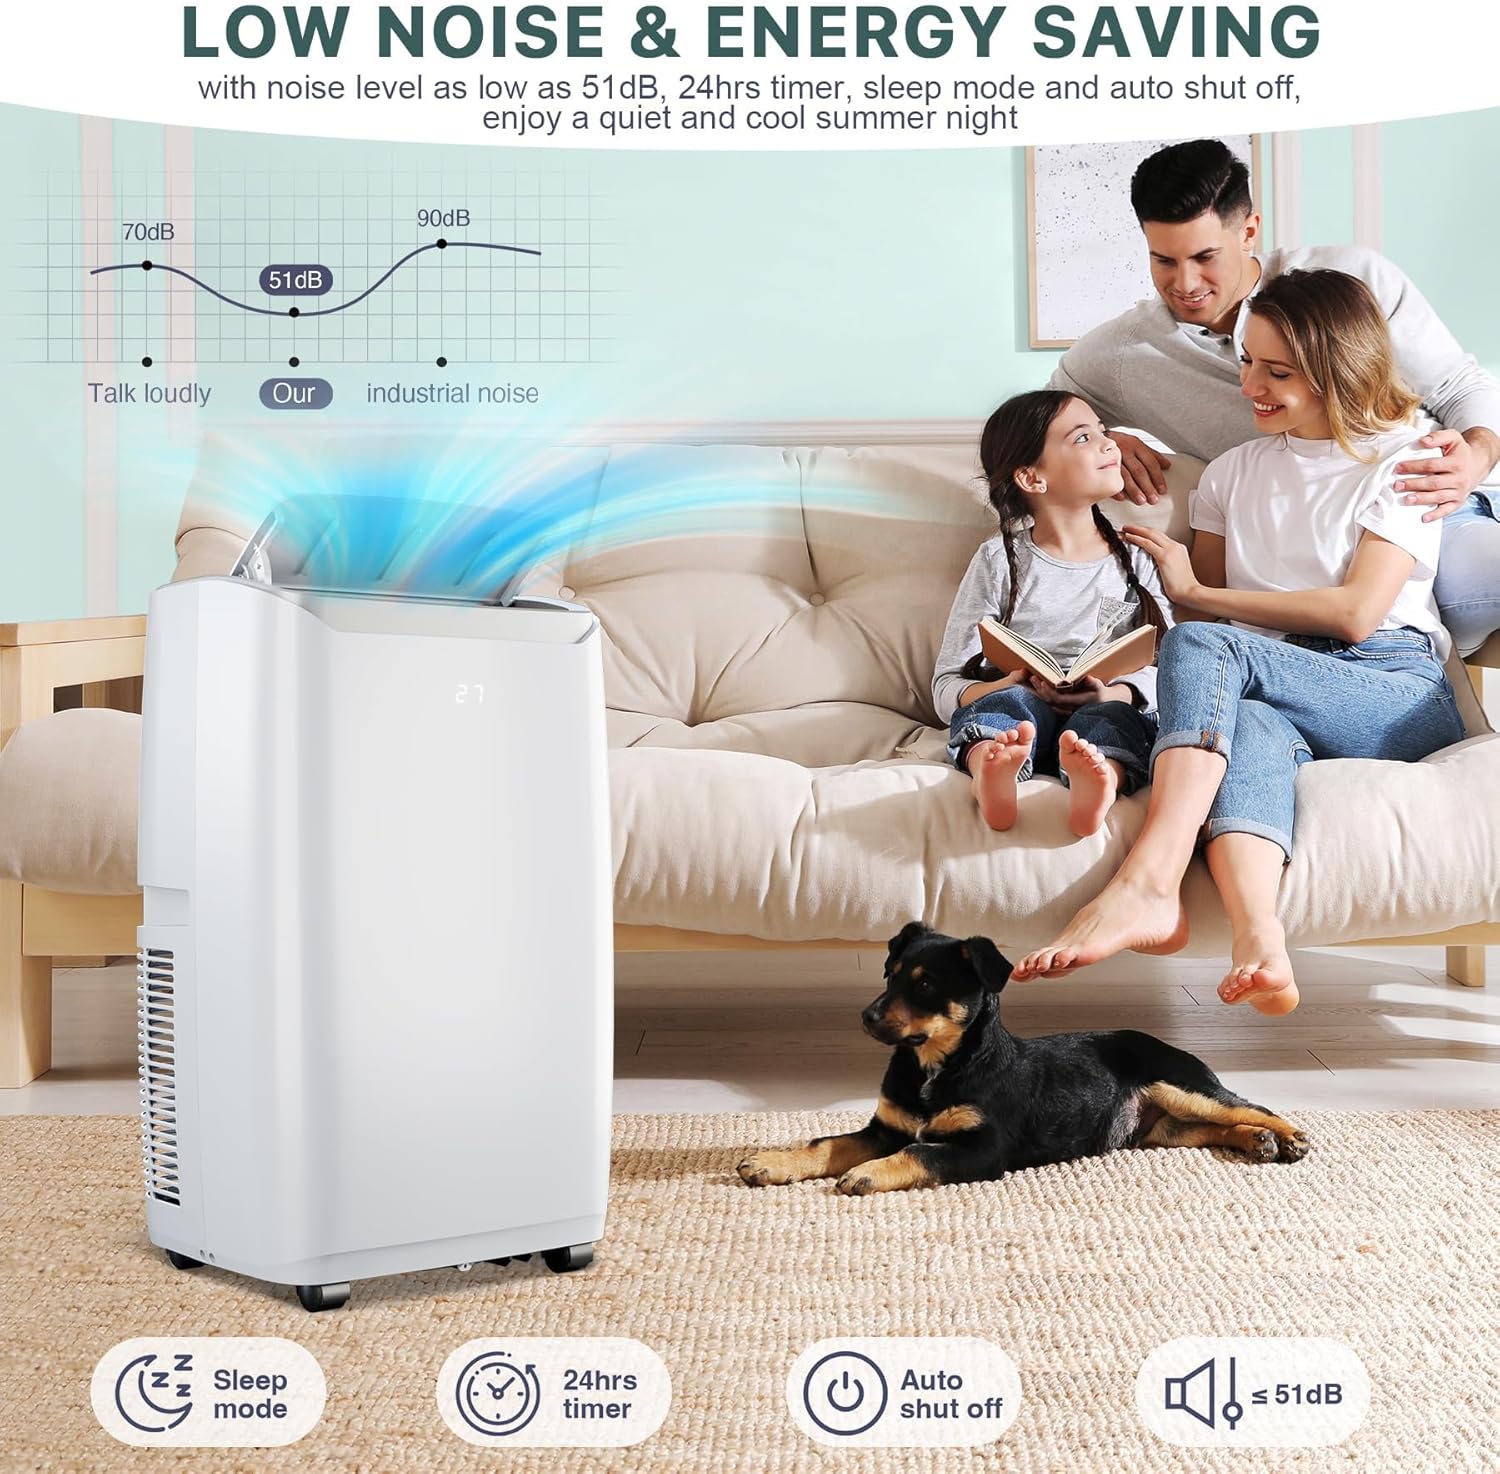
Image 5.3: Demonstrating the quiet operation and benefits of Sleep Mode.
6. Maintenance
Regular maintenance is crucial for ensuring the optimal performance, efficiency, and longevity of your portable air conditioner. Always unplug the unit before performing any maintenance.
6.1 Air Filter Cleaning
The air filter should be cleaned regularly, typically every two weeks, or more frequently if the unit is used in dusty environments. A clean filter helps maintain cooling efficiency and air quality.
- Power Off and Unplug: Ensure the unit is turned off and unplugged from the electrical outlet.
- Remove Filter: Locate the air filter panel, usually on the back or side of the unit. Gently open the panel and slide out the air filter.
- Clean Filter: Wash the filter under running warm water with a mild detergent. Rinse thoroughly to remove all dirt and soap residue.
- Dry Filter: Allow the filter to air dry completely in a shaded area. Do not expose it to direct sunlight or use a dryer, as this can damage the filter material.
- Reinstall Filter: Once completely dry, slide the air filter back into its slot and close the filter panel securely.

Image 6.1: Steps for accessing and cleaning the air filter for optimal air quality.
6.2 Draining Condensed Water
Your unit features a self-evaporation system that typically expels most condensed water through the exhaust hose. However, in high humidity conditions or during prolonged dehumidification, the internal water tank may fill, and the unit will stop operating to prevent overflow. When this occurs, an indicator light may illuminate, and the unit may display an error code (e.g., "FL" for full). To drain the water:
- Turn off and unplug the unit.
- Place a shallow pan or tray beneath the drain port, usually located at the bottom rear of the unit.
- Remove the drain plug to allow water to flow out.
- Once drained, replace the drain plug securely.
For continuous draining, connect the provided drain hose to the continuous drain port (if available) and direct it to a floor drain or suitable container. Ensure the hose is sloped downwards to allow gravity drainage.
7. Troubleshooting
Before contacting customer support, please refer to the following table for common issues and their potential solutions. This can help resolve minor problems quickly.
| Problem | Possible Cause | Solution |
|---|---|---|
| Unit does not turn on. | No power supply, tripped circuit breaker, faulty plug, unit not plugged in. | Ensure the power cord is securely plugged into a working electrical outlet. Check your home's circuit breaker and reset if tripped. Inspect the power cord and plug for damage. |
| Unit is not cooling effectively. | Dirty air filter, blocked air inlets/outlets, room size exceeds capacity, open windows/doors, exhaust hose improperly installed or kinked, high ambient temperature. | Clean the air filter (refer to Section 6.1). Ensure all air vents are clear of obstructions. Verify the room size is within the unit's capacity (up to 550 sq.ft). Close all windows and doors. Check that the exhaust hose is properly connected, extended, and not bent. |
| Unit is noisy or vibrating excessively. | Unit not on a level surface, internal components vibrating, foreign object inside. | Place the unit on a flat, stable, and level surface. Check for any loose parts or foreign objects. If noise persists, contact customer support. |
| Water leakage from the unit. | Drain plug not secured, continuous drain hose clogged or improperly connected, unit tilted. | Ensure the manual drain plug is tightly closed. If using continuous drainage, check the drain hose for clogs or improper connection and ensure it is sloped downwards. Ensure the unit is level. |
| Error code displayed (e.g., "FL"). | Internal water tank is full. | Drain the condensed water from the unit (refer to Section 6.2). The error code should clear once the tank is empty. |
8. Specifications
| Feature | Detail |
|---|---|
| Brand | TROPOW |
| Model Number | PHO_10HTZUF4fQ |
| Model Name (Alternate) | HF8CESVWK5 |
| Cooling Capacity | 12000 BTU (British Thermal Units) |
| Recommended Coverage Area | Up to 550 sq.ft |
| Functions | Cooling, Dehumidifying, Fan |
| Fan Speeds | 3 (Low, Medium, High) |
| Special Features | 4 Way Auto Swing, 24-Hour Timer, Sleep Mode, Remote Control |
| Noise Level | 52 Decibels |
| Product Dimensions (D x W x H) | 18.5" x 15.5" x 35.24" |
| Item Weight | 76.72 Pounds |
| Voltage | 115V |
| Wattage | 1200W |
| Annual Energy Consumption | 500 Watts |
| Air Volume Capacity | 260 Cubic Feet |
| Color | White-3032 |
| Included Components | Remote Control, Exhaust Hose, Window Kit, Drain Hose |
9. Warranty and Customer Support
For detailed warranty information, including coverage periods and terms, please refer to the warranty card or documentation included with your product packaging. Keep your original purchase receipt as proof of purchase for any warranty claims.
If you encounter any issues not covered in the troubleshooting section or require further assistance, please contact TROPOW customer service. You can typically find contact information (phone number, email, or website) on the product packaging, in the warranty documentation, or by visiting the official TROPOW website.
Online Support: For the latest support resources, FAQs, and contact options, please visit the TROPOW Store on Amazon or the manufacturer's official website.