1. Product Overview
The Generic Remote Battery Disconnect Switch (Model ZNKG01) is designed to provide convenient and intelligent power management for 12V vehicles. It features an LED voltage display for real-time monitoring, remote control functionality, and smart protection mechanisms to prevent battery drain and ensure safe operation.
Key Features:
- Battery Protection: Prevents battery drain from long-term parking, aging wires, and forgotten lights, extending battery lifespan.
- Smart Power Cutoff: Automatically disconnects power after 120 seconds if voltage drops below 11.8V to conserve energy.
- Remote Control: Allows power control from up to 100 meters away.
- LED Voltage Display: Provides real-time battery voltage monitoring.
- Driving Safety Feature: Disables remote control when voltage exceeds 13.2V to prevent accidental shutdown during driving.
- Wide Application: Suitable for most 12V vehicles including cars, boats, RVs, trailers, trucks, ATVs, UTVs, and motorcycles with a rated battery current below 240A.
What's in the Box:
- Remote Battery Disconnect Switch
- Remote Control (Quantity may vary, typically two)
2. Safety Information
Please read all safety instructions before installation and operation. Failure to follow these instructions may result in property damage, injury, or death.
- Always disconnect the negative terminal of the battery first when working on electrical systems to prevent accidental short circuits.
- Wear appropriate personal protective equipment, including safety glasses and gloves.
- Ensure the vehicle's ignition is off and all accessories are turned off before installation.
- Verify the switch is compatible with your vehicle's battery voltage (12V) and current rating (below 240A).
- Do not attempt to modify the switch or its components.
- Keep the remote control away from children.
3. Installation Guide
This switch uses a negative link method. Before installation, identify a suitable mounting position in the engine compartment. If the existing connector is incompatible, it may need to be replaced to adjust the mounting position.
Installation Steps:
- Remove Negative Terminal Clamp: Carefully remove the existing negative terminal clamp from your vehicle's battery.
- Connect Switch to Battery Negative Terminal: Connect the main clamp of the disconnect switch to the battery's negative terminal. Ensure a secure connection.
- Attach Battery Negative Terminal Clamp to Switch: Attach the vehicle's original negative terminal clamp to the negative terminal on the disconnect switch.
- Connect Red Power Cord: Connect the switch's red power cord to the battery's positive terminal. This provides power to the switch's internal electronics and LED display.

Image: The Remote Battery Disconnect Switch properly installed on a vehicle battery, showing connections to both positive and negative terminals.
Visual Installation Guide:
Video: A step-by-step animation demonstrating the installation process of the Remote Battery Disconnect Switch onto a vehicle battery, including connecting negative and positive terminals.
4. Operating Instructions
Remote Control Operation:
The switch can be controlled wirelessly using the provided remote control from a distance of up to 100 meters.
- Press the ON button on the remote to connect the battery and supply power to the vehicle.
- Press the OFF button on the remote to disconnect the battery and cut off power to the vehicle.
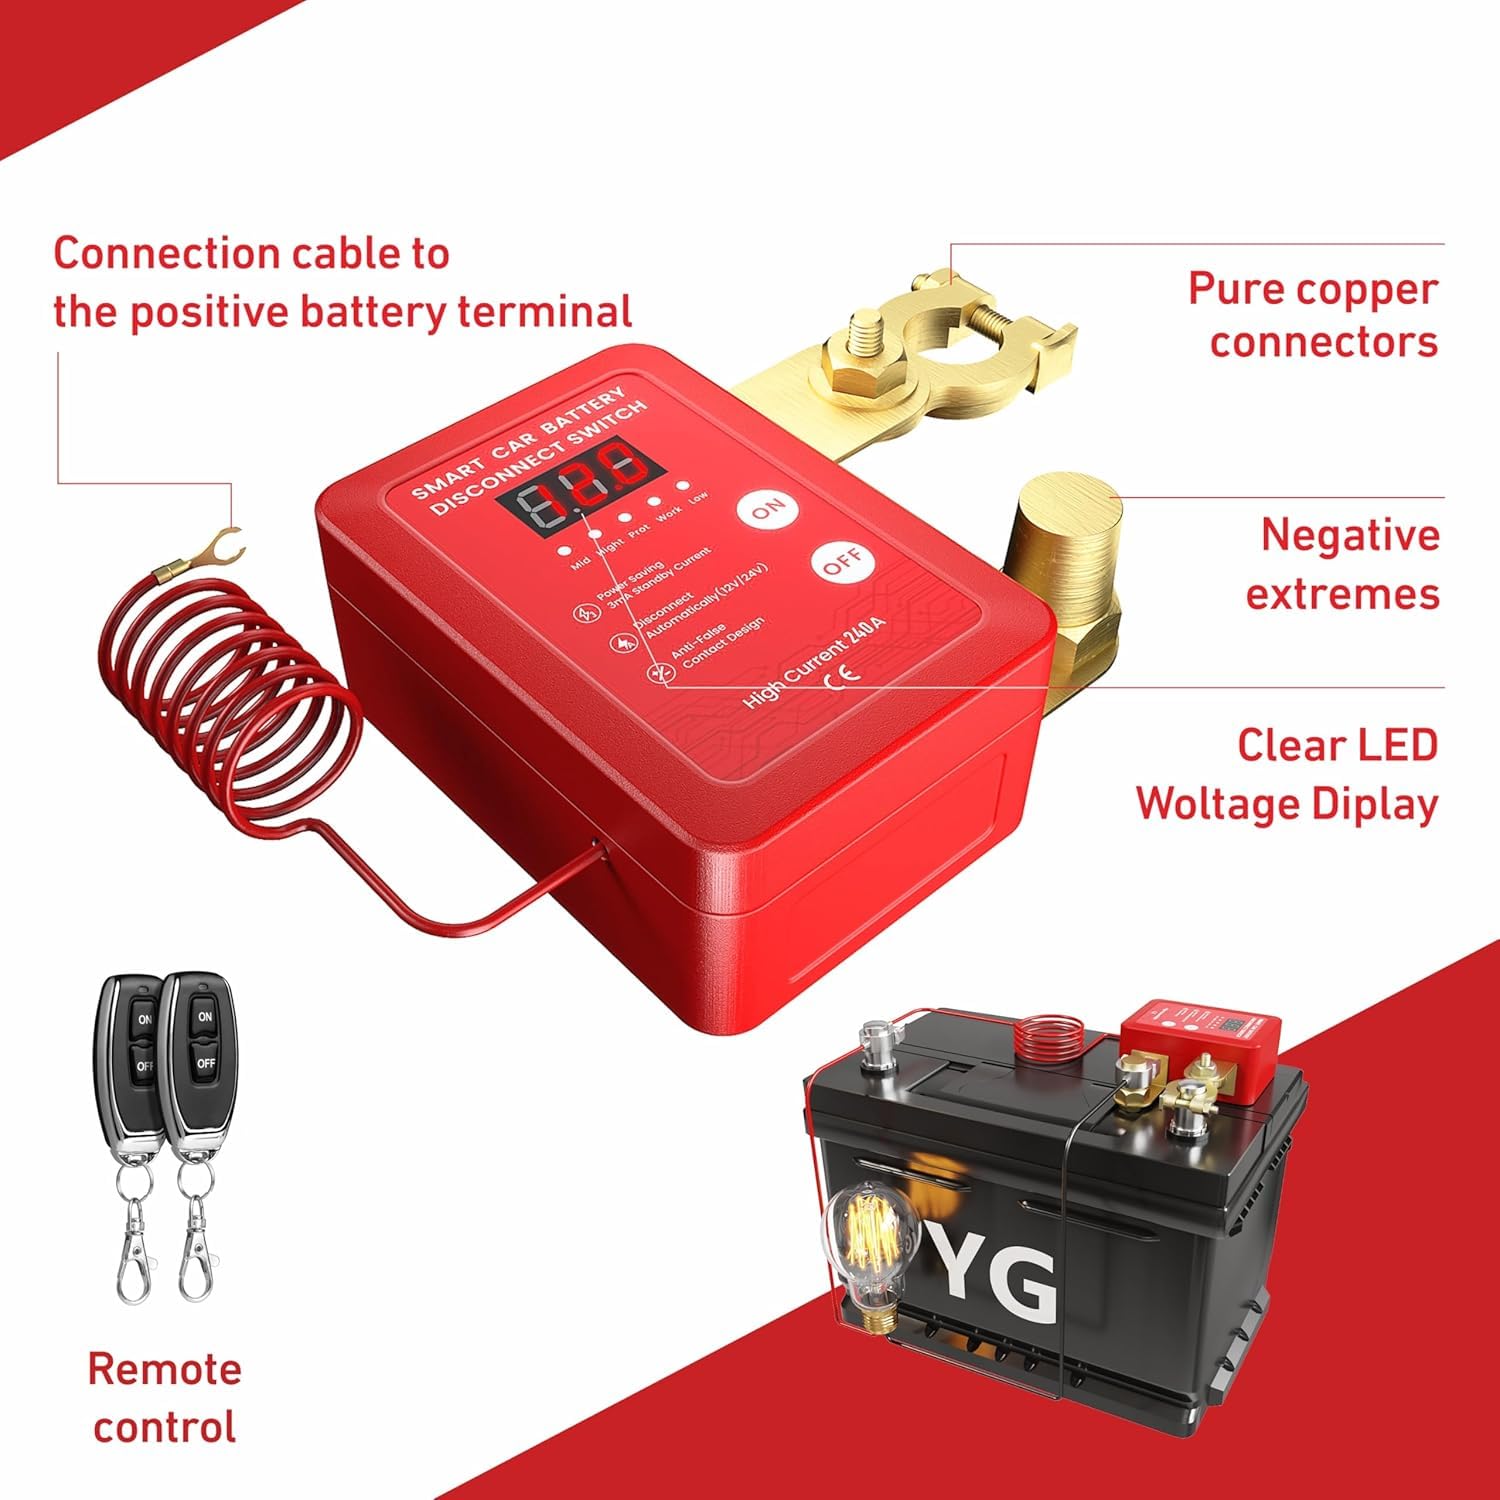
Image: The Remote Battery Disconnect Switch with its two remote controls, illustrating the components and basic connection points.
LED Voltage Display:
The integrated LED display shows the real-time voltage of your vehicle's battery, allowing for continuous monitoring of battery health.
Smart Protection Features:
- Low Voltage Protection: If the battery voltage drops below 11.8V, the remote control function will be disabled, and the device will automatically cut off power after 120 seconds to prevent deep discharge and conserve battery life.
- Driving Safety Lock: When the battery voltage exceeds 13.2V (indicating the engine is running and charging), the remote control will be disabled. This prevents accidental power cutoff while the vehicle is in operation, ensuring safety. Manual control is still possible if needed.

Image: The Remote Battery Disconnect Switch displaying a low voltage reading, highlighting its 'Low Voltage Protection' feature.
5. Maintenance
To ensure optimal performance and longevity of your Remote Battery Disconnect Switch, follow these maintenance guidelines:
- Regular Inspection: Periodically check all connections to ensure they are tight and free from corrosion.
- Cleaning: Keep the switch and terminals clean from dirt, dust, and moisture. Use a dry cloth for cleaning. Do not use harsh chemicals or abrasive cleaners.
- Battery Health: Monitor your vehicle's battery health regularly, especially if the low voltage protection feature is frequently activated.
- Remote Control Batteries: Replace the batteries in the remote control as needed to maintain reliable operation.
6. Troubleshooting
- Switch does not respond to remote control:
- Check if the battery voltage is below 11.8V (low voltage protection active).
- Check if the battery voltage is above 13.2V (driving safety lock active).
- Ensure the remote control batteries are not depleted.
- Verify that the remote control is within the 100-meter operating range.
- Vehicle power cuts off unexpectedly:
- This is likely due to the low voltage protection feature. Check your battery's charge level.
- Inspect for any loose connections or damaged wiring.
- LED display is off or flickering:
- Ensure the red power cord is securely connected to the positive battery terminal.
- Check the main battery connections for tightness and corrosion.
7. Specifications
| Specification | Value |
|---|---|
| Model | ZNKG01 |
| Brand | Generic |
| Operation Mode | Automatic |
| Current Rating | 240 Amps |
| Operating Voltage | 12V (Note: Product data shows 24 Volts, but description and title indicate 12V. Assuming 12V for typical vehicle use as per product title/description.) |
| Contact Type | Normally Closed |
| Connector Type | Battery Terminal |
| Switch Type | Battery Disconnect |
| Material | Metal, Copper (Contact Material) |
| Item Dimensions (L x W x H) | 4.33 x 4.33 x 2.36 inches |
| Circuit Type | DC |
| Mounting Type | Vehicle Mount |
| Actuator Type | Remote |
| Number of Positions | 2 |
| Upper Temperature Rating | 100 Degrees Celsius |
| International Protection Rating | IP54 |
| Specification Met | CE |
8. Warranty and Support
This product is covered by a standard manufacturer's warranty against defects in materials and workmanship. For specific warranty details, returns, or technical support, please refer to the retailer's policy or contact the seller directly through your purchase platform.
Please retain your proof of purchase for any warranty claims.