Important Safety Information
- Weight Capacity: The top tier supports up to 200 lbs (90.7 kg) with evenly distributed weight. The bottom tier supports up to 100 lbs (45.3 kg). Do not exceed these limits.
- Tank Compatibility: This stand is designed for a 10-20 gallon high tank on the top tier and a 5-10 gallon tank on the bottom tier. It is not suitable for 20-gallon long tanks. Always measure your aquarium carefully to ensure a proper fit.
- Stability: Ensure the stand is placed on a flat, level surface. Use the adjustable leveling feet to stabilize the stand and prevent wobbling. Secure the stand to a wall using the provided anti-tip kit to prevent accidental tipping, especially in households with children or pets.
- Electrical Safety: The integrated power outlet includes 2 AC outlets and 2 USB ports. Ensure all connected devices are within the specified voltage and amperage limits (125V/12A for AC, 5V/2A for USB). Do not overload the power strip. Keep the power cord away from water.
- Assembly: Follow all assembly instructions carefully. Do not use power tools for assembly as this may damage components.
Package Contents
Please verify that all components are present before beginning assembly:
- 1 x Aquarium Stand Frame and Panels
- 1 x Accessory Kit (screws, bolts, Allen wrench)
- 1 x Anti-Tip Kit
- 1 x Instruction Manual
Assembly Instructions
Follow these steps carefully to assemble your Heybly Aquarium Stand. It is recommended to assemble the stand on a soft, clean surface to prevent scratches.
- Unpack and Identify Parts: Carefully remove all components from the packaging. Lay them out and compare them with the parts list in your manual to ensure nothing is missing or damaged.
- Assemble the Metal Frame: Begin by connecting the main metal frame components using the provided screws and Allen wrench. Ensure all connections are finger-tight before fully tightening.
- Attach Side and Back Panels: Secure the side and back panels to the metal frame. Pay attention to the orientation of each panel as indicated in the manual.
- Install Shelves: Place the top and middle shelves onto the frame, securing them with the appropriate hardware. Ensure the shelves are level and firmly attached.
- Install Power Outlet Unit: Attach the power outlet unit to the designated area on the stand. Route the power cord as instructed.
- Assemble and Insert Drawers: Assemble the fabric drawers according to their specific instructions. Insert the assembled drawers into their compartments.
- Attach Accessory Hooks: Secure the accessory hooks to the side of the stand.
- Install Adjustable Feet: Screw the adjustable leveling feet into the bottom of the stand.
- Final Tightening and Stability Check: Once all components are in place, go back and fully tighten all screws. Gently shake the stand to check for stability. Adjust the leveling feet as needed to eliminate any wobbling.
- Secure with Anti-Tip Kit: Attach the anti-tip kit to the stand and secure it to a wall stud to prevent accidental tipping.

Figure 1: Fully assembled Heybly Aquarium Stand with tanks.
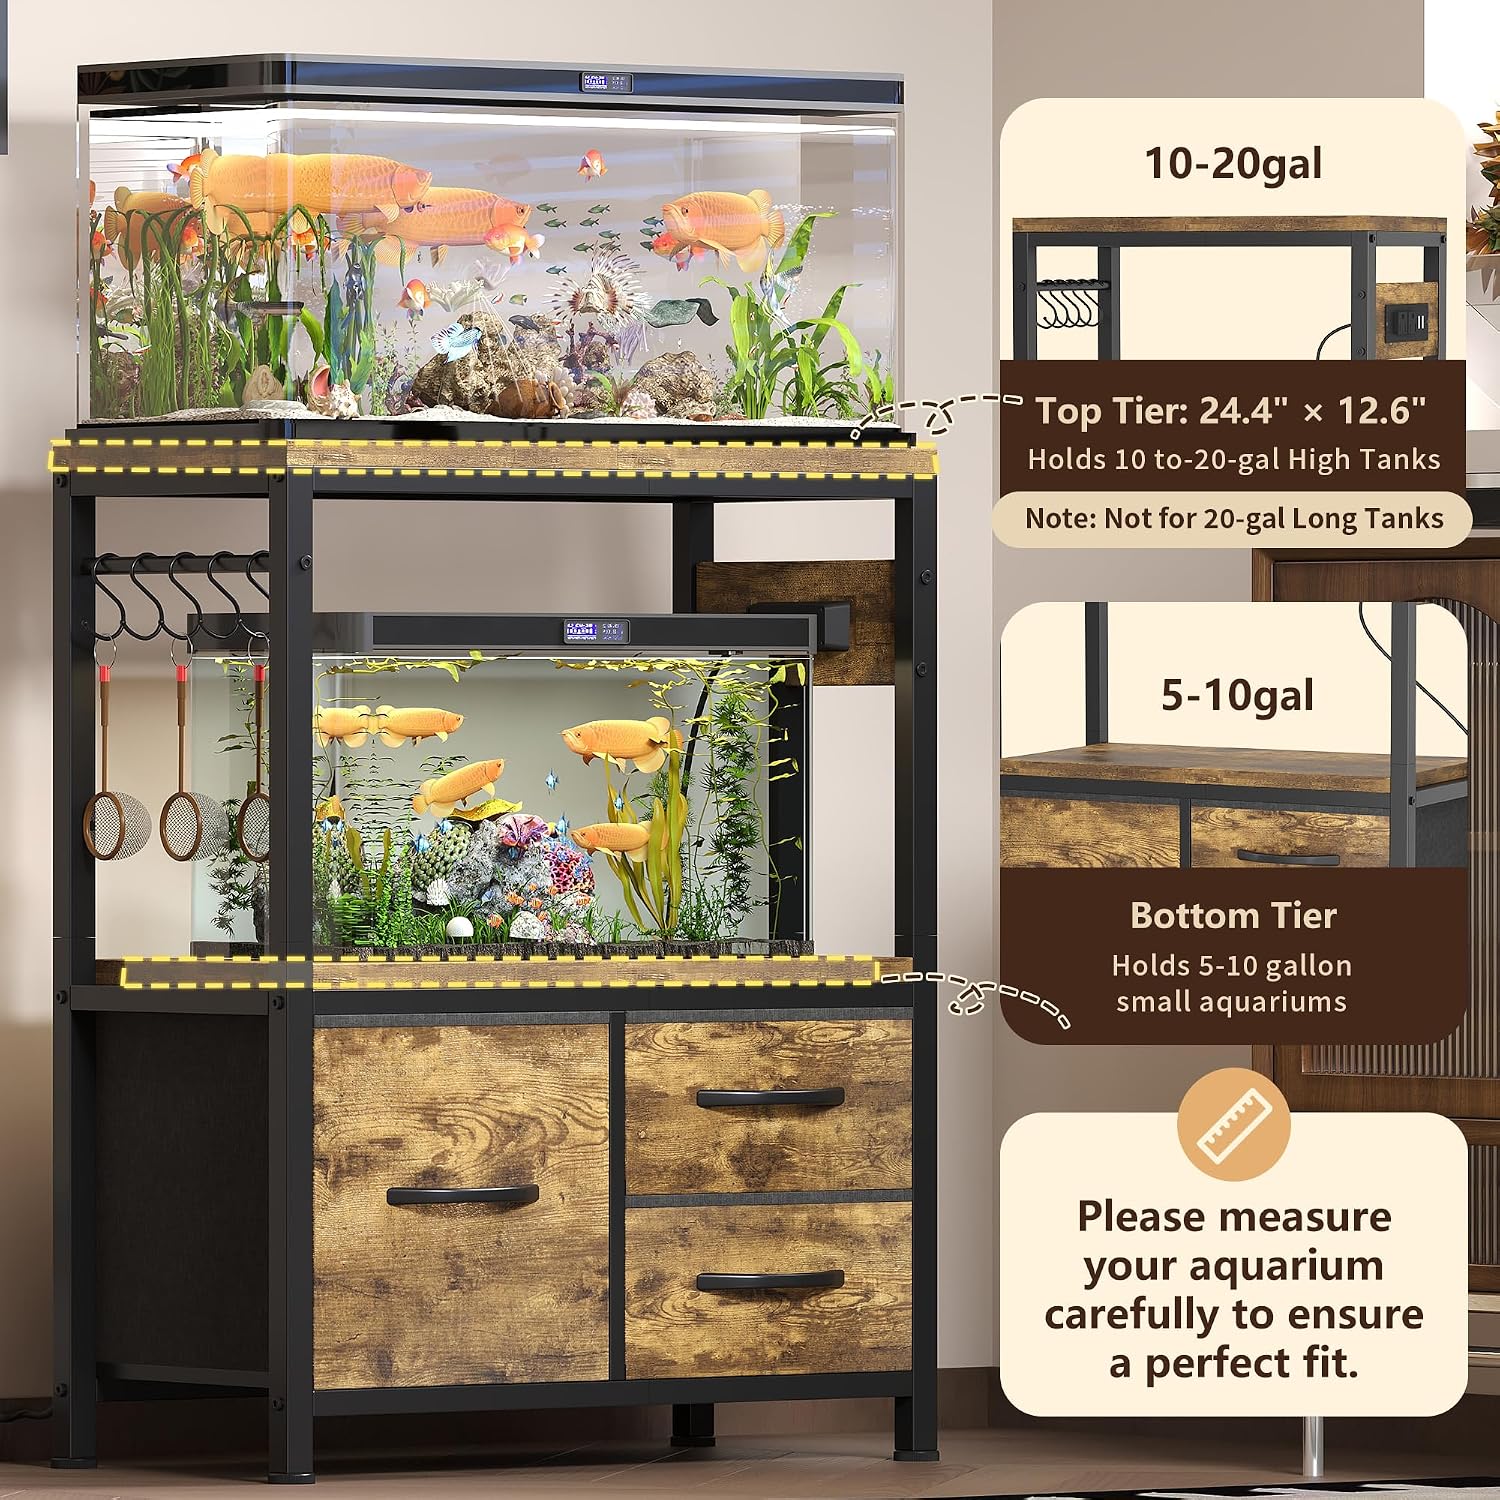
Figure 2: Top tier (24.4" x 12.6") holds 10-20 gallon high tanks. Bottom tier holds 5-10 gallon tanks. Not for 20-gallon long tanks.
Setup
Proper setup ensures the safety and longevity of your aquarium stand and its contents.
- Location: Choose a location that is level, away from direct sunlight, heat sources, and high-traffic areas. Ensure the floor can support the combined weight of the stand, tanks, water, and accessories.
- Leveling: Use the adjustable feet at the base of the stand to ensure it is perfectly level. This is crucial for the stability of your aquariums.
- Tank Placement: Carefully place your 10-20 gallon high aquarium on the top tier and your 5-10 gallon aquarium on the bottom tier. Ensure they are centered and stable.
- Power Connection: Plug the stand's power cord into a grounded electrical outlet.

Figure 3: Integrated power outlet for convenient device connection.
Operating Instructions
This section details the use of the stand's features.
- Power Outlets: The stand features 2 AC outlets and 2 USB ports. Use these to power your aquarium equipment such as lights, heaters, and air pumps. The 4.9-foot power cord provides flexibility in placement.
- Storage Drawers: The stand includes one large and two small fabric drawers. These are designed for organizing fish medication, filter media, fish food, and small tools. Avoid placing excessively heavy items in the drawers.
- Accessory Hooks: Utilize the side-mounted hooks to hang aquarium tools like nets or cleaning brushes for easy access.

Figure 4: Foldable fabric drawers for organized storage.
Maintenance
Regular maintenance will help keep your stand in good condition.
- Cleaning: The stand features waterproof panels. Wipe down surfaces with a soft, damp cloth to clean spills or dust. Avoid abrasive cleaners that could damage the finish.
- Stability Check: Periodically check all screws and connections to ensure they remain tight. Re-adjust leveling feet if the stand becomes wobbly.
- Power Outlet Inspection: Regularly inspect the power cord and outlets for any signs of wear or damage. Discontinue use if damage is found and contact customer support.

Figure 5: Features like waterproof panels and adjustable feet aid in maintenance.
Troubleshooting
This section addresses common issues you might encounter.
- Stand is Wobbly:
- Ensure all assembly screws are fully tightened.
- Adjust the leveling feet at the bottom of the stand to compensate for uneven floors.
- Verify the stand is placed on a flat, stable surface.
- Ensure the anti-tip kit is properly installed and secured to a wall stud.
- Power Outlets Not Working:
- Check if the main power cord is securely plugged into a functional wall outlet.
- Ensure the power strip on the stand is fully connected.
- Test the wall outlet with another device to confirm it is receiving power.
- Do not exceed the maximum load capacity of the power outlets.
- Drawers Do Not Slide Smoothly:
- Ensure the fabric drawers are correctly assembled and inserted.
- Check for any obstructions in the drawer compartments.
- Avoid overloading the drawers with heavy items.
Specifications
| Feature | Detail |
|---|---|
| Model Number | HAS003SSR |
| Dimensions (L x W x H) | 24.4" x 12.6" x 30.9" (62 x 32 x 78.5 cm) |
| Material | Particle Board, Metal |
| Top Tier Load Capacity | Up to 200 lbs (90.7 kg) |
| Bottom Tier Load Capacity | Up to 100 lbs (45.3 kg) |
| Compatible Top Tank Size | 10-20 Gallon High Tank |
| Compatible Bottom Tank Size | 5-10 Gallon Tank |
| AC Outlets | 2 (125V/12A) |
| USB Ports | 2 (5V/2A) |
| Power Cord Length | 4.9 feet |
| Item Weight | 11.24 Pounds (5.1 kg) |
| Assembly Required | Yes |

Figure 6: Load capacities and key dimensions.
Warranty Information
For detailed warranty information, please refer to the documentation included with your product packaging or visit the official Heybly website. Keep your purchase receipt for warranty claims.
Customer Support
If you have any questions, require assistance with assembly, or need to report missing/damaged parts, please contact Heybly customer support. Contact details can typically be found on the product packaging or the manufacturer's official website.