1. Important Safety Information
Please read and understand all safety warnings and instructions before assembling, operating, or servicing this grill. Failure to follow these instructions could result in fire, explosion, or burn hazard, which could cause property damage, personal injury, or death.
General Safety Warnings
- FOR OUTDOOR USE ONLY. Do not operate this appliance indoors.
- PROPANE GAS ONLY. Do not use charcoal, lighter fluid, or any other fuel type.
- KEEP CHILDREN AND PETS AWAY. Never leave the grill unattended when in use.
- CLEARANCE. Maintain a minimum distance of 10 feet from any combustible materials.
- VENTILATION. Ensure adequate ventilation around the grill.
- LEAK TEST. Always perform a leak test on gas connections before first use and after any cylinder change.
- HOT SURFACES. Grill surfaces become extremely hot during operation. Use heat-resistant gloves and tools.
- GAS CYLINDER. Use only a 20 lb (9.1 kg) propane cylinder (LP gas tank) with an OPD (Overfill Protection Device) and QCC1 connection.
- DO NOT STORE SPARE LP CYLINDER under or near this appliance.
2. Product Overview
The Feasto 3 Burner Propane Gas Grill, Model GS302, is designed for outdoor cooking, offering a versatile grilling experience with its main burners and a dedicated side burner. Its durable porcelain-enamel construction ensures longevity and consistent performance.

Image: The Feasto 3 Burner Propane Gas Grill in use, showcasing its main cooking area and side burner.
Key Features
- All-Porcelain-Enamel Design: Main body and lid are porcelain-enameled for heat resistance up to 1700℉, resisting peeling, blistering, and discoloration.
- Powerful & Versatile Burners: Three 10,000 BTU stainless steel main burners and one 8,000 BTU side burner, totaling 38,000 BTUs.
- Ample Grilling Area: Total of 504 sq. in. cooking area, including 364 sq. in. porcelain-enameled cooking grates and a 140 sq. in. warming rack.
- Efficient Heat & Temperature Monitor: Porcelain-enameled grates for quick heat transfer and a built-in thermometer in the lid for monitoring.
- Convenient Side Shelf: Provides extra prep space and includes built-in hooks for tool storage.
3. Assembly Instructions
Assembly of the Feasto 3 Burner Propane Gas Grill requires basic tools and careful attention to detail. It is recommended to have two people for assembly.
Tools Required (Not Included)
- Adjustable Wrench
- Phillips Head Screwdriver
- Pliers
Step-by-Step Assembly (General Guide)
- Unpack Components: Carefully remove all parts from the packaging. Verify all components are present against the parts list (refer to your included manual for a complete list).
- Assemble the Cart/Base: Attach the legs and bottom shelf to form the grill's base. Ensure all bolts are securely tightened.
- Mount the Grill Body: Carefully place the main grill body onto the assembled cart. Secure it with the provided fasteners.
- Install Side Burner and Side Shelf: Attach the side burner assembly and the side shelf to the main grill body. Connect the gas line for the side burner as instructed.
- Insert Burners and Heat Tents: Place the main burners and porcelain-enameled flame tamers (heat tents) into their designated positions inside the grill body.
- Place Cooking Grates and Warming Rack: Position the porcelain-enameled cooking grates and the warming rack inside the grill.
- Connect Gas Hose and Regulator: Attach the regulator and hose assembly to the grill's gas manifold. Ensure a tight connection.
- Perform Leak Test: Before connecting to a propane tank, perform a leak test on all gas connections. (See Section 1 for safety information).

Image: Product dimensions, useful for planning placement during assembly.
4. Operating Instructions
Follow these steps for safe and effective operation of your Feasto Propane Gas Grill.
Before First Use
- Ensure all packing materials are removed from the grill.
- Perform a leak test on all gas connections.
- Season the cooking grates by preheating the grill on high for 15 minutes, then turning off and allowing to cool.
Connecting the Propane Tank
- Ensure all burner control knobs are in the OFF position.
- Connect the regulator to the propane tank valve, turning clockwise until tight. Do not overtighten.
- Slowly open the propane tank valve fully.
Lighting the Main Burners
- Open the grill lid.
- Turn one main burner control knob to the HIGH position.
- Immediately press and hold the electronic igniter button until the burner lights. You should hear a clicking sound.
- Once lit, release the igniter button. If the burner does not light within 5 seconds, turn the knob to OFF, wait 5 minutes, and repeat the process.
- Repeat for other main burners as needed. Adjust heat by turning the control knobs between HIGH and LOW.

Image: The three main stainless steel burners ignited, demonstrating the powerful heat.
Lighting the Side Burner
- Open the side burner lid.
- Turn the side burner control knob to the HIGH position.
- Immediately press and hold the electronic igniter button until the burner lights.
- Once lit, release the igniter button. If the burner does not light within 5 seconds, turn the knob to OFF, wait 5 minutes, and repeat the process.
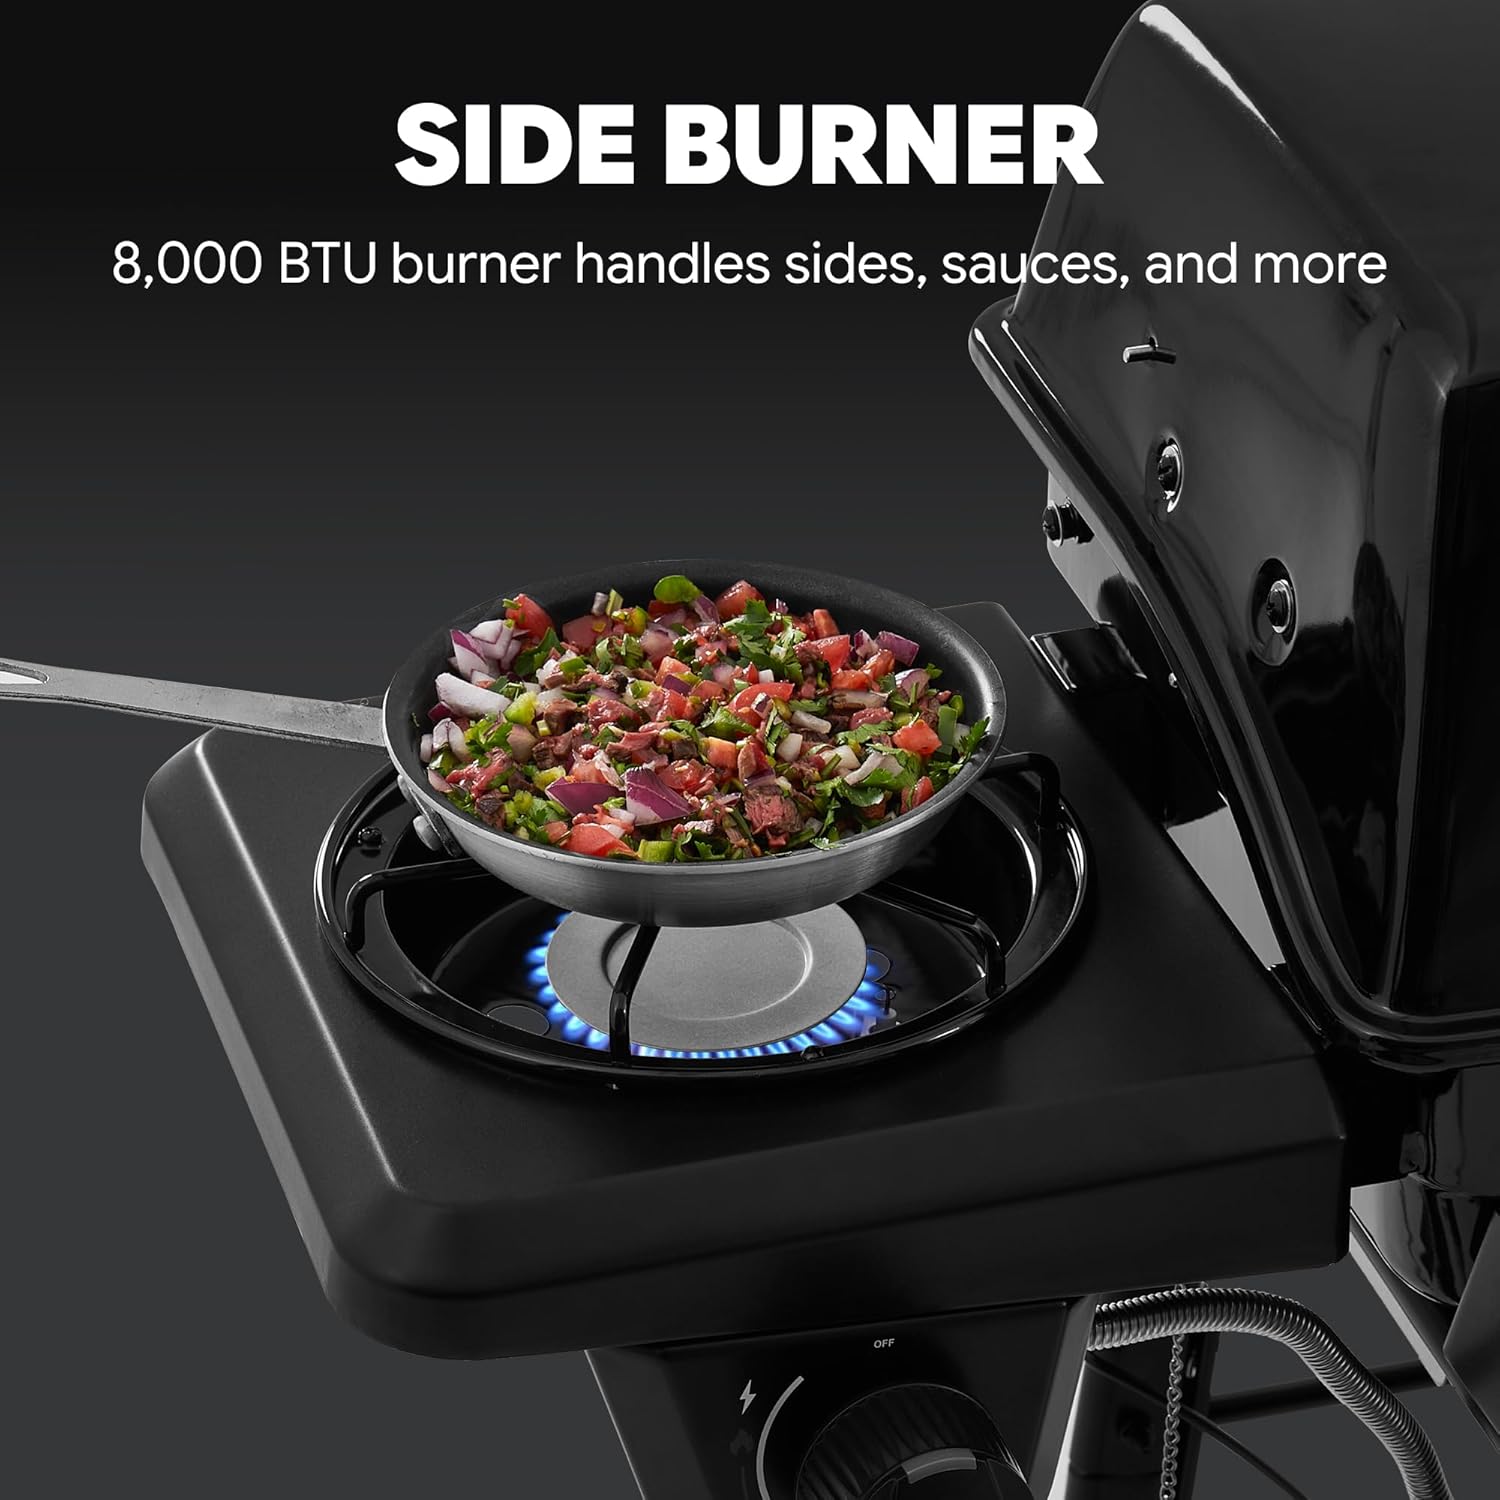
Image: The side burner in operation, suitable for preparing sauces or side dishes.
Temperature Monitoring
The built-in thermometer on the lid allows you to monitor the internal temperature of the grill without lifting the lid, helping to maintain consistent cooking temperatures.
Shutting Down the Grill
- Turn all burner control knobs to the OFF position.
- Close the valve on the propane tank.
5. Maintenance and Care
Regular cleaning and maintenance will extend the life of your grill and ensure optimal performance.
Cleaning the Cooking Grates
- After each use, while the grates are still warm, use a grill brush to remove food residue.
- For deeper cleaning, remove grates and wash with warm, soapy water. Rinse thoroughly and dry completely before reinstalling.
Cleaning the Interior
- Remove cooking grates and flame tamers.
- Scrape off any loose debris from the bottom of the firebox into the removable grease cup.
- Wipe down interior surfaces with a damp cloth.
Grease Management
The grill is equipped with a removable grease cup to collect drippings. Regularly check and empty the grease cup to prevent flare-ups and maintain cleanliness.

Image: The removable grease cup, designed for convenient cleaning and grease disposal.
Exterior Cleaning
- Wipe exterior surfaces with a mild detergent and warm water.
- For porcelain-enameled surfaces, avoid abrasive cleaners to prevent damage.
- Dry thoroughly to prevent rust.
Storage
- Store the grill in a dry, sheltered location when not in use.
- Disconnect the propane tank and store it outdoors in a well-ventilated area, away from direct sunlight and heat sources.
- Consider using a grill cover to protect against weather elements.
6. Troubleshooting
This section addresses common issues you might encounter with your grill.
| Problem | Possible Cause | Solution |
|---|---|---|
| Burner fails to light with igniter | No gas flow; clogged burner port; faulty igniter electrode; low battery in igniter. | Check propane tank connection and gas level. Clean burner ports. Check igniter wire connection. Replace igniter battery if applicable. |
| Uneven heat | Clogged burner ports; uneven flame tamers; low gas pressure. | Clean burner ports. Ensure flame tamers are correctly positioned. Check propane tank for low pressure. |
| Sudden drop in flame size (low flow) | OPD (Overfill Protection Device) on propane tank activated. | Turn off all burner knobs and propane tank valve. Disconnect regulator. Wait 10 minutes. Reconnect and slowly open tank valve, then light burners. |
| Grease fires/Flare-ups | Excess grease accumulation; high fat content in food. | Regularly clean grease tray and cup. Trim excess fat from meat. Reduce heat. Close lid to smother flames (do not use water). |
7. Product Specifications
Detailed specifications for the Feasto 3 Burner Propane Gas Grill, Model GS302.
| Feature | Specification |
|---|---|
| Brand | Feasto |
| Model Name | GS302 |
| Product Dimensions (D x W x H) | 22" x 51.2" x 43.7" |
| Item Weight | 48 Pounds |
| Fuel Type | Propane Gas |
| Main Burner Count | 3 |
| Main Burner BTU Output | 3 x 10,000 BTU (30,000 BTU total) |
| Side Burner Count | 1 |
| Side Burner BTU Output | 8,000 BTU |
| Total BTU Output | 38,000 BTU |
| Cooking Surface Area | 504 Square Inches (364 sq. in. primary, 140 sq. in. warming rack) |
| Material Type | Alloy Steel, Porcelain-enamel (Lid & Main Body) |
| Color | Black |
| Special Features | Built-In Thermometer, Tool Holder, Warming Rack |
| Installation Type | Free Standing |
| Required Assembly | Yes |
| UPC | 850074723165 |

Image: Visual representation of the grill's cooking surface area and warming rack dimensions.
8. Warranty and Customer Support
Warranty Information
This Feasto grill comes with a 1 Year Manufacturer Warranty. This warranty covers defects in materials and workmanship under normal use and service. Please retain your proof of purchase for warranty claims.
Customer Support
For technical assistance, parts replacement, or warranty inquiries, please contact Feasto customer support. Refer to the contact information provided in your product packaging or visit the official Feasto website for the most up-to-date support details.
When contacting support, please have your grill's model number (GS302) and proof of purchase readily available.