1. Important Safety Information
Before operating your RubiQ Sports ST Electric Scooter, please read this manual thoroughly to ensure safe and proper use. Failure to follow these instructions may result in serious injury or damage to the scooter.
- Always wear a helmet and appropriate safety gear (knee pads, elbow pads) when riding.
- Ensure all bolts and fasteners are securely tightened before each ride.
- Do not ride in wet conditions, heavy rain, or through standing water. The scooter has an IPX4 waterproof rating, meaning it is resistant to splashing water from any direction, but not submersion.
- Observe local laws and regulations regarding electric scooter use.
- The maximum weight limit for this scooter is 300 pounds (136 kg).
- Recommended age for riders is 16 years and older.
- Avoid riding on steep slopes exceeding 35% incline.
- Regularly check tire pressure and brake functionality.
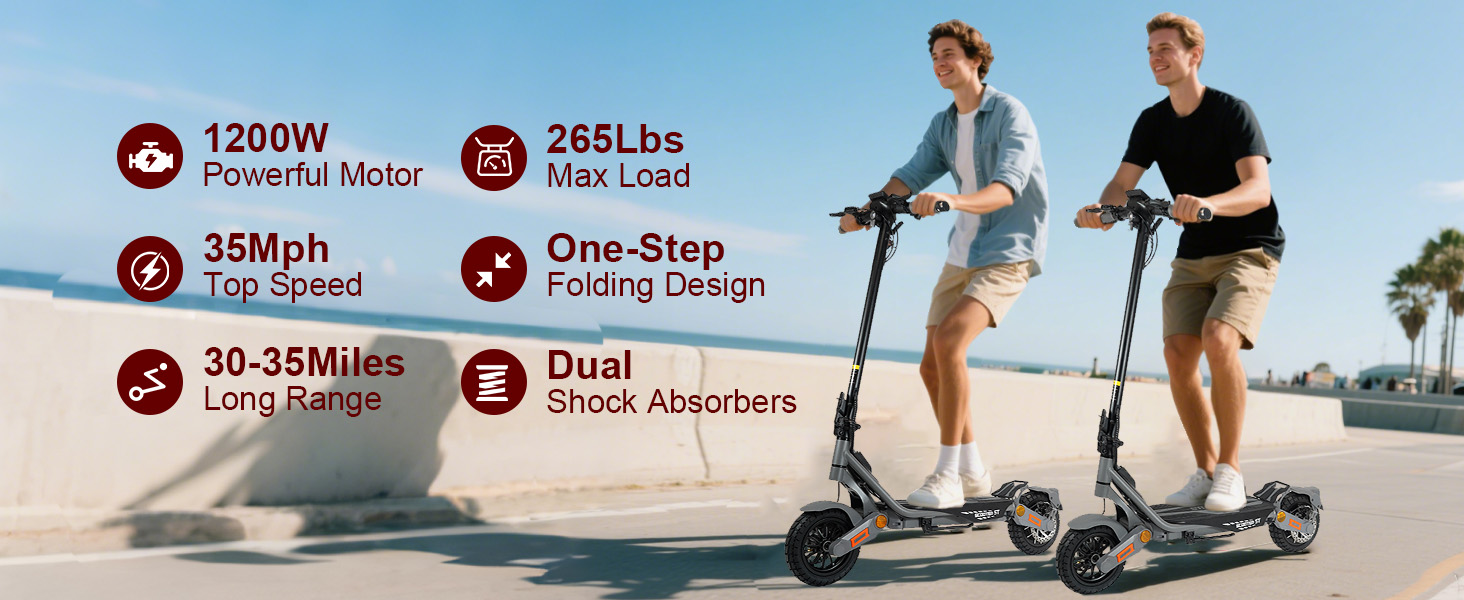
Image: Safety certifications for the electric scooter.
2. Package Contents
Upon opening the box, please verify that all the following items are included:
- Electric Scooter
- Charger
- Hand Bag
- Tool kit
- User Manual
- Unlock Card (x2)
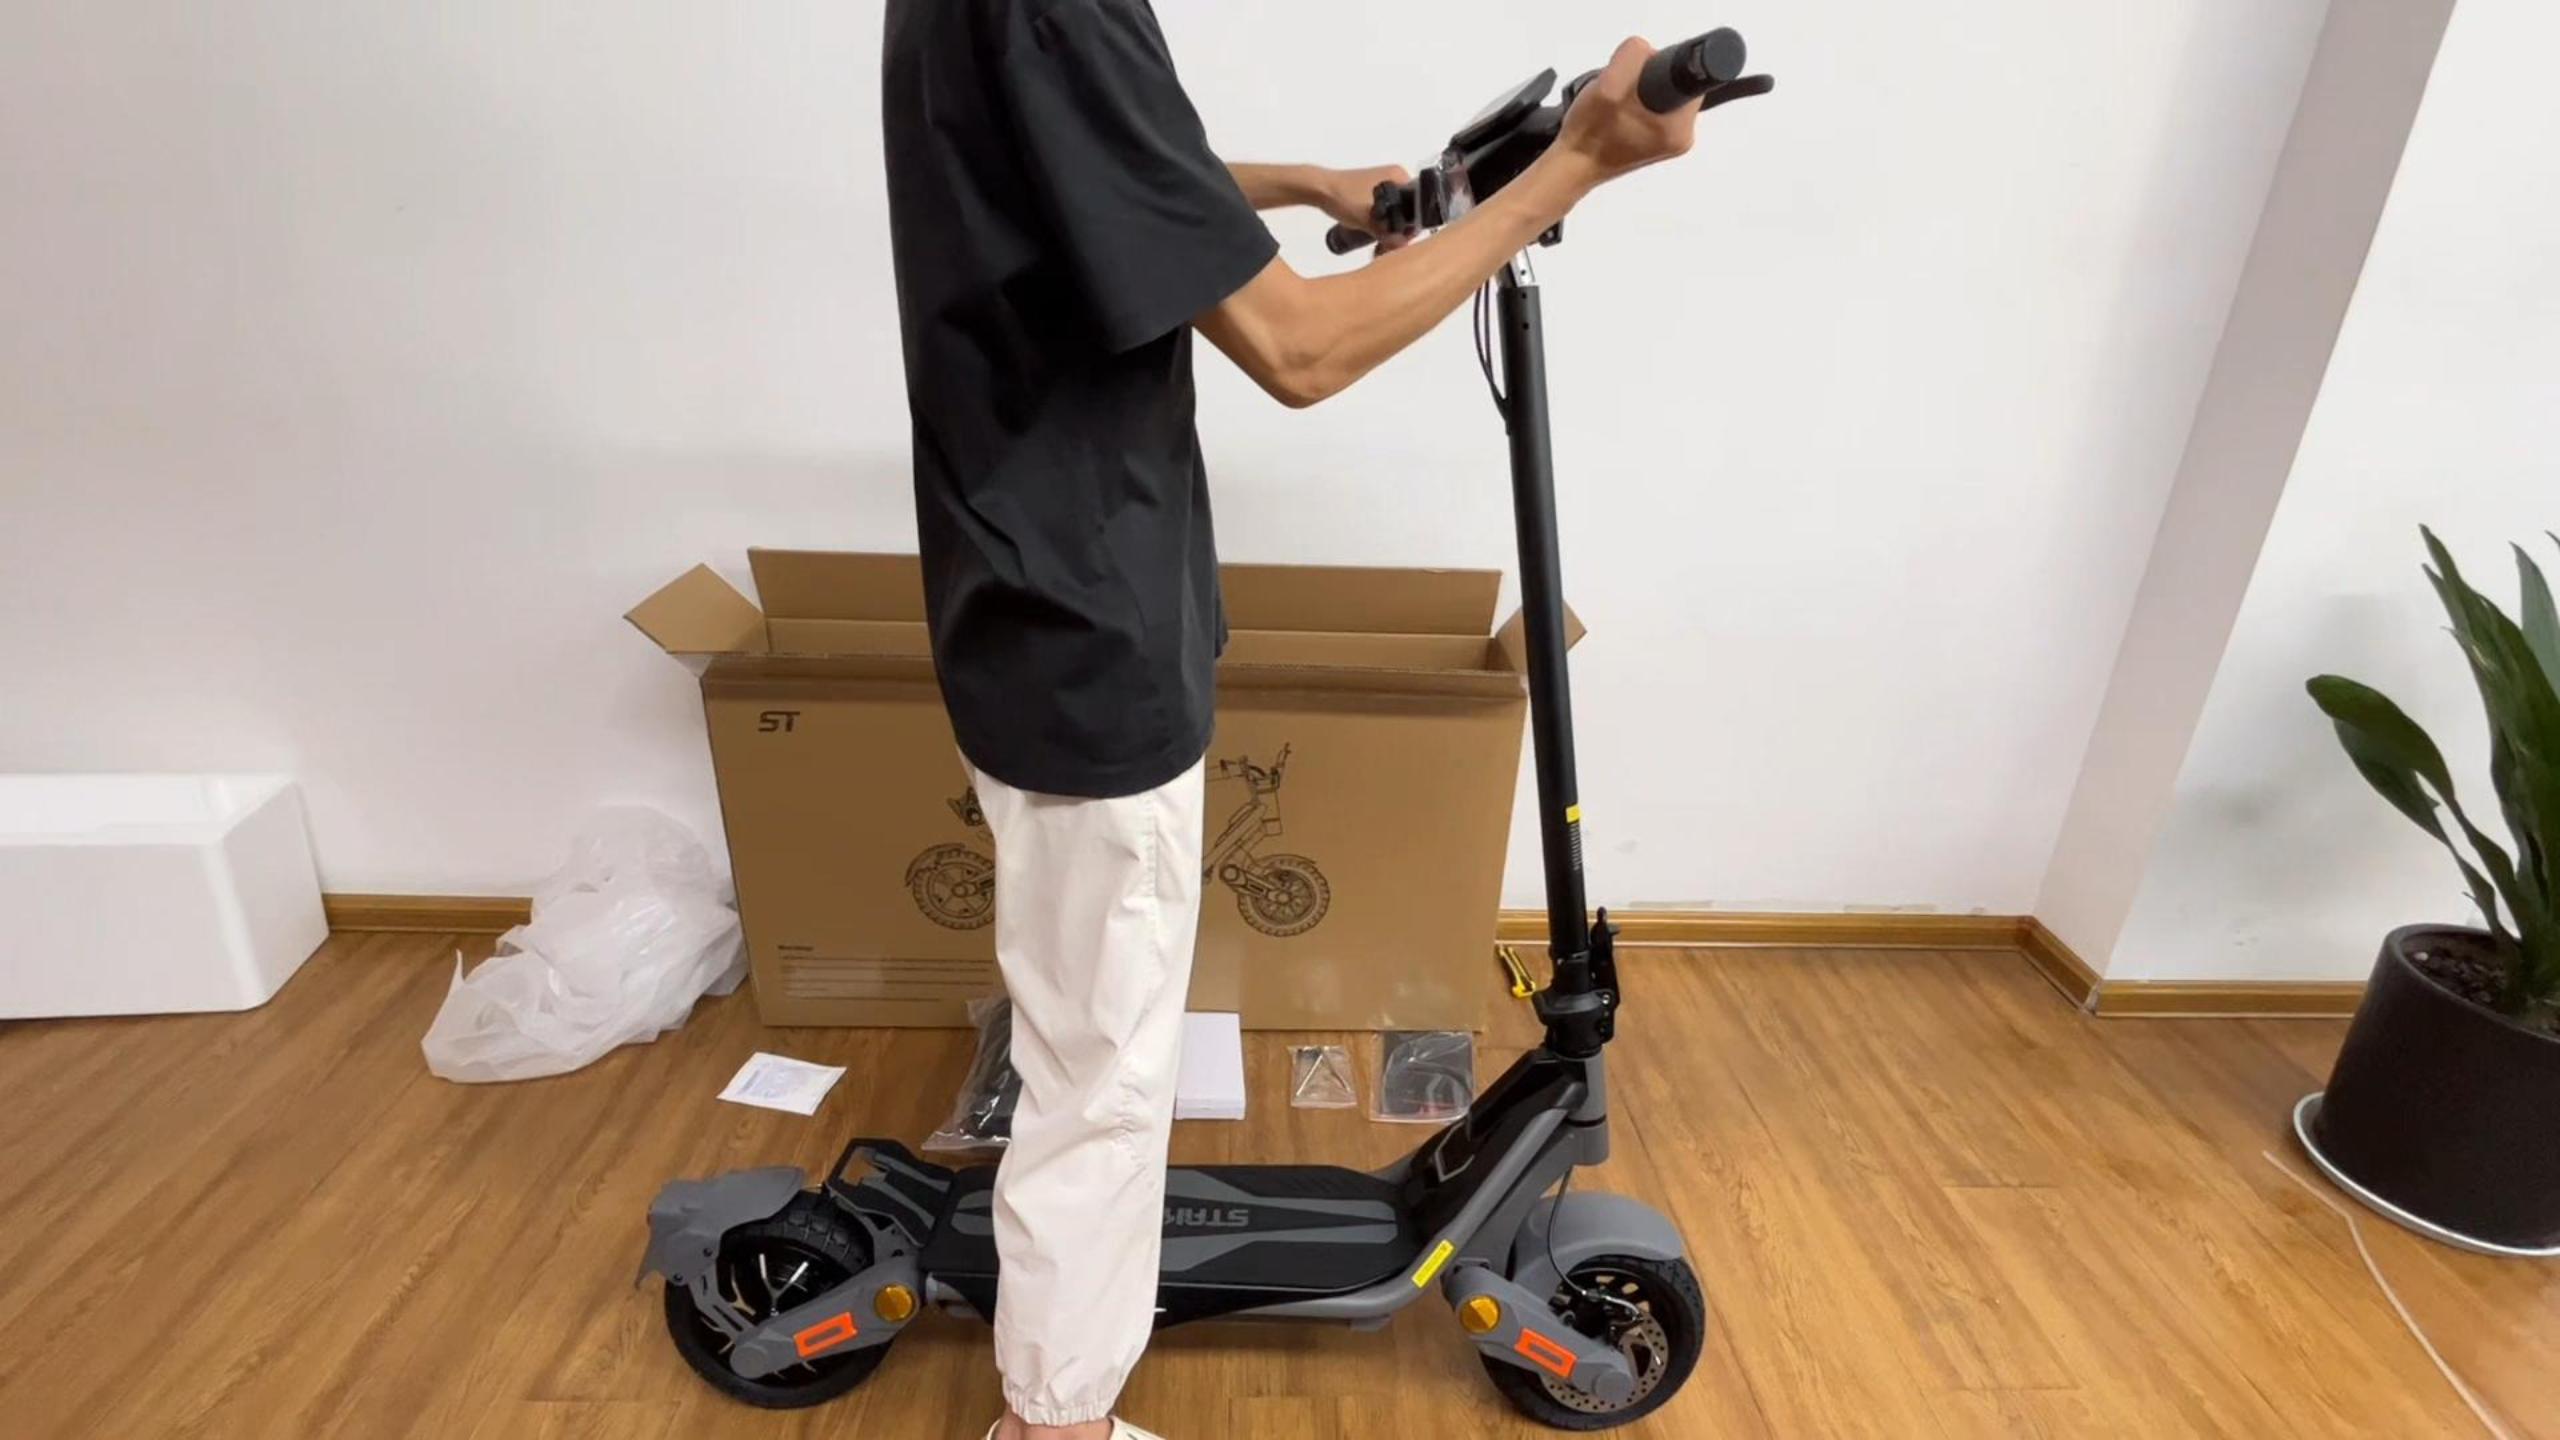
Image: All items included in the RubiQ Sports ST Electric Scooter package.
3. Setup and Assembly
Your RubiQ Sports ST Electric Scooter comes partially assembled. Follow these steps to complete the setup:
- Unboxing: Carefully remove the scooter and all accessories from the packaging.
- Handlebar Installation:
- Lift the handlebar stem to its upright position.
- Secure the folding mechanism.
- Attach the handlebar assembly to the stem using the provided screws and Allen wrench. Ensure all connections are tight.
- Connecting Cables: Connect any loose cables, ensuring they are securely fastened.
- Kickstand Attachment: Install the kickstand to the designated area on the scooter deck using the provided tools.
- Rear Fender Installation: Attach the rear fender over the rear wheel.
- Turn Signal Installation: Screw in the front and rear turn signals.
Video: Unboxing and initial setup of the ST Electric Scooter. This video demonstrates how to safely remove the scooter from its packaging and prepare it for assembly.
4. Operating Instructions
Familiarize yourself with the scooter's controls and functions for an optimal riding experience.
4.1 Power On/Off
- To Power On: Press and hold the power button for 2-3 seconds until the display shows the lock icon. Then, place the NFC card on the NFC sensor area to unlock the scooter.
- To Power Off: Hold the power button for 2-3 seconds until the display shows "OF".
4.2 Speed Modes
The scooter features multiple speed gears for different riding conditions:
- 1-Gear (ECO): Approximately 11 mph. Ideal for energy saving and casual rides.
- 2-Gear (RACE): Approximately 22 mph. Suitable for balanced performance.
- 3-Gear (SPORT): Up to 35 mph. For maximum speed and performance.

Image: Display showing the three adjustable speed modes: ECO (10 mph), RACE (20 mph), and SPORT (35 mph).
4.3 Unit Switching (KMH/MPH)
To switch between Kilometers per Hour (KMH) and Miles per Hour (MPH), short-press the power button 3 times.
4.4 Cruise Control Mode
- To Activate: Short-press the power button 4 times. The flashing green icon will appear. Maintain a constant speed for about 5 seconds until the icon stays solid. Cruise control is now active.
- To Deactivate: Press the power button 4 times again, or apply the brakes. The green icon will disappear.
4.5 Startup Mode Setting
- Zero Start Mode: Short-press the power button 5 times. If the display shows the icon, zero start mode is active (scooter starts immediately with throttle).
- Non-Zero Start Mode: Short-press the power button 5 times. If the icon disappears, non-zero start mode is active (scooter requires a kick-off before throttle engages).
Video: Detailed guide on function settings for the ST Electric Scooter, including power, speed, cruise control, and startup modes.
4.6 Lighting
The scooter is equipped with a full 360° lighting system for safety and visibility.
- Headlights: Double-click the headlight button to turn on the ambient light.
- Turn Signals: Use the left and right turn signal buttons on the handlebar.
- Brake Lights: The rear brake light activates automatically when braking.
- Ambient Lights: Color ambient lights enhance visibility and style.

Image: Overview of the scooter's lighting system, including headlights, turn signals, ambient lights, and brake lights.
4.7 Folding the Scooter
For easy storage and transport, the scooter features a foldable design.
- Pull up and outwards on the folding handle located on the stem.
- Fold the handlebar stem down towards the deck.
- Lock the folding handle to secure the scooter in its folded position.

Image: The scooter in its folded state, demonstrating its portability for storage and transport.
5. Maintenance
Regular maintenance ensures the longevity and performance of your scooter.
- Tires: Regularly check tire pressure and inspect for wear or damage. The 10-inch pneumatic tubeless off-road tires are designed for durability, but proper inflation is crucial.
- Brakes: Periodically inspect the dual disc brakes and electronic brake assist system for proper function. Adjust as needed.
- Battery: Store the scooter in a cool, dry place. Avoid fully discharging the battery for extended periods. The smart BMS protects against overcharging, overheating, and short-circuiting.
- Cleaning: Wipe down the scooter with a damp cloth. Avoid using high-pressure water jets directly on electronic components.
- Fasteners: Check all bolts and screws regularly and tighten if loose.
6. Troubleshooting
Here are some common issues and potential solutions:
| Problem | Possible Cause | Solution |
|---|---|---|
| Scooter does not power on | Low battery, power button not held long enough, NFC card not used correctly. | Charge the battery. Hold power button for 2-3 seconds. Ensure NFC card is placed correctly on the sensor. |
| Error Code 23e (Motor Error) | Motor malfunction or connection issue. | Check motor connections. If the issue persists, contact customer service for assistance. |
| Reduced speed or range | Low battery, incorrect speed mode, tire pressure, rider weight, terrain. | Charge battery fully. Select appropriate speed mode. Check tire pressure. Consider terrain and load. |
| Brakes feel weak | Brake pads worn, cable loose, disc damage. | Inspect brake pads and discs. Adjust brake cables if loose. Consult a technician if necessary. |
7. Specifications
| Feature | Detail |
|---|---|
| Brand | RubiQ sports |
| Model Name | ST |
| Motor Power | 1200W |
| Top Speed | 35 MPH |
| Maximum Distance Range | 35 Miles |
| Battery | 48V 15.6Ah Lithium |
| Charging Time | 6-8 Hours |
| Wheel Size | 10 Inches |
| Wheel Type | Pneumatic, Tubeless Off-Road |
| Suspension Type | Dual Suspension |
| Brake Style | Dual Disc Brakes, Electronic Brake Assist |
| Frame Material | Aluminum Alloy |
| Item Weight | 58.2 Pounds |
| Weight Limit | 300 Pounds |
| Product Dimensions | 45.5"L x 22.8"W x 51"H |
| Age Range (Description) | 16+ |
| Special Features | Anti-Puncture Tire, Cruise Control, Digital Display, Dual Braking System, Non Slip Deck, 360° Lighting (Headlights, Turn Signals, Ambient Light, Brake Lights) |
8. Warranty and Support
RubiQ Sports offers a comprehensive warranty and dedicated customer support:
- Warranty: RubiQ offers a 180-day to 1-year warranty on various parts, excluding any damage caused by misuse or stains.
- Customer Service: For any product issues or technical assistance, please contact our customer service via email. You can expect a solution within 24 hours.
- Parts Availability: A full range of parts for our scooters is available. Contact customer service for specific part inquiries and purchase links.

Image: Information on warranty duration and customer service availability.


